1. Introduction
Thank you for choosing FLEXTAILGEAR portable air pumps. This manual provides detailed instructions for the safe and efficient operation of your Tiny Pump and EVO Pump 2. These compact and powerful devices are designed for various inflation and deflation needs, including air mattresses, sleeping pads, swimming rings, vacuum storage bags, and more.
Please read this manual thoroughly before using the product and retain it for future reference.
2. Product Overview
The FLEXTAILGEAR product line includes two distinct portable air pump models, each designed for specific user needs while maintaining portability and efficiency.
2.1 Tiny Pump

The Tiny Pump is an ultra-mini, lightweight air pump ideal for extreme portability. It features a rechargeable battery and is perfect for inflating small to medium-sized inflatables and deflating vacuum bags.
Key Features:
- Ultra-Mini Size: Weighs only 2.82 oz (80g) with dimensions of 2"x1.7"x1.7".
- Powerful Performance: Delivers 3.5kPa air pressure and 180L/min wind speed for rapid inflation/deflation.
- Rechargeable: Built-in battery, capable of inflating 4-5 swim rings or 6-8 single camping air mattresses on a single charge.
- Versatile Nozzles: Includes 5 different nozzles for various applications.
- One-Button Operation: Simple to use (double-click to start).
2.2 EVO Pump 2
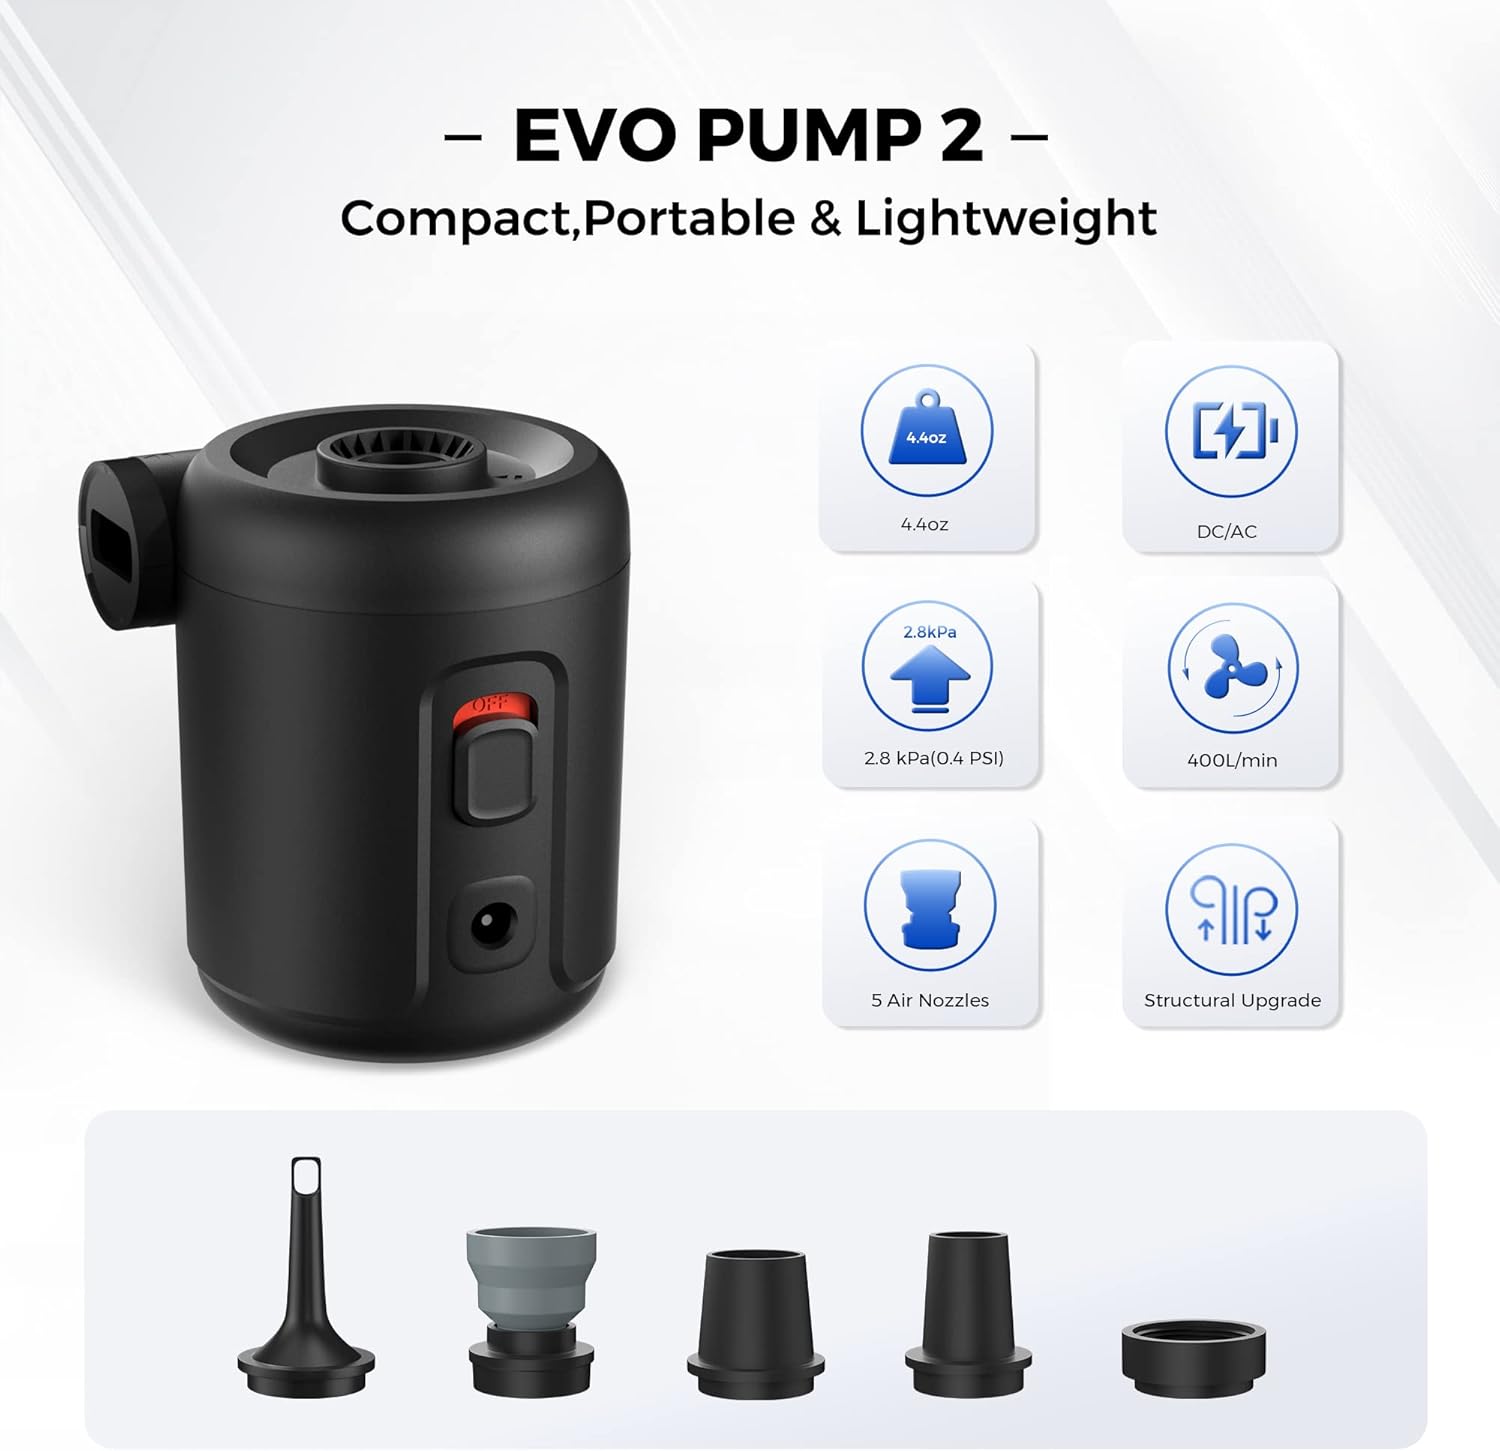
The EVO Pump 2 is a compact and powerful electric air pump designed for both AC and DC power sources, offering continuous operation without battery concerns. It's suitable for larger inflatables and more demanding tasks.
Key Features:
- Compact & Lightweight: Weighs 4.4 oz (125g) with dimensions of 2.7"x2.5"x3.2".
- Dual Power Supply: Operates via 12V DC (car adapter) or AC (home socket) power adapter. Note: This model is not rechargeable.
- High Performance: Achieves 2.8kPa pressure and 400L/min airflow for quick inflation/deflation.
- Versatile Nozzles: Includes 5 different nozzles for various applications.
- Structural Upgrade: Enhanced design for improved performance.
3. Specifications
| Feature | Tiny Pump | EVO Pump 2 |
|---|---|---|
| Weight | 2.82 oz (80g) | 4.4 oz (125g) |
| Dimensions | 2" x 1.7" x 1.7" | 2.7" x 2.5" x 3.2" |
| Air Pressure | 3.5 kPa (0.5 PSI) | 2.8 kPa (0.4 PSI) |
| Airflow | 180 L/min | 400 L/min |
| Power Supply | Rechargeable (Type-C) | AC/DC Adapter (12V DC) |
| Nozzles Included | 5 | 5 |
4. Setup
Before first use, please ensure you understand the basic components and power requirements for your specific pump model.
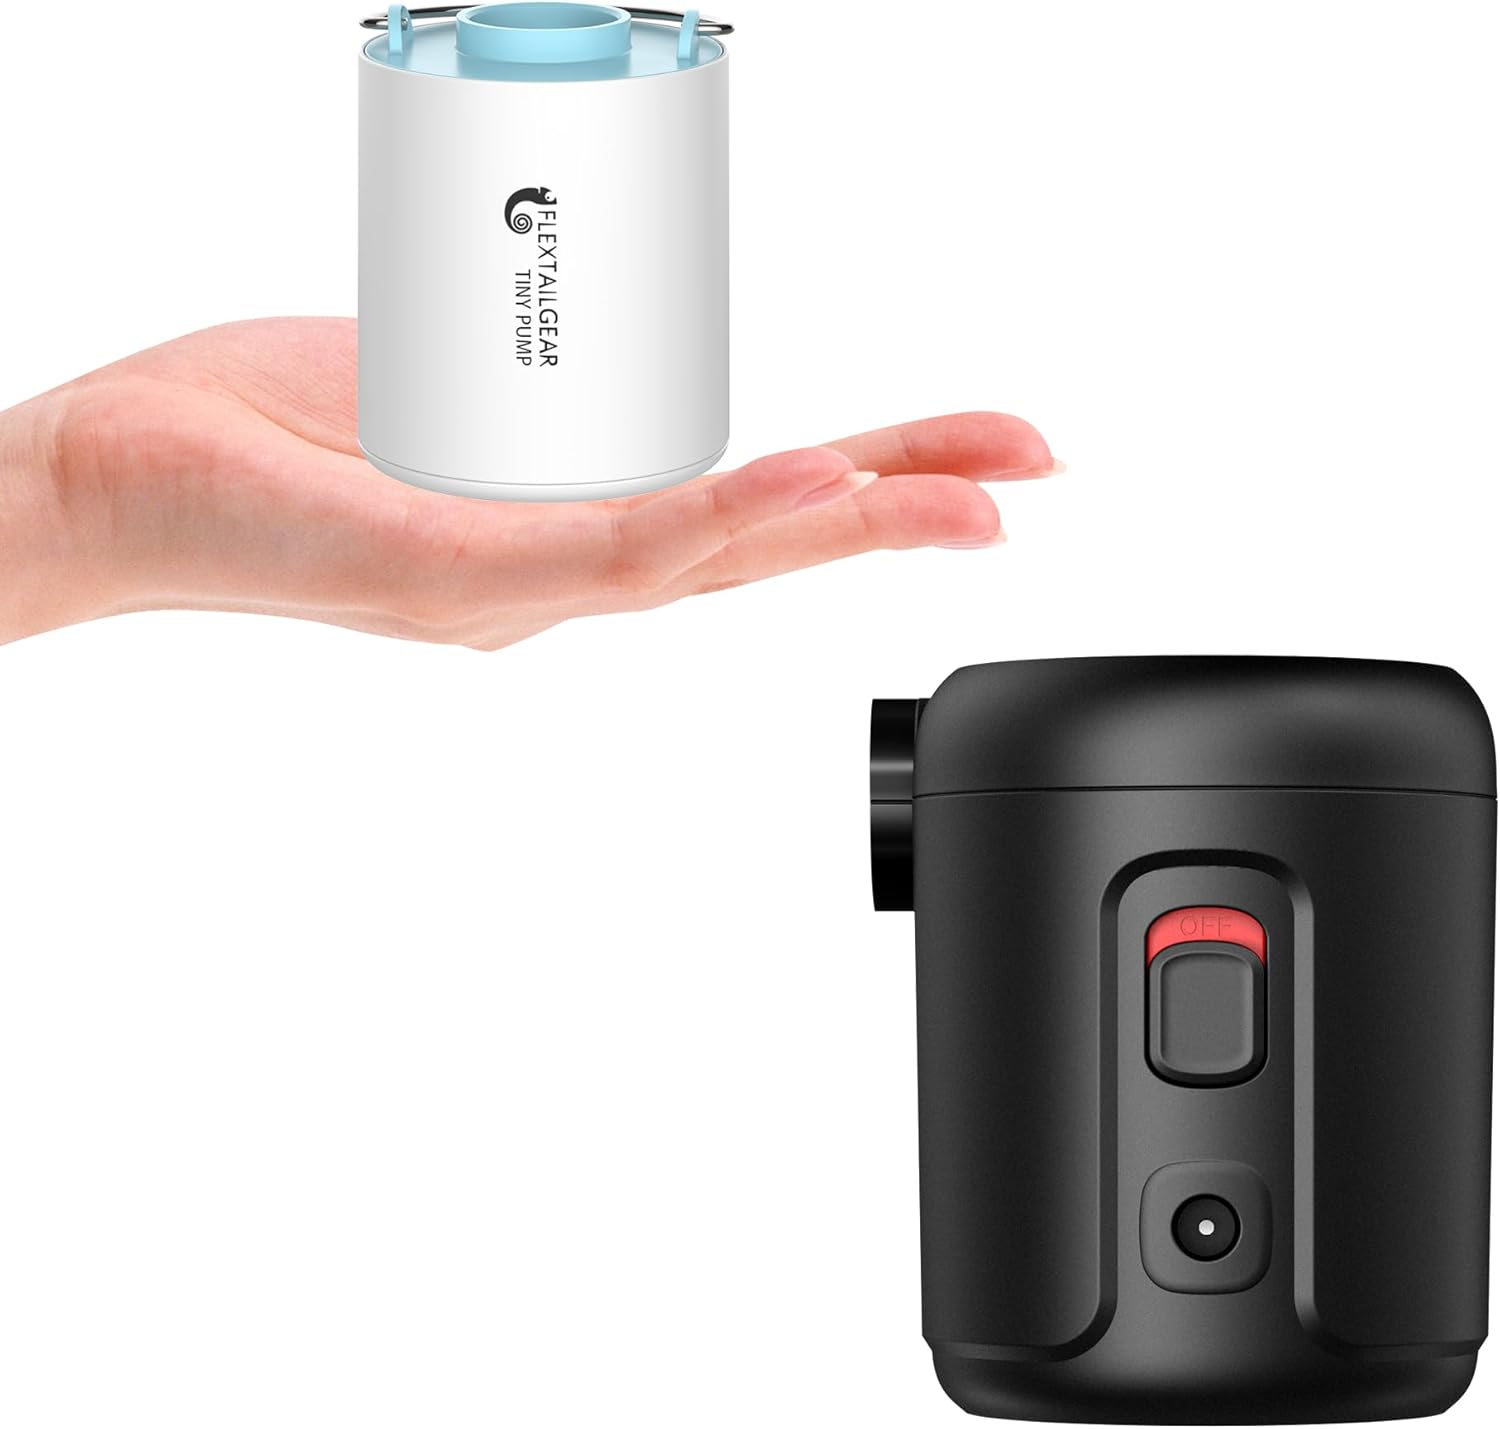
Image: Both Tiny Pump (left) and EVO Pump 2 (right) models.
4.1 Tiny Pump Initial Setup
- Charge the Pump: Before first use, fully charge the Tiny Pump using the provided Type-C USB cable. Connect the cable to the pump's charging port and a suitable USB power source (e.g., wall adapter, power bank). The charging indicator will show status.
- Select Nozzle: Identify the appropriate nozzle for the item you intend to inflate or deflate.
- Attach Nozzle: Firmly attach the selected nozzle to the pump's inflation or deflation port.
4.2 EVO Pump 2 Initial Setup
- Connect Power: The EVO Pump 2 is not rechargeable. Connect it to a power source using either the AC adapter (for home outlets) or the DC adapter (for 12V car outlets).
- Select Nozzle: Identify the appropriate nozzle for the item you intend to inflate or deflate.
- Attach Nozzle: Firmly attach the selected nozzle to the pump's inflation or deflation port.

Image: EVO Pump 2 with its AC and DC power supply options.
5. Operating Instructions
Follow these steps for effective inflation and deflation using your FLEXTAILGEAR pump.
5.1 Inflation
- Attach Nozzle: Select the correct nozzle and attach it securely to the inflation port of the pump. For the EVO Pump 2, the inflation port is on the side. For the Tiny Pump, it's the main opening.
- Insert into Valve: Insert the nozzle firmly into the valve of the item you wish to inflate. Ensure a snug fit to prevent air leakage.
- Start Pump:
- Tiny Pump: Double-click the power button to turn on the pump.
- EVO Pump 2: Flip the power switch to the "ON" position.
- Monitor Inflation: Allow the pump to inflate the item to the desired firmness. Do not overinflate.
- Turn Off Pump:
- Tiny Pump: Single-click the power button to turn off.
- EVO Pump 2: Flip the power switch to the "OFF" position.
- Remove Nozzle: Carefully remove the nozzle from the item's valve.

Image: Tiny Pump in various inflation and deflation applications.
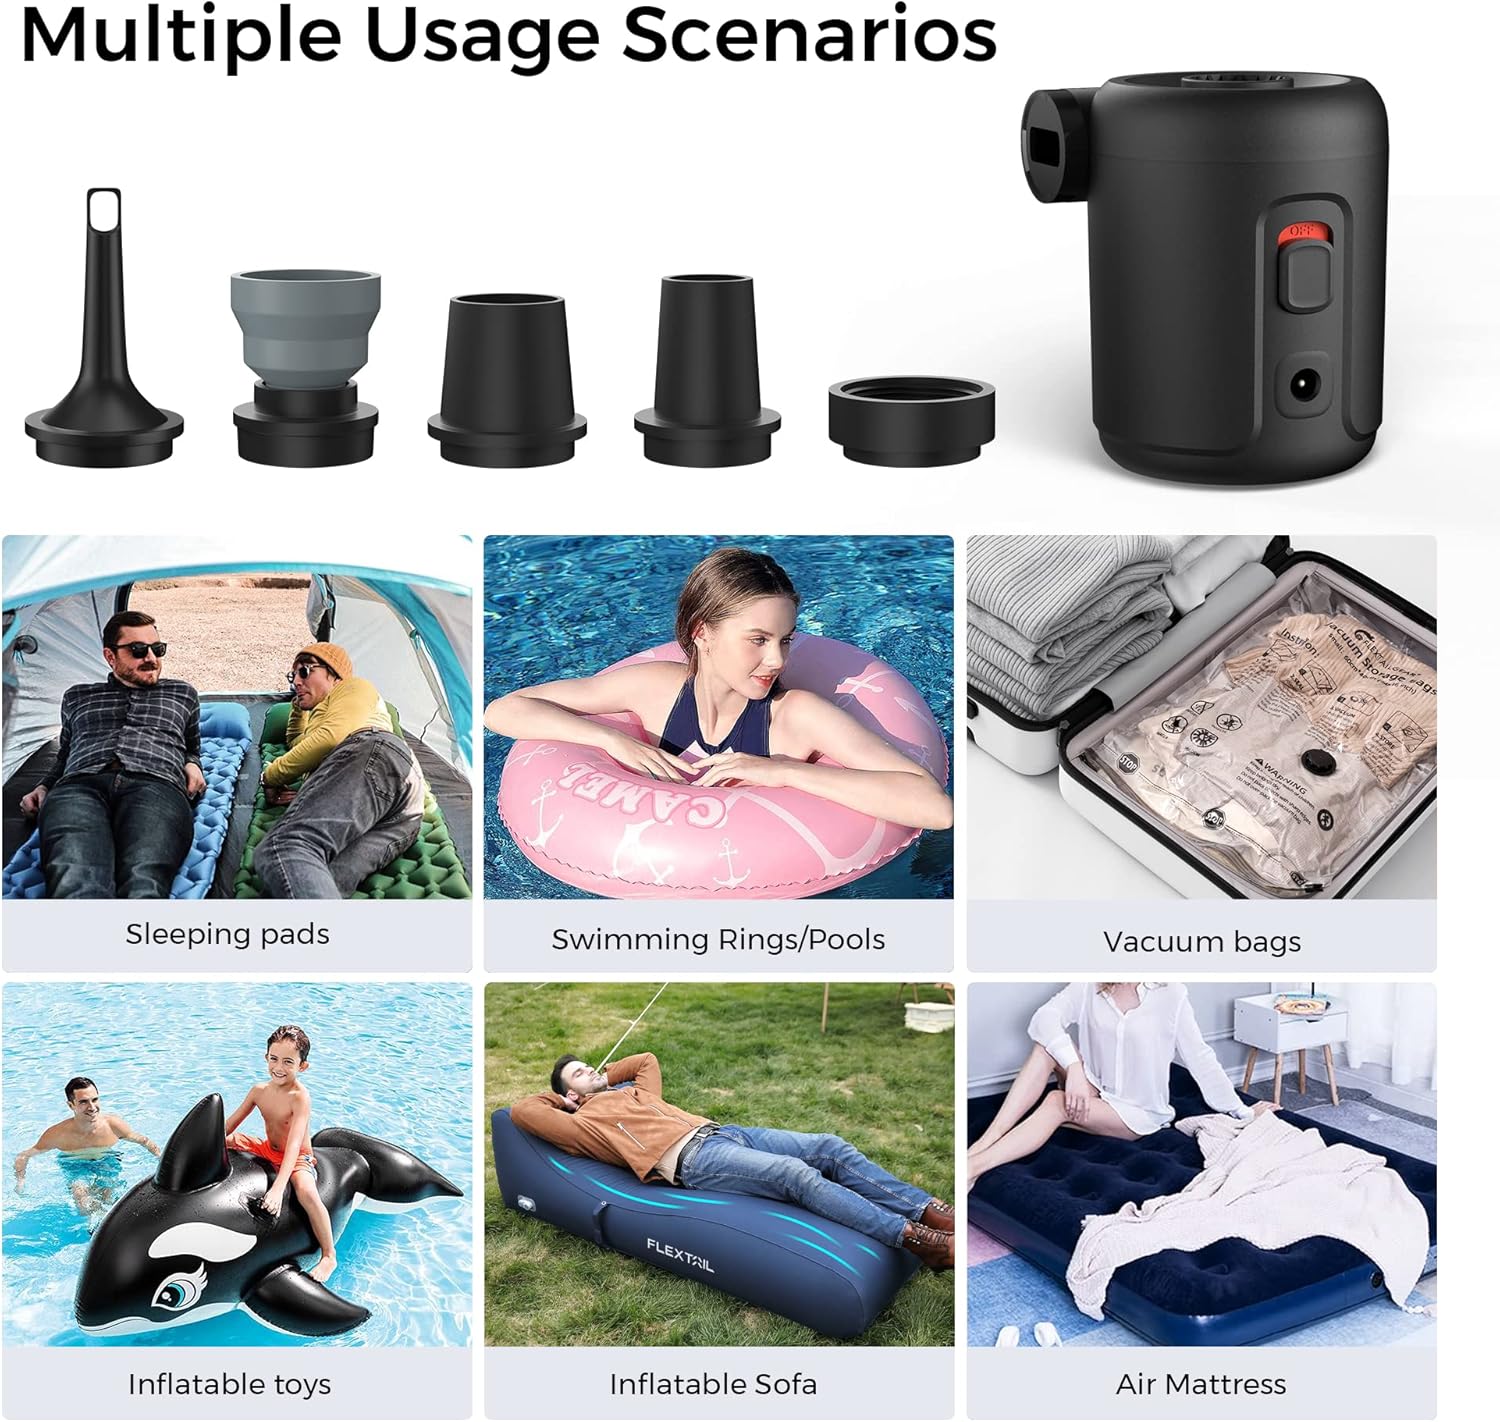
Image: EVO Pump 2 in various inflation and deflation applications.
5.2 Deflation
- Attach Nozzle: Select the correct nozzle and attach it securely to the deflation port of the pump. For the EVO Pump 2, the deflation port is on the top. For the Tiny Pump, it's the main opening.
- Insert into Valve: Insert the nozzle firmly into the valve of the item you wish to deflate.
- Start Pump:
- Tiny Pump: Double-click the power button to turn on the pump.
- EVO Pump 2: Flip the power switch to the "ON" position.
- Monitor Deflation: Allow the pump to remove air until the item is sufficiently deflated.
- Turn Off Pump:
- Tiny Pump: Single-click the power button to turn off.
- EVO Pump 2: Flip the power switch to the "OFF" position.
- Remove Nozzle: Carefully remove the nozzle from the item's valve.
5.3 Nozzle Compatibility
Both pumps come with 5 different nozzles to fit a wide range of inflatable products. Refer to the image below for examples of nozzle types and their typical applications.

Image: Various nozzles and items not suitable for inflation (e.g., balloons, sports balls, car tires).
Important Note:
- These pumps are not suitable for inflating balloons, sports balls (like soccer or volleyballs), or vehicle tires, as these require higher pressure than the pumps can provide.
- The Tiny Pump is not designed for continuous long-term operation. Allow it to cool down after extended use.
6. Maintenance
Proper maintenance ensures the longevity and optimal performance of your FLEXTAILGEAR air pump.
- Cleaning: Wipe the exterior of the pump with a soft, dry cloth. Do not use abrasive cleaners or immerse the pump in water.
- Storage: Store the pump and its accessories in a cool, dry place away from direct sunlight and extreme temperatures.
- Nozzles: Keep nozzles clean and free from debris to ensure proper airflow.
- Tiny Pump Battery: For the Tiny Pump, if storing for an extended period, charge the battery periodically (e.g., every 3-6 months) to maintain battery health.
- Avoid Damp Environments: For both models, avoid damp environments or being splashed by water.
7. Troubleshooting
If you encounter issues with your pump, refer to the following common problems and solutions.
| Problem | Possible Cause | Solution |
|---|---|---|
| Pump does not turn on (Tiny Pump) | Low battery; Not double-clicked | Charge the pump fully; Double-click the power button to activate. |
| Pump does not turn on (EVO Pump 2) | No power supply; Power switch off | Ensure AC/DC adapter is securely connected to a live power source; Flip the power switch to "ON". |
| Weak airflow / Slow inflation | Incorrect nozzle; Nozzle not fully inserted; Air leakage; Low battery (Tiny Pump) | Ensure correct nozzle is used and securely attached; Check for leaks around the valve; Recharge Tiny Pump. |
| Pump overheats | Extended continuous use | Turn off the pump and allow it to cool down for at least 15-20 minutes before resuming use. |
| Nozzle does not fit item valve | Wrong nozzle selected | Try a different nozzle from the included set. If no nozzle fits, the item may be incompatible. |
8. Safety Information
- Do not operate the pump near flammable liquids or gases.
- Do not block the air intake or outlet during operation.
- Keep out of reach of children. This is not a toy.
- Do not immerse the pump in water or expose it to rain.
- Do not attempt to disassemble or repair the pump yourself. Contact customer support for assistance.
- Ensure the voltage of the power supply matches the requirements for the EVO Pump 2.
- Avoid over-inflating items, as this can cause damage to the item or the pump.
9. Warranty and Support
FLEXTAILGEAR products are manufactured to high-quality standards. For warranty information, technical support, or any questions regarding your product, please refer to the warranty card included with your purchase or visit the official FLEXTAILGEAR website.
You can also visit the FLEXTAILGEAR Store on Amazon for more product information and support resources.


