1. Introduction
This manual provides comprehensive instructions for the assembly, operation, and maintenance of your Cooler Master Elite 302 White Micro-ATX PC Case. Designed for high airflow and a minimalist aesthetic, this case offers a robust foundation for your computing needs. Please read this manual thoroughly before beginning assembly to ensure proper installation and safe usage.
2. Safety Information
- Always disconnect power from all components before installation or maintenance.
- Handle components with care to prevent damage from electrostatic discharge (ESD). Consider using an anti-static wrist strap.
- Keep small parts and packaging materials away from children.
- Ensure proper ventilation around the PC case to prevent overheating.
- Do not attempt to modify the case or its components, as this may void your warranty and pose safety risks.
3. Package Contents
Verify that all items are present in your package:
- Cooler Master Elite 302 White Micro-ATX PC Case
- Accessory Box (screws, standoffs, cable ties, etc.)
- User Manual (this document)
- Pre-installed Triple 120mm aRGB Fans
4. Technical Specifications
| Feature | Specification |
|---|---|
| Brand | Cooler Master |
| Model Name | Elite 302 White |
| Item Model Number | E302-WGNN-S00 |
| Case Type | Mid Tower |
| Motherboard Compatibility | Micro ATX, Mini ITX |
| Color | White |
| Material | Alloy Steel, Tempered Glass |
| Product Dimensions (LxWxH) | 15.35 x 16.92 x 8.01 inches |
| Item Weight | 11.86 pounds |
| GPU Clearance | Up to 365mm |
| CPU Cooler Height | Up to 163.5mm |
| PSU Length | Up to 160mm |
| Liquid Cooler Support | 280mm Max |
| Fan Support | Up to six fans |
| USB 3.0 Ports | 3 |
| USB Type-C | Integrated in I/O panel |
5. Setup Guide
Follow these steps to assemble your PC within the Cooler Master Elite 302 case. Refer to your individual component manuals for specific installation details.
5.1. Prepare the Case
- Remove Side Panels: Carefully remove the tempered glass side panel and the solid steel side panel by unscrewing the thumb screws at the rear of the case.
- Inspect Interior: Familiarize yourself with the internal layout, including motherboard standoffs, cable routing cutouts, and drive bays.
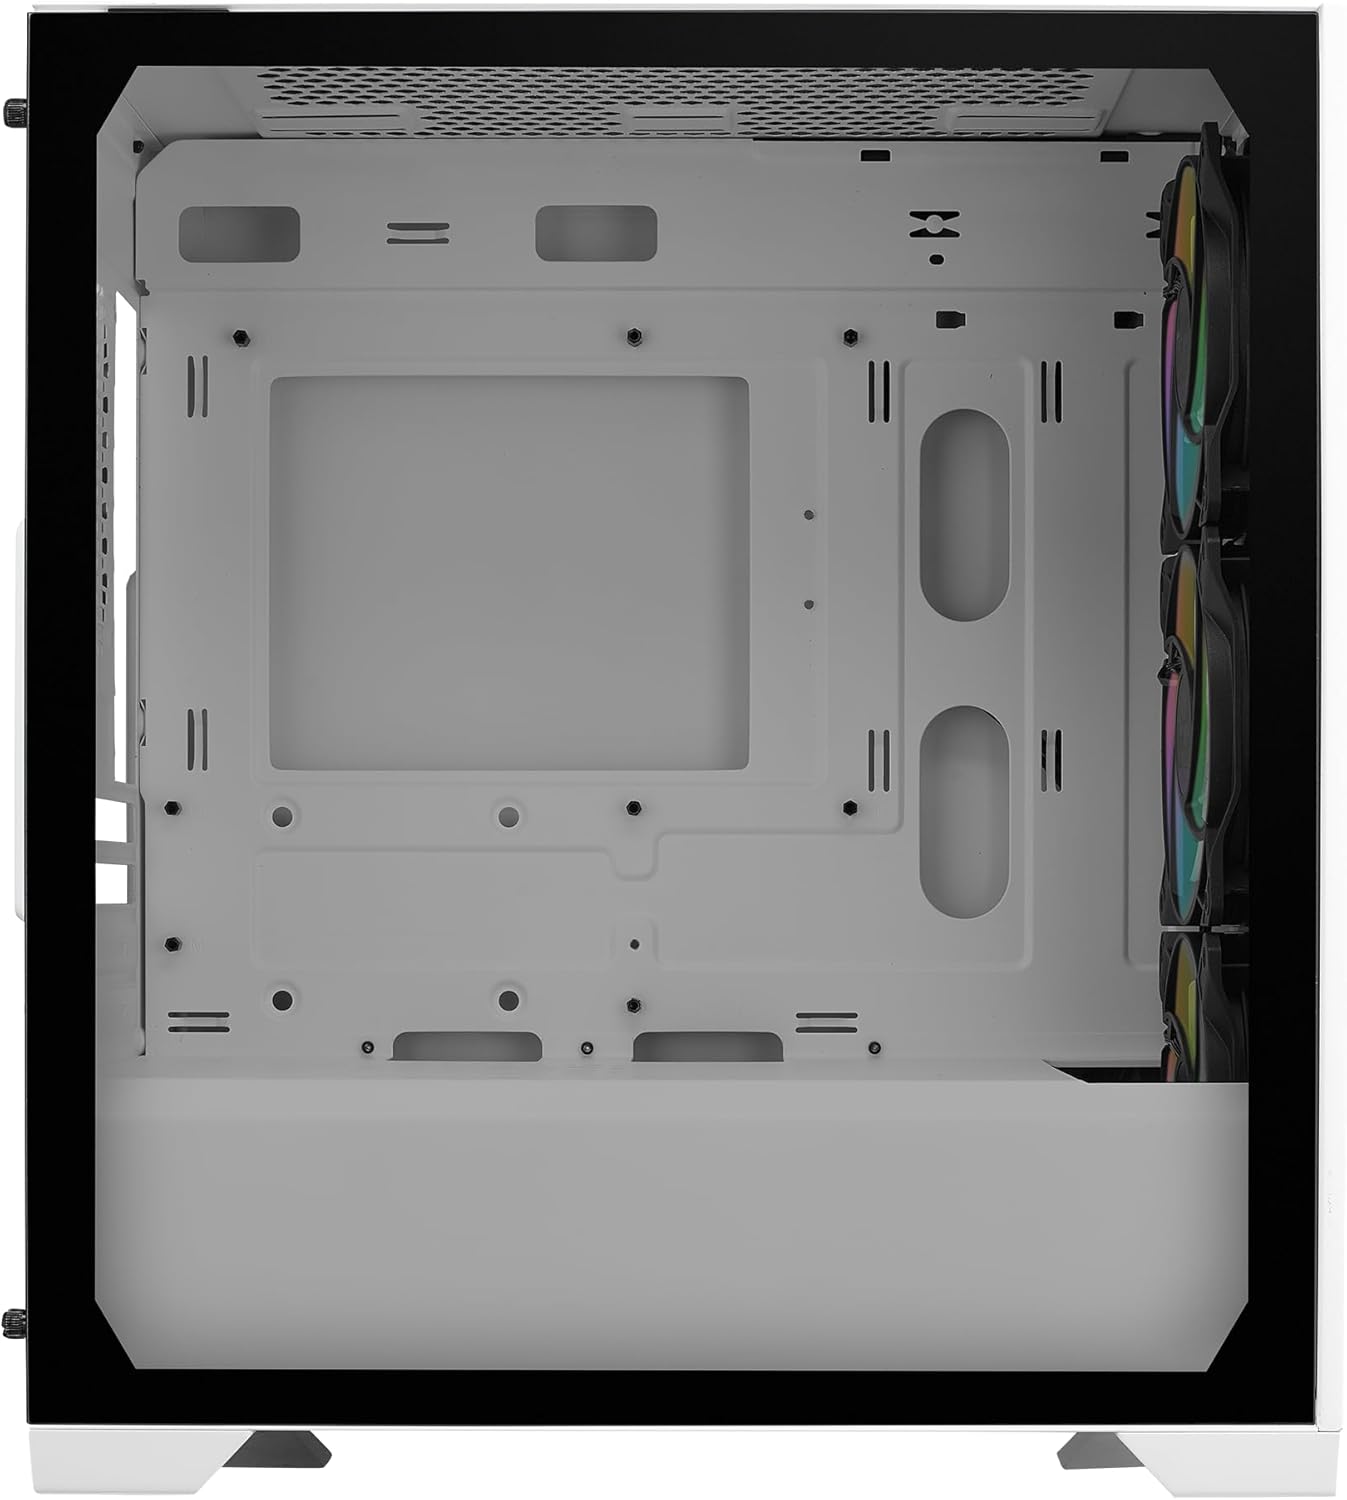
Figure 1: Interior view of the Cooler Master Elite 302 White PC Case.
5.2. Motherboard Installation
- Install CPU: Open the CPU socket lever on your motherboard, align the CPU with the socket, and gently place it. Close the lever to secure.
- Install RAM: Open the retention clips on the RAM slots, align your RAM modules, and press firmly until the clips snap into place.
- Install M.2 SSD (if applicable): Locate the M.2 slot(s) on your motherboard, insert the M.2 SSD at an angle, and secure it with the provided screw or standoff.
- Mount Motherboard: Align your motherboard with the standoffs in the case. Secure it using the motherboard screws from the accessory box.

Figure 2: Motherboard compatibility for Micro-ATX and Mini-ITX.
5.3. Power Supply Unit (PSU) Installation
- Position PSU: Slide the PSU into its designated compartment at the bottom rear of the case, ensuring the fan faces downwards for optimal airflow.
- Secure PSU: Fasten the PSU to the case using the screws provided with your PSU or from the accessory box.
- Connect PSU Cables: Route the necessary power cables (24-pin ATX, 8-pin CPU, PCIe for GPU, SATA for drives) through the cable management cutouts.

Figure 3: Ventilated PSU shroud for efficient cooling.
5.4. Cooling System Installation (AIO Liquid Cooler / Additional Fans)
- Mount Radiator/Fans: If installing an AIO liquid cooler, mount the radiator and fans to the top or front fan mounts as per your cooler's instructions. The Elite 302 supports up to a 280mm AIO.
- Install CPU Block: Apply thermal paste to the CPU (if not pre-applied on the cooler) and mount the CPU block/pump assembly.
- Connect Fan/Pump Cables: Connect all fan and pump cables to the appropriate headers on your motherboard.
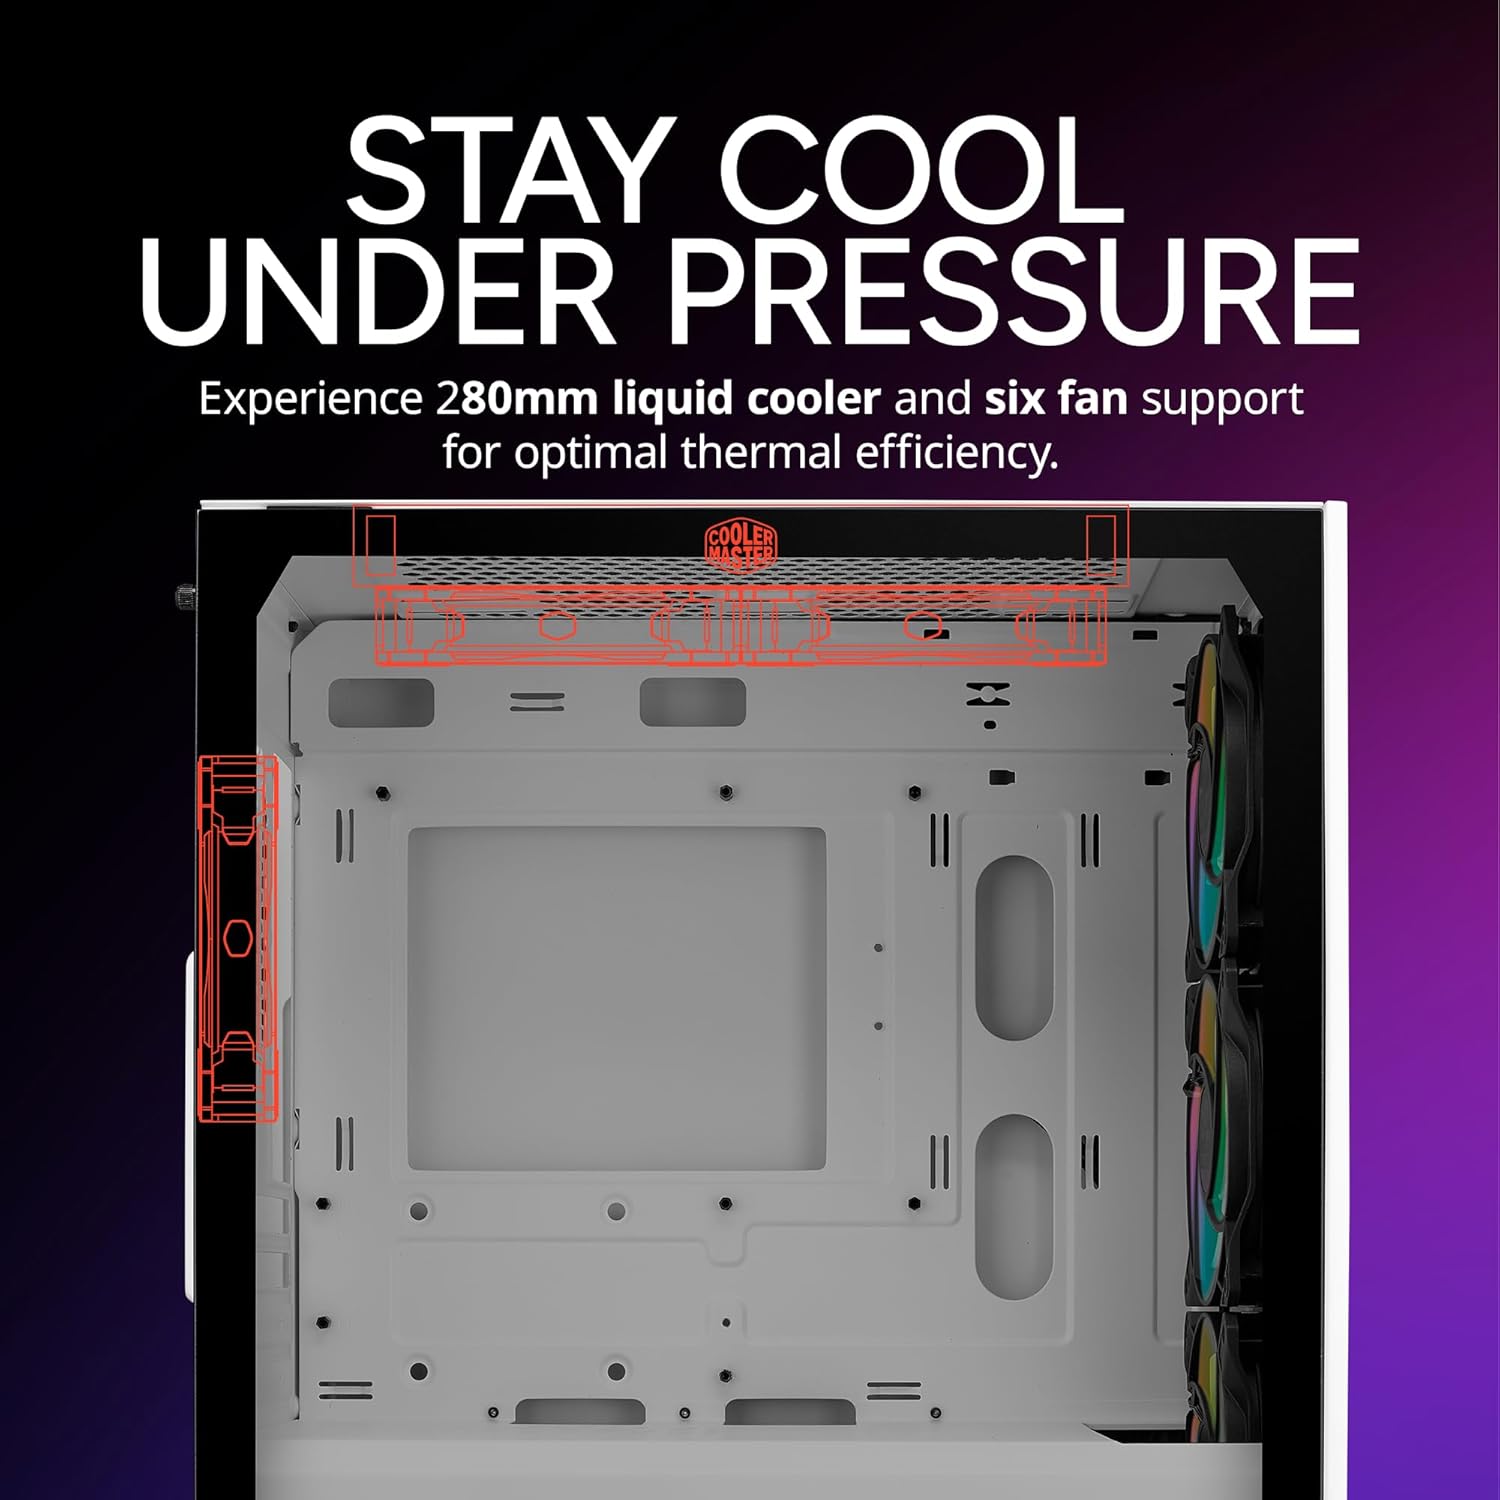
Figure 4: Cooling support for 280mm AIO and multiple fans.
5.5. Graphics Card (GPU) Installation
- Remove PCIe Slot Covers: Remove the necessary PCIe slot covers from the rear of the case corresponding to your GPU's size.
- Insert GPU: Align your GPU with the PCIe slot on the motherboard and press firmly until it clicks into place. Secure it with screws at the rear.
- Connect PCIe Power: Connect the appropriate PCIe power cables from your PSU to the GPU.

Figure 5: GPU clearance of 365mm.
5.6. Cable Management
Utilize the cable routing cutouts and tie-down points behind the motherboard tray to organize cables. This improves airflow and aesthetics.

Figure 6: Cable management area.
5.7. Front I/O and Final Assembly
- Connect Front I/O: Connect the front panel connectors (USB, audio, power switch, reset switch, LED indicators) to the corresponding headers on your motherboard. The case features an integrated USB Type-C port.
- Reattach Side Panels: Carefully reattach the solid steel and tempered glass side panels, securing them with the thumb screws.

Figure 7: Front I/O panel with USB Type-C.
5.8. Build Video Reference
For a visual guide on PC assembly within a Cooler Master case, please refer to the following video:
Video 1: Cooler Master Elite 301 Panda Build Guide. This video demonstrates general PC assembly steps applicable to Cooler Master cases.
6. Operating Your PC Case
Once all components are installed and connected, plug in your monitor, keyboard, mouse, and power cable. Press the power button on the front I/O panel to start your system. The pre-installed aRGB fans will illuminate, providing both cooling and aesthetic appeal.

Figure 8: Cooler Master Elite 302 White PC Case with illuminated fans.
7. Maintenance
- Dust Filter Cleaning: Regularly clean the removable dust filters (front, top, bottom) to maintain optimal airflow and prevent dust buildup inside the case. Gently remove the filters and clean them with water or a soft brush. Ensure they are completely dry before reattaching.
- Case Cleaning: Use a soft, damp cloth to wipe down the exterior surfaces of the case. Avoid abrasive cleaners or solvents. For the tempered glass panel, use a glass cleaner and a microfiber cloth.
- Internal Dust Removal: Periodically use compressed air to remove dust from internal components, especially heatsinks and fan blades.

Figure 9: Large intake grill for easy cleaning.
8. Troubleshooting
- No Power:
- Ensure the PSU is switched on and properly connected to the wall outlet.
- Verify all power cables (24-pin ATX, 8-pin CPU, PCIe) are securely connected to the motherboard and components.
- Check front panel power switch connection to the motherboard.
- No Display:
- Confirm the monitor cable is connected to the graphics card (GPU), not the motherboard's integrated graphics ports (unless using integrated graphics).
- Reseat the graphics card and RAM modules.
- Overheating:
- Ensure all case fans and CPU cooler fans are spinning.
- Clean dust filters and internal components.
- Verify proper thermal paste application on the CPU.
9. Warranty and Support
Cooler Master products come with a limited warranty. For detailed warranty information, please visit the official Cooler Master website or refer to the warranty card included with your product. For technical support, product registration, or to contact customer service, please visit www.coolermaster.com/support/.
You can also visit the Cooler Master Store on Amazon for additional product information and accessories.


