1. Important Safety Instructions
- Read all instructions before using the appliance.
- Keep the appliance away from water. Do not use it near bathtubs, showers, basins, or other vessels containing water.
- This appliance can be used by children aged 8 years and above and persons with reduced physical, sensory or mental capabilities or lack of experience and knowledge if they have been given supervision or instruction concerning use of the appliance in a safe way and understand the hazards involved.
- Children shall not play with the appliance. Cleaning and user maintenance shall not be made by children without supervision.
- Only use the charging cable provided with the device.
- Do not disassemble or attempt to repair the appliance yourself. Contact qualified service personnel for repairs.
- Ensure the appliance is fully dry before charging.
2. Product Overview
The Hoofun Dog Clippers Grooming Kit is designed for comprehensive pet grooming, featuring a cordless, rechargeable design with multiple interchangeable heads and accessories.
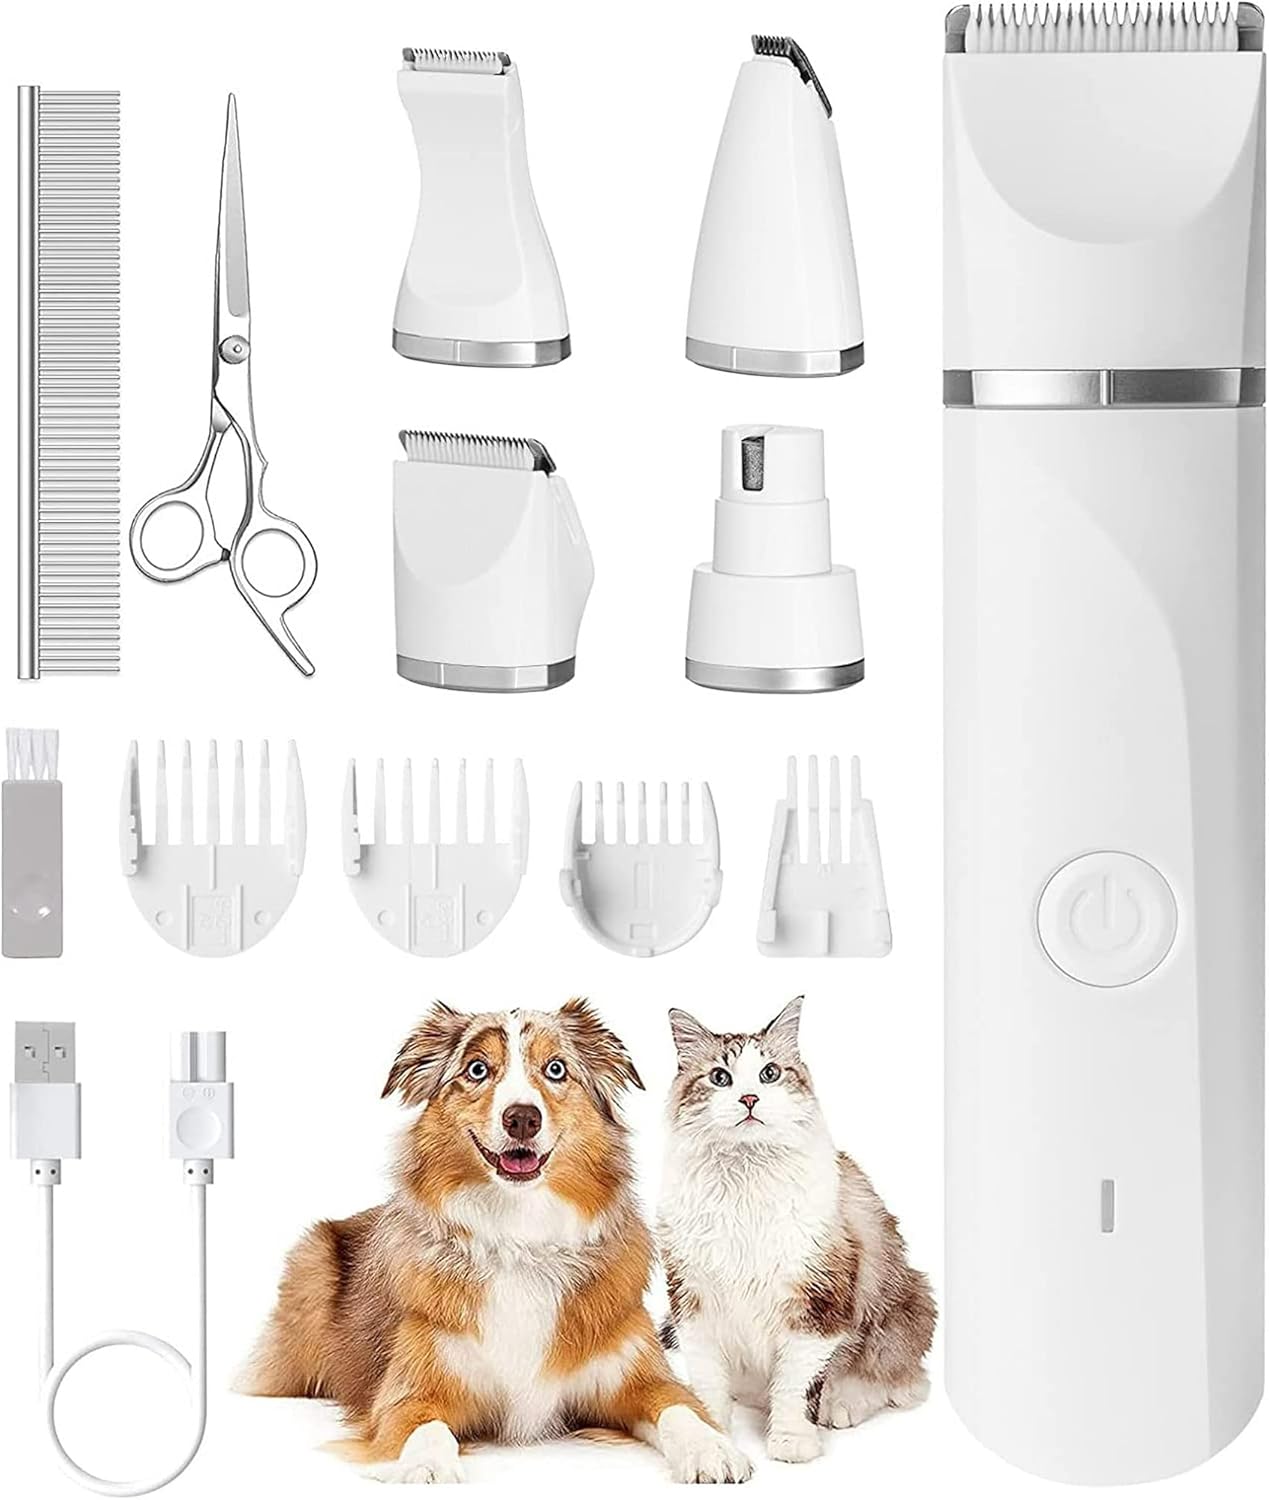
Image: Contents of the Hoofun Dog Clippers Grooming Kit. This includes the main clipper unit, four interchangeable trimmer heads (narrow, standard, detail, and a nail grinder), four comb attachments (3/6/9/12mm), a stainless steel comb, grooming scissors, a cleaning brush, and a USB charging cable.
Kit Contents:
- 1x Main Dog Clipper Unit
- 4x Interchangeable Trimmer Heads (Narrow, Standard, Detail, Nail Grinder)
- 1x USB Charging Cable
- 4x Comb Attachments (3mm, 6mm, 9mm, 12mm)
- 1x Stainless Steel Comb
- 1x Grooming Scissors
- 1x Cleaning Brush
3. Setup
3.1 Charging the Device
- Connect the USB charging cable to the charging port on the clipper unit.
- Plug the other end of the USB cable into a compatible USB power adapter (not included) or a computer USB port.
- The charging indicator light will illuminate.
- Allow approximately 50 minutes for a full charge. A full charge provides about 50-60 minutes of continuous operation.
3.2 Attaching Trimmer Heads
- Ensure the clipper unit is turned off.
- Align the desired trimmer head with the top of the clipper unit.
- Gently push the head down until it clicks securely into place.
- To remove, hold the clipper unit firmly and pull the trimmer head upwards.
3.3 Attaching Comb Attachments
- Ensure a trimmer head is securely attached to the clipper unit.
- Select the desired comb attachment (3mm, 6mm, 9mm, or 12mm).
- Slide the comb attachment onto the trimmer head until it locks into position.
- To remove, gently lift the tab on the comb attachment and slide it off.
4. Operating Instructions
4.1 General Grooming Tips
- Before grooming, ensure your pet's coat is clean, dry, and free of tangles. Use the stainless steel comb to remove any mats.
- Familiarize your pet with the clipper's sound and vibration before starting. The clipper operates with low vibration and under 60dB noise to minimize pet stress.
- Always hold the clipper at a slight angle to the pet's skin.
- Groom in the direction of hair growth for a smoother finish.
- Take breaks if your pet becomes anxious.
4.2 Using Trimmer Heads
- Standard Trimmer Head: For general body grooming and larger areas.
- Narrow Trimmer Head: Ideal for smaller areas like paws, face, and around the ears.
- Detail Trimmer Head: For intricate work and very small, sensitive areas.
- Nail Grinder Head: Use to gently smooth and shorten pet nails. Ensure your pet is comfortable with nail grinding before use.
4.3 Using Comb Attachments
Comb attachments help control hair length. Start with a longer comb (e.g., 12mm) and gradually move to shorter ones if desired, to avoid cutting too much hair at once.
- 3mm / 6mm / 9mm / 12mm: Select the appropriate comb for the desired hair length.
- Ensure the comb is firmly attached before turning on the clipper.
5. Maintenance
5.1 Cleaning the Blades and Unit
- After each use, turn off the clipper and remove the trimmer head.
- Use the provided cleaning brush to remove any trapped hair from the blades and inside the trimmer head.
- The clipper unit and trimmer heads are IP7X waterproof. They can be rinsed under running water for thorough cleaning. Ensure the charging port cover is securely closed before rinsing the main unit.
- Allow all parts to air dry completely before reassembling or storing.
5.2 Storage
Store the clipper and all accessories in a dry, cool place, away from direct sunlight and out of reach of children and pets.
6. Troubleshooting
- Clipper not turning on: Ensure the battery is charged. Connect to the charger and check the indicator light.
- Poor cutting performance: Clean the blades thoroughly to remove hair buildup. Ensure the trimmer head is securely attached. The blades may need oiling (not included, but recommended for longevity).
- Battery not charging: Check the USB cable and power adapter for damage. Ensure the cable is fully inserted into both the clipper and the power source.
- Excessive noise or vibration: Ensure the trimmer head is correctly and securely attached. Clean any hair or debris from around the blade area.
7. Specifications
- Model: LH250002-KJ
- Brand: Hoofun
- Body Material: ABS (Acrylonitrile Butadiene Styrene)
- Color: White
- Power Source: Battery Powered (Rechargeable)
- Battery Capacity: 700mAh Lithium Battery
- Working Time: Approximately 50-60 minutes
- Charging Time: Approximately 50 minutes
- Waterproof Rating: IP7X
- Noise Level: Under 60dB
8. Warranty and Support
For warranty information or technical support, please refer to the purchase documentation or contact the seller directly. Keep your proof of purchase for any warranty claims.
If you encounter any issues not covered in this manual, please reach out to the Hoofun customer service team for assistance.


