1. Introduction
This manual provides detailed instructions for the safe and proper installation and operation of your USX MOUNT XMM930 Full Motion Long Arm TV Wall Mount. This mount is designed to securely hold 32-70 inch televisions weighing up to 80 lbs (36 kg). It offers extensive adjustability including swivel, tilt, and extension to optimize your viewing experience.
2. Safety Information
WARNING: Failure to read and follow all instructions may result in personal injury, property damage, or voiding of warranty. If you have any questions, please contact customer service.
- Weight Capacity: Do not exceed the maximum weight capacity of 80 lbs (36 kg). This mount is intended for use only with the maximum weights indicated. Use with products heavier than the maximum weights indicated may result in instability causing possible injury.
- TV Size: This mount is suitable for TVs between 32 and 70 inches.
- Wall Type: This mount is designed for installation on wood studs, concrete walls, or solid brick walls. DO NOT install on drywall alone. Ensure the wall structure can safely support the combined weight of the mount and the television.
- VESA Compatibility: Ensure your TV's VESA pattern (mounting hole spacing) is compatible with this mount (Min: 75x75mm, Max: 400x400mm).
- Professional Installation: If you are unsure about the installation process or the suitability of your wall, seek assistance from a qualified professional.
- Children: Keep children away from the installation area. Small parts may be a choking hazard.
- Tools: Use appropriate tools and wear safety gear during installation.
3. Package Contents
Verify that all components are present and undamaged before beginning installation. If any parts are missing or damaged, do not proceed with installation and contact customer service.

Image: Labeled hardware packs and mount components. This image displays the main mount assembly, TV brackets, a small bubble level, and various screws, washers, and anchors organized in labeled bags.
Typical package contents include:
- Wall Plate Assembly
- TV Bracket Arms (2)
- Hardware Kit (various screws, washers, spacers, anchors)
- Bubble Level
- Cable Ties
- Instruction Manual
4. Specifications
| Feature | Specification |
|---|---|
| Model Number | XMM930 |
| TV Size Compatibility | 32 - 70 inches |
| Weight Capacity | 80 lbs (36 kg) |
| VESA Compatibility | Min: 75x75mm, Max: 400x400mm |
| Extension Range | 2.52 inches (retracted) to 31.22 inches (extended) |
| Tilt Angle | +5° / -12° |
| Swivel Angle | ±90° (maximum, depends on TV size) |
| Level Adjustment | ±4° |
| Wall Type Compatibility | Wood Studs, Concrete Walls, Solid Brick Walls |
| Material | Metal |
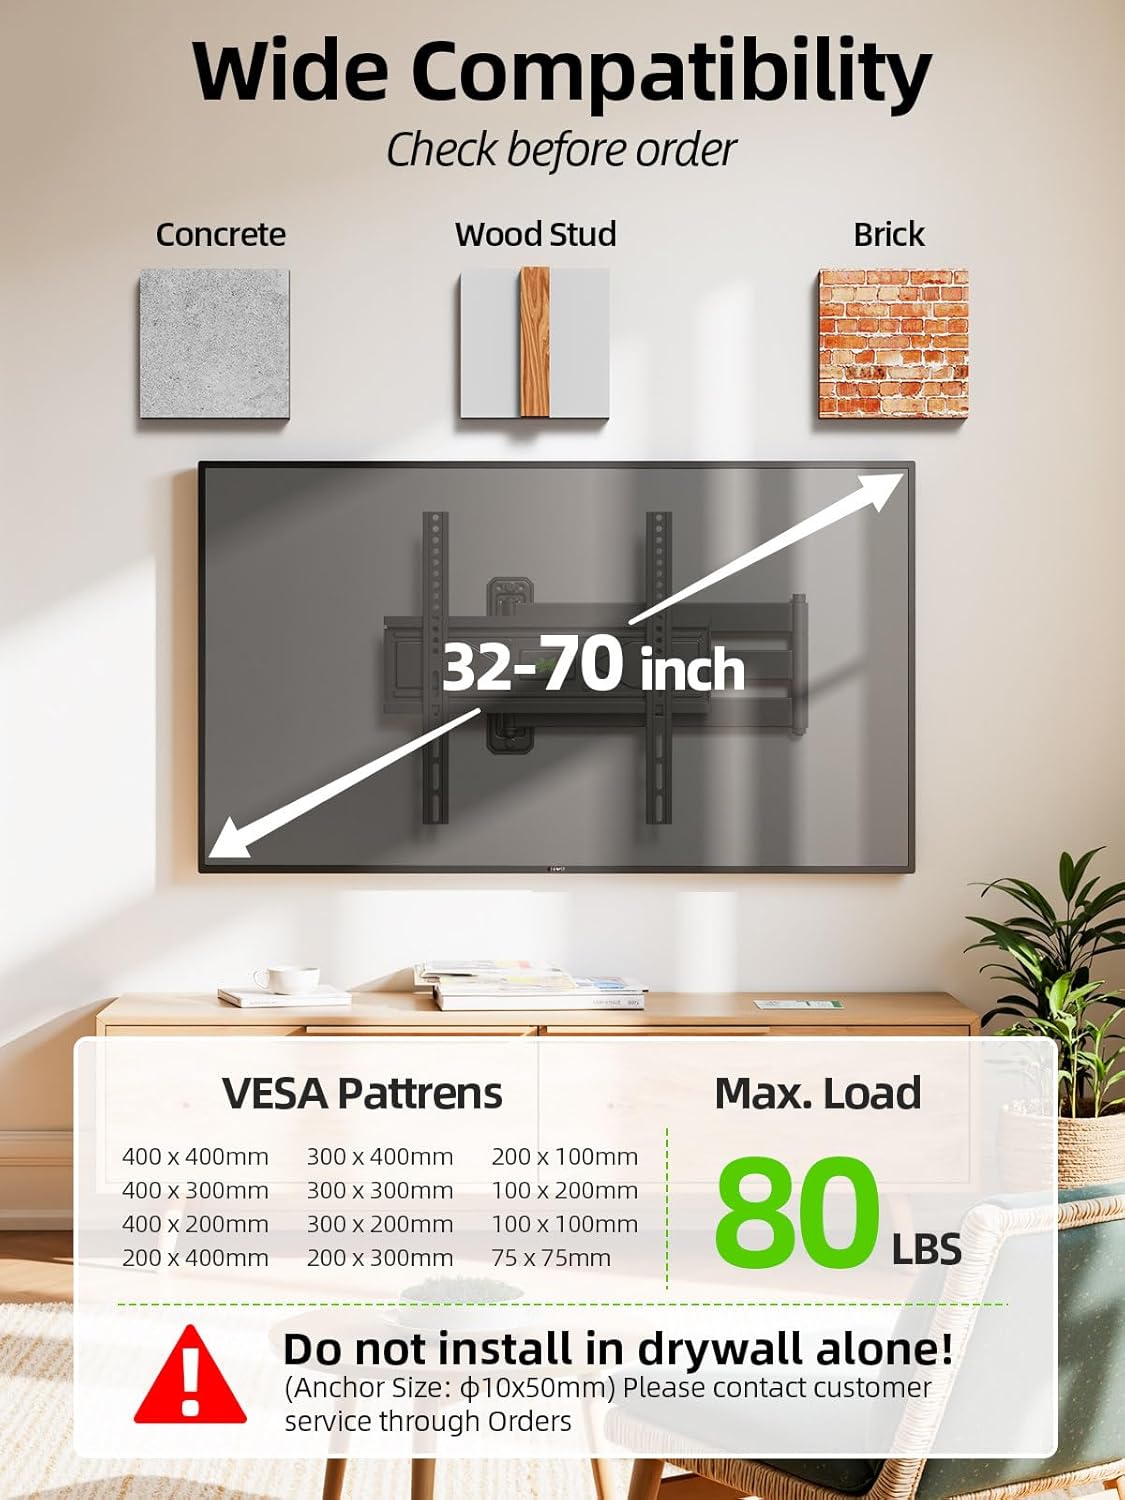
Image: Wide Compatibility. This image illustrates the mount's compatibility with various wall types (concrete, wood stud, brick), TV sizes (32-70 inches), VESA patterns (75x75mm to 400x400mm), and maximum load capacity (80 lbs).
5. Setup and Installation
5.1 Pre-Installation Checks
- Verify TV Compatibility: Confirm your TV's size, weight, and VESA pattern meet the specifications listed in Section 4.
- Identify Wall Type: Determine if your wall is wood stud, concrete, or solid brick. Use a stud finder for wood studs.
- Check Cable Outlets: Before mounting, ensure the mount will not block any cable outlets or ports on the back of your TV.

Image: Check Cable Outlet. This image shows the back of a TV with the mount attached, highlighting the importance of ensuring cable connections are not obstructed by the mount.
5.2 Installation Steps
Follow these general steps for installation. Refer to the included detailed instruction manual for specific diagrams and hardware usage.
- Attach TV Brackets: Secure the vertical TV bracket arms to the back of your television using the appropriate screws, washers, and spacers from the hardware kit. Ensure they are centered and level.
- Mount Wall Plate: Mark the desired mounting height and position on your wall. Drill pilot holes according to the template provided in your detailed manual. Secure the wall plate assembly to the wall using the appropriate lag bolts and anchors for your wall type. Use the included bubble level to ensure the wall plate is perfectly horizontal.
- Hang TV: Carefully lift the television and hook the TV bracket arms onto the wall plate. Secure the TV to the wall plate using the safety screws or locking mechanisms as instructed in your detailed manual.

Image: Easy 3-Step Installation. This image visually depicts the three main installation steps: 1) Attaching TV brackets to the TV, 2) Mounting the wall plate to the wall, and 3) Hanging the TV onto the wall plate.
6. Operating and Adjustments
The USX MOUNT XMM930 offers various adjustments to achieve optimal viewing angles.
- Extension and Retraction: Gently pull or push the TV to extend it up to 31.22 inches from the wall or retract it to 2.52 inches.
- Swivel: The mount allows for a swivel of up to ±90 degrees (left/right), depending on your TV size and wall clearance. Carefully rotate the TV to your desired angle.
- Tilt: Adjust the tilt angle from +5° (upward) to -12° (downward) to reduce glare and improve viewing comfort. Loosen the tilt adjustment knobs, set the angle, and re-tighten.
- Level Adjustment: After installation, if your TV is not perfectly level, you can adjust it by ±4°. Refer to your detailed manual for specific instructions on how to use the post-installation leveling feature.

Image: Reduce Glare & Extend Distance. This image demonstrates the mount's ability to extend the TV from 2.52 inches to 31.22 inches and adjust the tilt from +5° to -12°.
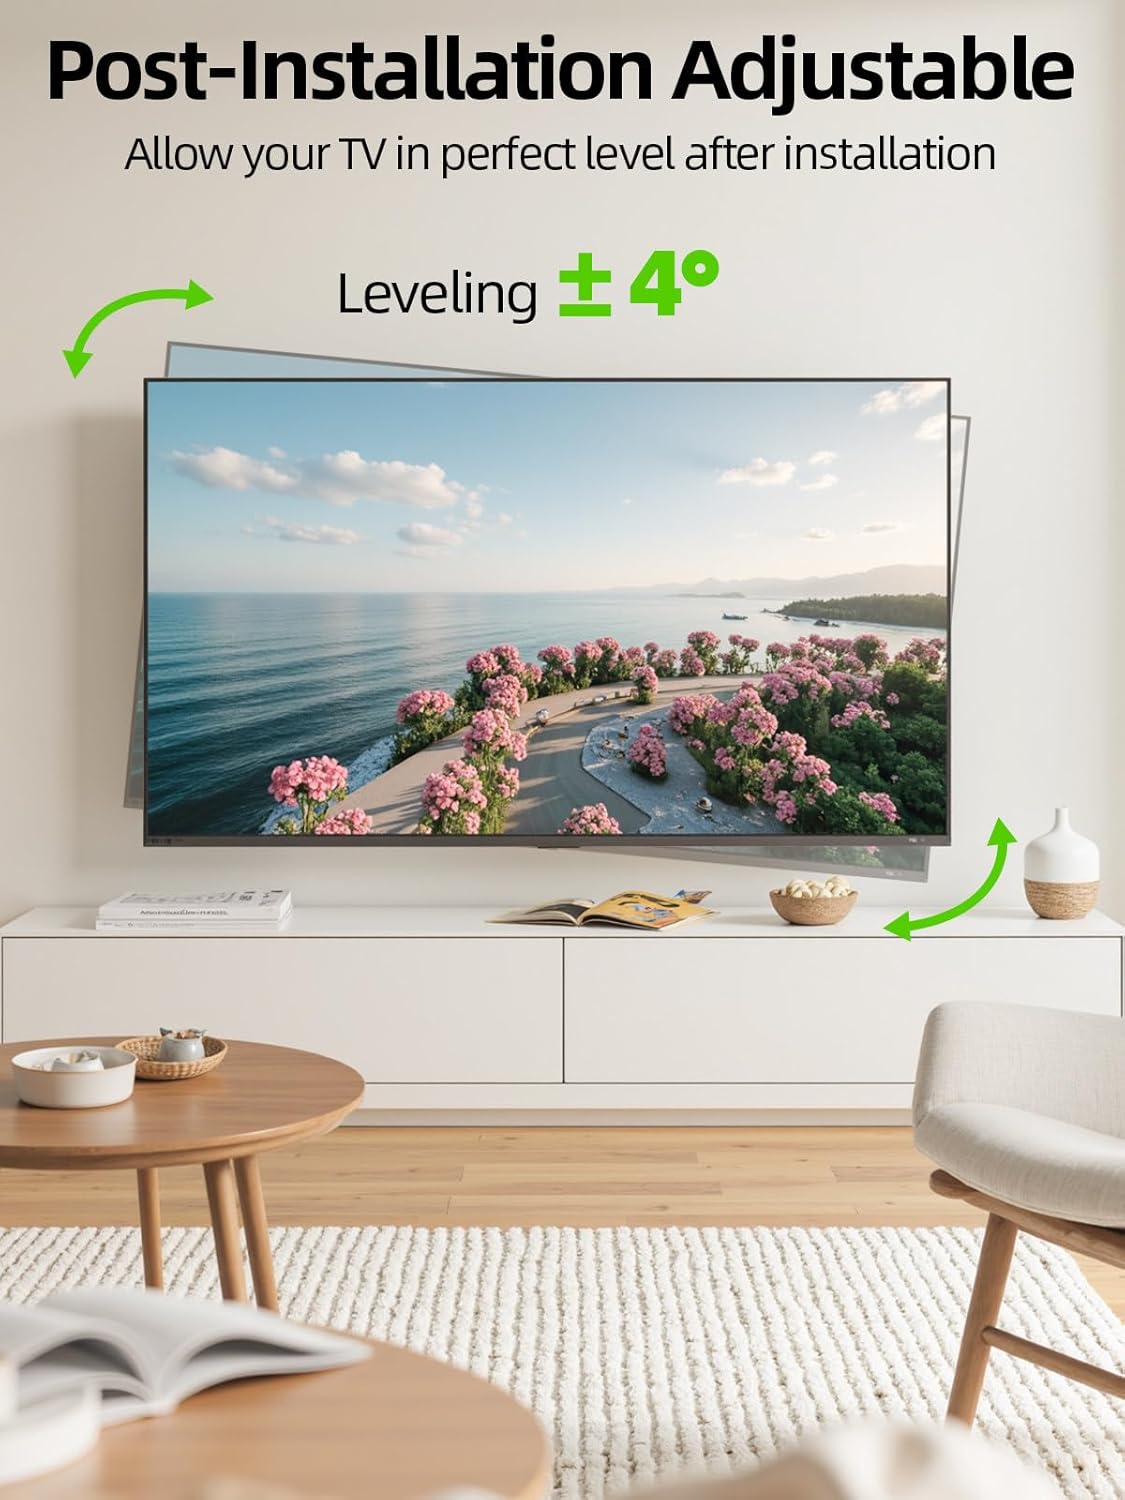
Image: Post-Installation Adjustable. This image illustrates the ±4° leveling adjustment feature, allowing for fine-tuning of the TV's horizontal position after installation.
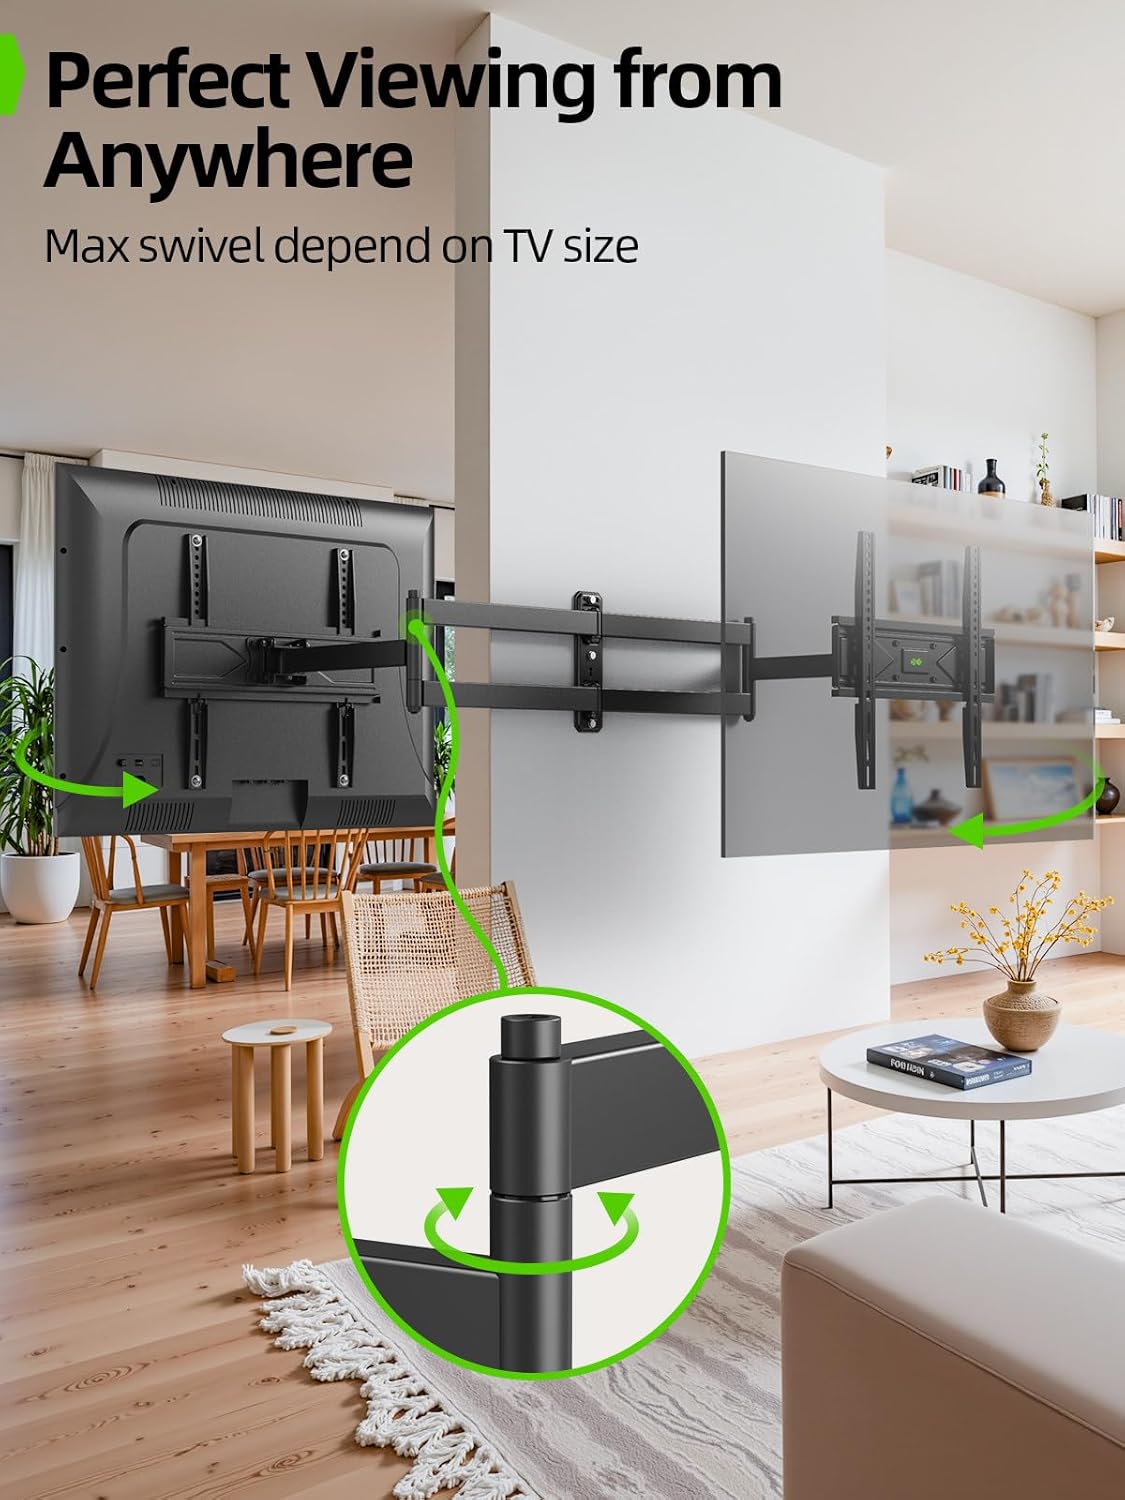
Image: Perfect Viewing from Anywhere. This image shows the swivel capability of the mount, allowing the TV to be angled for optimal viewing from different positions in a room.
7. Maintenance
Regular maintenance helps ensure the longevity and safe operation of your TV mount.
- Cleaning: Wipe the mount with a soft, dry cloth. Avoid abrasive cleaners or solvents.
- Periodic Checks: Periodically check all screws and bolts to ensure they are securely tightened. Over time, vibrations or adjustments may cause them to loosen.
- Lubrication: The articulating joints are designed for smooth movement. If movement becomes stiff, a small amount of silicone-based lubricant can be applied to the pivot points.
8. Troubleshooting
If you encounter issues with your TV mount, refer to the following common solutions:
- TV is not level after installation: Use the post-installation level adjustment feature (refer to Section 6 and your detailed manual).
- Difficulty moving the TV (swivel/extension): Check if any cables are snagged or if the joints require lubrication (see Maintenance). Ensure no locking mechanisms are engaged.
- Mount feels unstable: Immediately remove the TV from the mount. Re-check all wall plate and TV bracket connections. Ensure all bolts are securely tightened and that the wall type is appropriate for the mount and TV weight. If issues persist, contact customer support.
- Missing parts or damaged components: Do not proceed with installation. Contact USX MOUNT customer service for replacement parts.
9. Warranty and Support
USX MOUNT provides a dedicated professional customer service team to assist you with any questions or concerns before, during, or after installation.
For warranty information, technical support, or to report missing/damaged parts, please contact USX MOUNT customer service through the retailer where you purchased the product or visit the official USX MOUNT website.

Image: Easy to Install and US-based Support. This image shows the mount's components, a manual, and a representation of customer support agents, indicating readily available assistance.


