1. Introduction
The GEPRC TAKER F405 BLS 50A Stack is an integrated flight control system designed for FPV drones, offering enhanced performance and simplified installation. This stack combines a high-performance flight controller with a robust Electronic Speed Controller (ESC) to provide stable and responsive flight characteristics. It is engineered for both beginners and experienced pilots, featuring plug-and-play compatibility with O4 Air Units and advanced vibration reduction for clear footage.
Key Features:
- Plug-and-Play Simplicity: Designed for effortless installation, this stack system seamlessly integrates with O4 Air Units, eliminating soldering hassles and saving time for both beginners and seasoned pilots.
- Enhanced Flight Performance: Equipped with advanced gyroscope technology and a high-performance ESC, it delivers ultra-smooth and responsive handling, perfect for immersive FPV racing and cinematic aerial shots.
- Durable and Reliable Design: Features a reinforced USB-C connector for long-lasting durability and stable connectivity, minimizing contact issues even during intense flights.
- Dual Independent Power Supply: Provides clean, stable power to onboard devices with dual BEC circuits, ensuring consistent performance for cameras, VTXs, and other accessories.
- Optimized Stability and Control: Built-in shock absorption and precision filtering reduce vibrations, keeping the gyroscope stable for crisp, jitter-free footage in dynamic flying conditions.
2. Setup and Installation
The TAKER F405 BLS 50A Stack is designed for straightforward integration into your FPV drone build. Follow these steps for proper installation and initial setup.
2.1 Unboxing and Component Identification
Upon opening the package, verify that all components listed in the product list are present and undamaged.

Image: The GEPRC TAKER F405 BLS 50A Stack along with its complete set of accessories, including cables, screws, and mounting hardware. This image helps in identifying all parts upon unboxing.
2.2 Connection Diagram
Refer to the following diagram for correct wiring of the flight controller to various drone components such as the ESC, camera, GPS, LED, and DJI Air Unit.

Image: A detailed connection diagram illustrating how to connect the flight controller to the ESC, camera, LED, GPS module, receiver, and DJI Air Unit. Each port is clearly labeled for easy identification.
2.3 Physical Installation
- Mount the flight controller and ESC stack securely onto your drone frame using the provided screws and nylon nuts. Ensure proper orientation as indicated in your drone's frame manual.
- Connect the main power cable (XT60) to your battery.
- Connect the DJI Air Unit using the dedicated adapter cable for plug-and-play functionality.
- Connect the camera, GPS, and LED modules to their respective ports as shown in the connection diagram.
- Verify all connections are firm and correctly oriented to prevent short circuits or damage.

Image: An assembled view of the GEPRC TAKER F405 BLS 50A Stack, showing its compact form factor and integrated design. This image provides a visual reference for the physical appearance of the stack.
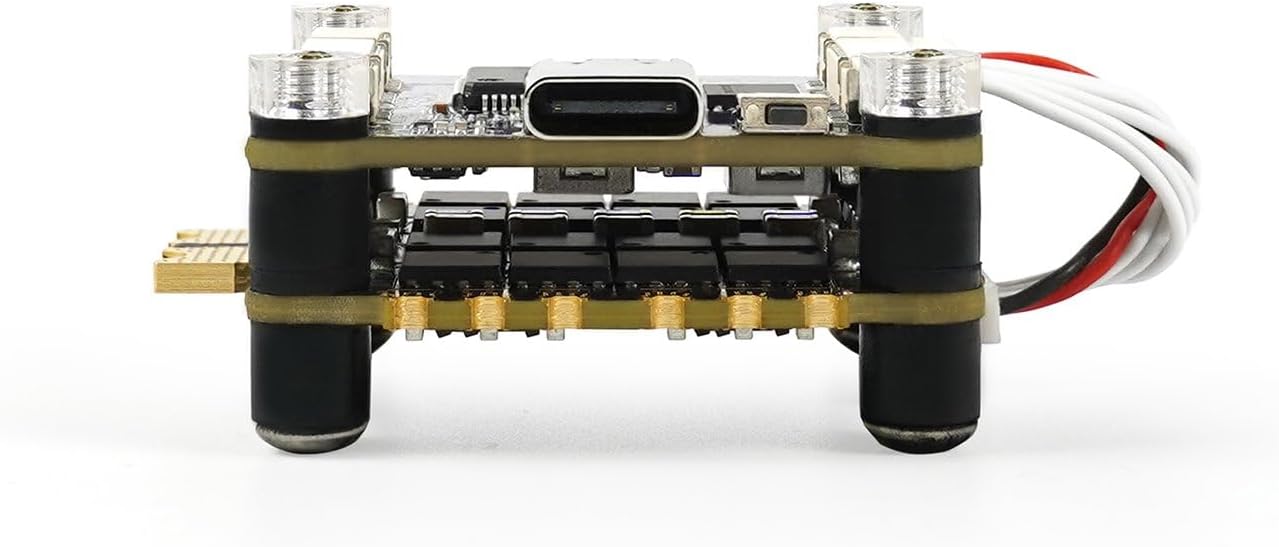
Image: A side profile view of the GEPRC TAKER F405 BLS 50A Stack, highlighting the layered design of the flight controller and ESC, and the reinforced USB-C port.
3. Operation
Once installed, the GEPRC TAKER F405 BLS 50A Stack is ready for configuration and flight. This section outlines general operational guidelines.
3.1 Initial Configuration (Betaflight/INAV)
The flight controller typically comes pre-flashed with firmware (e.g., Betaflight). For advanced configuration, connect the stack to your computer via the USB-C port.
- Download and install the appropriate configurator software (e.g., Betaflight Configurator) on your computer.
- Connect the stack to your computer using a USB-C cable.
- Launch the configurator software and connect to the flight controller.
- Perform initial setup, including sensor calibration (accelerometer, gyroscope), receiver setup, and ESC calibration if necessary.
- Configure flight modes, OSD settings, and other parameters according to your preferences and drone setup.

Image: A top-down view of the flight controller board, showing the main processor (STM32F405) and various connection pads. This view is useful for identifying components during software configuration.
3.2 Flight Operation
After successful configuration, ensure your drone is in a safe environment for flight. Always perform pre-flight checks.
- Power on your radio transmitter and ensure it is linked to the drone's receiver.
- Connect the drone battery. The flight controller will initialize.
- Arm the motors using your configured arming switch.
- Begin flight, observing the drone's behavior. The optimized stability and control features of the stack will contribute to a smooth flight experience.
4. Maintenance
Proper maintenance ensures the longevity and optimal performance of your GEPRC TAKER F405 BLS 50A Stack.
- Regular Inspection: Periodically inspect the stack for any signs of physical damage, loose connections, or corrosion.
- Cleaning: Gently clean the boards with a soft brush or compressed air to remove dust and debris. Avoid using liquids directly on the electronics.
- Firmware Updates: Check the official GEPRC website or Betaflight/INAV repositories for firmware updates. Keeping the firmware updated can improve performance and add new features.
- Storage: When not in use for extended periods, store the stack in a dry, cool environment, away from direct sunlight and extreme temperatures.
5. Troubleshooting
This section provides solutions to common issues you might encounter with your GEPRC TAKER F405 BLS 50A Stack.
| Problem | Possible Cause | Solution |
|---|---|---|
| No Power/No Lights | Incorrect power connection, faulty battery, damaged power cable. | Check XT60 power cable connection. Ensure battery is charged and functional. Inspect for any visible damage to the board or cables. |
| Cannot Connect to PC via USB | Driver issues, faulty USB-C cable, incorrect port selected in configurator. | Install necessary VCP drivers. Try a different USB-C cable. Ensure the correct COM port is selected in Betaflight/INAV Configurator. |
| Motors Not Spinning/Arming Issues | ESC not calibrated, motor direction incorrect, safety pre-arms not met (e.g., accelerometer not calibrated, low battery). | Calibrate ESCs. Verify motor direction in configurator. Check Betaflight/INAV 'Motors' tab for arming flags. Ensure accelerometer is calibrated. |
| Excessive Vibrations/Jittery Footage | Loose mounting, unbalanced propellers, soft-mounting issues, PID tuning required. | Ensure the stack is securely mounted. Check propellers for damage or balance. Verify soft-mounting grommets are correctly installed. Consider fine-tuning PID settings. |
6. Specifications
Detailed technical specifications for the GEPRC TAKER F405 BLS 50A Stack.
| Feature | Detail |
|---|---|
| Brand | GEPRC |
| Model Number | TAKER F405 BLS 50A Stack |
| Flight Controller MCU | STM32F405 (implied) |
| ESC Current | 50A (BLS) |
| Connectivity | USB-C |
| Item Weight | 22 Grams (0.776 ounces) |
| Product Dimensions | 1"L x 1"W x 1"H |
| Color | Black |
| Country of Origin | China |
| First Available | May 6, 2025 |
7. Warranty and Support
GEPRC is committed to providing high-quality products and customer satisfaction.
7.1 Product Warranty
For specific warranty terms and conditions, please refer to the official GEPRC website or contact your point of purchase. Keep your proof of purchase for any warranty claims.
7.2 Customer Support
If you encounter any issues or have questions regarding the GEPRC TAKER F405 BLS 50A Stack, please contact GEPRC customer support. Our team is available to assist with setup, troubleshooting, and general inquiries.
- Online Resources: Visit the official GEPRC website for FAQs, firmware downloads, and additional documentation.
- Contact Information: Refer to the GEPRC store page on Amazon or the official website for direct contact methods.


