1. Introduction
Thank you for purchasing the BOIFUN MT05 Motorcycle Drive Recorder. This device is designed to enhance your riding experience with advanced features including a 6.25-inch IPS touchscreen, triple SONY cameras for comprehensive recording, and seamless integration with Apple CarPlay and Android Auto. This manual provides detailed instructions for setup, operation, and maintenance to ensure optimal performance and longevity of your device.
2. Safety Information
- Always ensure the device is securely mounted before riding.
- Do not attempt to operate the device in a way that distracts you from driving.
- Keep the device and its components away from extreme temperatures and direct sunlight for prolonged periods.
- Ensure all cables are properly connected and secured to prevent interference with motorcycle controls.
- Regularly check the mounting for stability and tightness.
3. Package Contents
Please verify that all items listed below are included in your package:
- 6.25-inch Monitor Motorcycle Drive Recorder Main Unit
- USB Cable (requires 5V/2A or higher)
- ACC Power Cable
- SONY Cameras (3 units)
- Instruction Manual (with warranty card)
- Metal Anti-theft Bracket
- Camera Mounting Accessories
- Bracket Mounting Screws
- Remote Control Mounting Accessories
- Sun Visor Cover
- Camera Extension Cables (3 units)
- Wired Remote Control (with built-in GPS)
- Tool Set

4. Setup
4.1 Mounting the Device
The BOIFUN MT05 offers flexible mounting options. Choose the method that best suits your motorcycle type and ensures secure attachment.
Method 1: Handlebar Mount (Handlebar diameter: 20mm-25mm)
- Attach anti-slip mats to the upper and lower parts of the U-clamp.
- Set flat washers on the long screws.
- Attach the nuts corresponding to the long screws to the bottom of the U-clamp.
Note: If the screw hole has a blue washer, position that side facing outwards. - Secure the bracket to the motorcycle handlebar and tighten the screws.
- Attach the stand anti-slip pad to the screw holes on the ball joint rectangular plate using a screwdriver.
- Using the special hexagonal wrench, loosen the screw in the center of the long arm. Insert the ball part onto the long arm and tighten the screw in the center of the long arm.
- Align the screw holes of the bracket's rectangular plate with the screw holes on the back of the product main unit and tighten the screws.
Method 2: Mirror Mount (Hole diameter: up to 10mm)
- Remove the motorcycle mirror using a spanner (wrench).
Note: A spanner (wrench) is not included, so separate preparation is required. Mirror removal methods may vary by model. - Assemble the mirror mount with the motorcycle mirror.
- Attach the assembled product unit to the mirror mount.
- After inserting the ball head of the rearview mirror into the rod, adjust it to an easy-to-view position, firmly tighten the center of the long arm, and complete the installation.
Method 3: Brake Reservoir Tank Mount
- Remove the original screw from the brake reservoir tank.
- Tighten the brake reservoir tank with the original screw.
Note: The length of the original screw and the ball-type part may not be compatible. In such cases, please use other mounting methods. - Attach the assembled product unit to the brake reservoir mount.
Important Note:
Motorcycle types vary widely, so please select the appropriate mounting method according to the actual condition of your motorcycle. Also, please note that the mounting method may not be suitable for some vehicle models. Your understanding is appreciated.
4.2 Power Connection and Initial Startup
Connect the power cord. The device will start within 10 seconds after connecting the power cord.

5. Operating Instructions
5.1 Display and Interface
The MT05 features a 6.25-inch IPS full-touch screen with 1400nit high brightness, ensuring clear visibility even in bright daylight. An automatic brightness adjustment sensor adapts to ambient light conditions, and a sun visor plate further enhances screen clarity.


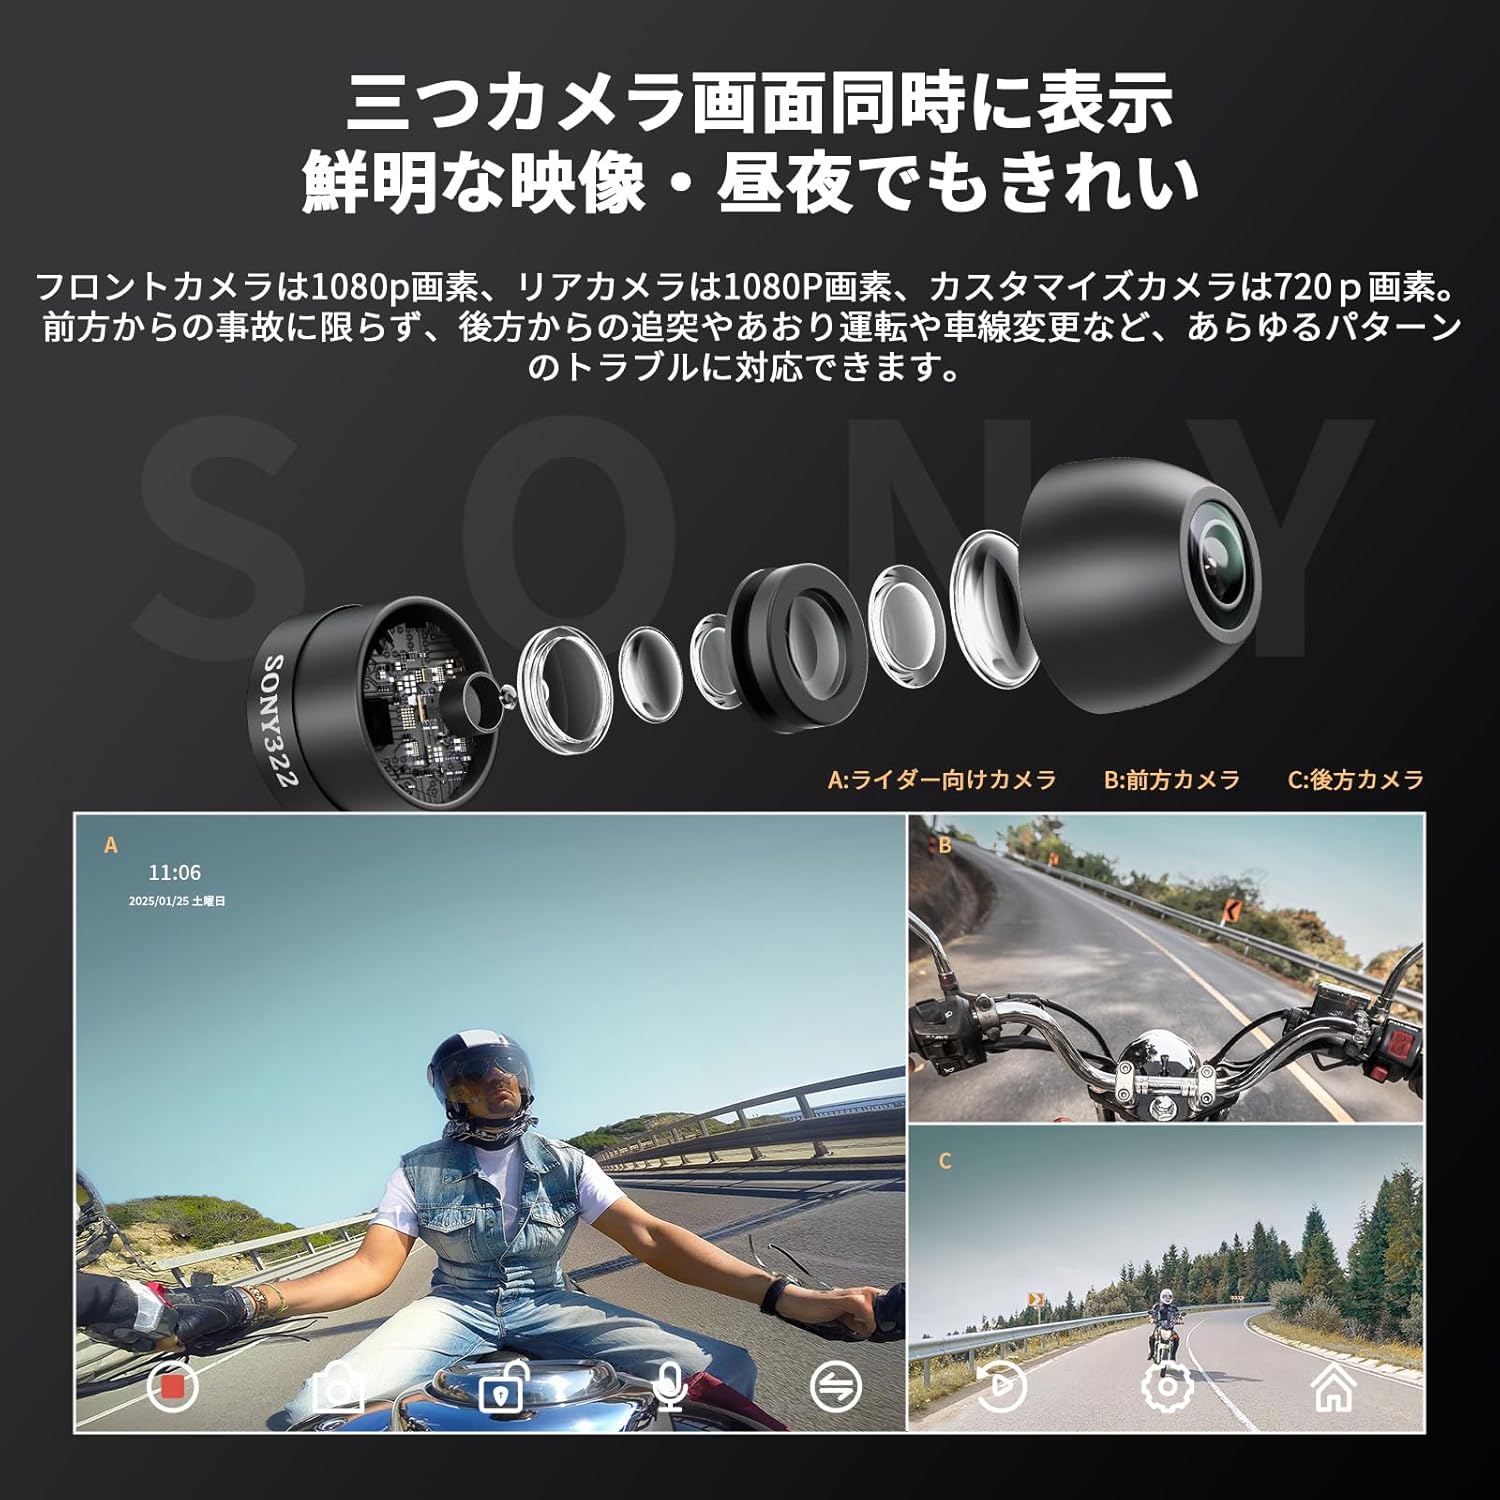
5.2 Camera Functions
The device is equipped with three high-definition SONY cameras, recording front (1080p), rear (1080p), and a customizable selfie camera (720p) simultaneously. The 140° wide-angle lenses provide extensive coverage for accident evidence and safe driving support.
- Front Camera: 140° recording for accident evidence during lane changes or sudden stops.
- Rear Camera: 140° recording for evidence of tailgating or dangerous driving from behind.
- Selfie Camera: 140° recording to monitor your own driving behavior and fatigue.

5.3 CarPlay and Android Auto
Connect your iPhone (iOS 9.0 or higher) or Android smartphone (Android 11 or higher with 5G support) to access navigation, voice assistant, calls, and music playback directly on the MT05 screen. The device supports both Apple CarPlay and Android Auto for a connected riding experience.
5.3.1 Apple CarPlay Connection
- Ensure Bluetooth on your motorcycle drive recorder is turned ON.
- From the drive recorder's home screen, tap "Apple CarPlay" to enter CarPlay mode.
- On your smartphone, go to the "Bluetooth" menu and select the Bluetooth device named "MT05-*****" (model-specific).
- Wait approximately 20-30 seconds. A "Bluetooth Pairing Request" will appear on your smartphone. Select "Pairing" to pair your smartphone and the device.
- Afterward, a message "Use CarPlay via SmartScreen?" will appear on your smartphone. Select "Use CarPlay".
- After a short wait, the system will switch to CarPlay mode.
5.3.2 Android Auto Automatic Setup
- Ensure Bluetooth on your motorcycle drive recorder is turned ON.
- From the drive recorder's home screen, tap "Android Auto" to enter Android Auto mode.
- On your smartphone, access "Bluetooth" settings and start searching for devices.
- Select the Bluetooth device named "MT05-*****" (model-specific) according to your model.
- Wait approximately 20-30 seconds. A "MT05-***** Pairing Request" will appear on your smartphone. Select "Pairing" to pair your smartphone and the device.
- Next, a message "Connect to device?" will appear on the screen. Tap "Connect".
- Once Android Auto is successfully connected, the system will automatically switch to Android Auto mode.
You can use navigation while your smartphone is connected, and earphones or motorcycle intercoms can be utilized.
Note: Intercoms/earphones can only be used with Bluetooth-compatible models. The motorcycle monitor and intercom do not connect directly; please link them via your smartphone.


5.3.3 Displaying Smartphone Screen and Camera Simultaneously
To display your smartphone screen and one camera feed simultaneously:
- Touch the settings icon.
- Touch "Screen Mode" and select your desired camera (A, B, or C).
Note: Only one camera can be displayed simultaneously.
5.4 Recording Features
The MT05 supports loop recording, file locking, and G-sensor functionality. It comes with a 64GB microSD card and supports up to 128GB (Class 10 or U3 required).
- Loop Recording: Files are divided into 2/3/5 minute segments. When the SD card is full, older data is automatically overwritten.
- Manual Recording/Photo: You can manually record videos or take photos of scenic views during your ride, which will be locked to prevent overwriting.
- G-Sensor: In case of impact, the device automatically records several seconds before and after the event, saving it to a separate "Impact Recording" folder to prevent overwriting. This ensures critical accident footage is securely stored.


5.5 Wired Remote Control and Voice Assistant
The wired remote control includes built-in GPS for accurate time and date stamping. It allows for quick access to functions like answering/rejecting calls and switching camera views. Voice assistants like Siri and Google Assistant can be used for navigation, music control, and sending messages.
- Siri Voice Assistant: Receive navigation instructions, control music, and send messages by voice.
- Google Assistant: Perform various operations using voice commands, such as receiving navigation instructions like "Turn right at the next exit."


6. Maintenance
6.1 SD Card Management
Periodically clear the SD card to prevent capacity issues. Locked videos cannot be overwritten, which can lead to insufficient capacity and device reboots. Regular maintenance ensures smooth operation.
6.2 Durability and Protection
The MT05 is designed for harsh motorcycle environments, featuring high-temperature and low-temperature resistance, anti-aging properties, and strong resistance to drops and scratches. It is fully waterproof (IP65 level) for reliable performance in various weather conditions.


7. Troubleshooting
- Device not powering on: Ensure the power cable is securely connected and receiving adequate power (5V/2A for USB, 12V-30V for ACC).
- Bluetooth connection issues: Verify Bluetooth is enabled on both the device and your smartphone. Ensure no other devices are interfering with the connection. Try restarting both devices.
- Recording problems: Check if the microSD card is properly inserted and has sufficient free space. Format the SD card periodically. Ensure the card meets Class 10 or U3 specifications.
- Screen not clear: Adjust the screen brightness settings. Ensure the sun visor plate is correctly positioned.
- GPS not working: Ensure the wired remote control with built-in GPS is connected.
8. Specifications
| Feature | Specification |
|---|---|
| Screen Size | 6.25 inches |
| Display Type | IPS LCD |
| Video Capture Resolution | 1080p & 720p |
| Compatible Devices | Smartphones (iOS 9.0+, Android 11+ with 5G) |
| Flash Memory Type | microSD (8GB-128GB, Class 10 or U3 required) |
| Mounting Type | Handlebar Mount, Mirror Mount, Brake Reservoir Mount |
| Special Features | 6.25-inch Large Touchscreen Monitor, G-Sensor, Built-in GPS, Built-in Bluetooth, Built-in Speaker & Microphone, Metal Anti-theft Bracket |
| Product Dimensions | 24 x 8.7 x 21 cm; 1.41 kg |
| Compatible Vehicle Type | Motorcycle |
9. Warranty and Support
The BOIFUN MT05 Motorcycle Drive Recorder comes with a 1-year manufacturer's warranty. For any product inquiries, technical support, or warranty claims, please contact our customer service team. Refer to the warranty card included in your package for specific terms and conditions.
Contact Information:
Official Email Address: admin@boifun.net


