
1. Introduction
This manual provides instructions for the proper installation, operation, and maintenance of your RED DOT Folding Tinted Golf Cart Windshield. This windshield is designed for compatibility with Denago EV Rover XL golf cart models, offering a snug, vibration-free fit. It is constructed from high-quality 3/16 inch (3.8 mm) thick acrylic with a 35% tint for good visibility and serves as a light-duty option.
Please read all instructions carefully before proceeding with installation or use. Retain this manual for future reference.
2. Safety Information
Always prioritize safety during installation and operation. Failure to follow safety guidelines may result in injury or damage to the product or golf cart.
- Ensure the golf cart is parked on a level surface with the parking brake engaged before beginning installation.
- Wear appropriate personal protective equipment, such as gloves and eye protection, during installation.
- Handle the acrylic windshield with care to prevent scratches or damage.
- Do not operate the golf cart if the windshield is improperly installed or damaged.
- Regularly inspect the windshield and mounting hardware for any signs of wear, damage, or loosening.
3. Setup and Installation
The windshield is designed for quick and easy attachment to your existing golf cart windshield frame. All necessary installation hardware is included.
3.1. Pre-Installation Check
Important: Before removing the protective film from the windshield, perform a dry-fit to confirm accurate fitment on your Denago EV Rover XL golf cart. Once the protective film is removed, the windshield becomes ineligible for return or exchange.
- Unpack all components and verify that all parts are present: windshield panels, hinges, and mounting hardware (clips, screws).
- Carefully place the windshield panels onto your golf cart's existing windshield frame without removing the protective film.
- Confirm that the windshield aligns correctly with the frame and that the folding mechanism operates smoothly.
- If fitment is satisfactory, proceed to the next step. If not, contact customer support before removing the film.
3.2. Installation Steps
- Prepare the Windshield: Carefully remove the protective film from both sides of the acrylic windshield panels.
- Attach Hinges (if separate): If the windshield panels are not pre-hinged, align the hinge components between the upper and lower panels and secure them according to the hardware instructions.
- Position Windshield: Place the assembled windshield onto the golf cart's existing windshield frame. Ensure the bottom edge rests securely and the top edge aligns with the roof support.
- Secure Top Clips: Attach the provided clips to the top portion of the windshield, securing it to the front struts of the golf cart. Tighten screws firmly but do not overtighten to avoid cracking the acrylic.
- Install Bottom Grips/Clips: Install the bottom grips or clips that will hold the lower windshield panel when folded down. These typically attach to the golf cart's dashboard area or lower frame.
- Final Check: Verify that the windshield is securely mounted and does not vibrate. Test the folding mechanism to ensure smooth operation.

Figure 3.2.1: Windshield installed, showing folding points and hardware.

Figure 3.2.2: Detail of the top mounting clip.
4. Operating Instructions
The RED DOT Folding Tinted Golf Cart Windshield offers flexibility to adapt to various weather conditions.
4.1. Folding the Windshield Down
- Ensure the golf cart is stationary.
- Grasp the top edge of the upper windshield panel.
- Gently push the upper panel forward and down, allowing it to pivot on its hinge.
- Guide the upper panel until it rests securely against the lower panel, typically held in place by bottom grips or clips.
- Confirm the folded windshield is stable and does not obstruct your view or interfere with golf cart controls.
4.2. Raising the Windshield Up
- Ensure the golf cart is stationary.
- Release the upper panel from its bottom grips/clips.
- Gently lift the upper panel upwards until it is fully extended and aligns with the top mounting clips.
- Ensure the top clips secure the windshield to the front struts, preventing movement during operation.
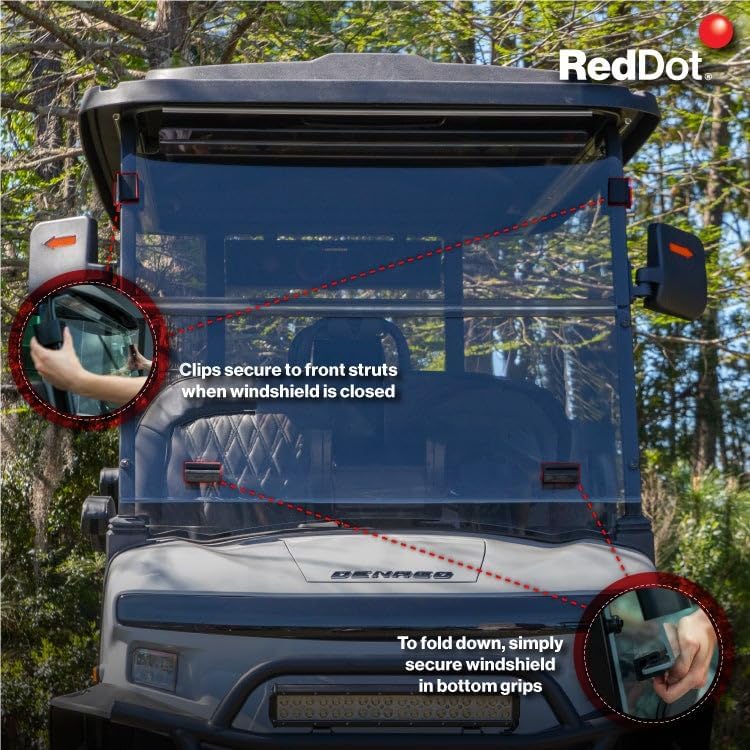
Figure 4.2.1: Demonstrating the folding and securing mechanism.
5. Maintenance
Proper care will extend the life and clarity of your acrylic windshield.
- Cleaning: Use only mild soap and water with a soft, non-abrasive cloth or sponge. Avoid harsh chemicals, ammonia-based cleaners (like window cleaner), or abrasive materials, as these can scratch or damage the acrylic. Rinse thoroughly with clean water.
- Drying: Air dry or gently blot with a clean, soft cloth. Do not wipe vigorously when dry, as this can cause static and attract dust.
- Inspection: Periodically check all mounting hardware for tightness. Retighten any loose screws or clips to maintain a snug, vibration-free fit. Inspect the acrylic for any cracks or significant scratches that might impair visibility.
6. Troubleshooting
| Problem | Possible Cause | Solution |
|---|---|---|
| Windshield does not fit correctly. | Incorrect model for golf cart; protective film removed before dry-fit. | Verify golf cart model compatibility. If protective film is still on, contact customer support. If removed, return/exchange may not be possible. |
| Windshield vibrates during operation. | Loose mounting hardware; improper installation. | Check all screws and clips. Tighten securely. Ensure windshield is properly seated in its frame. |
| Difficulty folding/unfolding. | Hinges are stiff; obstruction; improper alignment. | Ensure hinges are clean and free of debris. Check for any obstructions. Verify correct alignment of panels. |
| Scratches or cloudy appearance. | Improper cleaning agents or abrasive materials used. | Refer to the cleaning instructions in the Maintenance section. Minor scratches may be polished with specialized acrylic polish (not included). |
7. Specifications
- Model Number: 09-245
- Compatibility: Denago EV Rover XL Golf Carts
- Material: High-quality 3/16 inch (3.8 mm) thick acrylic
- Color: Tinted (35% tint rating)
- Type: Folding, hinged windshield
- Weight: Approximately 15 pounds
- Origin: Made in the U.S.A.

Figure 7.1: Acrylic thickness comparison (this product is 3/16 inch acrylic).
8. Warranty Information
This RED DOT Folding Tinted Golf Cart Windshield comes with a 90-day manufacturer's warranty. This warranty covers defects in materials and workmanship under normal use. It does not cover damage resulting from improper installation, misuse, neglect, accidents, or unauthorized modifications.
For warranty claims, please retain your proof of purchase and contact customer support.
9. Customer Support
If you have any questions regarding the installation, operation, or maintenance of your RED DOT Folding Tinted Golf Cart Windshield, please contact your retailer or the manufacturer's customer service department. Please have your product model number (09-245) and proof of purchase available when contacting support.