1. Introduction
This manual provides comprehensive instructions for the CallToU Caregiver Pager Wireless Call Button System, Model CC32WH. This system is designed to facilitate communication between caregivers and individuals requiring assistance, such as the elderly, bedridden, or those with limited mobility. Please read this manual thoroughly before operating the device to ensure proper function and safety.
2. Product Overview
The CallToU Caregiver Pager system consists of a portable USB receiver and two call buttons: one wrist-worn button and one waterproof pendant-style button. The system offers a reliable method for individuals to alert their caregiver with a simple press of a button.

Figure 2.1: Overview of the CallToU Caregiver Pager System components.
Key features include a 500-foot operating range in open areas, 18 selectable ringtones, vibration mode, multi-color LED indicators, and adjustable volume levels. The call buttons are designed for versatile placement, including wearing on the body or mounting on a wall.
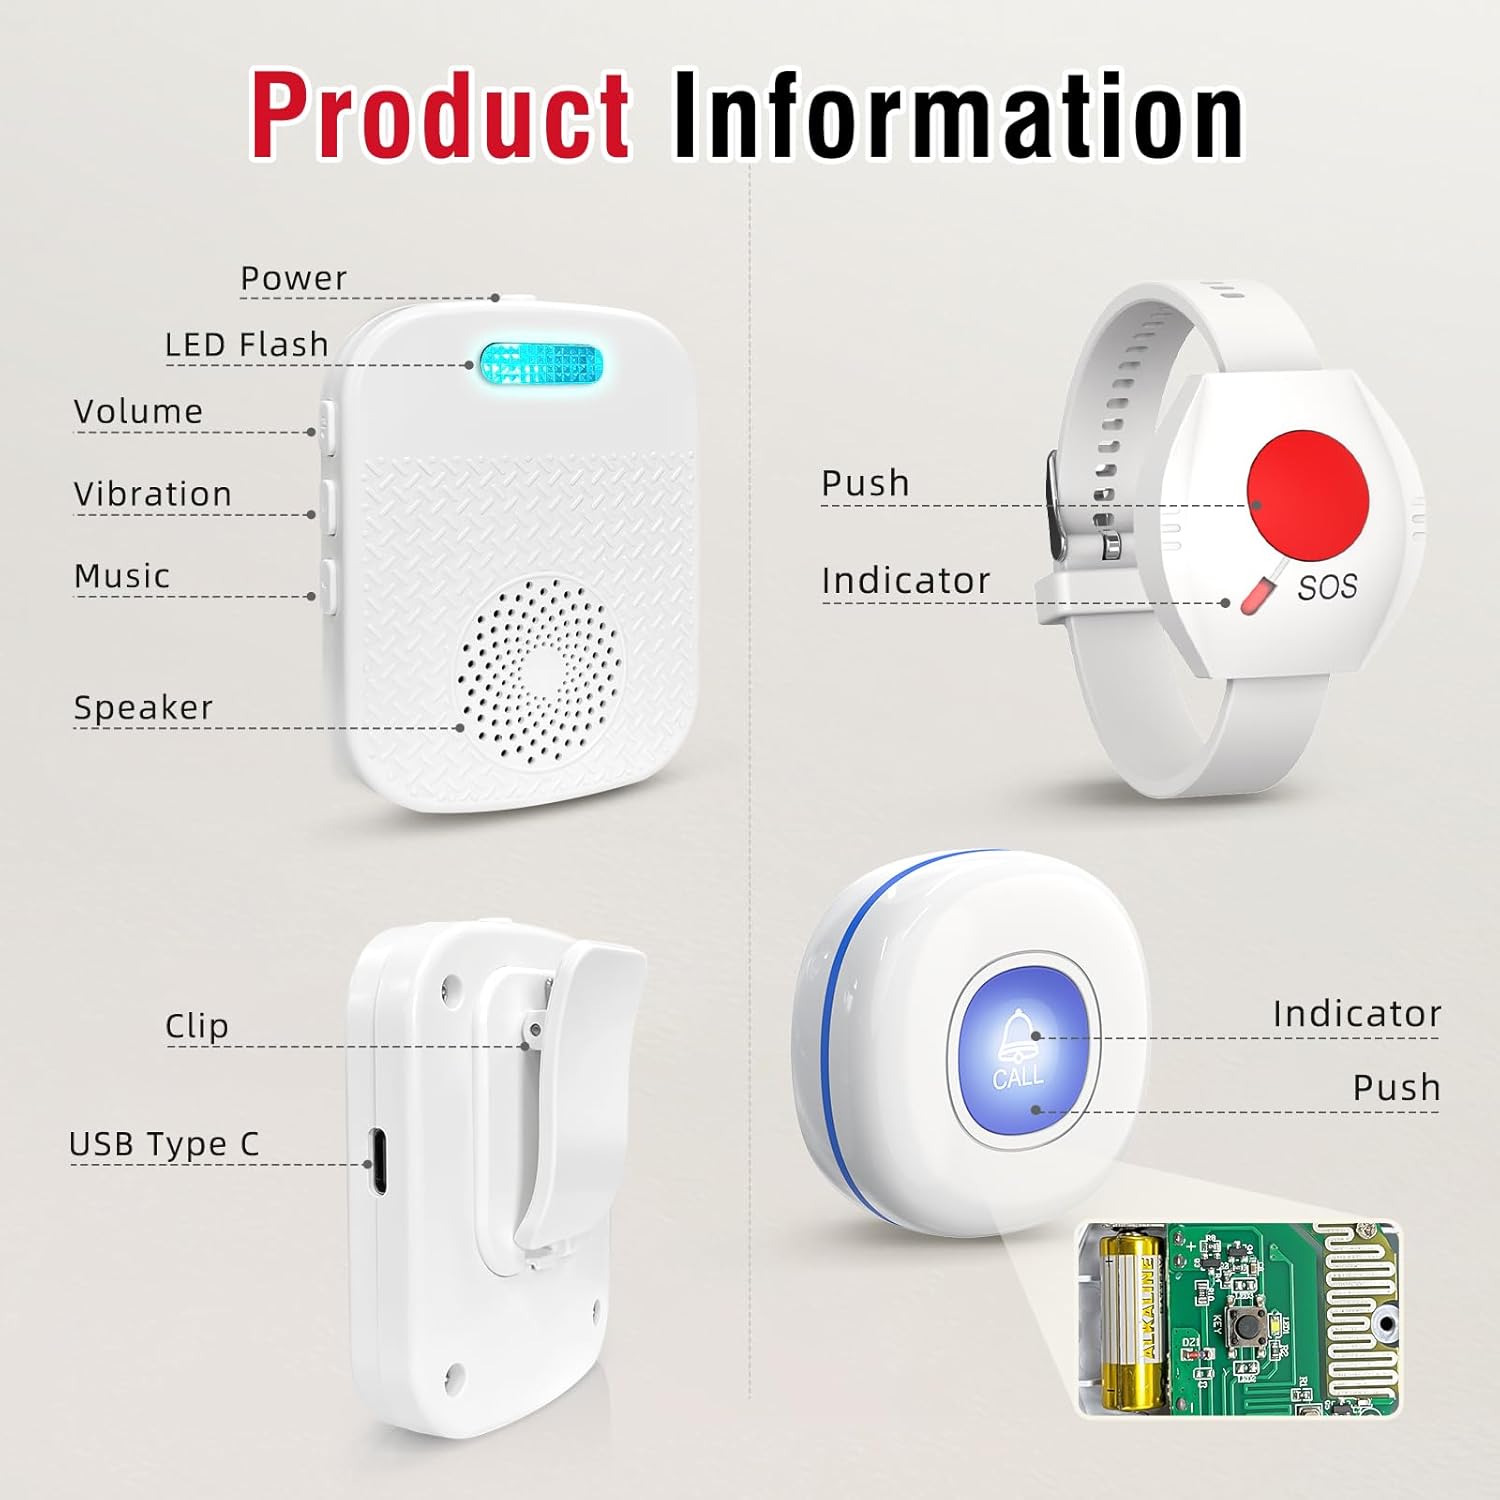
Figure 2.2: Labeled components of the CallToU Caregiver Pager System.
3. Package Contents
Verify that all items are present in your package:
- 1 x Portable USB Receiver
- 1 x Wrist Call Button (SOS)
- 1 x Waterproof Pendant Call Button (CALL)
- 1 x USB Charging Cable (for Receiver)
- 2 x 12V Alkaline Batteries (pre-installed in call buttons)
- 1 x Lanyard (for pendant call button)
4. Setup Instructions
4.1. Charging the Receiver
Before first use, fully charge the portable USB receiver. Connect the provided USB charging cable to the receiver's Type-C port and plug the other end into a standard USB power adapter (not included).

Figure 4.1: Charging the portable USB receiver.
A full charge typically takes 1.5 to 2 hours. The receiver has a standby time of approximately 30 days and can support up to 400 calls on a full charge. A low battery alert will sound as "Low Battery" when charging is needed.
4.2. Installing/Checking Call Button Batteries
The call buttons come with 12V alkaline batteries pre-installed. If replacement is needed, open the button casing carefully and insert a new 12V battery, ensuring correct polarity. A low battery alert for the call buttons will also be indicated by the receiver.
4.3. Powering On/Off the Receiver
Press and hold the 'On/Off' button located on the side of the receiver to power it on or off.
4.4. Pairing Call Buttons with the Receiver
The call buttons are typically pre-paired with the receiver. If re-pairing is necessary or if you are adding additional buttons, follow these steps:
- Step 1: Power on the receiver by pressing the 'On/Off' button.
- Step 2: Press the 'Ringtone' button on the receiver to select your desired alert sound.
- Step 3: Press and hold the 'Volume' button on the receiver until it emits a "di-di" sound and the LED indicator begins to flash. This indicates pairing mode.
- Step 4: Press the call button (either wrist or pendant) you wish to pair. The receiver will emit a "di-di" sound and its LED light will flash, confirming receipt of the signal.
- Step 5: Press the same call button again to confirm the pairing. The receiver should now ring with the selected ringtone.

Figure 4.2: Visual guide for pairing call buttons with the receiver.
5. Operating Instructions
5.1. Making a Call
To alert the caregiver, simply press the large button on either the wrist call button or the pendant call button. The receiver will activate its alert.
5.2. Receiver Alerts
Upon receiving a signal from a call button, the receiver will:
- Ring with the selected melody.
- Vibrate.
- Flash its multi-color LED indicator.
5.3. Adjusting Volume
The receiver offers 5 adjustable volume levels, ranging from 0 dB (mute) to 110 dB. Use the 'Volume' buttons on the side of the receiver to cycle through the levels.

Figure 5.1: Adjustable volume levels for the receiver.
5.4. Changing Ringtones
The receiver has 18 different ringtones. Press the 'Ringtone' button on the side of the receiver to cycle through the available melodies.
5.5. Mute Mode
For silent alerts, set the receiver to 0 dB volume. In this mode, the receiver will only vibrate and flash its LED indicator, which is useful for nighttime monitoring without disturbing others.

Figure 5.2: Receiver operating in mute mode.
5.6. Placement Options for Call Buttons
The call buttons are designed for flexible placement to suit user needs:
- Wrist Button: Worn like a watch for easy access.
- Pendant Button: Can be worn around the neck using the included lanyard or fixed to a wall near a bed, toilet, or shower.

Figure 5.3: Flexible placement options for call buttons.
5.7. Receiver Portability
The portable receiver features a back clip, allowing it to be easily attached to a belt or carried in a pocket. This ensures the caregiver can remain mobile while staying alert.

Figure 5.4: Receiver features including back clip and portability.
6. Maintenance
6.1. Cleaning
Wipe the devices with a soft, dry cloth. Do not use abrasive cleaners or immerse the receiver in water. The call buttons are IP55 dustproof and waterproof, meaning they can withstand splashes but should not be submerged.
6.2. Battery Replacement (Call Buttons)
When the receiver indicates a low battery alert for a call button, replace the 12V alkaline battery inside the respective button. Refer to Section 4.2 for guidance.
6.3. Charging (Receiver)
Regularly charge the receiver when the low battery alert is triggered to ensure continuous operation. Refer to Section 4.1 for charging instructions.
7. Troubleshooting
| Issue | Possible Cause | Solution |
|---|---|---|
| Receiver does not alert when button is pressed. | Buttons are not paired, receiver is off, or batteries are low. | Ensure receiver is powered on. Re-pair the call buttons (Section 4.4). Check and replace call button batteries. Charge the receiver. |
| Receiver volume is too low or silent. | Volume setting is too low or in mute mode. | Adjust the volume using the 'Volume' buttons on the receiver (Section 5.3). |
| Receiver constantly indicates "Low Battery". | Receiver battery is low or a fault in the battery/charging circuit. | Ensure the receiver is fully charged (Section 4.1). If the issue persists after charging, contact customer support. |
| Call button is difficult to press or unresponsive. | Button mechanism issue or internal fault. | Ensure the button is not obstructed. If unresponsive, contact customer support for assistance. |
| Limited wireless range. | Obstructions (thick walls, metal structures) or interference. | Relocate the receiver or call buttons to minimize obstructions. Avoid placing near large metal objects or other wireless devices. |
8. Specifications
| Feature | Detail |
|---|---|
| Model Number | CC32WH |
| Brand | CallToU |
| Power Source (Receiver) | Battery Powered (Rechargeable Lithium-Ion) |
| Receiver Battery Capacity | 3.7V/300MAH |
| Receiver Charging Port | Type-C USB |
| Receiver Charging Time | 1.5 - 2 hours |
| Receiver Standby Time | Up to 30 days |
| Call Button Battery Type | 12V Alkaline (included) |
| Wireless Range | Up to 500 feet (152m) in open area |
| Volume Levels | 5 levels (0 dB to 110 dB) |
| Ringtones | 18 options |
| Call Button Water Resistance | IP55 Dustproof and Waterproof |
| Control Method | Touch |
| Product Dimensions | 2.8"L x 2.4"W x 3"H (Receiver) |
| Item Weight | 6.7 ounces (Total package) |
9. Warranty and Support
CallToU products are designed for reliability and performance. For warranty information, technical support, or any questions regarding your device, please refer to the contact information provided with your purchase or visit the official CallToU website. Please retain your proof of purchase for warranty claims.


