1. Introduction
Thank you for choosing the VIRROW X5 Dash Cam. This advanced dual dash camera system is designed to provide comprehensive video surveillance for your vehicle, ensuring peace of mind during your drives and while parked. Featuring high-resolution 4K front and 2K rear recording, a responsive touchscreen, and smart app control, the X5 offers reliable performance and ease of use.
Please read this manual thoroughly before operating the device to ensure proper installation and functionality.
2. Package Contents
Verify that all items listed below are included in your package:
- Front and Rear Dash Cam
- 64GB Memory Card (pre-installed)
- Power Cable (22.97ft)
- Static Stickers (x2)
- Cable Clips (x5)
- Installation Tool
- User Manual

Figure 2.1: What's in the Box
3. Product Features
- 4K Front + 2K Rear Recording: Capture ultra-high-definition video from both the front and rear of your vehicle.
- Wide-Angle Lenses: 170° front and 165° rear wide-angle views minimize blind spots.
- 3.39" IPS Touchscreen: Intuitive touch controls for easy navigation, settings adjustment, and video playback.
- Super Night Vision: Equipped with SC2336 sensor, F1.8 aperture, and 6-layer lens system for clear recordings in low-light conditions.
- Built-in WiFi & APP Control: Connect to the dash cam via a dedicated app to view, download, and manage footage wirelessly.
- G-Sensor Collision Detection: Automatically detects sudden impacts and locks emergency footage to prevent overwriting.
- Seamless Loop Recording: Continuously records by overwriting the oldest unlocked files, ensuring constant protection.
- 24-Hour Parking Monitor: Monitors your vehicle for motion or impact while parked (requires hardwire kit, sold separately).
- Time-Lapse Recording: Condenses long parking surveillance periods into shorter videos for efficient review.

Figure 3.1: VIRROW X5 Feature Comparison

Figure 3.2: Front 4K + Rear 2K HD Recording

Figure 3.3: Starlight-Level Night Vision

Figure 3.4: Wide-Angle Views
4. Setup and Installation
Follow these steps for proper installation of your VIRROW X5 Dash Cam:
- Prepare the Windshield: Clean the area on your front and rear windshields where the cameras will be mounted. Ensure it is free of dust and grease.
- Mount the Front Camera: Attach the front dash cam to the front windshield, ideally behind the rearview mirror, ensuring it does not obstruct your view. Use the provided static stickers for easy removal and repositioning.
- Mount the Rear Camera: Attach the rear camera to the rear windshield.
- Route Rear Camera Wiring: Carefully route the rear camera cable along the roof seam and trim of your vehicle to the front dash cam. Use the included cable clips to secure the cable neatly.
- Connect Power Supply: Connect the power cable to the front dash cam and then plug the other end into your vehicle's cigarette lighter socket.
- Insert Memory Card: The 64GB memory card is pre-installed. If you need to replace it, ensure the dash cam is off before inserting or removing the card.

Figure 4.1: Easy and Quick Installation Diagram
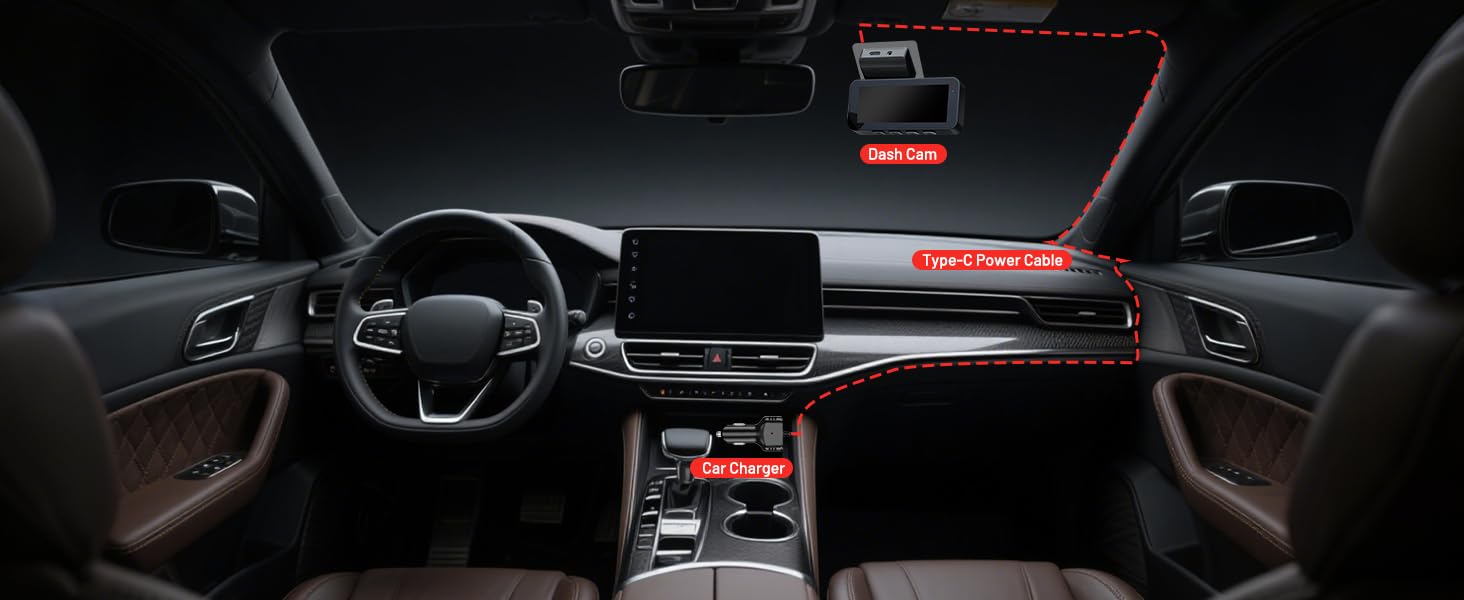
Figure 4.2: In-Car Installation Overview
5. Operating Instructions
5.1 Basic Operation
- Power On/Off: The dash cam will automatically power on and begin recording when your vehicle starts and power is supplied. It will power off automatically when the vehicle is turned off.
- Recording: Once powered on, the dash cam automatically starts loop recording. The recording indicator will be visible on the screen.
- Touchscreen Control: Use the 3.39-inch IPS touchscreen to navigate menus, adjust settings, and play back recorded videos.

Figure 5.1: Touchscreen Interface
5.2 App Control (WiFi Connection)
The VIRROW X5 features built-in WiFi for seamless control and video management via a smartphone app.
- Download the App: Search for the official VIRROW app on the Google Play Store or Apple App Store.
- Connect to WiFi: On the dash cam, enable WiFi. On your smartphone, connect to the dash cam's WiFi network (SSID and password will be displayed on the dash cam screen).
- Access Features: Once connected, you can:
- View live footage from both cameras.
- Adjust dash cam settings.
- Play back recorded videos.
- Download videos directly to your phone for sharing or evidence.
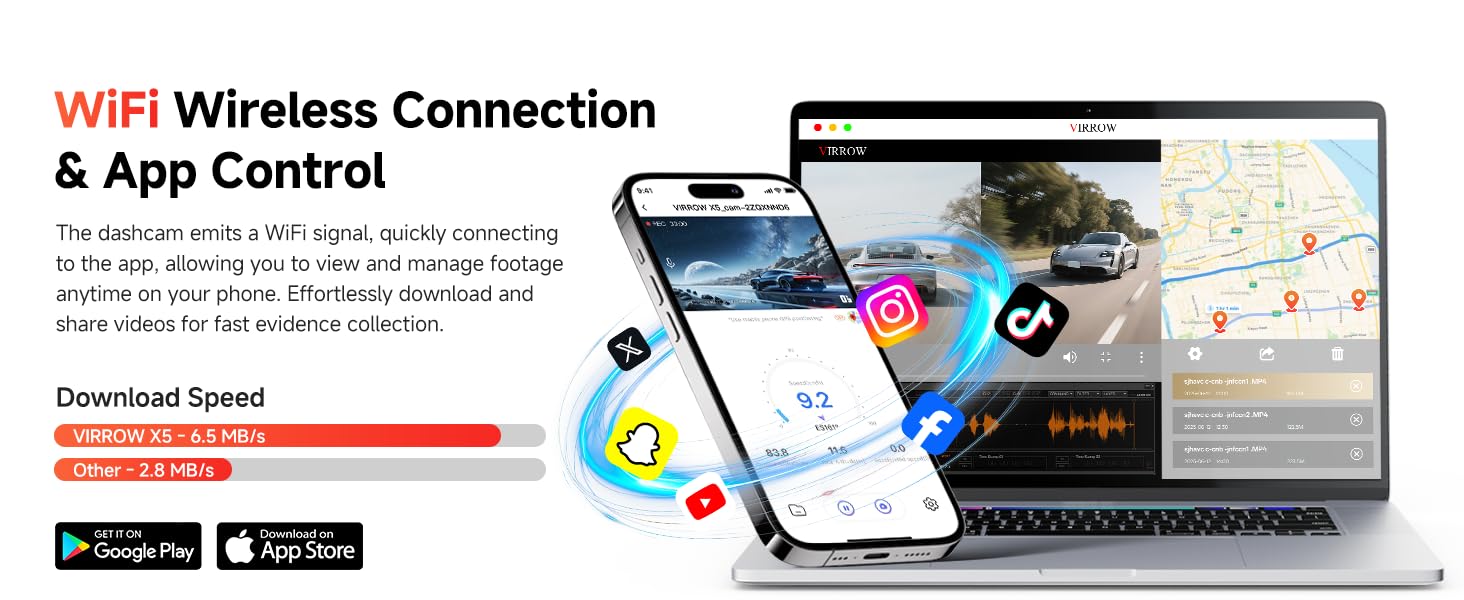
Figure 5.2: WiFi Wireless Connection & App Control
5.3 G-Sensor & Emergency Recording
The built-in G-sensor automatically detects sudden impacts or collisions. When triggered, it will lock the current video segment, preventing it from being overwritten by loop recording. This ensures critical evidence is preserved.

Figure 5.3: G-Sensor Collision Detection
5.4 Loop Recording
The dash cam records continuously in short segments (e.g., 1, 3, or 5 minutes). When the memory card is full, the oldest unlocked files are automatically overwritten to make space for new recordings. This ensures uninterrupted recording.

Figure 5.4: Smart Loop Recording
5.5 Parking Monitor & Time-Lapse
To enable 24-hour parking surveillance, a hardwire kit (ASIN: B0F8HJPVZP) is required and sold separately. Once installed, the dash cam can monitor your vehicle while parked. It can record time-lapse videos, condensing hours of footage into minutes, or trigger recording upon motion detection or impact.

Figure 5.5: 24-Hour Parking Monitor

Figure 5.6: Time-Lapse Recording
6. Maintenance
- Memory Card Formatting: It is recommended to format the memory card once a month to ensure optimal performance and prevent data corruption. This can be done through the dash cam's settings menu or via the app.
- Lens Cleaning: Regularly clean the camera lenses with a soft, lint-free cloth to ensure clear video quality. Avoid abrasive materials.
- Temperature Control: Avoid exposing the dash cam to extreme temperatures for prolonged periods. If parked in direct sunlight, consider removing the dash cam or using a sunshade.
- Firmware Updates: Check the VIRROW official website or app periodically for firmware updates to ensure your dash cam has the latest features and bug fixes.
7. Troubleshooting
If you encounter issues with your VIRROW X5 Dash Cam, refer to the following common problems and solutions:
| Problem | Possible Cause | Solution |
|---|---|---|
| Dash cam not powering on. | No power supply; faulty cable; loose connection. | Check power cable connection; try a different power source/cable; ensure vehicle's cigarette lighter socket is working. |
| Recording stops or freezes. | Memory card full/corrupted; low-quality memory card; firmware issue. | Format the memory card; use a high-speed (Class 10 or U3) memory card; update firmware. |
| Poor video quality. | Dirty lens; protective film still on lens; incorrect resolution settings. | Clean lenses; remove protective film; ensure resolution is set to 4K/2K. |
| WiFi connection issues. | Incorrect password; too far from dash cam; app issues. | Re-enter password; ensure close proximity; restart app/phone/dash cam. |
| G-sensor too sensitive/not sensitive enough. | G-sensor sensitivity setting. | Adjust G-sensor sensitivity in the settings menu (via touchscreen or app). |
If the problem persists, please contact VIRROW customer support for assistance.
8. Specifications
| Feature | Detail |
|---|---|
| Model Name | X5 |
| Product Dimensions | 1.41 x 3.62 x 2.19 inches |
| Item Weight | 15.5 ounces |
| Video Capture Resolution | Front: 2160p (4K), Rear: 1440p (2K) |
| Display | 3.39" IPS Touchscreen |
| Connectivity Technology | USB, Wi-Fi |
| Special Features | App Control, G-Sensor, Loop Recording, Night Vision, Parking Monitor |
| Mounting Type | Windshield Mount |
| Color | Black |
| Batteries | 1 Lithium Ion battery required |
9. Warranty and Support
VIRROW products are designed for reliability and performance. For specific warranty information, please refer to the warranty card included in your package or visit the official VIRROW website. If you require technical assistance or have questions about your VIRROW X5 Dash Cam, please contact VIRROW customer support through the contact information provided on the official website or your purchase platform.


