1. Introduction
Thank you for purchasing the Mesqool CR1028R RGB LED Digital Alarm Clock. This manual provides detailed instructions on how to set up, operate, and maintain your new alarm clock. Please read this manual thoroughly before use and keep it for future reference.
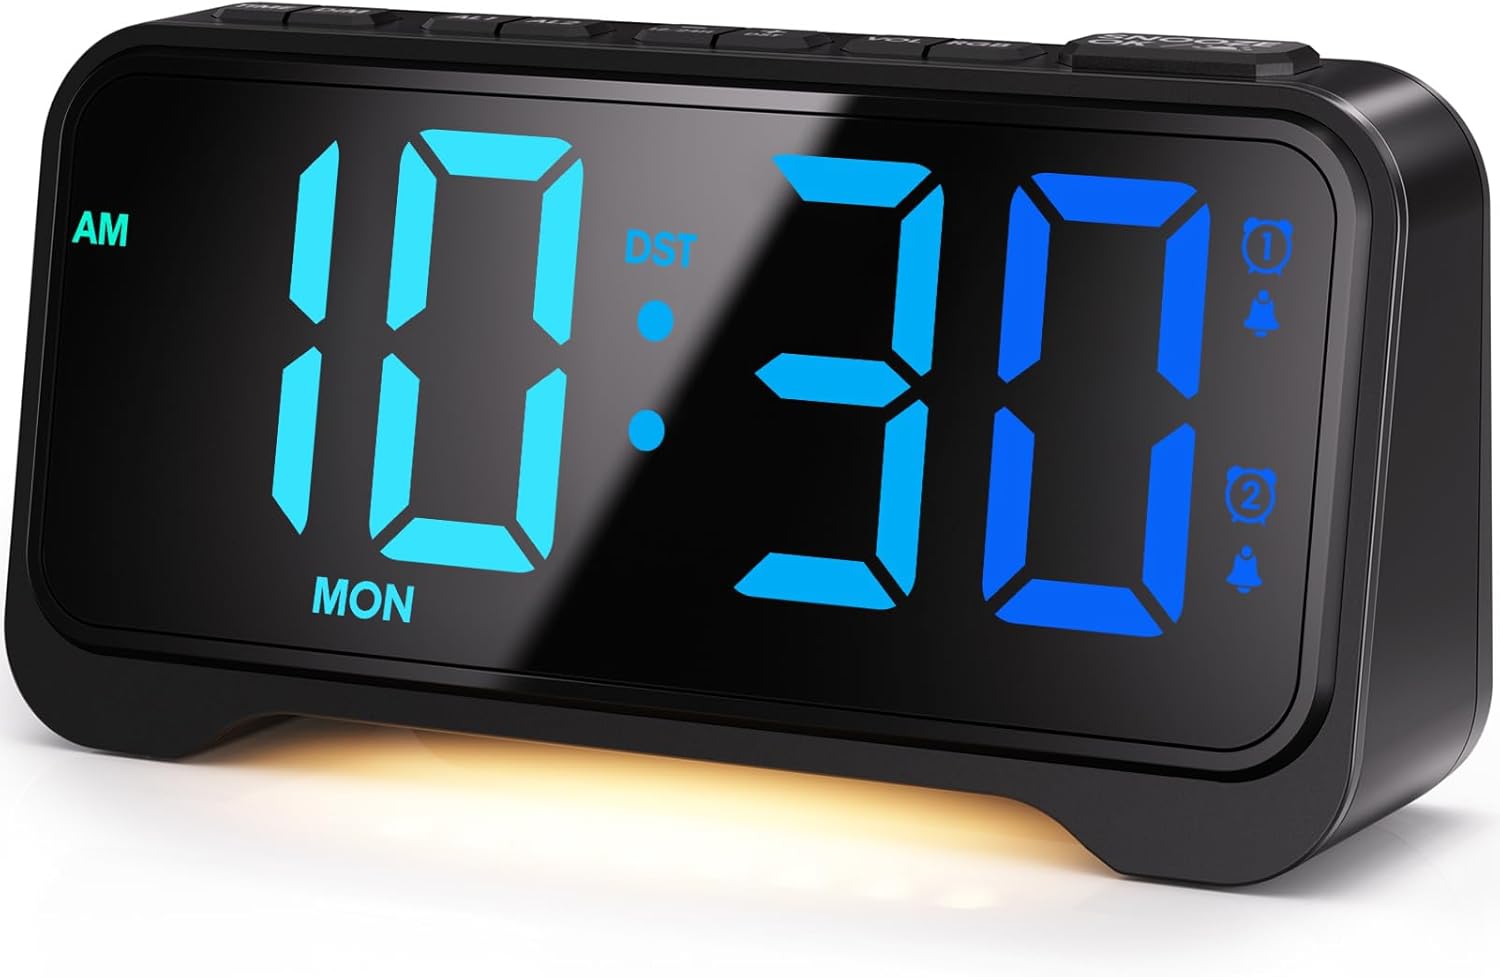
Figure 1: Mesqool CR1028R RGB LED Digital Alarm Clock
2. Product Overview
2.1 Key Features
- Wide Viewing Angle LED Display: High-quality LED screen with uniform light emission and excellent visibility from various angles.
- 10-Color Display Modes: Choose from 6 high-contrast single colors and 4 dynamic RGB changing colors.
- Dual Alarms: Set two independent alarms with flexible modes (weekdays, weekends, everyday).
- Enhanced Snooze Function: Up to 9 repetitions at 9-minute intervals.
- 7-Level Brightness Adjustment: Adjust screen brightness for optimal viewing in any lighting condition.
- Ambient Night Light: Soft, warm night light at the bottom with 3 adjustable brightness levels.
- Loud Volume: Alarm volume up to 116dB, with 5 adjustable levels (76-86-96-106-116dB).
- Thoughtful Button Design: Protruding buttons of different sizes for intuitive and easy operation, even in the dark.
- 12/24-Hour Format & DST: Easily switch between time formats and activate Daylight Saving Time.
- Dual USB Charging Ports: Includes Type-A and Type-C ports for charging external devices.
2.2 Package Contents
- Mesqool CR1028R RGB LED Digital Alarm Clock
- USB Power Cable
- USB Power Adapter
- User Manual

Figure 2: Package Contents and Product Dimensions
2.3 Product Diagram (Top & Rear View)
The alarm clock features intuitive button placement on the top for easy access and control. The rear panel houses essential ports and switches.
- Top Buttons: TIME SET, AL1, AL2, VOL, SNOOZE/DIMMER, DST, 12/24H, LIGHT, RGB.
- Rear Panel: USB-A Charging Port, USB-C Charging Port, DC IN (Power Input), Battery Compartment.

Figure 3: Rear View with USB Charging Ports
3. Setup
3.1 Power Connection
- Connect the provided USB power cable to the DC IN port on the back of the alarm clock.
- Plug the other end of the USB power cable into the USB power adapter.
- Insert the USB power adapter into a standard wall outlet. The display will light up.
3.2 Battery Backup (Not Included)
The alarm clock requires 2 AAA batteries (not included) for backup power. These batteries retain time and alarm settings during a power outage but will not power the display.
- Open the battery compartment cover on the back of the unit.
- Insert 2 new AAA batteries, ensuring correct polarity (+ and -).
- Close the battery compartment cover.
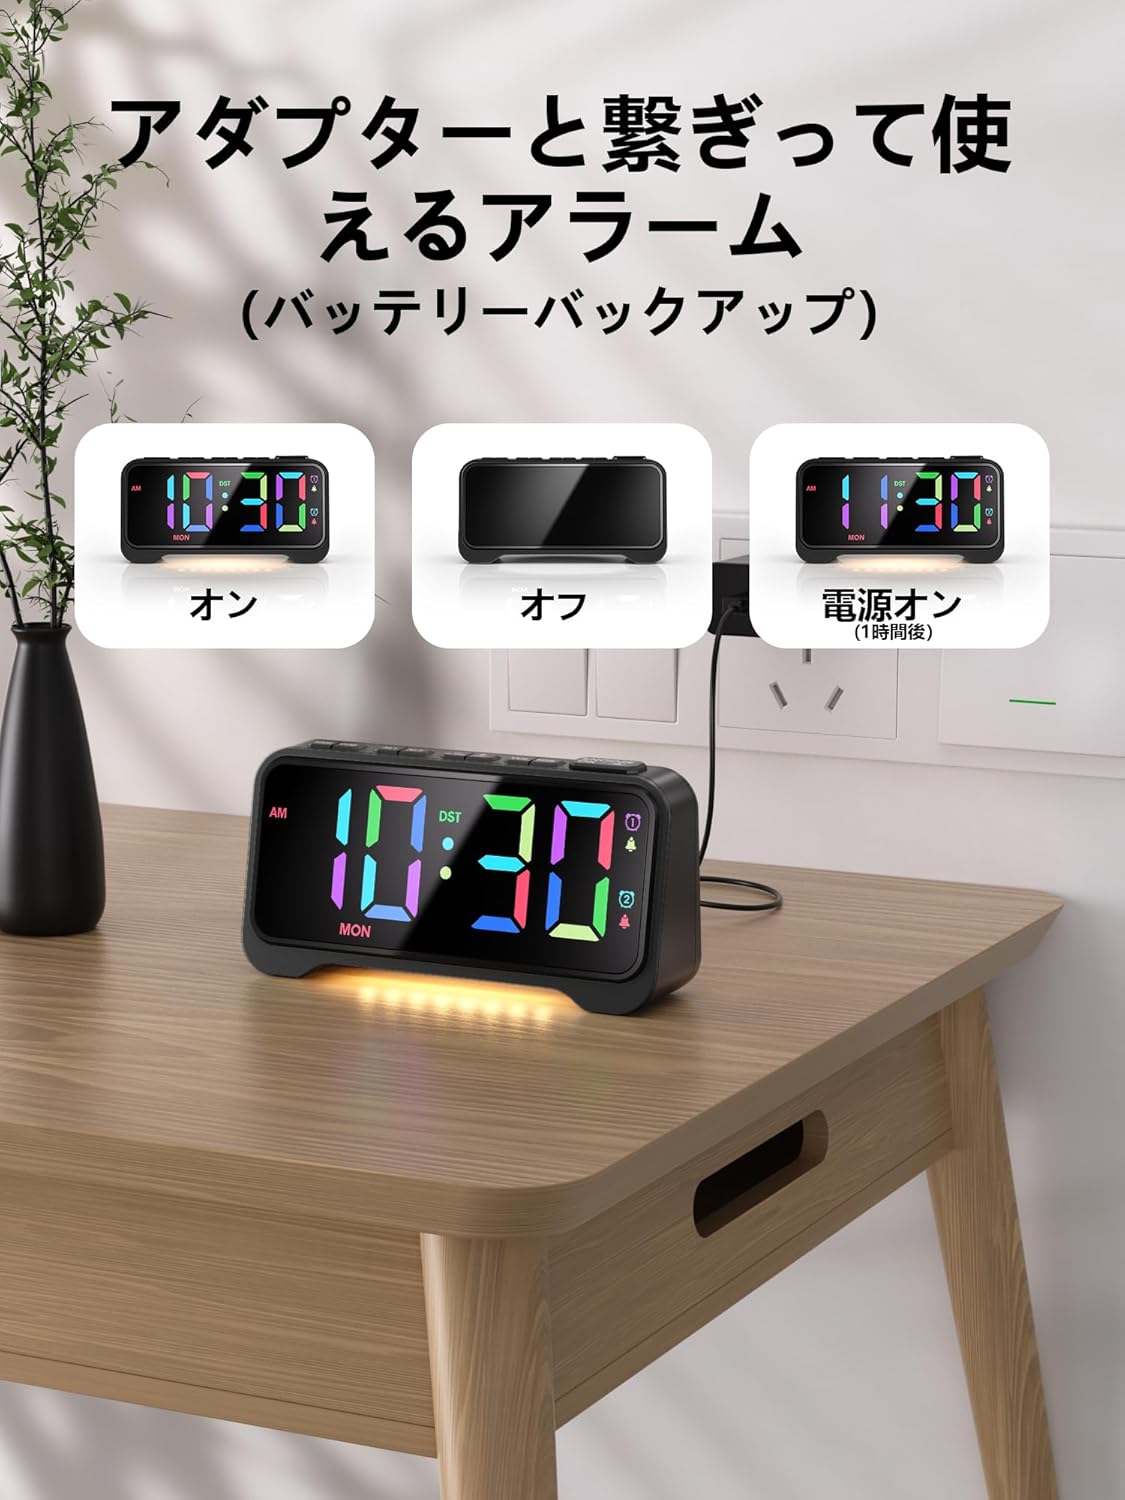
Figure 4: Power Connection and Battery Backup
4. Operating Instructions
4.1 Time Setting
- Press and hold the TIME SET button until the hour digits flash.
- Use the VOL+ or VOL- buttons to adjust the hour.
- Press TIME SET again, and the minute digits will flash.
- Use the VOL+ or VOL- buttons to adjust the minutes.
- Press TIME SET again to confirm and exit time setting mode.
4.2 12/24 Hour Format
Press the 12/24H button to switch between 12-hour (with AM/PM indicator) and 24-hour time formats.

Figure 5: 12/24 Hour Format and DST Display
4.3 Alarm Setting (AL1 / AL2)
This clock features two independent alarms (AL1 and AL2).
- Press and hold the AL1 (or AL2) button until the alarm hour digits flash.
- Use the VOL+ or VOL- buttons to adjust the alarm hour.
- Press AL1 (or AL2) again, and the alarm minute digits will flash.
- Use the VOL+ or VOL- buttons to adjust the alarm minutes.
- Press AL1 (or AL2) again to select the alarm mode: 1-5 (Weekdays), 6-7 (Weekends), or 1-7 (Everyday).
- Press AL1 (or AL2) again to confirm and exit alarm setting mode.
To activate/deactivate an alarm, short press the AL1 or AL2 button. An alarm icon will appear/disappear on the display.

Figure 6: Alarm Modes and Volume Adjustment
4.4 Snooze Function
When the alarm sounds, press the large SNOOZE/DIMMER button on top to activate snooze. The alarm will pause for 9 minutes and then sound again. This can be repeated up to 9 times.
To turn off the alarm completely, press any other button (e.g., AL1, AL2, TIME SET).

Figure 7: Dual Alarm and Snooze Operation
4.5 Display Brightness Adjustment
The display brightness can be adjusted to 7 levels. Short press the SNOOZE/DIMMER button to cycle through the brightness levels (L01 to L07).

Figure 8: 7-Level Display Brightness Adjustment
4.6 RGB Display Color Modes
The clock offers 10 display color modes: 6 static single colors and 4 dynamic RGB changing colors. Short press the RGB button to cycle through the available color modes.
- Static Colors: White, Green, Ice Blue, Blue, Red, Pink.
- Dynamic RGB Modes: RGB Random, RGB Flow Down, RGB Flow Right, RGB Change.
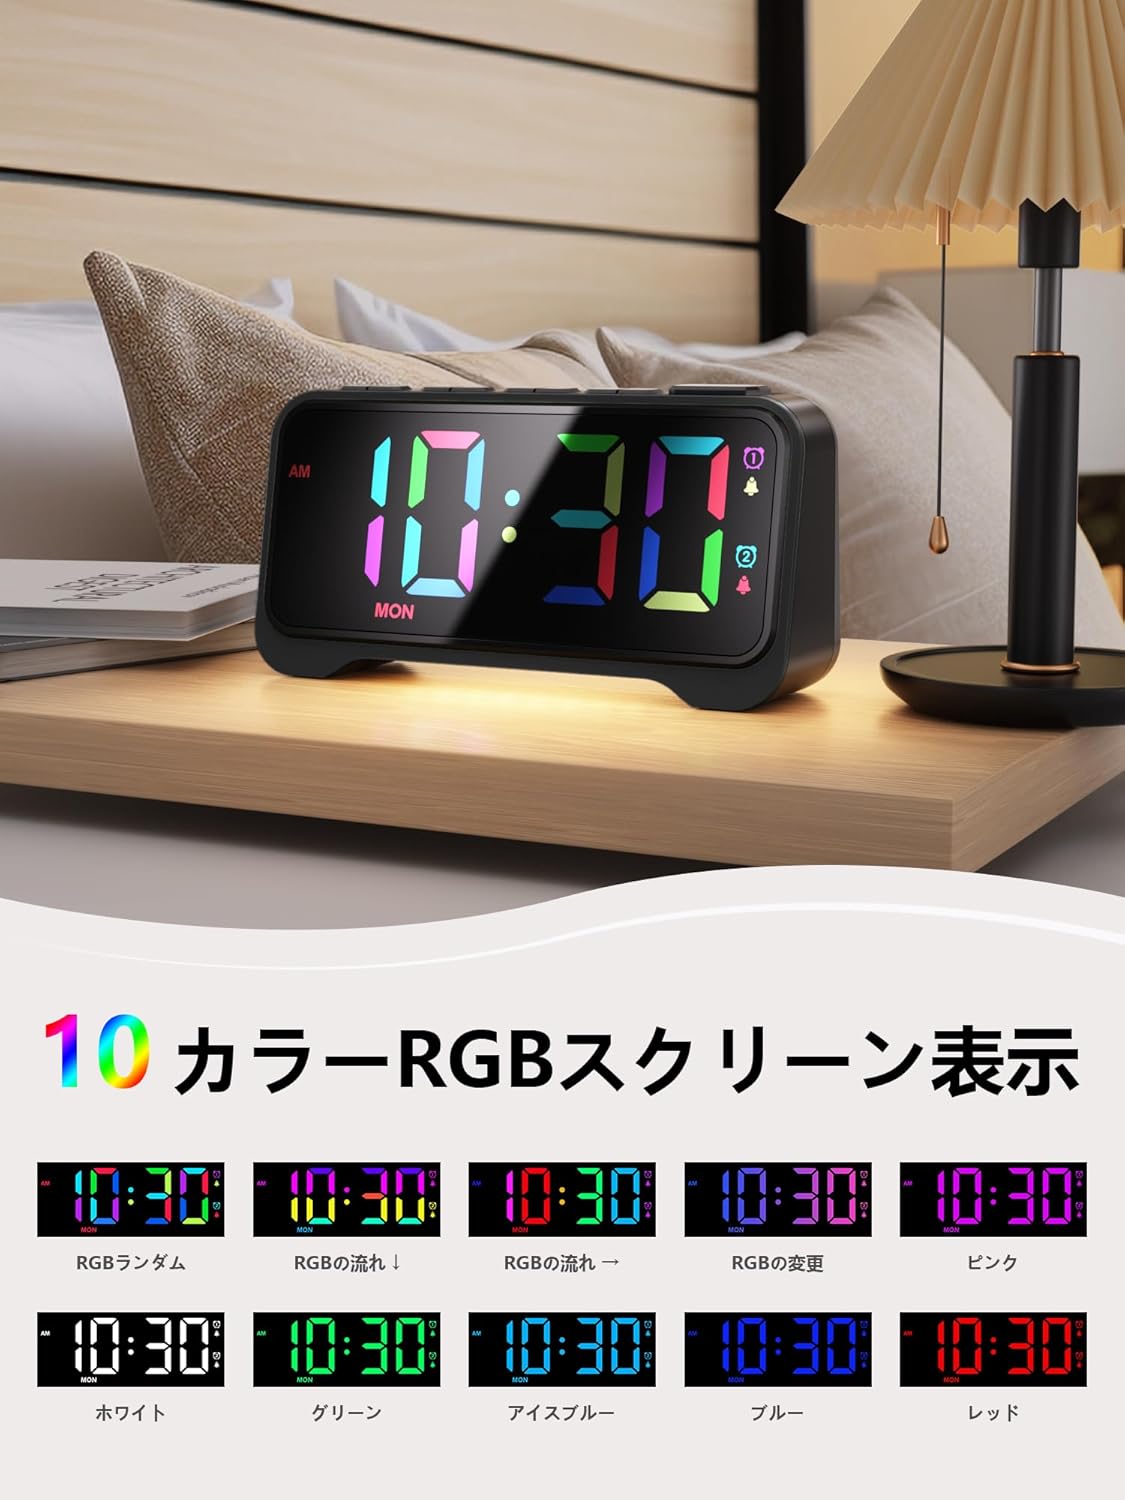
Figure 9: 10 Color RGB Screen Display Options
4.7 Night Light
The alarm clock features a soft, warm night light at its base. Short press the LIGHT button to cycle through 3 brightness levels (Low, Medium, Bright) or turn it off.

Figure 10: Warm Night Light with 3 Brightness Levels
4.8 Volume Adjustment
The alarm volume can be adjusted to 5 levels. Short press the VOL+ or VOL- buttons to cycle through the volume levels (76dB, 86dB, 96dB, 106dB, 116dB). Each press will play a sample of the alarm sound at the selected volume.
4.9 Daylight Saving Time (DST)
Press the DST button to activate or deactivate Daylight Saving Time. When activated, the time will adjust by one hour, and a 'DST' indicator will appear on the display.
4.10 USB Charging Ports
The alarm clock is equipped with a USB-A port and a USB-C port on the rear for charging external devices. These ports provide 5V/1A output. Connect your device's charging cable to the appropriate port.

Figure 11: Dual USB Charging Ports in Use
5. Maintenance
- Clean the clock with a soft, dry cloth. Do not use abrasive cleaners or solvents.
- Keep the clock away from direct sunlight, extreme temperatures, and high humidity.
- Ensure the ventilation openings on the back are not blocked.
- If not using the clock for an extended period, remove the backup batteries to prevent leakage.
6. Troubleshooting
| Problem | Possible Cause | Solution |
|---|---|---|
| Display is off / Clock not working. | No power connection or power outage. | Ensure the USB power cable is securely connected to a working power outlet. Check if there's a power outage. |
| Time/Alarm settings reset after power loss. | Backup batteries are not installed or are depleted. | Install 2 new AAA batteries in the battery compartment. |
| Alarm does not sound. | Alarm is not activated or volume is too low. | Press the AL1/AL2 button to activate the alarm (icon should appear). Adjust the volume using VOL+ button. |
| Display is too bright/dim. | Brightness level needs adjustment. | Short press the SNOOZE/DIMMER button to cycle through 7 brightness levels. |
| Night light is not working. | Night light is off or at lowest setting. | Short press the LIGHT button to cycle through 3 brightness levels or turn it on. |
7. Specifications
| Feature | Specification |
|---|---|
| Brand | Mesqool |
| Model Number | CR1028R |
| Color | Black |
| Product Dimensions | 16.9 cm (Width) x 4.4 cm (Height) |
| Package Dimensions | 21.6 x 9.4 x 5.7 cm |
| Package Weight | 0.3 Kilograms |
| Display Type | Digital LED |
| Power Source | Corded Electric |
| Battery Required | Yes (2 x AAA for backup, not included) |
| Alarm Function | Dual Alarms with Snooze |
| Special Features | RGB LED Display, Adjustable Brightness (7 levels), Adjustable Volume (5 levels), Night Light (3 levels), 12/24H Format, DST Function, Dual USB Charging Ports (Type-A & Type-C) |
8. Warranty and Support
Mesqool products are designed and manufactured to the highest quality standards. For any questions, technical support, or warranty claims, please contact Mesqool customer service through your purchase platform or the official Mesqool website. Please retain your proof of purchase for warranty purposes.


