
RADIOMASTER TX16S MKII MAX
Radiomaster TX16S MKII MAX Radio Control System Instruction Manual
Comprehensive instruction manual for the Radiomaster TX16S MKII MAX radio control system, covering setup, operation, maintenance, and specifications for optimal performance.
Product Overview
The Radiomaster TX16S Mark II MAX is an advanced radio control system designed for hobbyists and professionals. It features improved internal circuitry, optimized power supply, and enhanced ergonomics for a superior user experience. This manual provides essential information for setup, operation, and maintenance.
This video provides a general overview of the Radiomaster TX16S MKII V4.0 16CH Transmitter, highlighting its design and features.
Key Features
- Improved internal circuitry and optimized power supply.
- New charge circuitry with integrated reverse-polarity protection.
- Optimized charge IC now allows up to 2.2A internal USB-C charge current.
- Rear-mounted audio jack provided headphone output.
- V4.0 Gimbal improved centering and temperature stability (Same circuitry as AG01).
- Optional high/low rear grips are included for improved ergonomics.
- Improved S1/S2 knobs with clear center detents.
- Improved LS/RS Sliders with smoother feel and better center detents.
- Redesigned battery cover for improved battery access.
- Retooled body shell with improved fit and finish.
- Trainer socket changed to standard TRS 3.5mm socket.
- Rear DIY Socket added for personalized mods.
- Improved internal plastics for better longevity.
- Built-in ExpressLRS Backpack and 4in1 versions.
- Supports EdgeTX and OpenTX (EdgeTX is installed by default).
- AG01 Gimbals are fully CNC milled for ultimate precision with quad ball bearings for a smooth and precise feel. Featuring front-accessible tension and travel adjustment for easy fine-tuning.
- External Module Bay natively supports Team Black Sheep MicroTX modules in CRSFmode with LUA scripts. The internal 4-in-1 Multi-protocol module allows switching between internal RF and Crossfire via software.
Package Contents
Verify that all items listed below are included in your package:
- 1 * TX16S Mark II Max Radio Controller
- 1 * 18650 Tray
- 1 * USB-C Cable
- 1 * Screen Protector
- 1 pair of flat grips
Component Identification

Front view of the Radiomaster TX16S MKII MAX radio controller with labels indicating various components such as antenna, handle, S1/S2 dials, 6-position buttons, LS/RS slider pots, left and right gimbals, power LED, T1-T6 trim buttons, SYS button, RTN button, PAGE> button, PAGE< button, TELE button, MDL button, menu wheel, and 4.3-inch color screen.
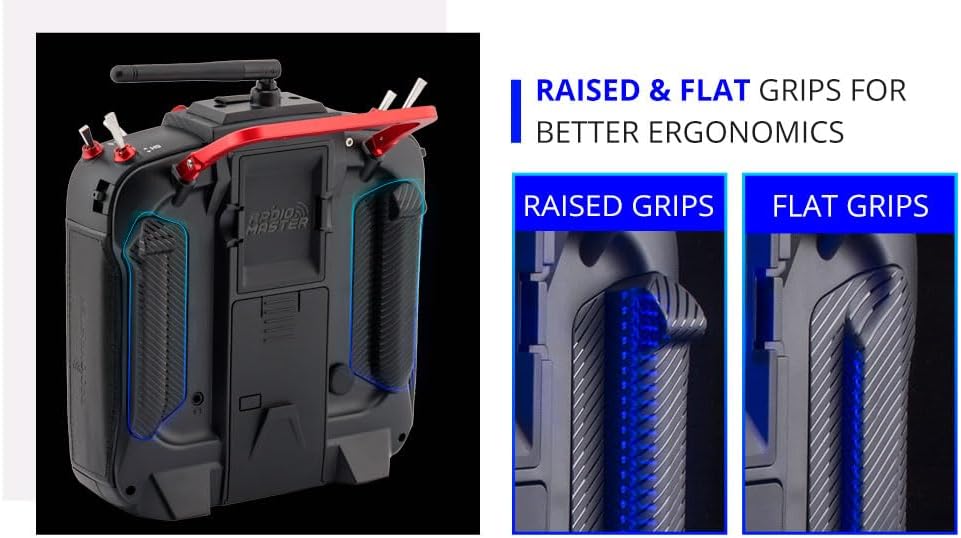
Rear view of the Radiomaster TX16S MKII MAX radio controller, highlighting the redesigned battery cover and the rear DIY socket.
Setup
1. Battery Installation
The TX16S Mark II MAX requires a 2S Li-ion battery (not included) or 18650 cells using the provided tray. Ensure correct polarity when installing batteries.
- Open the battery compartment cover on the rear of the transmitter.
- If using 18650 cells, insert them into the provided 18650 tray, observing correct polarity.
- Connect the battery's balance lead and main power lead to the corresponding ports inside the battery compartment.
- Carefully place the battery into the compartment and close the cover securely.
This video demonstrates the battery installation process for Radiomaster transmitters, including the TX16S MKII. It shows how to open the battery compartment, connect the battery, and secure the cover.
2. Initial Power On
Press and hold the power button until the screen illuminates. The transmitter will boot into the EdgeTX operating system.
3. Firmware and Software
The TX16S Mark II MAX comes pre-installed with EdgeTX. For updates or to switch to OpenTX, refer to the official Radiomaster website or the respective firmware project pages. Ensure you are using EdgeTX version 2.6.0 or OpenTX version 2.3.15 or later for full touch screen functionality.
Operating Instructions
1. Navigation and Controls
The transmitter features a 4.3-inch TFT full-color touch display for easy navigation. Use the menu wheel and dedicated buttons (SYS, RTN, PAGE<, PAGE>, TELE, MDL) to access and adjust settings. The S1/S2 knobs and LS/RS sliders provide additional control inputs.
2. Gimbal Adjustment
The AG01 CNC Hall Gimbals allow for tension and travel adjustment without disassembly. Refer to the detailed instructions on the Radiomaster website or the EdgeTX/OpenTX documentation for precise adjustment procedures.

A close-up view of the AG01 CNC Hall Gimbals, illustrating the precision engineering and accessible adjustment points for tension and travel.
3. External Module Bay
The JR compatible module bay supports external modules like Team Black Sheep MicroTX. The internal 4-in-1 multi-protocol module allows switching between internal RF and Crossfire via software, eliminating the need for physical module swapping.
4. Charging
Connect the included USB-C cable to the transmitter's USB-C port and a suitable power source. The optimized charge IC supports up to 2.2A internal USB-C charge current. The internal circuitry includes reverse-polarity protection.
Maintenance
- Keep the transmitter clean and free from dust and debris. Use a soft, dry cloth for cleaning.
- Avoid exposing the transmitter to extreme temperatures, moisture, or direct sunlight for prolonged periods.
- Regularly check all switches, gimbals, and buttons for proper function.
- Ensure the antenna is securely attached and not damaged.
- Store the transmitter in a safe place when not in use, preferably in a protective case.
Troubleshooting
1. Transmitter Not Powering On
- Check battery charge level.
- Ensure battery is correctly installed with proper polarity.
- Verify battery connections are secure.
2. Display Issues
- If the screen is unresponsive, try restarting the transmitter.
- Ensure the firmware is up to date.
3. Control Input Problems
- Calibrate gimbals and switches through the EdgeTX/OpenTX menu.
- Inspect gimbals and switches for any physical obstructions or damage.
For more detailed troubleshooting, consult the comprehensive EdgeTX or OpenTX documentation available online, or visit the Radiomaster support page.
Specifications
| Item | TX16S Mark II Max |
| Size | 287x129x184mm |
| Weight | 750g (without battery) |
| Transmission Frequency | 2.400GHz-2.480GHz |
| Transmitter Module | Option 1: Internal 4-in-1 multi-protocol module (CC2500 CYRF6936 A7105 NRF2401); Option 2: Internal ELRS (SX1280) |
| SD Card | 256MB by default, 8GB maximum |
| Antenna Gain | 2db (transmit power adjustable) |
| Working Current | 400mA |
| Working Voltage | 6.6-8.4v DC |
| Radio Firmware | EdgeTX |
| Module Firmware | Multiprotocol-Module (4IN1) OR ExpressLRS (ELRS) |
| Channels | Up to 16 channels (depending on the receiver) |
| Display | 4.3-inch TFT full-colour touch display with a resolution of 480 * 272 |
| Gimbal | AG01 CNC Hall sensor |
| Module Bay | JR compatible module bay |
| Upgrade Method | Supports USB-C online / SD card offline upgrade |
Safety Information
Always operate your radio control system responsibly and in accordance with local regulations. Ensure you understand the full capabilities and limitations of your equipment before use. Never operate your RC model in unsafe conditions or near people, animals, or property that could be damaged.
This product is recommended for users aged 18 years and up.
Warranty and Support
For warranty information, technical support, and additional resources, please visit the official Radiomaster website or contact your retailer. Keep your proof of purchase for warranty claims.
You can find more information and products from Radiomaster at their official Amazon store: Radiomaster Amazon Store.
Related documentsTX16S MKII MAX


Ask a question about this manual
Ask about setup, troubleshooting, compatibility, parts, safety, or missing instructions. Manuals+ will review the question and use this page’s manual context to help answer it.