1. Introduction
This manual provides detailed instructions for the setup, operation, and maintenance of your Radiomaster TX16S MKII MAX Radio Control System. Please read this manual thoroughly before using the device to ensure proper function and safety. The TX16S MKII MAX is a versatile radio controller featuring advanced gimbals, a color touch display, and support for multiple protocols, including 4-in-1 and ExpressLRS.
2. Safety Information
Always operate the radio controller responsibly and in accordance with local regulations. Failure to do so may result in damage to property or injury. Ensure all connections are secure and batteries are correctly installed before operation. Keep the device away from water, extreme temperatures, and direct sunlight. Do not attempt to disassemble or modify the radio controller beyond the instructions provided in this manual.
3. Product Overview
The Radiomaster TX16S MKII MAX is a high-performance radio control system designed for precision and reliability. It features a robust design with ergonomic enhancements and advanced internal components.
3.1 Key Components
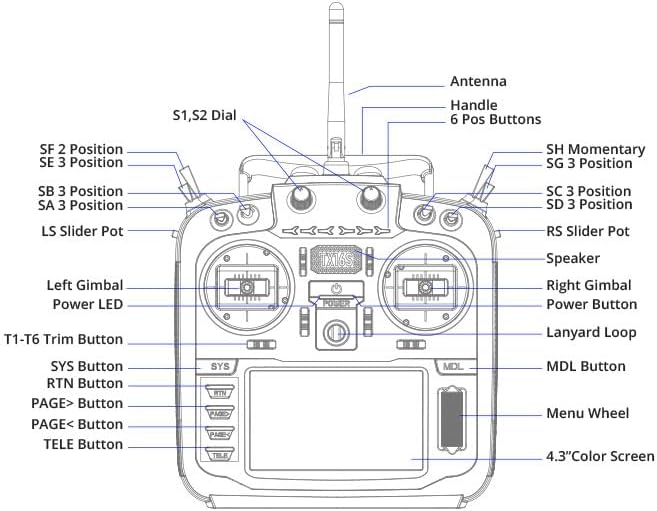
Refer to the diagram below for an overview of the radio controller's main components and controls.

Figure 1: Labeled diagram of the Radiomaster TX16S MKII MAX radio controller, showing the antenna, handle, 6-position buttons, S1/S2 dials, SH/SG/SC/SD switches, LS/RS slider pots, left and right gimbals, power LED, T1-T6 trim buttons, SYS button, MDL button, PAGE> button, PAGE< button, RTN button, TELE button, power button, lanyard loop, speaker, menu wheel, and 4.3-inch color screen.

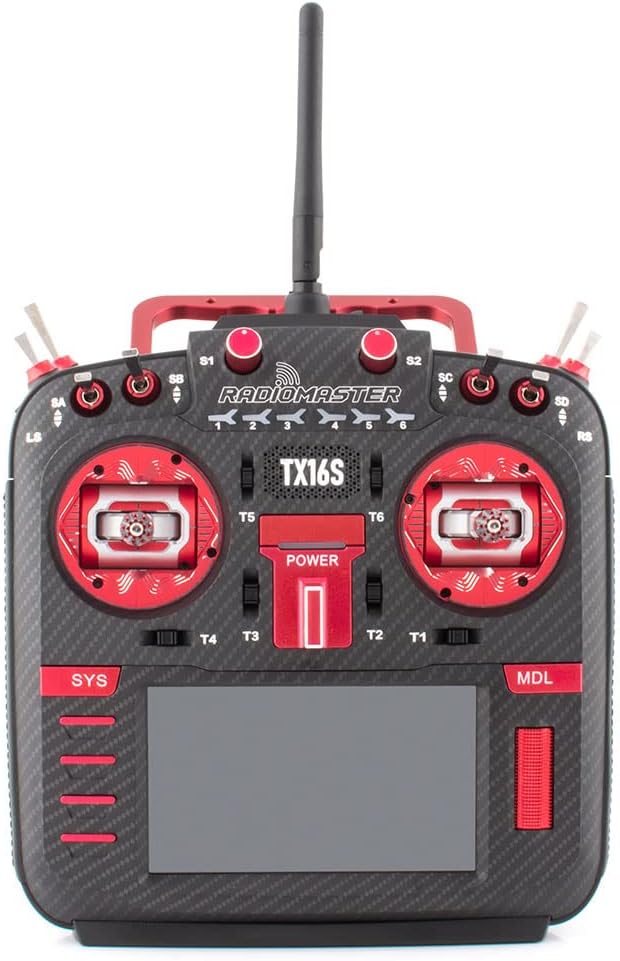
Figure 2: Front view of the Radiomaster TX16S MKII MAX radio controller, showcasing its carbon-look faceplate, red CNC accents, AG01 Hall Gimbals, and central power button.
4. Setup
4.1 Battery Installation and Charging
- Open the redesigned battery cover located on the rear of the radio controller.
- Insert two 18650 batteries into the provided 18650 tray, ensuring correct polarity.
- Place the battery tray with batteries into the battery compartment and close the cover securely.
- Connect the supplied USB-C cable to the radio controller's USB-C port and to a suitable USB power source for charging. The optimized charge IC supports up to 2.2A internal USB-C charge current.
4.2 Initial Power On and Firmware
The TX16S MKII MAX comes with EdgeTX firmware installed by default. The touch screen functionality requires EdgeTX version 2.6.0 or OpenTX version 2.3.15 or later.
- Press and hold the power button until the display illuminates.
- Follow any on-screen prompts for initial setup, such as language selection and calibration.
- To update firmware, connect the radio via USB-C to a computer or use an SD card for offline upgrades. Refer to the official EdgeTX or OpenTX documentation for detailed firmware update procedures.
5. Operating Instructions
5.1 Gimbals and Controls
The TX16S MKII MAX features AG01 CNC Hall Gimbals for precise control. These gimbals are fully CNC milled with quad ball bearings, offering smooth and accurate movement. Tension and travel adjustments are accessible from the front for fine-tuning.

Figure 3: Image comparing the V4.0 Hall Gimbals and the AG01 CNC Hall Gimbals, highlighting their maximum deflection angles and precision engineering.
- Gimbals: Control primary flight surfaces or vehicle movement.
- S1/S2 Knobs: Improved design with clear center detents for tactile feedback.
- LS/RS Sliders: Offer smoother feel and better center detents for auxiliary functions.
- Switches (SA, SB, SC, SD, SF, SH): Configurable for various functions, including 2-position and 3-position switches, and a momentary switch (SH).
- Trim Buttons (T1-T6): Used for fine-tuning channel outputs.
5.2 Display and Navigation
The radio controller is equipped with a 4.3-inch TFT full-color touch display with a resolution of 480x272 pixels, enabling easy programming and navigation.

Figure 4: Image illustrating the improved S1/S2 knobs with center detents and the 4.3-inch IPS color display, demonstrating its touch functionality for programming.
- Touch Screen: Navigate menus and adjust settings directly on the display.
- Menu Wheel: Provides an alternative method for menu navigation and selection.
- SYS Button: Accesses system settings.
- MDL Button: Accesses model settings.
- PAGE> / PAGE< Buttons: Navigate between pages within menus.
- RTN Button: Returns to the previous screen or cancels an action.
- TELE Button: Accesses telemetry data.
5.3 External Module Bay
The TX16S MKII MAX includes a JR compatible external module bay, allowing for the use of various external RF modules. It natively supports Team Black Sheep MicroTX modules in CRSFmode with LUA scripts.

Figure 5: Image showing the rear of the Radiomaster TX16S MKII MAX, highlighting the external module bay compatible with modules like TBS Crossfire.
The internal 4-in-1 Multi-protocol module allows you to keep an external module installed and switch between internal RF and external modules via software, eliminating the need for physical module swapping.
6. Features
- Internal Circuitry: Improved and optimized power supply for enhanced performance.
- Charging: New charge circuitry with integrated reverse-polarity protection and optimized charge IC supporting up to 2.2A internal USB-C charge current.
- Audio Output: Rear-mounted audio jack for headphone output.
- Gimbals: Equipped with AG01 CNC Hall Gimbals for ultimate precision, featuring front-accessible tension and travel adjustment.
- Ergonomics: Includes optional high/low rear grips for improved comfort.
- Knobs & Sliders: Improved S1/S2 knobs with clear center detents and LS/RS sliders with smoother feel and better center detents.
- Battery Access: Redesigned battery cover for improved battery access.
- Construction: Retooled body shell with improved fit and finish, and improved internal plastics for better longevity.
- Trainer Socket: Changed to standard TRS 3.5mm socket.
- DIY Socket: Rear DIY Socket added for personalized modifications.
- Module Options: Available with built-in ExpressLRS or 4-in-1 multi-protocol internal modules.
7. Specifications
| Item | Specification |
|---|---|
| Model | TX16S Mark II Max |
| Size | 287 x 129 x 184mm |
| Weight | 750g (without battery) |
| Transmission Frequency | 2.400GHz-2.480GHz |
| Transmitter Module Options | Internal 4-in-1 multi-protocol (CC2500 CYRF6936 A7105 NRF2401) OR Internal ELRS (SX1280) |
| SD Card | 256MB (default), 8GB (maximum) |
| Antenna Gain | 2db (transmit power adjustable) |
| Working Current | 400mA |
| Working Voltage | 6.6-8.4V DC |
| Radio Firmware | EdgeTX (default) |
| Module Firmware | Multiprotocol-Module (4IN1) OR ExpressLRS (ELRS) |
| Channels | Up to 16 channels (depending on receiver) |
| Display | 4.3-inch TFT full-color touch display, 480 x 272 resolution |
| Gimbal Options | V4.0 Hall sensor with Aluminium fascia OR AG01 CNC Hall sensor |
| Module Bay | JR compatible |
| Upgrade Method | USB-C online / SD card offline |
8. Maintenance
- Cleaning: Use a soft, dry cloth to clean the radio controller. Avoid using harsh chemicals or solvents.
- Storage: Store the radio controller in a cool, dry place away from direct sunlight and extreme temperatures.
- Battery Care: If storing for extended periods, remove batteries or ensure they are charged to a storage voltage as recommended by the battery manufacturer.
- Firmware Updates: Regularly check for and install firmware updates to ensure optimal performance and access to new features.
9. Troubleshooting
This section addresses common issues you might encounter with your Radiomaster TX16S MKII MAX. For more detailed troubleshooting, refer to the official EdgeTX/OpenTX documentation or online community forums.
- Radio Not Powering On: Ensure batteries are correctly installed and charged. Check the battery compartment for any loose connections.
- Display Not Responding: If the touch screen is unresponsive, try restarting the radio. Ensure the firmware version supports touch screen functionality.
- Controls Unresponsive: Verify that the radio is bound to the receiver and that the correct model is selected. Check for any physical obstructions to gimbals or switches.
- Firmware Update Issues: Ensure a stable USB connection or a properly formatted SD card is used. Follow firmware update instructions precisely.
10. What's in the Box
The following items are included with your Radiomaster TX16S MKII MAX Radio Control System:
- 1 x TX16S Mark II Max Radio Controller
- 1 x 18650 Tray
- 1 x USB-C Cable
- 1 x Screen Protector
- 1 pair of flat grips
11. Warranty and Support
For warranty information and technical support, please refer to the official Radiomaster website or contact your authorized dealer. Keep your proof of purchase for warranty claims.


