
1. Introduction
This manual provides comprehensive instructions for the installation, operation, and maintenance of your FalconEye Electronics Pinnacle Mini 4K Dash Cam with GPS. Please read this manual thoroughly before using the device to ensure proper functionality and to maximize its performance.
2. Package Contents
Verify that all items listed below are present in your package:
- FalconEye Electronics Pinnacle Mini 4K Dash Cam
- Car Charger
- 128GB Micro SD Card (if purchased with this variant)
- Mounting Bracket

Image: Contents of the FalconEye Pinnacle Mini 4K Dash Cam package, including the dash cam, car charger, and a Micro SD card.
3. Product Overview
The FalconEye Electronics Pinnacle Mini 4K Dash Cam is designed to record high-quality video footage of your journeys. Key features include 4K Ultra HD recording, a 170-degree wide-angle view, built-in GPS, G-Sensor, Wi-Fi connectivity, and enhanced night vision.
3.1 Device Components
- 4K Ultra HD Lens: Captures video at 2160p@30fps with a 170-degree field of view.
- 2" IPS Screen: For live view, playback, and menu navigation.
- GPS Module: Records vehicle speed and location data.
- G-Sensor: Automatically detects impacts and locks video files.
- Wi-Fi Module: Enables connection to a smartphone app for control and file transfer.
- Micro SD Card Slot: Supports up to 256GB for continuous loop recording.
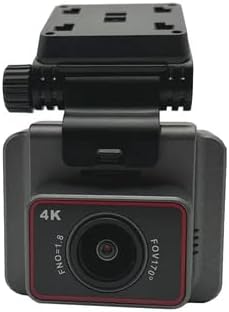
Image: Front view of the dash cam, showing the 4K lens and FOV 170° marking.

Image: Rear view of the dash cam, displaying the 2-inch IPS screen.

Image: Side view of the dash cam, showing the adjustable mounting bracket.
4. Setup and Installation
4.1 Inserting the Micro SD Card
- Ensure the dash cam is powered off.
- Locate the Micro SD card slot on the side of the device.
- Insert the Micro SD card (up to 256GB, Class 10 or higher recommended) into the slot until it clicks into place.
- To remove, gently push the card in until it springs out.
4.2 Mounting the Dash Cam
- Clean the windshield area where you intend to mount the dash cam.
- Attach the mounting bracket to the dash cam.
- Secure the dash cam with its bracket to the windshield, ensuring it does not obstruct your view.
- Adjust the camera angle to capture the road ahead clearly.
4.3 Power Connection
- Connect the car charger to the dash cam's power input port.
- Plug the other end of the car charger into your vehicle's 12V power outlet (cigarette lighter socket).
- The dash cam will typically power on automatically when the vehicle starts and power off when the vehicle is turned off.
5. Operating Instructions
5.1 Basic Recording
Once powered on, the dash cam will automatically begin continuous loop recording. Video files are saved to the Micro SD card. When the card is full, the oldest unprotected files will be overwritten.
5.2 GPS Functionality
The built-in GPS module records your vehicle's speed and location data, embedding this information into the video files. This data can be viewed during playback using compatible software on a computer or via the smartphone app.
- Disabling GPS: If you wish to disable GPS recording, navigate to the settings menu on the dash cam and turn off the GPS option.
5.3 G-Sensor (Emergency Recording)
The G-Sensor detects sudden impacts, hard braking, or collisions. When triggered, it automatically locks the current video file, preventing it from being overwritten by loop recording. These emergency files are stored in a separate folder on the Micro SD card.
5.4 Wi-Fi and Smartphone App Control
The dash cam features built-in Wi-Fi, allowing you to connect it to your smartphone via a dedicated app (available for Apple and Android devices). This app enables:
- Live view of the camera feed.
- Playback and download of recorded videos.
- Adjustment of dash cam settings.
Refer to the app's instructions for detailed connection and usage procedures.
Image: The dash cam's screen showing a live view of the road, indicating active recording.
6. Maintenance
6.1 Cleaning the Device
- Use a soft, dry cloth to clean the dash cam body.
- For the lens, use a specialized lens cleaning cloth and solution to avoid scratches.
- Do not use abrasive cleaners or solvents.
6.2 Micro SD Card Management
- Regularly format the Micro SD card (e.g., once a month) within the dash cam's settings to ensure optimal performance and prevent data corruption.
- Back up any important video files to a computer or cloud storage before formatting.
7. Troubleshooting
| Problem | Possible Cause / Solution |
|---|---|
| Dash cam does not power on. |
|
| Recording stops or freezes. |
|
| GPS not recording location/speed. |
|
| Wi-Fi connection issues. |
|
8. Specifications
| Feature | Detail |
|---|---|
| Video Resolution | 4K Ultra HD (2160p@30fps) |
| Lens Angle | 170-degree wide-angle |
| Display | 2" IPS Screen |
| GPS | Built-in (records speed & location) |
| G-Sensor | Yes (emergency recording) |
| Wi-Fi | Built-in (smartphone app control) |
| Night Vision | Enhanced with Sony Sensor |
| Loop Recording | Continuous, 24-hour protection |
| Memory Support | Up to 256GB Micro SD card |
| Connectivity | USB |
| Special Feature | Touch Screen |
| Product Dimensions | 5 x 3 x 4 inches |
| Item Weight | 15.47 pounds |
| Manufacturer | FalconEye Electronics |
9. Warranty and Support
For warranty information and technical support, please refer to the official FalconEye Electronics website or contact their customer service directly. Keep your purchase receipt as proof of purchase for warranty claims.
Manufacturer: FalconEye Electronics
Brand: Falcon Electronics


