1. Introduction
This manual provides detailed instructions for the installation, operation, and maintenance of your Nakamichi ND410W Dash Cam. The ND410W is a Full HD 1080p front and rear dash camera integrated into a digital rearview mirror, offering advanced features such as parking assistance, Wide Dynamic Range (WDR), loop recording, and app control. Please read this manual thoroughly before using the device to ensure proper functionality and safety.
2. Setup and Installation
2.1. What's in the Box
Before installation, verify that all components are present:
- Nakamichi ND410W Front Dash Cam (Mirror Unit)
- Rear Dash Cam
- Step-down Line Adapter (Hardwire Kit)
- Power Adapter (Car Charger)
- 64GB Class-10 MicroSD Card
- Mounting Straps (Elastic Bands)
- Screws (for Rear Camera)
- User Manual

Image: All components included in the Nakamichi ND410W Dash Cam package, laid out for inspection.
2.2. MicroSD Card Insertion
- Locate the microSD card slot on the main mirror unit.
- Insert the provided 64GB Class-10 microSD card into the slot until it clicks into place.
- It is recommended to format the microSD card through the dash cam's settings menu before first use and periodically thereafter to ensure optimal performance.
2.3. Front Dash Cam (Mirror Unit) Installation
- Attach the main mirror unit over your vehicle's existing rearview mirror using the provided elastic mounting straps. Ensure it is securely fastened and does not obstruct your view.
- Connect the power adapter cable to the mirror unit and route the cable neatly along the windshield trim to the vehicle's 12V power outlet (cigarette lighter) or connect the hardwire kit to the vehicle's fuse box for 24-hour parking monitoring.
- Adjust the angle of the front camera lens on the mirror unit to capture the desired view of the road ahead.

Image: A user adjusting the angle of the Nakamichi ND410W mirror unit, demonstrating its flexible positioning.
2.4. Rear Dash Cam Installation
- Choose a suitable location for the rear camera, either inside the rear window or mounted externally near the license plate. Ensure the view is unobstructed.
- Secure the rear camera using the provided screws or adhesive.
- Route the rear camera cable to the main mirror unit. Connect the cable to the designated rear camera input port on the mirror unit.
- For parking assistance with guidelines, connect the red wire from the rear camera cable to your vehicle's reverse light power supply. This will automatically display parking guidelines when shifting into reverse.

Image: An overhead view illustrating the wide-angle rear camera coverage and parking guidelines displayed on the mirror unit, aiding in reverse parking.
3. Operation
3.1. Power On/Off
- The dash cam will automatically power on and begin recording when your vehicle's ignition is turned on (if connected to the 12V power outlet).
- It will automatically power off when the ignition is turned off.
- You can manually power the device on or off using the power button located on the mirror unit.
3.2. Basic Recording and Display Modes
- Upon powering on, the dash cam automatically starts continuous loop recording. Video files are saved in 1 or 3-minute segments.
- The 9.3-inch IPS display can show the front camera view, rear camera view, or a split-screen view of both simultaneously. Tap the screen to switch between display modes.

Image: The Nakamichi ND410W mirror display showing a split-screen view, capturing both front and rear camera footage simultaneously.
3.3. Loop Recording
The ND410W features seamless loop recording. When the microSD card is full, the oldest unlocked video files will be overwritten by new recordings. This ensures continuous recording without manual intervention.

Image: The Nakamichi ND410W mirror display showcasing its wider angle view, with a hand interacting with the touchscreen interface.
3.4. G-Sensor and Emergency Recording
The built-in G-sensor detects sudden impacts or collisions. When an event is detected, the current video segment is automatically locked and saved to prevent it from being overwritten by loop recording. This footage serves as critical evidence in case of an accident.
3.5. 24-Hour Parking Monitoring and Time-Lapse
With the included hardwire kit, the dash cam can provide 24-hour parking monitoring. When the vehicle is parked and the ignition is off, the dash cam can enter parking mode, recording at 1 frame per second (time-lapse) to conserve power and storage space. This feature helps protect against theft or vandalism.

Image: An illustration depicting a car under 24-hour smart parking surveillance, highlighting protection against potential incidents like break-ins or vandalism.
3.6. Wi-Fi and App Control (Viidure App)
- The ND410W features integrated Wi-Fi for seamless connection to your smartphone via the Viidure app (available for Android and iOS).
- Download the Viidure app from your device's app store.
- Connect your smartphone to the dash cam's Wi-Fi network (SSID and password can be found in the dash cam's settings).
- Through the app, you can view live footage, download recorded videos, adjust settings, and share clips directly from your phone.
3.7. WDR (Wide Dynamic Range)
WDR technology enhances video quality in challenging lighting conditions, such as strong backlight or low light, ensuring clear and balanced recordings.
4. Maintenance
4.1. MicroSD Card Care
- Regularly format the microSD card (at least once a month) through the dash cam's settings menu to prevent data corruption and ensure smooth recording.
- If you need to replace the microSD card, use only Class 10 or higher cards from reputable brands to guarantee compatibility and performance. The device supports up to 128GB.
4.2. Cleaning
- Use a soft, dry cloth to clean the dash cam's lenses and screen. Avoid using abrasive cleaners or solvents.
- Ensure the lenses are free from dust and smudges for clear video recording.
5. Troubleshooting
5.1. Device Not Powering On
- Check if the power cable is securely connected to both the dash cam and the vehicle's power outlet.
- Ensure the vehicle's 12V power outlet is functioning.
- If using the hardwire kit, verify connections to the fuse box.
5.2. Recording Issues (e.g., Not Recording, Gaps in Recording)
- Ensure the microSD card is inserted correctly and is not full.
- Format the microSD card through the dash cam's settings.
- Check if the microSD card is a Class 10 or higher and from a reliable brand. A slow card can cause recording issues.
- Reset the device to factory settings (refer to the settings menu).
5.3. Poor Video Quality
- Clean the camera lenses.
- Ensure the protective film has been removed from the lenses.
- Check video resolution settings in the menu; ensure it is set to 1080p.
5.4. Wi-Fi Connection Problems
- Ensure Wi-Fi is enabled on the dash cam and your smartphone.
- Verify you are connecting to the correct Wi-Fi network (SSID) and entering the correct password.
- Restart both the dash cam and your smartphone.
5.5. Parking Monitoring Not Working
- Ensure the hardwire kit is correctly installed and connected to a constant power source in your vehicle's fuse box.
- Verify that parking monitoring is enabled in the dash cam's settings.
6. Specifications
| Feature | Description |
|---|---|
| Model | ND410W |
| Display Screen | 9.3-inch IPS Touch Screen |
| Recording Resolution | Full HD 1080p (Front & Rear) |
| Viewing Angle | Front: 170 degrees, Rear: 140 degrees |
| Memory Card Support | Up to 128GB (64GB Class-10 included) |
| Loop Recording | 1 or 3-minute clips |
| Special Features | WDR Night Vision, App Control, Automatic Incident Detection, Built-in Display, Wi-Fi, Built-in Microphone, Loop Recording, Compact Design, Reversing Camera, Digital Rearview Mirror |
| Video Coding | H.264 (Advanced Video Coding) |
| Dimensions | 25.8 x 7 x 4 cm |
| Weight | 200 g |
| Battery | 1 Lithium-ion battery (included) |
| Mounting Type | Elastic Band |
| Control Method | App |
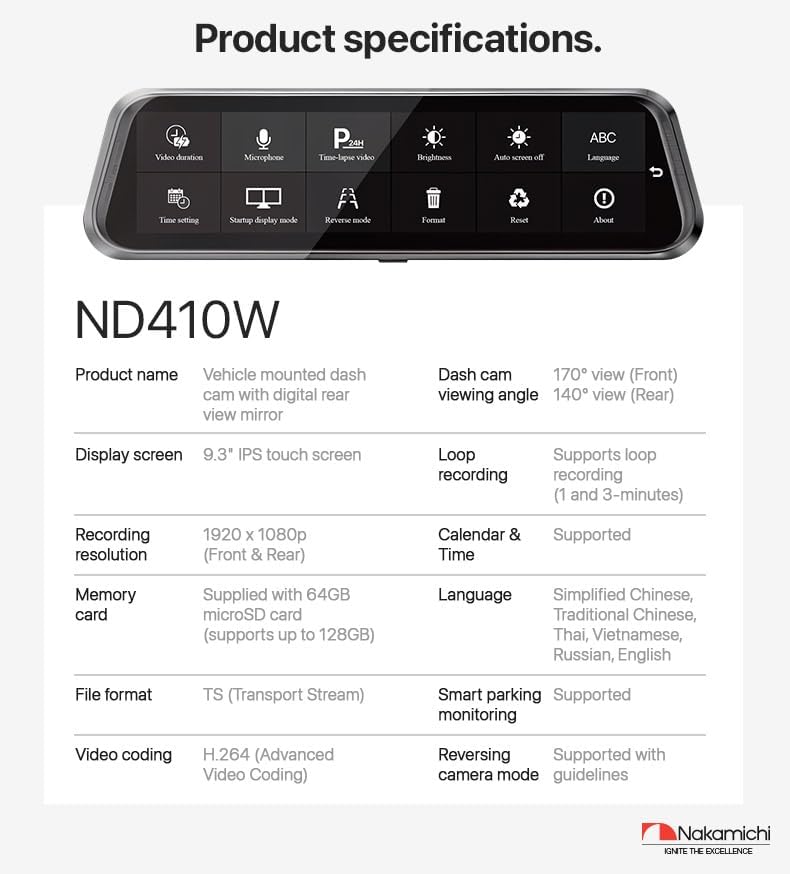
Image: A visual representation of the Nakamichi ND410W's key product specifications, including display, recording, and features.
7. Warranty Information
The Nakamichi ND410W Dash Cam is covered by a 12-month warranty from the date of purchase. This warranty covers manufacturing defects and ensures the product functions as intended under normal use. Please retain your proof of purchase for warranty claims.
8. Customer Support
Should you have any questions, require assistance with installation, or encounter any issues with your Nakamichi ND410W Dash Cam, please do not hesitate to contact our customer service team. We are committed to resolving your concerns as quickly as possible.
For support, please refer to the contact information provided with your product packaging or visit the official Nakamichi website.


