1. Introduction
The MECHEER JK-TM02 Digital Timer Socket is designed to automate the control of electrical appliances in your home or office. This device allows you to set precise ON/OFF schedules, helping to manage energy consumption and enhance home security. With its user-friendly interface and robust features, it provides a convenient solution for various timing needs.

Figure 1: The MECHEER JK-TM02 Digital Timer Socket shown in various household applications, including controlling a lamp, oven, aquarium, air purifier, fireplace, and router. This illustrates its versatility for automating different devices.
2. Product Overview
The MECHEER JK-TM02 features a clear LCD display and intuitive buttons for easy programming. It supports up to 16 ON/OFF programs, 24-hour and weekly scheduling, a random mode for security, and a manual override function.

Figure 2: Front view of the MECHEER JK-TM02 Digital Timer Socket, highlighting the LCD screen displaying time and day, and the control buttons below the screen and around the socket.
Key Features:
- Up to 16 ON/OFF programs for flexible scheduling.
- 24-hour and weekly programming options.
- Random mode for enhanced home security.
- Manual ON/AUTO/OFF override.
- Built-in battery to retain settings during power outages.
- Large, easy-to-read LCD display.
- Durable PC material construction.
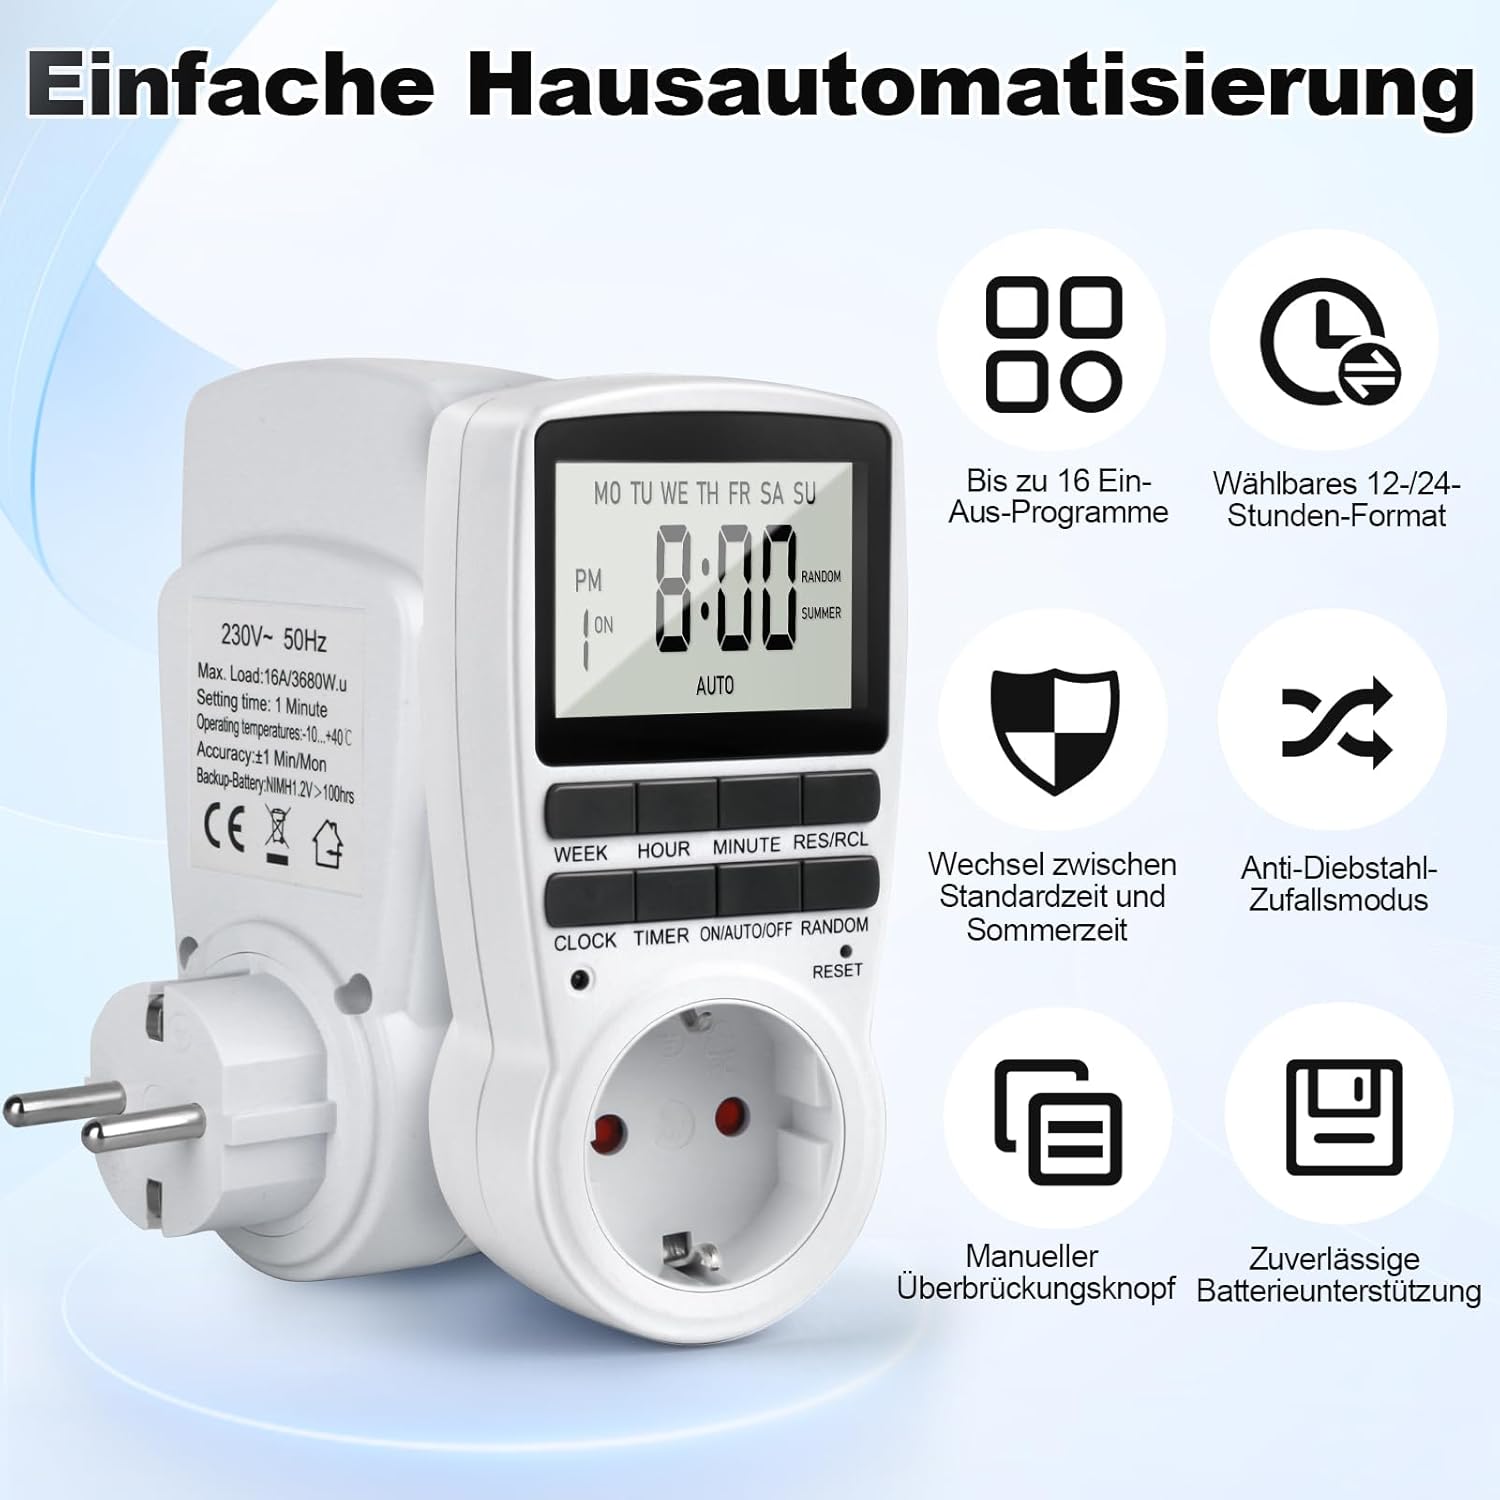
Figure 3: An illustrative diagram detailing the key features of the timer socket, including up to 16 ON/OFF programs, selectable 12/24-hour format, standard/daylight saving time switch, anti-theft random mode, manual override button, and reliable battery backup.
3. Setup and Initial Configuration
3.1 First Use and Charging
Before initial use, plug the timer into a power outlet for approximately 5-10 minutes to charge the internal backup battery. This battery ensures that your programmed settings are retained even if the timer is unplugged or in case of a power failure.
3.2 Resetting the Timer
If the display shows abnormal characters or the timer is not functioning correctly, a reset may be necessary. Locate the small RESET button, typically found near the bottom of the device. Use a thin, pointed object (like a pen tip or paperclip) to press this button. This will clear all settings and restore the timer to its factory defaults.

Figure 4: Illustration of the reset function, showing a finger pressing the small RESET button with a pointed object to restore factory settings.
3.3 Setting Current Time and Day
- Press and hold the CLOCK button.
- While holding CLOCK, press the WEEK button repeatedly to set the current day (MO, TU, WE, TH, FR, SA, SU).
- Continue holding CLOCK, then press the HOUR button to set the current hour.
- Continue holding CLOCK, then press the MINUTE button to set the current minute.
- Release the CLOCK button. The time is now set.
- To switch between 12-hour (AM/PM) and 24-hour format, press the CLOCK and TIMER buttons simultaneously.
- To activate or deactivate Daylight Saving Time (SUMMER), press the CLOCK and ON/AUTO/OFF buttons simultaneously. The "SUMMER" indicator will appear or disappear on the display.
4. Operating Instructions
4.1 Programming ON/OFF Times
The timer allows for up to 16 distinct ON/OFF programs. Each program consists of an ON time and an OFF time.
- Press the TIMER button once. The display will show "1 ON". This indicates you are setting the first ON program.
- Press the WEEK button to select the desired day(s) for this program. You can choose individual days, weekdays (MO TU WE TH FR), weekends (SA SU), or various combinations (e.g., MO TU WE TH FR SA SU for everyday).
- Press the HOUR button to set the desired ON hour.
- Press the MINUTE button to set the desired ON minute.
- Press the TIMER button again. The display will now show "1 OFF". This indicates you are setting the first OFF program.
- Repeat steps 2-4 to set the desired OFF day(s), hour, and minute for this program.
- To set additional programs (up to 16), press the TIMER button repeatedly to cycle through "2 ON", "2 OFF", ..., "16 ON", "16 OFF". Follow the same steps for each program.
- After setting all desired programs, press the CLOCK button to return to the current time display.

Figure 5: Display examples showing programmed ON and OFF times for various days, illustrating the flexibility of setting up to 16 different schedules. An aquarium and toaster are shown as examples of controlled devices.
4.2 Daily Timer Example
For a simple daily schedule, such as turning a device ON at 7:00 AM and OFF at 8:00 AM every day:
- Set Program 1 ON for "MO TU WE TH FR SA SU" at 7:00.
- Set Program 1 OFF for "MO TU WE TH FR SA SU" at 8:00.

Figure 6: An example demonstrating a daily ON/OFF timer setting, showing a device turning on at 7:00 AM and off at 8:00 AM every day, with a coffee machine as an application example.
4.3 Flexible Day Combinations
The timer offers various day grouping options for your programs:
- Every day (Monday to Sunday)
- A specific day
- Weekends (Saturday, Sunday)
- Weekdays (Monday to Friday)
- Sunday excluded
- Only Monday, Wednesday, Friday
- Only Tuesday, Thursday, Saturday
- Only Monday, Tuesday, Wednesday
- Only Thursday, Friday, Saturday
- Only Monday, Wednesday, Friday, Sunday

Figure 7: The timer display illustrating the different day combination options available for programming, from daily to specific day groupings.
4.4 Random Mode (Holiday Security)
The random mode is designed to simulate occupancy when you are away, deterring potential intruders. When activated, the timer will randomly turn the connected appliance ON and OFF within a half-hour window before or after the set program times. This mode is typically active between 6:00 AM and 6:00 AM (24-hour cycle).
- Ensure your desired ON/OFF programs are set.
- Press the RANDOM button. The "RANDOM" indicator will appear on the display.
- To deactivate, press the RANDOM button again. The "RANDOM" indicator will disappear.

Figure 8: An image depicting the random mode feature, showing a house with lights turning on and off randomly to simulate occupancy and enhance security during holidays or extended absences.
4.5 Manual Override (ON/AUTO/OFF)
You can manually control the output of the timer, overriding the programmed settings temporarily.
- Press the ON/AUTO/OFF button repeatedly to cycle through the modes:
- ON: The connected appliance will remain continuously ON.
- AUTO: The connected appliance will operate according to the programmed schedules.
- OFF: The connected appliance will remain continuously OFF.
4.6 Countdown Timer (Implied)
While the product title mentions a "Countdown Timer Switch," specific instructions for activating and setting a countdown are not detailed in the provided feature bullets or images. Typically, a countdown timer allows you to set a duration after which the appliance will turn ON or OFF. Please refer to the full product manual or manufacturer's website for detailed instructions on this specific function if available.
5. Maintenance
To ensure the longevity and proper functioning of your MECHEER JK-TM02 Digital Timer Socket:
- Keep the device clean and dry. Wipe with a soft, dry cloth. Do not use liquid cleaners.
- Avoid exposing the timer to extreme temperatures, direct sunlight, or high humidity.
- Do not disassemble the unit. Refer to qualified personnel for any repairs.
- Ensure the timer is unplugged from the wall outlet before cleaning or if it will be unused for an extended period.
6. Troubleshooting
Common Issues and Solutions:
- Display is blank or dim:
- Ensure the timer is plugged into a live power outlet.
- The internal battery may be depleted. Plug the timer in for 5-10 minutes to charge it.
- Programs are not running:
- Check if the timer is in AUTO mode (press ON/AUTO/OFF until "AUTO" is displayed).
- Verify that the current time and day are set correctly.
- Ensure the ON/OFF programs are correctly entered and enabled for the desired days.
- Timer is unresponsive or displaying errors:
- Perform a full reset by pressing the RESET button with a pointed object (refer to Section 3.2). You will need to reprogram all settings after a reset.
7. Specifications
| Brand | MECHEER |
| Model Number | JK-TM02 |
| Color | White |
| Product Dimensions | 4.5 x 5 x 10.01 cm (1.77 x 1.97 x 3.94 inches) |
| Item Weight | 180 g (0.4 lbs) |
| Power Input | 230V~, 50Hz |
| Max. Load | 16A/3680W |
| Setting Time | 1 Minute |
| Operating Temperature | -10 to +40 °C |
| Accuracy | ±1 Min/Mon |
| Backup Battery | NiMh 1.2V >100hrs |
Note: Some specifications are inferred from product images containing technical labels.
8. Warranty and Support
Specific warranty information for the MECHEER JK-TM02 Digital Timer Socket is not provided in the product details. For warranty claims, technical support, or further assistance, please contact the retailer or the manufacturer directly. Keep your purchase receipt as proof of purchase.


