1. Introduction
This manual provides essential information for the safe and effective operation of your Ortur Laser Master 2 Pro S2 10000mW Laser Engraver. Please read it thoroughly before assembly and use to ensure optimal performance and safety.
The Ortur Laser Master 2 Pro S2 is a high-precision laser engraving and cutting machine designed for various materials, featuring a powerful 10000mW laser module and an efficient engraving speed of up to 15,000mm/min.

Image 1.1: Ortur Laser Master 2 Pro S2 Laser Engraver with various engraved samples.
2. Safety Information
WARNING: This product is a Class 4 laser device. Direct exposure to the laser beam can cause severe eye damage and skin burns. Always wear appropriate laser safety goggles during operation.
2.1 General Safety Precautions
- Eye Protection: Always wear the provided laser protective goggles. The laser module's protective cover filters 98% of UV light, but additional eye protection is mandatory.
- Ventilation: Operate the engraver in a well-ventilated area to dissipate fumes and smoke produced during engraving and cutting.
- Fire Hazard: Laser engraving and cutting can generate heat and sparks, potentially causing fires. Do not leave the machine unattended during operation. Keep a fire extinguisher nearby.
- Material Safety: Ensure the material being processed is suitable for laser engraving/cutting. Avoid highly reflective, flammable, or toxic materials.
- Children and Pets: Keep children and pets away from the operating area.
2.2 Integrated Safety Features
The Ortur Laser Master 2 Pro S2 incorporates several safety mechanisms:
- Active Position Protection: Detects accidental movement of the machine and stops operation.
- USB Disconnection Protection: Stops operation if the USB cable connection is lost.
- Emergency Stop Switch: Allows immediate shutdown of the machine in case of an emergency.
- Flame Alarm: An integrated sensor detects flames and triggers an alarm, stopping the machine.
- Exposure Time Detection and Limitation: Prevents prolonged laser exposure in a single spot.

Image 2.1: Overview of the machine's safety features.
3. Product Components and Assembly
3.1 Packing List
Verify that all components listed below are present in your package:

Image 3.1: Complete packing list of the Ortur Laser Master 2 Pro S2.
- Y Aluminum Profile-540mm *2
- X Aluminum Profile-460mm *2
- Motherboard Assembly *1
- LU2-10A Laser Module *1
- Assembly of X-axis *1
- Cable Loom *1
- USB Cable *1
- Laser Wire *1
- Wrench *1
- Y Limit Switch *1
- Base Anchors *3
- Fixing Plate 1 *1
- Fixing Plate 2 *1
- Corner Connectors *4
- Air Flow Regulator *1
- Angle Fasteners *4
- Timing Belt *2
- M5 Profile Nuts *6
- M5 T-nuts *3
- Power Adapter *1
- Pipe Connector *1
- M5*25mm Screws *4
- M5*8mm Screws *14
- M4*6mm Screws *6
- 2&2.5mm Allen Key *1
- Wrench *1
- Thumb Screw *1
- M5 Spacers *4
- Laser Goggle *1
- Brush *1
- Testing Aluminum Sheet *1
- Testing Woods *4
- Cable Ties *10
- Testing Acrylic *1
- Lens *1
- Air Pipe *1 (OD: 6mm ID: 4mm)
3.2 Assembly Instructions
The Ortur Laser Master 2 Pro S2 features a modular design for straightforward assembly. Typically, assembly can be completed within 10-15 minutes. Refer to the detailed assembly guide provided separately or available on the official Ortur website for step-by-step instructions.
Key steps generally involve:
- Assembling the aluminum profile frame.
- Mounting the X-axis assembly.
- Installing the motherboard assembly.
- Attaching the LU2-10A laser module.
- Connecting all cables and the timing belts.
- Securing the limit switches and base anchors.
Image 3.2: Key components and structural details of the engraver.
4. Operating Instructions
4.1 Software Compatibility
The Ortur Laser Master 2 Pro S2 is compatible with popular engraving software:
- LaserGRBL: A free, open-source software for Windows users.
- LightBurn: A paid, feature-rich software compatible with Windows, macOS, and Linux.
- Ortur Inspiraesth App: Ortur's self-developed application offering simple and professional modes for various engraving stages.
Supported operating systems include Win 7/8/XP/10/11 and MAC systems (via LightBurn).
Supported file formats: SVG, DXF, JPG, JPEG, PNG, BMP, TIF, CR2, etc.

Image 4.1: Software compatibility with LaserGRBL and LightBurn.
4.2 Laser Module Capabilities
The LU2-10A laser module provides a true 10000mW output with a compressed spot size of 0.05mm x 0.1mm, enabling high precision engraving and efficient cutting.

Image 4.2: Detail of the 10W laser module with compressed spot technology.
4.3 Engraving and Cutting Materials
The engraver is capable of processing a wide range of materials:
- Cutting: Up to 30mm acrylic and 20mm wood. The laser module includes a built-in air-assist interface for enhanced cutting performance.
- Engraving: Wood, metal, acrylic, glass, leather, ceramics, fabric, cardboard, paper, stainless steel, and more.
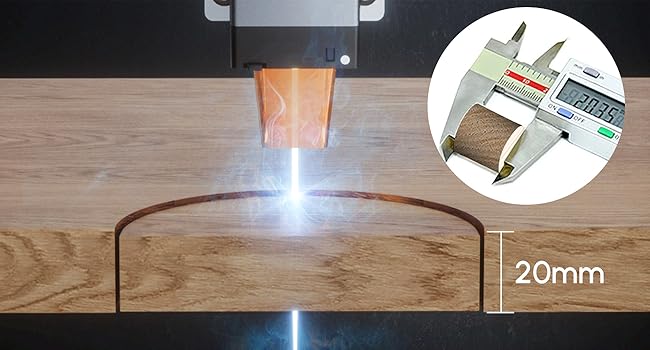
Image 4.3: 20mm Pine Board Cutting.
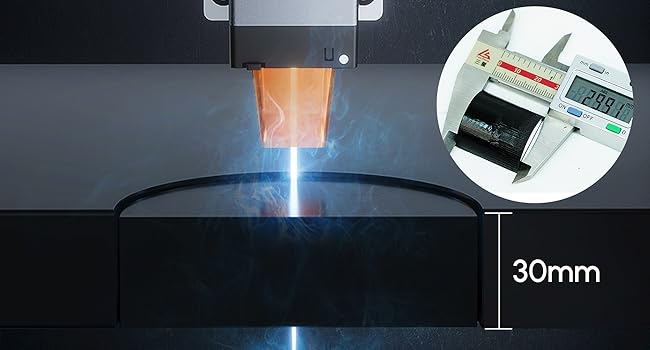
Image 4.4: 30mm Acrylic Sheet Cutting.

Image 4.5: Examples of multiple materials compatible with the engraver.
5. Maintenance
Regular maintenance ensures the longevity and optimal performance of your laser engraver.
- Laser Lens Cleaning: Periodically clean the laser lens with a soft, lint-free cloth and lens cleaning solution to maintain laser beam quality. Ensure the machine is powered off before cleaning.
- Rail and Belt Inspection: Check the X and Y axis rails for debris and clean as necessary. Inspect the timing belts for tension and wear. Adjust or replace if needed.
- Ventilation System: Ensure the working area has adequate ventilation. Clean any accumulated dust or debris from the machine's fan and exhaust ports.
- Firmware Updates: Check the official Ortur website for any available firmware updates to improve performance or add new features.
6. Troubleshooting
This section addresses common issues you might encounter. For more complex problems, contact Ortur customer support.
| Problem | Possible Cause | Solution |
|---|---|---|
| Laser not firing or weak output. |
|
|
| Engraving/Cutting quality is poor or inconsistent. |
|
|
| Machine stops unexpectedly. |
|
|
7. Specifications
| Feature | Detail |
|---|---|
| Model Number | Ortur-LaserMaster2-ProS2 (OLM2 Pro S2 10W) |
| Laser Module Output Power | 10000mW (10W) |
| Engraving Area | 390mm x 410mm |
| Compressed Spot Size | 0.05mm x 0.1mm |
| Engraving Speed | Up to 15,000mm/min |
| Cutting Capability (Wood) | Up to 20mm |
| Cutting Capability (Acrylic) | Up to 30mm |
| Product Dimensions | 23.62 x 22.44 x 5.12 inches |
| Item Weight | 10.68 pounds |
| Manufacturer | Ortur |
| Connectivity | USB |
| Supported Software | LaserGRBL, LightBurn, Ortur Inspiraesth App |
| Supported OS | Windows 7/8/XP/10/11, macOS (via LightBurn) |
8. Support and Warranty
For technical assistance, troubleshooting beyond this manual, or warranty inquiries, please contact Ortur customer support through their official website or the retailer where the product was purchased.
Please retain your proof of purchase for warranty claims.


