
Jansite T30 OEM Bracket
Jansite T30 Mirror Dash Cam OEM Bracket User Manual
Model: T30 OEM Bracket
1. Introduction
This user manual provides detailed instructions for the installation and use of the Jansite OEM Bracket, specifically designed for the Jansite T30 Mirror Dash Cam. This bracket offers a more secure and integrated mounting solution compared to traditional strap installations.
2. Advantages of Jansite OEM Bracket
The Jansite OEM Bracket provides significant advantages over traditional strap mounting methods for your mirror dash cam:
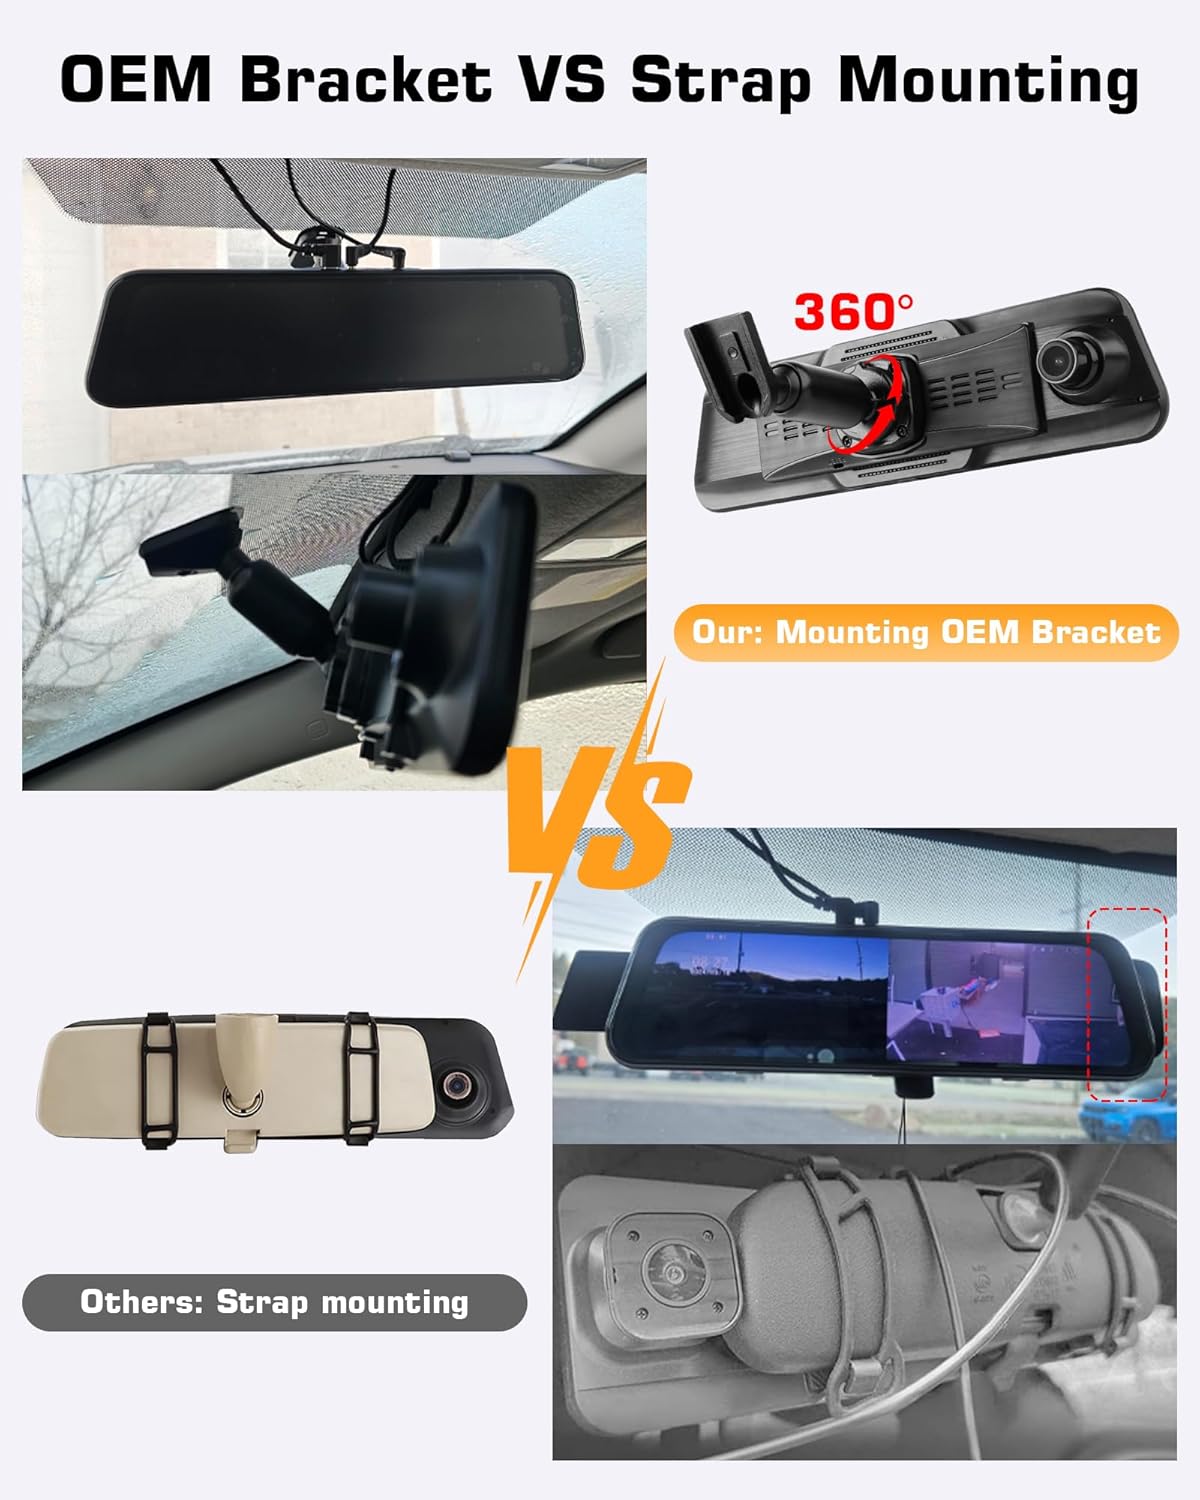
Image: A visual comparison showing the secure and integrated appearance of the OEM bracket installation versus the less stable and potentially unsightly strap mounting method.
- Firm Installation: Unlike straps that can allow for movement, the OEM bracket provides a rigid and stable mount, minimizing camera shake and ensuring clear, steady recordings.
- Beautiful Integration: Designed specifically for the Jansite T30, the bracket ensures a seamless fit that fully covers the original rearview mirror, avoiding the exposed straps and bulk often seen with universal mounts.
- Reduced Vibration: The secure attachment significantly reduces vibrations transmitted from the vehicle, leading to smoother video playback.
- Aesthetic Appeal: Enhances the interior look of your vehicle by providing a clean, factory-installed appearance.
3. Product Features
- Enhanced Stability: Provides a firmer installation, significantly reducing dash cam shaking during vehicle operation compared to strap mounting.
- Seamless Integration: Designed to perfectly fit the Jansite T30 rearview mirror dash cam, ensuring the original rearview mirror is fully covered for a clean, integrated look.
- Vehicle Specific Compatibility: The bracket is suitable for most vehicle models, but it is crucial to verify compatibility with your specific vehicle's original rearview mirror bracket and base before purchase.
- Durable Construction: Built for long-lasting performance and secure attachment.
4. Package Contents
Please check the package contents to ensure all items are present:

Image: Contents of the OEM Bracket package, showing the bracket assembly and four screws.
Jansite OEM Bracket Assembly
Includes the main bracket unit and necessary screws for installation.
- 1 x Jansite OEM Bracket
- 4 x Mounting Screws
- (Note: Jansite T30 Mirror Dash Cam sold separately)
5. Compatibility Check
The Jansite OEM bracket is designed for specific rearview mirror bases. Before proceeding with installation, it is critical to confirm your vehicle's rearview mirror base is compatible.
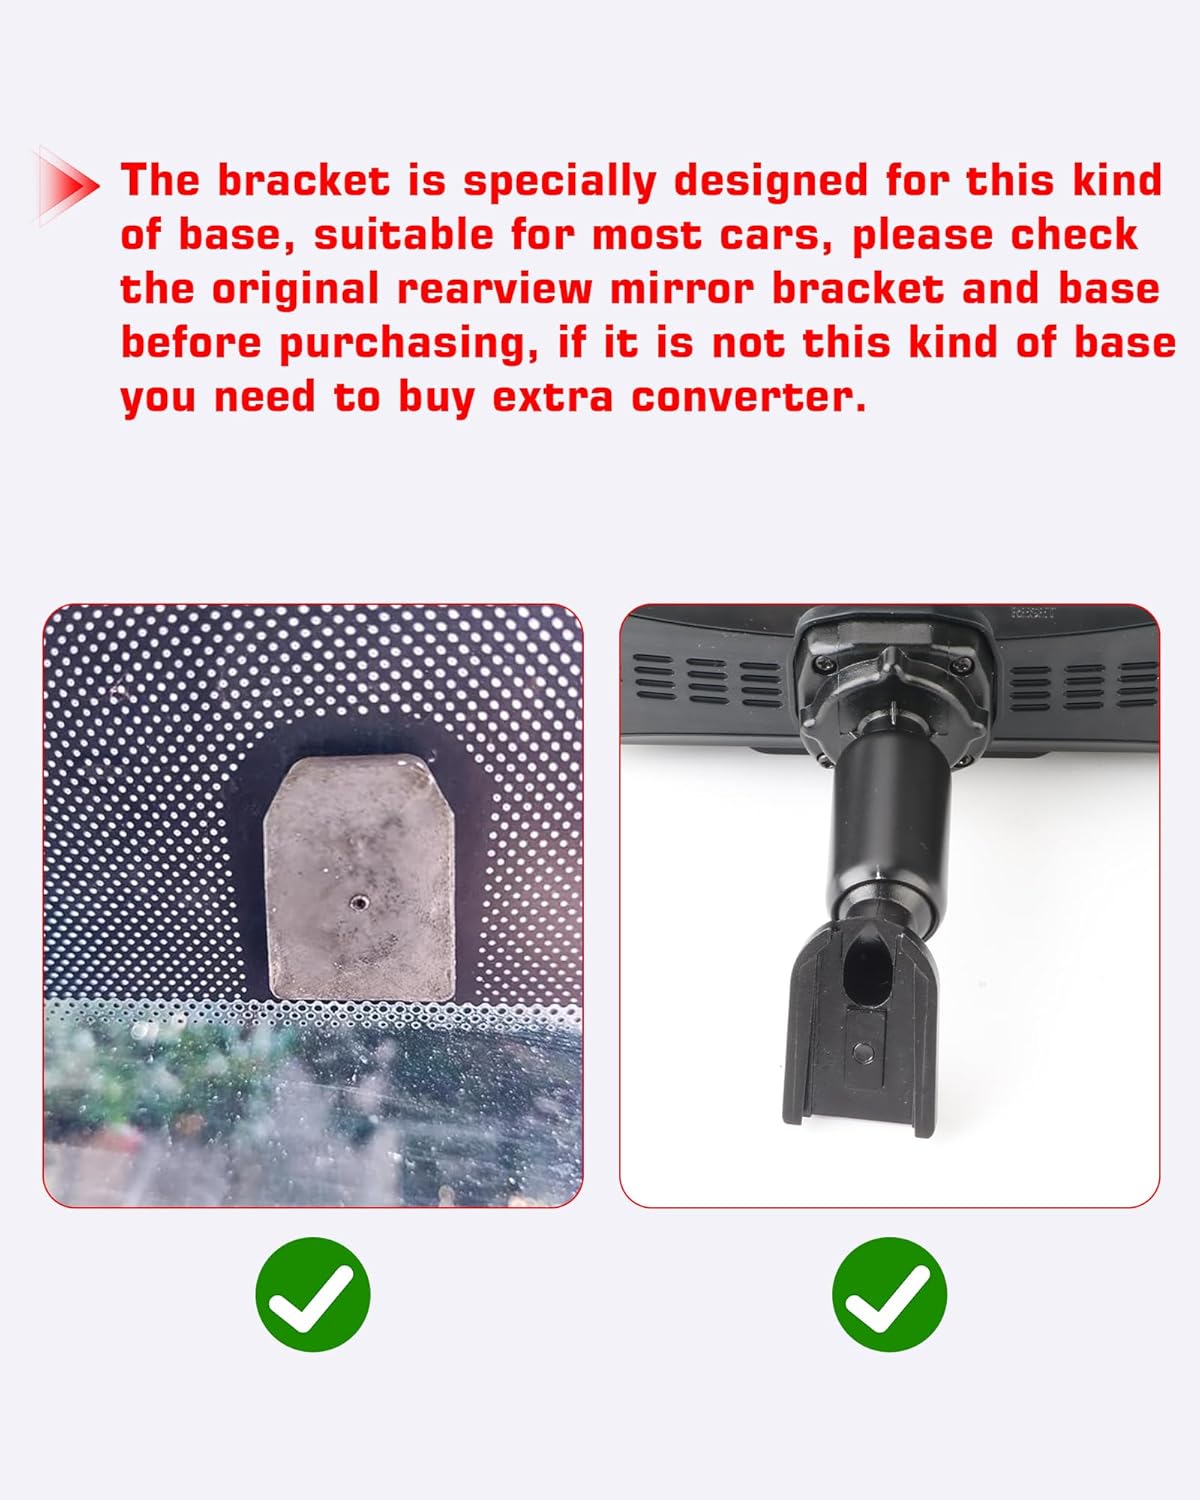
Image: Illustration showing two compatible rearview mirror base types with green checkmarks, indicating suitability for the bracket.
Verify Your Rearview Mirror Base
Ensure your vehicle's rearview mirror has a compatible base as shown in the image. If your base differs, an additional converter may be required or the bracket may not be suitable.
Important: Please contact Jansite customer service before purchasing to confirm whether the bracket is compatible with your vehicle model. The bracket is suitable for most models, and other models may require different brackets or adapters.
6. Setup and Installation
6.1. Attaching the Bracket to the Dash Cam
Follow these 6 steps to securely attach the OEM bracket to your Jansite T30 Mirror Dash Cam:

Image: A six-panel diagram illustrating the assembly process of the dash cam with the OEM bracket.
- Remove Original Bracket: If your mirror dash cam has an existing bracket, gently push it down to remove it.
- Align and Attach: Locate the RESET hole on the top of the dash cam. Align the buckle of the OEM bracket with this hole and push up with both hands simultaneously until it clicks into place.
- Insert Screw: Pass the provided screw through the designated hole in the bracket.
- Fix Back Panel: Install the screw to firmly fix the back panel of the bracket to the dash cam.
- Adjust Tightness: After initial installation, adjust the tightness of the screw to ensure the bracket is secure but still allows for minor angle adjustments.
- Final Check: Verify that the assembly looks correct and is firmly attached.
6.2. Installing the Bracket on the Front Glass (Rearview Mirror Base)
Once the bracket is attached to the dash cam, follow these steps to install it onto your vehicle's rearview mirror base:
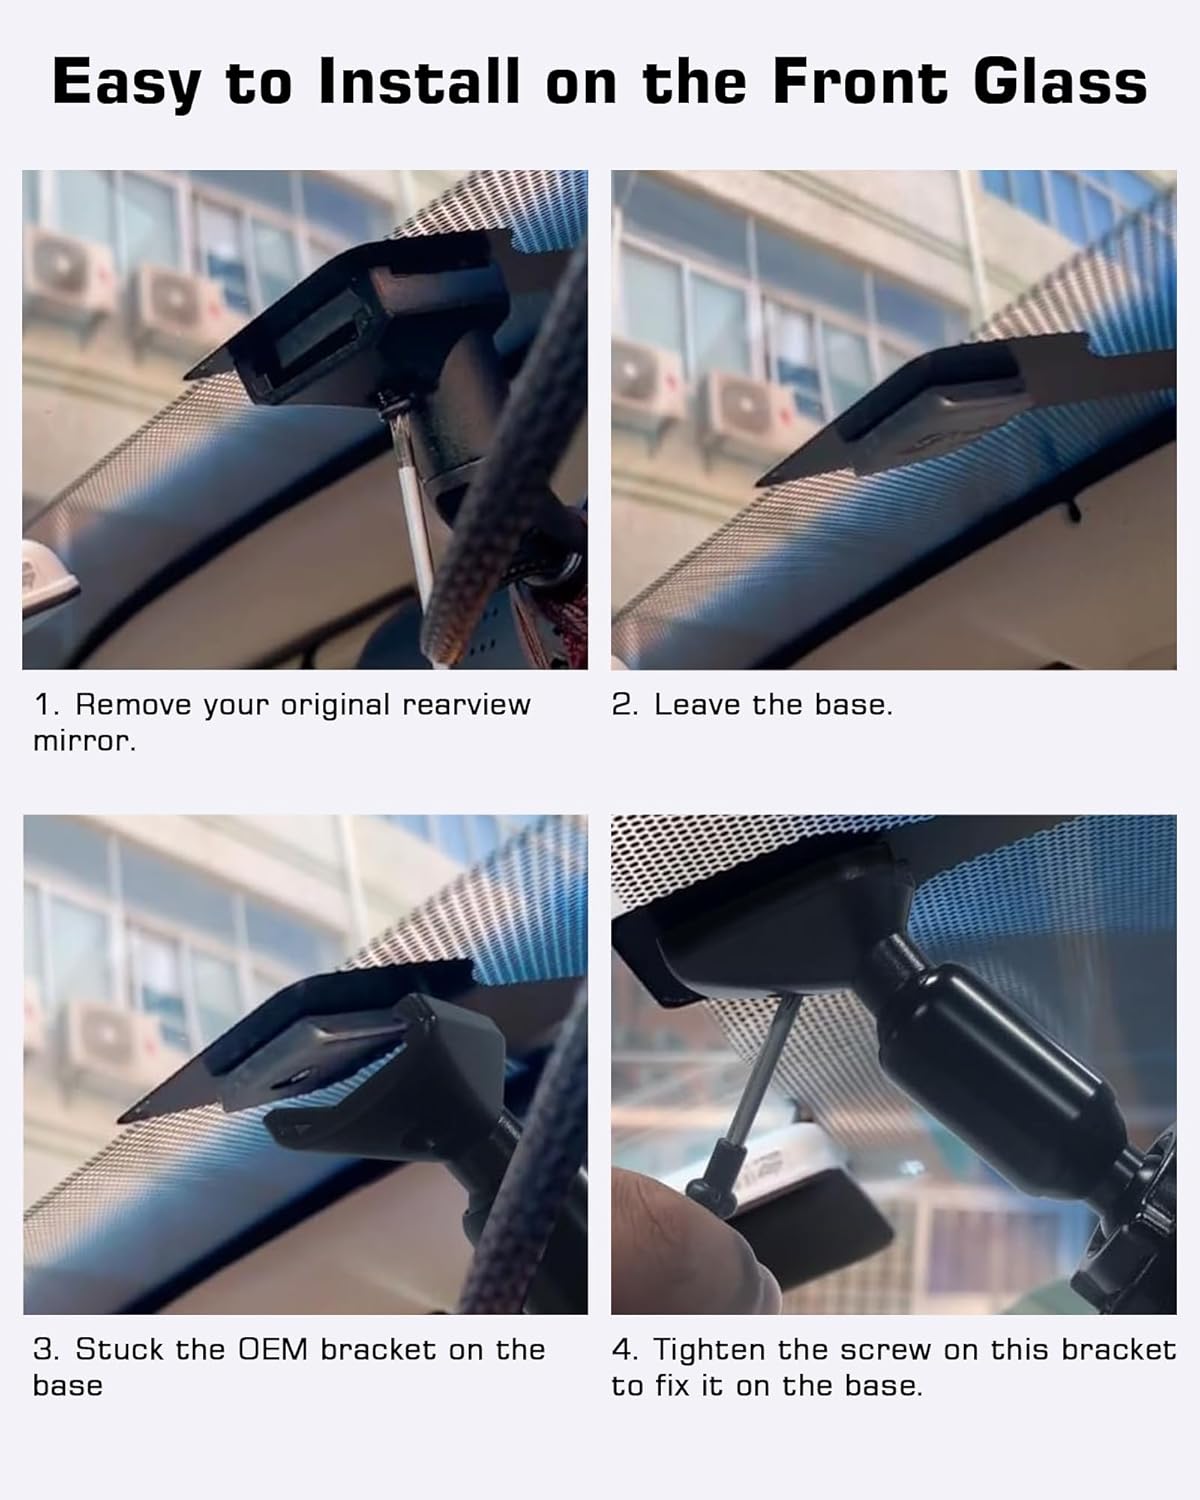
Image: A four-panel diagram illustrating the installation process of the OEM bracket onto the vehicle's rearview mirror base.
- Remove Original Rearview Mirror: Carefully remove your vehicle's original rearview mirror from its base.
- Leave the Base: Ensure the rearview mirror base remains securely attached to the windshield.
- Attach OEM Bracket: Align the OEM bracket (with the dash cam attached) with the vehicle's rearview mirror base and firmly attach it.
- Tighten Screw: Use a screwdriver to tighten the screw on the bracket, securing it firmly to the base.
The OEM bracket allows for 360-degree rotation, enabling optimal positioning of your dash cam for the best viewing and recording angles.

Image: The Jansite T30 Mirror Dash Cam mounted with the OEM bracket, highlighting its 360-degree rotation feature for flexible positioning.
7. Operating Instructions (Jansite T30 Mirror Dash Cam)
While this manual primarily covers the OEM bracket, here are general operating instructions for the Jansite T30 Mirror Dash Cam, which the bracket supports:
- Power On/Off: The dash cam typically powers on automatically when the vehicle starts and powers off when the ignition is turned off. A manual power button is usually located on the device.
- Recording: Once powered on, the dash cam will automatically begin loop recording. Ensure a compatible SD card (not included) is inserted.
- Screen Operation: The 10-inch mirror display is a touchscreen. Navigate menus, view recordings, and adjust settings by tapping and swiping.
- Rear Camera Display: If a rear camera is connected, the display can show front, rear, or split-screen views.
- Settings: Access settings to adjust video resolution (e.g., 1080p), loop recording duration, G-sensor sensitivity, parking monitor, and other features.

Image: The Jansite T30 Mirror Dash Cam displaying its touch screen interface with various icons and a timestamp, indicating active recording.
8. Maintenance
- Cleaning: Use a soft, dry cloth to clean the bracket and dash cam. Avoid abrasive cleaners or solvents.
- Check Connections: Periodically check that the bracket is securely fastened to both the dash cam and the vehicle's rearview mirror base. Tighten screws if necessary.
- Temperature: Avoid exposing the device to extreme temperatures for prolonged periods, as this can affect performance and longevity.
9. Troubleshooting
| Problem | Possible Cause | Solution |
|---|---|---|
| Dash cam shakes excessively while driving. | Bracket not securely tightened. | Ensure all screws attaching the bracket to the dash cam and the vehicle's base are tightened. |
| Bracket does not fit the rearview mirror base. | Incompatible rearview mirror base type. | Refer to the "Compatibility Check" section. Contact Jansite customer service for assistance or to inquire about adapters. |
| Dash cam not powering on (general). | Power connection issue; Dash cam specific problem. | Ensure the dash cam's power cable is correctly connected. Refer to the Jansite T30 Dash Cam's specific user manual for power-related troubleshooting. |
10. Specifications
Specifications for the Jansite T30 Mirror Dash Cam (for which this bracket is designed):
- Model Name: T30
- Display Size: 10 inches (Photo Sensor Size)
- Video Capture Resolution: 1080p
- Connectivity Technology: USB (for dash cam)
- Mounting Type: Rearview Mirror Mount (with OEM bracket)
- Optical Sensor Technology: CMOS
- Flash Memory Type: NAND
- Color: Black
- Manufacturer: Jansite
- Vehicle Service Type: Car, Van, Minivan
11. Warranty and Support
For warranty information and technical support regarding your Jansite T30 Mirror Dash Cam and OEM Bracket, please refer to the following:
- Return Policy: Typically 30 days for refund/replacement (as per Amazon's policy).
- Manufacturer Support: For product-specific inquiries, troubleshooting beyond this manual, or warranty claims, please contact Jansite customer service directly.
- Online Resources: Visit the official Jansite store on Amazon for additional product information and support: Jansite Amazon Store
Related documentsT30 OEM Bracket


Ask a question about this manual
Ask about setup, troubleshooting, compatibility, parts, safety, or missing instructions. Manuals+ will review the question and use this page’s manual context to help answer it.