Introduction
Thank you for choosing the AIKE Automatic Wall Mount Liquid Soap Dispenser. This manual provides essential information for the proper installation, operation, and maintenance of your new dispenser. Designed for commercial and residential use, this 33.8oz (1000ml) capacity dispenser offers hygienic, touch-free soap dispensing with adjustable volume settings. Please read this manual thoroughly before use to ensure optimal performance and longevity of the product.
Safety Information
- Do not immerse the dispenser in water or any other liquid.
- Ensure the battery compartment is securely closed to prevent water ingress.
- Use only 4 x AA alkaline batteries. Rechargeable batteries are not recommended.
- Keep the dispenser away from direct sunlight and heat sources.
- Do not mix old and new batteries, or different types of batteries.
- Keep out of reach of children unless supervised.
- Avoid placing the dispenser directly above reflective surfaces closer than 12 inches (30 cm) to prevent accidental activation.
Product Overview
The AIKE AK1226S dispenser features a robust ABS construction and an infrared sensor for touch-free operation. It is designed for durability and ease of use in various environments.
Components
- Dispenser Unit (Main Body)
- Mounting Plate
- Key (for opening the dispenser)
- Screws and Anchors (for installation)

Figure 1: AIKE Automatic Wall Mount Liquid Soap Dispenser (Black)

Figure 2: Key Features of the Dispenser including instant sensing, battery type, and soap volume adjustment.

Figure 3: Anti-Tampering Design for Public Areas, highlighting secure access points.
Setup and Installation
Required Tools (Not Included)
- Drill
- Drill bit (appropriate for anchors)
- Phillips head screwdriver
- Measuring tape
- Pencil
- Level
Installation Steps
- Choose Location: Select a suitable wall location. For optimal performance, mount the dispenser at least 8 inches (20 cm) above standard countertops or 12 inches (30 cm) above reflective surfaces to prevent accidental activation.
- Mark Drilling Points: Hold the mounting plate against the wall at the desired height. Use a level to ensure it is straight, then mark the four drilling points with a pencil.
- Drill Holes: Drill holes at the marked points. Insert the wall anchors into the drilled holes.
- Attach Mounting Plate: Align the mounting plate with the anchors and secure it to the wall using the provided screws.
- Install Batteries: Open the dispenser using the provided key. Locate the battery compartment. Insert 4 x AA alkaline batteries, ensuring correct polarity (+/-). Close the battery compartment securely.
- Fill with Soap: Pour liquid soap into the dispenser's reservoir. The capacity is 33.8oz (1000ml). Avoid overfilling.
- Mount Dispenser: Carefully align the dispenser unit with the mounting plate and slide it down until it clicks securely into place.
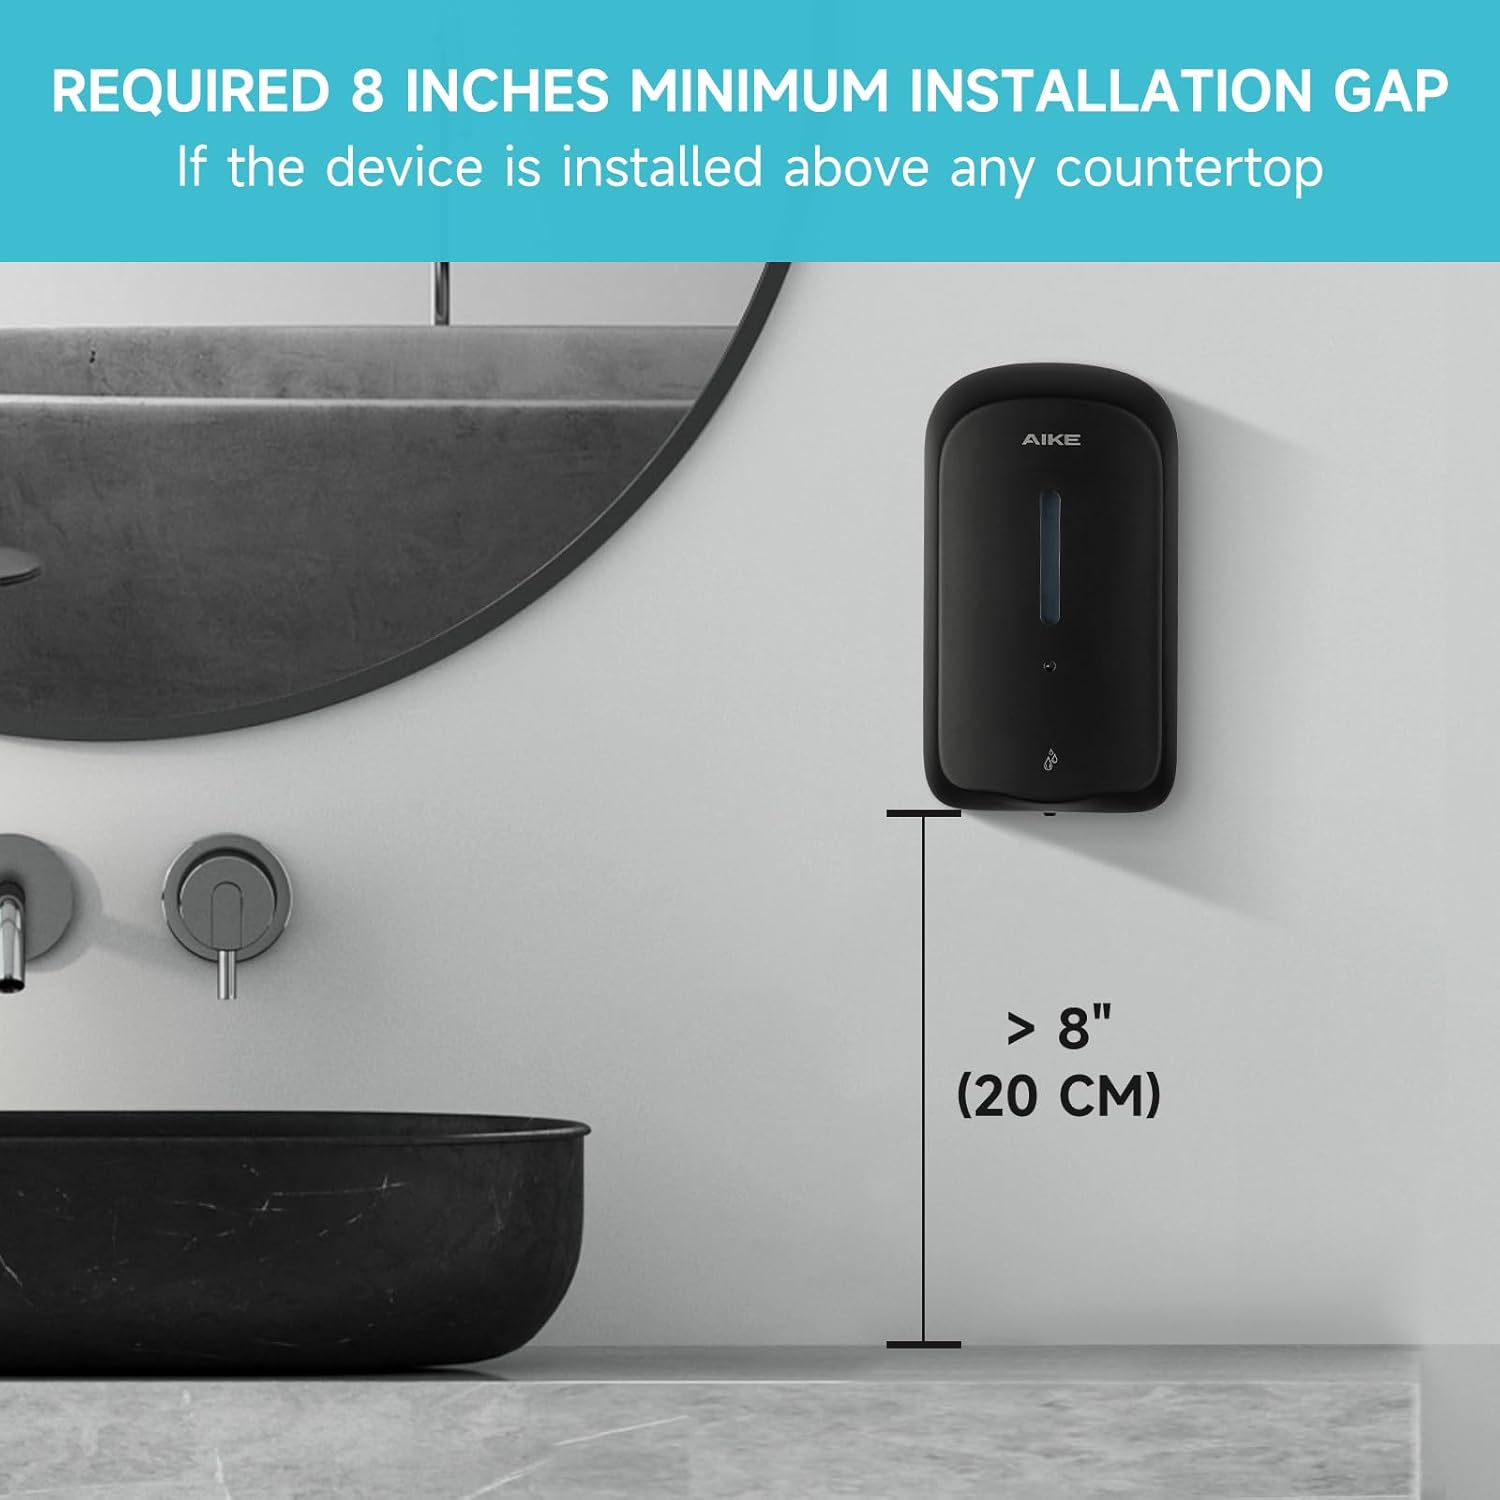
Figure 4: Recommended Installation Height.

Figure 5: Screw Assembly for stable installation.

Figure 6: Battery Installation and Lifespan.

Figure 7: Commercial-Grade Capacity of 33.8oz (1000ml).
Operating Instructions
Power On/Off
- To power on, press and hold the power button (located inside the dispenser) for 2 seconds. The indicator light will flash.
- To power off, press and hold the power button for 2 seconds again.
Adjusting Soap Volume (5 Levels)
- With the dispenser powered on, briefly press the power button to cycle through the 5 soap volume settings.
- Each press will change the dispensed amount. Select the level that best suits your needs.
- The default setting is Level 2.
Dispensing Soap
- Place your hand under the dispenser's sensor.
- The infrared sensor will detect your hand and automatically dispense the pre-set amount of liquid soap.
- Remove your hand once soap is dispensed.
Maintenance
Cleaning
- Wipe the exterior of the dispenser with a soft, damp cloth. Do not use abrasive cleaners or solvents.
- Do not rinse the dispenser directly under water.
- Regularly clean the sensor area to ensure proper operation.
Refilling Soap
- Use the provided key to open the dispenser.
- Carefully pour liquid soap into the reservoir.
- Close the dispenser securely.
Battery Replacement
- When the indicator light flashes rapidly or the dispenser stops working, it's time to replace the batteries.
- Open the dispenser with the key, access the battery compartment, and replace all 4 AA batteries with new ones.
- Ensure correct polarity.
Troubleshooting
| Problem | Possible Cause | Solution |
|---|---|---|
| Dispenser not working / No soap dispensed. |
|
|
| Accidental dispensing. |
|
|
| Soap dispenses too little/too much. |
|
|
Specifications
| Model | AK1226S |
| Brand | AIKE |
| Capacity | 33.8 oz (1000 ml) |
| Material | Commercial Grade ABS Plastic |
| Color | Black |
| Power Source | 4 x AA Batteries (not included) |
| Product Dimensions (L x W x H) | 5.4" x 3.5" x 9.5" (13.7cm x 9.0cm x 24.1cm) |
| Item Weight | 2.16 pounds (0.98 kg) |
| Dispensing Method | Automatic Infrared Sensor |
| Soap Volume Settings | 5 Levels |

Figure 8: Product Dimensions and Included Components.
Warranty and Support
The AIKE Automatic Wall Mount Liquid Soap Dispenser comes with a one-year manufacturer warranty from the date of purchase.
For any questions, concerns, or support needs regarding your product, please contact AIKE customer support:
- Via Amazon message system.
- Through our official support email (refer to product packaging or AIKE's official website for the exact address).
We value your experience and are committed to providing excellent customer service.


