Introduction
This instruction manual provides detailed guidance for the safe and efficient installation and operation of your MOUNT PRO Long Arm TV Wall Mount. Please read all instructions carefully before beginning installation to ensure proper setup and to prevent damage or injury. This mount is designed to accommodate most 32-75 inch TVs with VESA patterns from 150x100mm to 600x400mm, supporting up to 99 lbs.
Product Features
- Universal TV Wall Mount: Accommodates most 32"-75" TVs with VESA patterns from 150x100mm to 600x400mm. Suitable for LED LCD flat curved screen TVs up to 99 lbs.
- 37.9" Long Extension TV Mount: Extends 37.9" from the wall for optimal viewing and retracts to just 3" to save space. Ideal for corner placement.
- Maximized Flexibility: Features +/-90° smooth swivel to cover more viewing positions. Offers +5°/-10° tilt to reduce glare and +/-3° post-install leveling for precise alignment.
- Space-Efficient Corner TV Solution: Combines extended reach with flexibility, making it perfect for corner installations and expanding room layout possibilities.
- Quick & Easy Installation: Includes clear instructions, a bubble level, a mounting template, and necessary hardware in pre-labeled bags. Concrete anchors are available upon request.
Safety Information
- WARNING: DO NOT install into drywall alone! This mount requires installation into a wood stud or concrete/brick wall.
- Ensure the TV weight and VESA pattern are within the specified limits (Max 99 lbs, VESA 150x100mm to 600x400mm).
- Always use a stud finder to locate the center of wood studs.
- Verify that the mounting surface can safely support the combined weight of the equipment and all attached hardware.
- Do not overtighten screws to avoid stripping or damaging the wall/TV.
- Keep children and pets away during installation.
Package Contents
The package includes all necessary hardware for installation. Please verify all components are present before beginning.

Image: A variety of screws, washers, spacers, concrete anchors, and a small wrench are included, neatly organized in labeled plastic bags, alongside a mounting template and instruction manual.
The kit provides various screw sizes to match the back of your TV, concrete anchors for masonry installation, a small wrench, and a mounting template to assist with accurate measurements and alignment.
Setup and Installation
Step 1: Attach TV Brackets
Carefully place your TV face down on a soft, clean surface. Align the included TV brackets with the VESA mounting holes on the back of your TV. Select the appropriate screws and spacers from the hardware kit to secure the brackets. Ensure the brackets are equally centered and securely fastened.
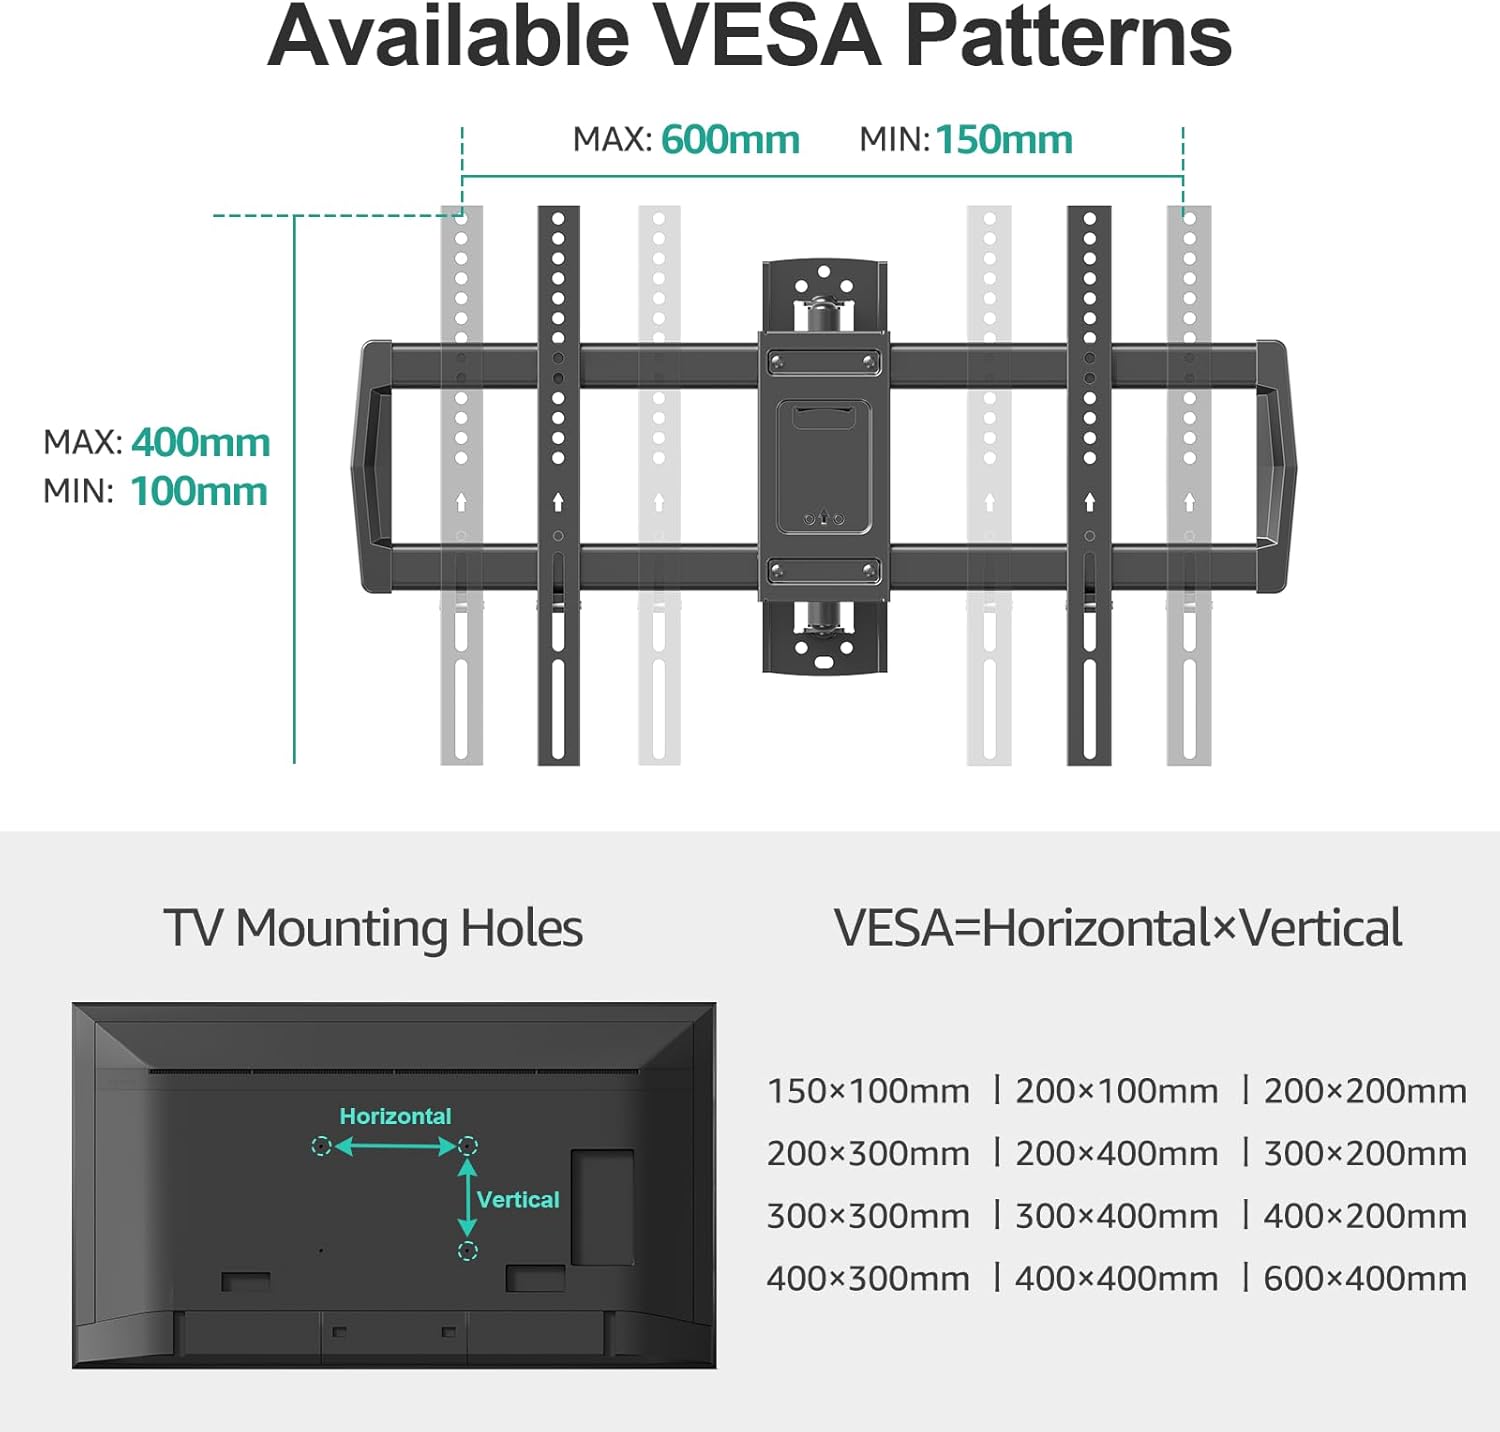
Image: A diagram illustrating various VESA mounting patterns (150x100mm to 600x400mm) and how to identify horizontal and vertical screw holes on the back of a TV.
Step 2: Mount Wall Plate
Using a stud finder, locate the wood studs in your desired mounting location. Mark the drill holes using the provided mounting template. Pre-drill pilot holes. For concrete/brick walls, use appropriate concrete anchors (sent per request) and drill bits. Secure the wall plate to the wall using the provided lag bolts and washers. Use the integrated bubble level to ensure the wall plate is perfectly horizontal.

Image: A visual guide showing the three main steps of installation: 1. Mount brackets to TV, 2. Install wall plate, 3. Hang TV onto wall plate. A drilling template is also shown.
Step 3: Hang TV onto Wall Plate
With assistance, carefully lift the TV with the attached brackets and hook them onto the wall plate. Ensure the TV is securely seated on the wall plate. Tighten the safety screws located at the bottom of the TV brackets to prevent accidental dislodgement.
Video: This video demonstrates the installation process of a BONTEC TV wall mount, highlighting its features and ease of setup. It shows the mount extending, swiveling, and tilting, and illustrates the steps to attach the TV to the wall plate.
Operating Instructions
Extension and Retraction
Gently pull or push the TV to extend it up to 37.9 inches from the wall or retract it to a slim 3 inches. This allows for flexible viewing angles and space-saving when not in use.

Image: A visual representation of the TV mount extending a full 37.9 inches from the wall and retracting to a compact 3 inches, demonstrating its long extension capability.
Swivel Functionality
The articulating arm allows for a +/-90° swivel, enabling you to adjust the TV to face various parts of the room for optimal viewing from any position, including corners.

Image: The TV mount is shown swiveling 180 degrees, illustrating its multi-angle flexibility to provide a great view from various positions within a room.
Tilt and Leveling
Adjust the tilt of your TV by +5° to -10° to reduce glare from lights or windows. The mount also features +/-3° post-installation leveling, allowing you to fine-tune the TV's horizontal position after it's mounted.

Image: This image displays the tilt function of the TV mount, adjustable from +5° to -10° to reduce glare, and the +/-3° leveling feature for perfect positioning after installation.
Maintenance
To ensure the longevity and safe operation of your TV wall mount, perform the following maintenance:
- Regular Checks: Periodically inspect all screws and connections to ensure they remain tight. Retighten if necessary.
- Cleaning: Wipe the mount with a soft, dry cloth. Avoid using abrasive cleaners or solvents that could damage the finish.
- Lubrication: If the articulating arm feels stiff, apply a small amount of silicone-based lubricant to the moving joints.
Troubleshooting
If you encounter any issues with your MOUNT PRO TV wall mount, refer to the following common solutions:
- TV is not level: Use the +/-3° post-installation leveling feature to adjust the TV's horizontal alignment. Ensure the wall plate was installed level initially.
- Mount feels loose: Recheck all lag bolts securing the wall plate to the wall and all screws attaching the TV brackets to the TV. Tighten any loose fasteners.
- Difficulty moving the arm: Ensure no cables are snagged or obstructing movement. Apply a small amount of silicone lubricant to the joints if necessary.
- TV not securely attached: Verify that the TV brackets are properly hooked onto the wall plate and that the safety screws at the bottom of the brackets are tightened.
Specifications
| Feature | Detail |
|---|---|
| Brand | MOUNT PRO |
| Model | B0DNZ697D6 |
| Compatible TV Sizes | 32" - 75" |
| Max Load Capacity | 99 lbs |
| VESA Compatibility | 150x100mm to 600x400mm |
| Extension from Wall | 3" (retracted) to 37.9" (extended) |
| Swivel Range | +/-90° |
| Tilt Range | +5° to -10° |
| Level Adjustment | +/-3° |
| Material | Alloy Steel |
| Color | Black |
| Item Weight | 14.52 pounds |
Warranty and Support
MOUNT PRO products are designed for durability and performance. For specific warranty details, please refer to the warranty card included in your product packaging or visit the official MOUNT PRO website. For technical support, troubleshooting assistance, or to request concrete anchors, please contact MOUNT PRO customer service.
Contact Information: Please refer to your product packaging or the official MOUNT PRO website for the most up-to-date contact details.


