1. Introduction
The MiBOXER WL-SW1 Smart Switch is designed to integrate traditional lighting and electrical appliances into a smart home system. It offers control via WiFi and 2.4G wireless technologies, enabling remote operation through a smartphone application, voice commands, and traditional manual switches. This manual provides essential information for the safe installation, setup, and operation of your WL-SW1 Smart Switch.
2. Safety Information
- Electrical Safety: Installation must be performed by a qualified electrician or service personnel in accordance with all local and national electrical codes.
- Power Disconnection: Always disconnect power at the circuit breaker before installing or servicing the device.
- Voltage Compatibility: Ensure the input voltage (100-240V AC, 50/60Hz) and maximum load (10A) are compatible with your electrical system and connected appliances.
- Indoor Use Only: This device is intended for indoor use in dry environments. Avoid exposure to moisture or extreme temperatures.
- Secure Connections: Ensure all wire connections are secure and properly insulated to prevent short circuits.
3. Package Contents
Verify that all items are present in the package:
- MiBOXER WL-SW1 Smart Switch
- User Manual (this document)

Figure 3.1: The MiBOXER WL-SW1 Smart Switch alongside its retail packaging and a small instruction leaflet, indicating typical package contents.
4. Product Overview
The WL-SW1 Smart Switch is a compact device designed for seamless integration into your electrical system. It features multiple connection points for input power, output to appliances, and connections for external manual switches.

Figure 4.1: Front view of the MiBOXER WL-SW1 Smart Switch, showing input and output terminals, model number, and basic electrical specifications.
Key Features:
- Dual Connectivity: Supports both WiFi and 2.4G wireless protocols for flexible control.
- Smart App Control: Compatible with the 'Tuya Smart' app for remote management.
- Voice Assistant Integration: Works with third-party voice control systems like Alexa and Google Assistant.
- Multi-Timer Function: Allows scheduling of operations.
- Manual Operation: Retains compatibility with traditional push or rocker switches.
- Memory Function: Remembers the last state after a power interruption.
- Wide Compatibility: Suitable for various electrical equipment.

Figure 4.2: Detailed diagram highlighting the various interfaces of the WL-SW1 Smart Switch, including input/output terminals, wire preparation guidelines, and construction features like screw lock terminals and a fire-resistant PC shell.
5. Specifications
| Attribute | Value |
|---|---|
| Model Number | WL-SW1 |
| Input Voltage | 100-240V~, 50/60Hz |
| Output Voltage | 100-240V~, 50/60Hz |
| Max Current | 10A |
| Working Temperature | -10~40°C |
| Wireless Connectivity | WiFi + 2.4G |
| Package Dimensions | 3 x 3 x 1.5 inches |
| Item Weight | 2.24 ounces |
6. Installation
Important: Ensure power is disconnected at the circuit breaker before beginning installation.
- Prepare the Installation Location: The WL-SW1 Smart Switch is designed to fit into standard bottom boxes with a depth greater than 50mm.
- Wire Preparation: Strip approximately 7mm of insulation from the ends of your wires.
- Connect Input Power: Connect the Live (L) and Neutral (N) wires from your power supply to the 'L' and 'N' terminals under the 'INPUT' section of the switch.
- Connect Output to Appliance: Connect the Live (L1) and Neutral (N) wires leading to your electrical appliance (e.g., light, fan) to the 'L1' and 'N' terminals under the 'OUTPUT' section.
- Connect Manual Switch (Optional): If using a traditional push or rocker switch, connect its terminals to 'S1' and 'S2' on the WL-SW1. This allows for manual control in addition to smart control.
- Secure the Device: Carefully place the WL-SW1 into the electrical box, ensuring no wires are pinched. Secure it in place.
- Restore Power: Once all connections are secure and the device is properly installed, restore power at the circuit breaker.

Figure 6.1: Step-by-step installation diagram for the WL-SW1 Smart Switch, detailing how it fits into standard electrical boxes (depth > 50mm) and connects to a push or rocker switch.
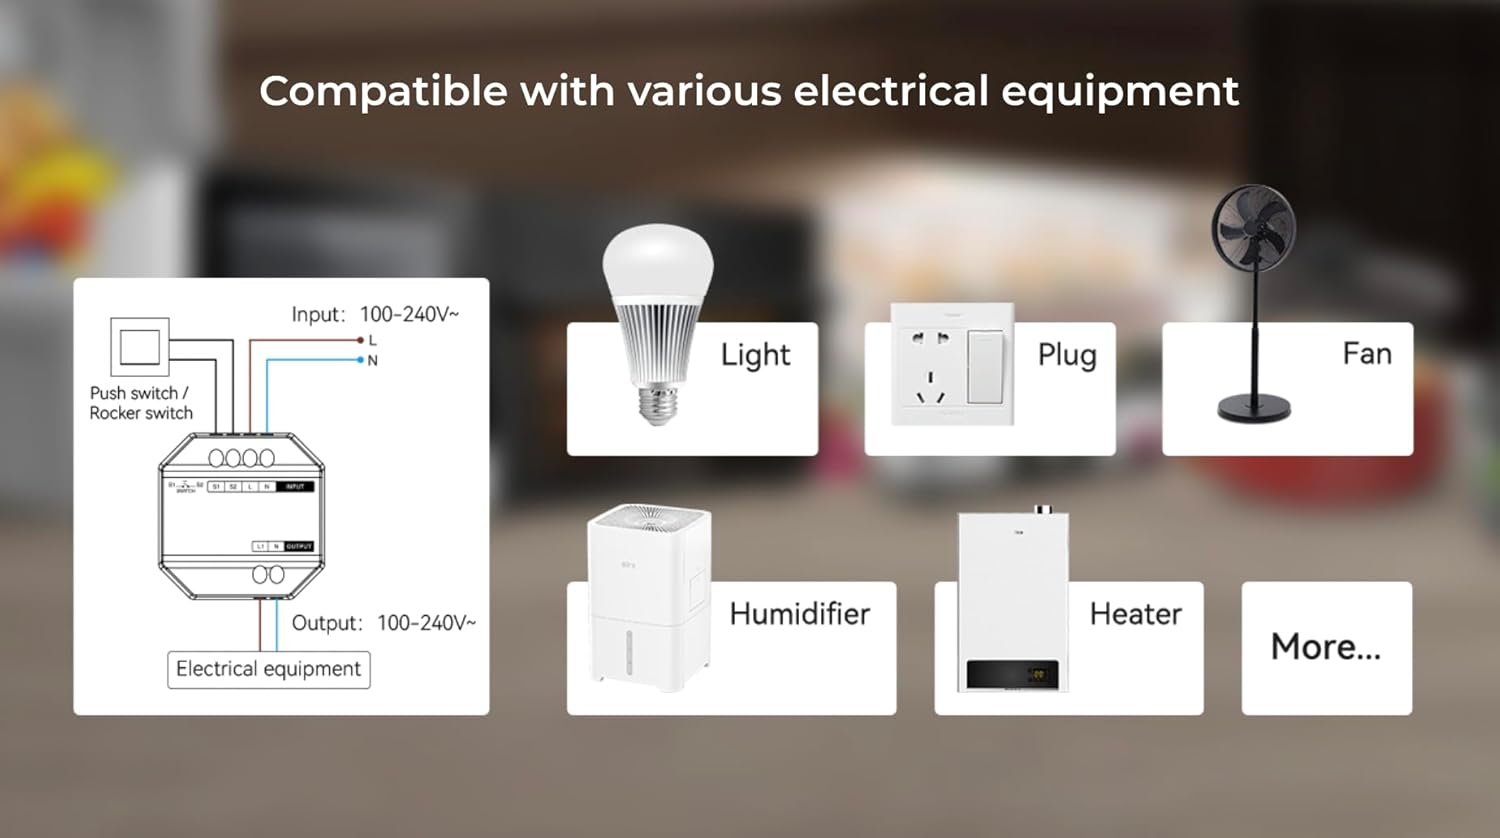
Figure 6.2: An illustrative diagram demonstrating the broad compatibility of the WL-SW1 Smart Switch with diverse electrical appliances, including lighting, fans, and heating devices.
7. Setup
7.1. App Pairing (Tuya Smart)
- Download App: Download the 'Tuya Smart' app from your smartphone's app store (iOS or Android).
- Register/Login: Open the app and register for a new account or log in with an existing one.
- Add Device: Follow the in-app instructions to add a new device. The WL-SW1 typically enters pairing mode automatically upon first power-up or after a reset.
- Connect to WiFi: Select your 2.4GHz WiFi network and enter the password. The app will guide you through the connection process.
- Device Renaming: Once connected, you can rename the switch for easier identification.

Figure 7.1: An illustration of the MiBOXER WL-SW1 Smart Switch being controlled via a smartphone application, demonstrating remote operation.

Figure 7.2: An overview of the 'Tuya Smart' application features compatible with the WL-SW1 Smart Switch, such as timing settings, device sharing, automation, and child lock functionality.
7.2. Voice Assistant Integration
To enable voice control with platforms like Amazon Alexa or Google Assistant:
- Ensure your WL-SW1 is successfully paired with the 'Tuya Smart' app.
- Open your Alexa or Google Home app.
- Navigate to the 'Skills' or 'Works with Google' section.
- Search for and enable the 'Tuya Smart' skill/service.
- Link your Tuya Smart account when prompted.
- Discover devices. Your WL-SW1 Smart Switch should now appear and be controllable via voice commands.
8. Operating Instructions
8.1. App Control
Once paired, you can control your WL-SW1 Smart Switch from the 'Tuya Smart' app:
- On/Off: Tap the switch icon in the app to toggle the connected appliance on or off.
- Timing Settings: Use the app's timing function to set schedules for automatic on/off operations.
- Device Sharing: Share control of the switch with other family members through the app.
- Automation: Create smart scenes and automations based on conditions like time, weather, or other device states.
8.2. Manual Control
If an external push or rocker switch is connected to the 'S1' and 'S2' terminals, you can operate the connected appliance manually by pressing the physical switch. This functionality works independently of the smart control system.

Figure 8.1: The MiBOXER WL-SW1 Smart Switch shown installed behind a conventional wall switch, illustrating its compatibility with existing manual controls.
8.3. Memory Function
The WL-SW1 Smart Switch features a memory function. In the event of a power outage, the switch will return to its last known state (on or off) once power is restored.
9. Maintenance
- Cleaning: Disconnect power before cleaning. Wipe the device with a soft, dry cloth. Do not use liquid cleaners or aerosols.
- Firmware Updates: Periodically check the 'Tuya Smart' app for available firmware updates to ensure optimal performance and security.
- Environmental Conditions: Ensure the device is kept within its specified working temperature range (-10~40°C) and away from excessive moisture.
10. Troubleshooting
- Device Not Responding: Check if the power supply is connected correctly. Verify the WiFi connection in the 'Tuya Smart' app. Ensure the device is within range of your WiFi router.
- Cannot Pair with App: Ensure your smartphone is connected to a 2.4GHz WiFi network (5GHz networks are not supported for initial pairing). Reset the device (refer to app instructions for reset procedure, typically involves holding a button or cycling power).
- Voice Control Not Working: Confirm that the 'Tuya Smart' skill/service is enabled and linked in your Alexa or Google Home app. Ensure the device is discovered and named appropriately.
- Manual Switch Not Working: Verify that the 'S1' and 'S2' terminals are correctly wired to your physical switch.
11. Warranty and Support
For warranty information and technical support, please refer to the documentation provided with your purchase or visit the official MiBOXER website. Keep your proof of purchase for warranty claims.


