
Introduction
This manual provides detailed instructions for the installation, operation, and maintenance of your Vrabocry DR03W RGB SPI WiFi LED Controller. This controller is designed to manage various addressable LED strip lights, offering smart control via WiFi and Bluetooth, app integration, and voice control capabilities.
Safety Information
- Ensure the input voltage (5-24V DC) matches the LED strip and power supply requirements. Incorrect voltage can damage the device and LED strips.
- Do not exceed the maximum current ratings: 12A for wiring terminals, 4A for DC input socket.
- Install the controller in a dry, indoor environment. Avoid exposure to moisture or extreme temperatures.
- Disconnect power before making any wiring connections to prevent electrical shock.
- This device is intended for indoor use only.
Package Contents
- 1 x Vrabocry DR03W RGB SPI WiFi LED Controller
Please check that all components are present and undamaged. If any items are missing or damaged, contact customer support.
Specifications
| Feature | Specification |
|---|---|
| Model Name | DR03W |
| Control Pixels | Up to 720 Pixels/LED |
| Working Temperature | -25°C to 55°C |
| Input Voltage | 5-24V DC |
| Max Current (Wiring Terminal) | 12A |
| Max Current (DC Input Socket) | 4A |
| Supported ICs | WS2811, WS2812B, WS2813, WS2815, etc. |
| Connectivity | 2.4G WiFi, Bluetooth |
| Control Method | Tuya Smart Life App, Voice Control (Google Home, Alexa) |
Product Overview
Familiarize yourself with the components of your Vrabocry DR03W controller.

Image: The Vrabocry DR03W RGB SPI WiFi LED Controller shown with its retail packaging. The box displays the model number, input/output specifications, and QR code for app installation.
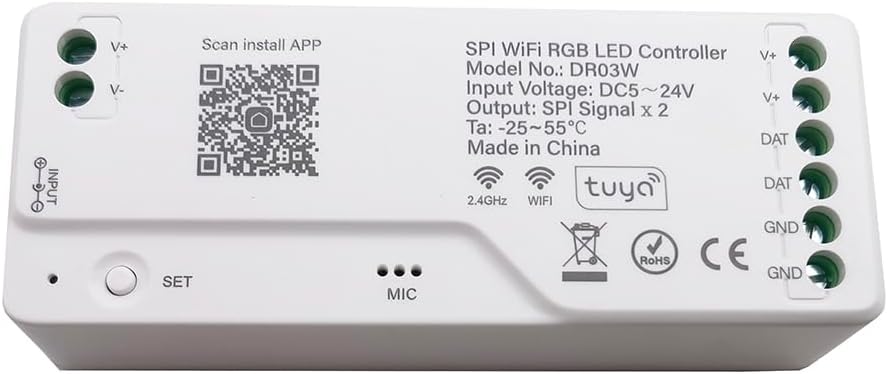
Image: Top view of the DR03W controller. Key features include the V+ and V- input terminals, a DC input jack, a 'SET' button for pairing, a 'MIC' (microphone) for music synchronization, and output terminals (V+, DAT, GND). A QR code for the Smart Life app is also visible. The link for the app is https://smartapp.tuya.com/smartlife.

Image: An angled view of the DR03W controller, highlighting the screw terminals for both power input (V+, V-) and LED strip output (V+, DAT, GND).

Image: Bottom view of the DR03W controller, showing its smooth, unadorned surface.
Component Identification:
- Input (V+, V-): Power input terminals for connecting the DC power supply.
- DC Input Socket: Alternative power input for DC adapters.
- SET Button: Used for pairing the controller with the Smart Life app.
- MIC: Integrated microphone for music synchronization features.
- Output (V+, DAT, GND): Terminals for connecting to the addressable LED strip light. DAT is the data line.
Setup
1. Wiring Instructions
Before connecting, ensure the power supply is disconnected. The controller supports both parallel and series connections for LED strips, with voltage supplementation as needed for longer runs.

Image: Detailed wiring diagram illustrating both parallel and series connection methods for LED strips with the DR03W controller. It also shows how to implement voltage supplementation for extended strip lengths. Note the data direction arrows on the LED strips.
Parallel Connection & Voltage Supplementation:
- Connect the main power supply (AC 110-220V) to a DC power supply (e.g., 5-24V DC).
- Connect the DC power supply output to the V+ and V- input terminals of the DR03W controller.
- Connect the V+, DAT, and GND output terminals of the controller to the first LED strip.
- For additional LED strips in parallel, connect their V+, DAT, and GND inputs directly to the controller's corresponding output terminals.
- For voltage supplementation on longer parallel runs, connect additional DC power supplies directly to the V+ and V- lines of the LED strips at intervals, ensuring the power supply output voltage matches the LED strip's working voltage.
Series Connection & Voltage Supplementation:
- Connect the main power supply (AC 110-220V) to a DC power supply.
- Connect the DC power supply output to the V+ and V- input terminals of the DR03W controller.
- Connect the V+, DAT, and GND output terminals of the controller to the input of the first LED strip.
- Connect the output of the first LED strip to the input of the second LED strip, and so on, following the data direction.
- For voltage supplementation in series, additional DC power supplies must be connected directly to the V+ and V- lines of the LED strips at appropriate points. Important: The power supply output voltage must be the same as the LED strip's working voltage.
2. App Installation and Pairing
- Download the App: Scan the QR code on the controller or its packaging, or search for "Smart Life" in your mobile app store (iOS App Store or Google Play Store). You can also visit https://smartapp.tuya.com/smartlife.
- Register/Log In: Open the Smart Life app and register for a new account or log in with an existing one.
- Add Device: Power on the DR03W controller. In the Smart Life app, tap the "+" icon to add a device.
- Pairing Mode: Press and hold the "SET" button on the controller until the indicator light flashes rapidly, indicating it's in pairing mode.
- Connect: Follow the in-app instructions to connect the controller to your 2.4GHz WiFi network. The app will use Bluetooth for initial discovery to improve the distribution network experience. If your router is disconnected, you can use Bluetooth for short-distance control.
- Configure IC Type and Pixel Count: Once connected, navigate to the device settings in the app to select the correct LED driver IC type (e.g., WS2811, WS2812B) and set the total number of pixels for your LED strip. This is crucial for proper light effects.
Operation
1. Smart Life App Control
The Smart Life app provides comprehensive control over your LED strip lights:
- Dimming & Color Control: Adjust brightness, select static colors, and fine-tune color temperature.
- Dynamic Modes: Choose from a variety of built-in dynamic lighting effects. You can also customize these modes to create your own unique sequences.
- Music Rhythm: Utilize the built-in microphone on the controller or your phone's microphone to synchronize light effects with music.
- Scene Customization: Create and save custom lighting scenes for different moods or occasions.
- Group Control: If you have multiple Vrabocry controllers, group them together for synchronized control.
- Timing & Schedules: Set schedules for your lights to turn on/off or change modes automatically.
- Automation: Integrate with other smart home devices and create automated routines (e.g., lights turn on when motion is detected).
- ON/OFF Animation Effects: Configure various animation effects for when the lights turn on or off.
2. Voice Control (Google Home / Amazon Alexa)
Integrate your Vrabocry DR03W controller with Google Home or Amazon Alexa for convenient voice control.
- Link Smart Life Account: In your Google Home or Amazon Alexa app, navigate to the "Skills" or "Works with Google" section. Search for and enable the "Smart Life" skill.
- Authorize: Log in with your Smart Life account credentials to link the accounts.
- Discover Devices: Ask your voice assistant to "discover devices" or manually initiate device discovery in the app.
- Control: You can now use voice commands such as:
- "Alexa, turn on the [Light Name]"
- "Hey Google, set [Light Name] to blue"
- "Alexa, dim [Light Name] to 50%"
Note: The 2.4G RF wireless signal auto-transmission technology mentioned in product features refers to the controller's capability to work with compatible 2.4G RF remote controls, allowing for extended control range without line-of-sight limitations. A remote control is typically sold separately.
Maintenance
- Keep the controller clean and free from dust. Use a soft, dry cloth for cleaning.
- Avoid exposing the controller to direct sunlight or high humidity.
- Regularly check wiring connections to ensure they are secure.
- Ensure adequate ventilation around the controller to prevent overheating.
Troubleshooting
| Problem | Possible Cause | Solution |
|---|---|---|
| LED strip not lighting up. | No power to controller or strip; incorrect wiring; faulty strip. | Check power supply connection and output voltage. Verify all wiring connections (V+, DAT, GND). Test the LED strip with a known working controller if possible. |
| Lights are flickering or displaying incorrect colors. | Incorrect IC type or pixel count set in app; insufficient power supply; loose data connection. | In the Smart Life app, ensure the correct LED driver IC type and pixel count are configured. Verify the power supply can handle the total wattage of the LED strip. Check DAT and GND connections. |
| Controller cannot connect to WiFi. | Incorrect WiFi password; 5GHz WiFi network; controller not in pairing mode; weak signal. | Ensure you are connecting to a 2.4GHz WiFi network. Double-check the WiFi password. Press and hold the SET button to re-enter pairing mode (rapid flashing light). Move the controller closer to the WiFi router. |
| Voice control not working. | Smart Life skill not linked; device not discovered; incorrect commands. | Ensure your Smart Life account is correctly linked in the Google Home/Alexa app. Ask the assistant to "discover devices." Use the exact device name configured in the Smart Life app. |
| Music synchronization is not accurate. | Microphone interference; low volume; incorrect sensitivity. | Ensure the controller's MIC is not obstructed. Adjust the microphone sensitivity settings within the Smart Life app. Increase music volume. |
Warranty and Support
Vrabocry products typically come with a standard manufacturer's warranty covering defects in materials and workmanship. Please refer to your purchase documentation or contact the seller for specific warranty terms and duration.
For technical support, troubleshooting assistance, or warranty claims, please contact Vrabocry customer service through the platform where you purchased the product or visit the official Vrabocry website if available.