
SMALLRIG 4259
SmallRig x Potato Jet Tribex Hydraulic Carbon Fiber Tripod Kit
Model 4259 User Manual
1. Introduction
This manual provides comprehensive instructions for the safe and effective use of your SmallRig x Potato Jet Tribex Hydraulic Carbon Fiber Tripod Kit, Model 4259. Please read this manual thoroughly before operating the product and retain it for future reference. This tripod is designed for professional videography and photography, offering stability, quick setup, and versatile adjustments.
2. Product Overview and Features
The Tribex Hydraulic Carbon Fiber Tripod Kit combines lightweight design with robust functionality, featuring innovative hydraulic technology for rapid deployment and precise control.
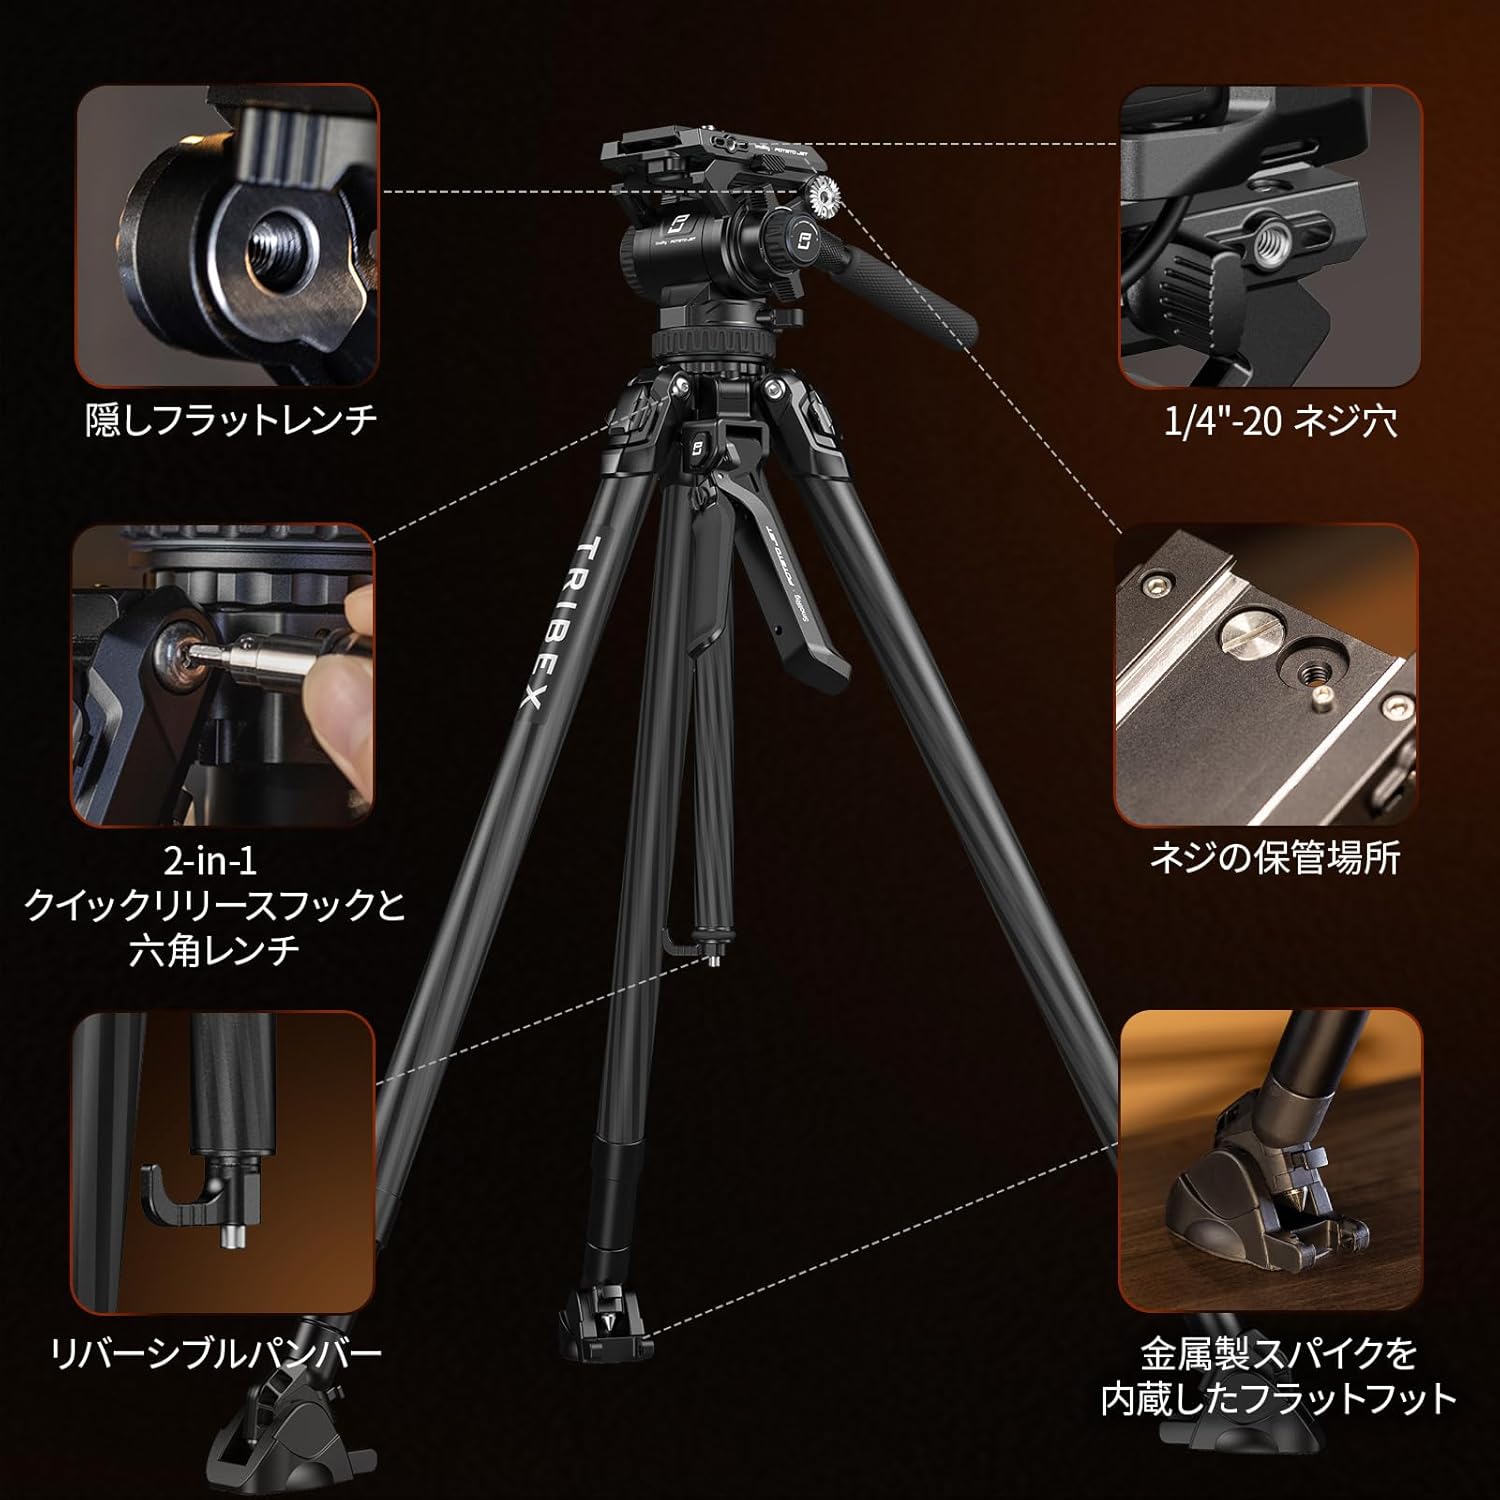
Figure 2.1: Overview of the SmallRig Tribex Tripod with key features highlighted.
Key Features:
- Lightweight Carbon Fiber Construction: The tripod legs and center column are constructed from carbon fiber, resulting in a total weight of approximately 3.8 kg (8.3 lbs) for enhanced portability without compromising stability.
- X-Clutch Hydraulic Technology: This patented system allows for rapid deployment and adjustment of all three legs simultaneously with a single clutch mechanism. Legs can be quickly locked at 45° or 90° angles.
- 4-Stage Dynamic Counterbalance Fluid Head: The included fluid head supports a maximum payload of 6kg (13.2 lbs) and features a 4-stage dynamic counterbalance system (0, 1, 2, 3) for smooth camera movements.
- Stepless Pan and Tilt Damping: Achieve precise and smooth camera movements with stepless damping adjustments for both 360° panning and +90°/-65° tilting.
- Versatile Height Adjustment: The tripod offers a wide height range from a minimum of 27cm (10.6 inches) to a maximum of 168cm (66.1 inches). The folded length is 79cm (31 inches).
- Removable Center Column: The center column features a quick-lock design for easy height adjustment and can be removed to achieve extremely low-angle shots (down to 27cm).
- Convertible Feet: The tripod feet can be quickly switched between flat rubber feet for stable ground surfaces and integrated metal spikes for soft terrain like grass or soil.
- Integrated Tools and Accessory Mounts: A removable hex wrench is integrated into the hook for convenient assembly and disassembly. The fluid head also includes three 1/4"-20 threaded holes for attaching accessories like magic arms or monitors.
- Quick Release Plate Compatibility: The quick release plate is compatible with both 501 quick release plates and DJI RS series quick release plates, allowing for rapid transitions between tripod and stabilizer setups.
3. Included Items
Please verify that all items listed below are present in your package:
- Tripod Kit x 1
- Hex Wrench x 1
- Storage Bag x 1
- Smartphone Holder x 1
- Warranty Card x 1

Figure 3.1: Contents of the SmallRig Tribex Tripod Kit package.
4. Setup Instructions
4.1 Unfolding the Tripod
- Place the tripod on a stable surface.
- Release the leg angle locks on each leg.
- Extend the legs to your desired height. The X-Clutch hydraulic system allows for quick, simultaneous extension.
- Adjust the leg angles using the leg angle locks. The legs can be set at 45° or 90° for various shooting scenarios.

Figure 4.1: The X-Clutch hydraulic system enables rapid leg deployment and angle adjustment.
4.2 Attaching the Camera
- Ensure the quick release plate is securely attached to your camera's base. Use the integrated hex wrench if needed.
- Loosen the quick release plate lock on the fluid head.
- Slide the camera with the attached quick release plate into the fluid head receiver until it clicks into place.
- Tighten the quick release plate lock to secure the camera.

Figure 4.2: Quick release plate system for fast camera attachment and detachment.
4.3 Adjusting Tripod Height
- Leg Height: Unlock the leg sections and extend them to the desired length. Secure the locks firmly.
- Center Column: To adjust the center column height, loosen the center column lock, raise or lower the column, and then tighten the lock.
- Low-Angle Shooting: For minimum height, remove the center column by fully loosening its lock and pulling it out. This allows for shooting as low as 27cm.

Figure 4.3: The tripod offers a wide range of height adjustments for diverse shooting needs.

Figure 4.4: The removable center column facilitates extremely low-angle shots.
4.4 Adjusting Feet for Terrain
The tripod features convertible feet for different surfaces:
- Flat Rubber Feet: Ideal for hard, flat surfaces like concrete or studio floors.
- Metal Spikes: For soft ground such as grass, soil, or sand, rotate the rubber feet to expose the integrated metal spikes for improved grip and stability.

Figure 4.5: Easily switch between flat rubber feet and metal spikes for optimal stability on any terrain.
5. Operating Instructions
5.1 Fluid Head Operation
- Pan Control: Use the pan lock knob to control horizontal rotation. Adjust the pan damping ring for desired resistance during 360° panning movements.
- Tilt Control: Use the tilt lock knob to control vertical tilt. Adjust the tilt damping knob for desired resistance during +90°/-65° tilting movements.
- Dynamic Counterbalance: The fluid head features a 4-stage dynamic counterbalance system (0-6kg payload). Rotate the counterbalance adjustment knob to match your camera setup's weight, ensuring smooth and stable tilting.

Figure 5.1: The fluid head offers precise control over pan, tilt, and counterbalance for smooth camera operation.

Figure 5.2: Experience seamless 360° panning with adjustable damping.
5.2 Leveling the Tripod
The tripod head includes a bubble level to assist in achieving a perfectly level setup. Adjust the leg lengths and the leveling base until the bubble is centered.
5.3 Accessory Attachment
Utilize the three 1/4"-20 threaded holes on the fluid head to attach external accessories such as monitors, microphones, or LED lights using compatible magic arms or mounts.

Figure 5.3: Expand your setup with various accessories using the integrated mounting points.
6. Maintenance
- Cleaning: Regularly wipe down the tripod with a soft, dry cloth. For stubborn dirt, use a slightly damp cloth and mild soap, then dry thoroughly. Avoid harsh chemicals.
- Lubrication: The hydraulic system is factory-sealed and generally does not require user lubrication. If you notice any stiffness in leg extension or head movement, contact customer support.
- Storage: Store the tripod in its provided storage bag in a cool, dry place away from direct sunlight and extreme temperatures.
- Inspection: Periodically check all screws, knobs, and locks to ensure they are secure. Tighten any loose components using the provided hex wrench.
7. Troubleshooting
- Legs not extending/retracting smoothly: Ensure all leg locks are fully disengaged. Check for any obstructions or debris in the leg sections. If the issue persists, it may indicate a hydraulic system problem; contact customer support.
- Fluid head movement is jerky or too loose/tight: Adjust the pan and tilt damping knobs to your desired resistance. Ensure the counterbalance is correctly set for your camera's weight.
- Tripod is unstable: Verify that all leg sections are fully extended and locked, and leg angles are securely set. Ensure the feet are appropriate for the terrain (flat for hard surfaces, spikes for soft ground). Check that the center column is fully tightened if extended.
- Camera not securely attached: Ensure the quick release plate is properly seated and the lock is fully tightened. Verify that the quick release plate is correctly attached to your camera.
For issues not covered here, please refer to the warranty and support section for assistance.
8. Specifications
| Brand | SMALLRIG |
| Model Name | PJ01 (Model 4259) |
| Material | Carbon Fiber, Aluminum Alloy, POM, Stainless Steel, Silicon |
| Product Weight | 3.8 kg (8.3 lbs) |
| Maximum Load Capacity | 6 kg (13.2 lbs) |
| Minimum Height | 27 cm (10.6 inches) |
| Maximum Height | 168 cm (66.1 inches) |
| Folded Size | 79 cm (31 inches) |
| Tripod Head Type | Fluid Head |
| Pan Control | Stepless 360° Damping |
| Tilt Control | Stepless +90°/-65° Damping |
| Counterbalance Steps | 4-step (0, 1, 2, 3) |
| Leg Diameter | 29.5mm - 25.5mm - 22mm |
| Fluid Head Base Diameter | 65.0mm |

Figure 8.1: Detailed product dimensions and specifications.
9. Warranty and Support
This SmallRig x Potato Jet Tribex Hydraulic Carbon Fiber Tripod Kit (Model 4259) comes with a 2-year manufacturer's warranty. Please retain your proof of purchase for warranty claims.
For technical support, troubleshooting assistance, or warranty service, please contact SmallRig customer service through their official website or the retailer where you purchased the product. You can also refer to the warranty card included in your package for specific contact details.

Figure 9.1: Warranty information for the Tribex Standard Version.
Related documents4259


Ask a question about this manual
Ask about setup, troubleshooting, compatibility, parts, safety, or missing instructions. Manuals+ will review the question and use this page’s manual context to help answer it.