
1. Introduction
This manual provides detailed instructions for the assembly, operation, and maintenance of your Niche SNOWSQUATCH Deluxe UTV Snow Plow System. This system is designed for efficient snow removal with UTVs, featuring an adjustable steel blade and universal mount kit. Please read this manual thoroughly before installation and use to ensure safe and optimal performance.
2. Safety Information
Always prioritize safety when operating the snow plow system. Failure to follow safety instructions can result in serious injury or property damage.
- Read and understand all instructions in this manual before assembly and operation.
- Wear appropriate personal protective equipment (PPE), including safety glasses, gloves, and sturdy footwear.
- Ensure the UTV is stable and turned off before performing any installation, adjustment, or maintenance.
- Keep bystanders, especially children and pets, away from the work area.
- Do not operate the plow on slopes that are too steep or in conditions that compromise UTV stability.
- A winch (not included) is required for operation. Ensure the winch is properly installed and maintained according to its manufacturer's instructions.
- Inspect all components for damage or wear before each use. Replace worn or damaged parts immediately.
- Be aware of hidden obstacles under the snow that could damage the plow or UTV.
- Some model applications may require minor frame modifications for proper fit. Consult a qualified technician if unsure.
3. Components List
The SNOWSQUATCH Deluxe UTV Snow Plow System includes the following main components and accessories:
- Adjustable Steel Blade (60-72 inches)
- Universal Mount Kit
- Plow Markers (brightly colored)
- Rubber Deflector
- Skid Shoes (adjustable, rugged)
- Drift Cutter Side Wings
- Push Tube Assembly
- Adjustment Turntable
- Mounting Hardware (U-bolts, nuts, bolts, pins, springs)

Figure 3.1: Main components of the SNOWSQUATCH Deluxe UTV Snow Plow System.

Figure 3.2: Detailed view of plow components.
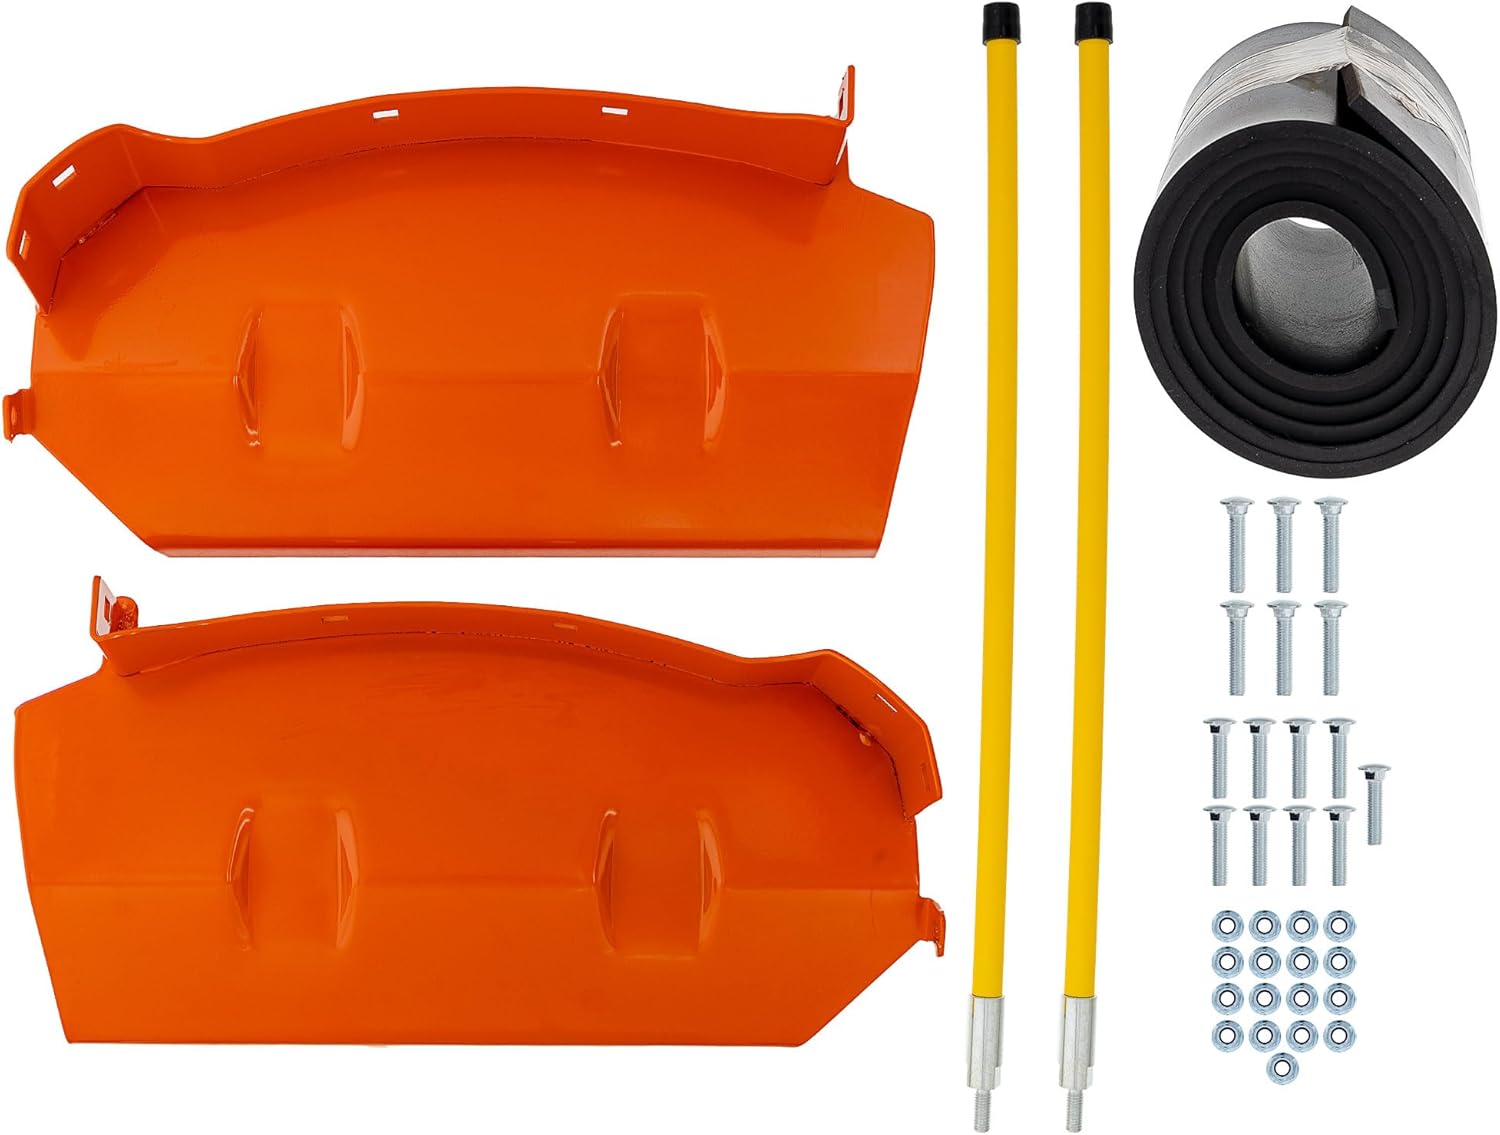
Figure 3.3: Included accessories and hardware.
4. Setup & Installation
Assembly and installation time is estimated to be 3-4+ hours. The plow kit ships in 2 boxes. A winch (not included) is required for operation. Some model applications may require minor frame modifications for proper fit. It is recommended to lift the UTV for easier access during installation.
4.1. Blade Assembly
Attach the skid shoes and hooks to the plow blade as shown in the video. Ensure all fasteners are securely tightened.
Video 4.1: Blade installation, including skid shoe and hook attachment. This video demonstrates the initial assembly of the plow blade components.
4.2. Adjustment Turntable Installation
Assemble the adjustment turntable onto the push tube frame. Install the steering adjustment handle and ensure it functions correctly for angle adjustments.
Video 4.2: Installation of the adjustment turntable and steering handle. This video shows how to attach the turntable mechanism to the push tube.
4.3. Push Tube and Blade Attachment
Connect the assembled blade to the push tube using the provided pins and springs. The springs are crucial for the trip force mechanism.

Figure 4.3: Push tube and blade assembly.
Video 4.3: Push tube installation and connection to the blade. This video details the final steps of connecting the push tube to the plow blade.
4.4. Universal Mount Kit Installation to UTV
Secure the universal mount plate to the underside of your UTV's frame using the U-bolts. Ensure the mounting is robust and stable. The plow system then attaches to this mounting bracket.

Figure 4.4: Plow system attached to a UTV, ready for winch connection.
Video 4.4: Demonstration of the universal mount kit installation to the UTV frame. This video provides a visual guide for securing the mounting bracket to your vehicle.
5. Operation
The SNOWSQUATCH Deluxe UTV Snow Plow System is designed for efficient snow removal. Proper operation ensures longevity and effectiveness.
5.1. Blade Adjustments
- Blade Width: The modular blade design allows adjustment to multiple widths (60 or 72 inches). Adjust the blade sections as needed for your plowing requirements.
- Plowing Angle: The plow features 5 quick-change angle settings. Use the steering adjustment handle to set the desired plowing angle.
- Skid Shoes: The adjustable, rugged skid shoes help control the plowing depth and protect the blade. Adjust them to prevent the blade from digging into the ground or to maintain a consistent plowing height.

Figure 5.1: Blade angle adjustment mechanism.
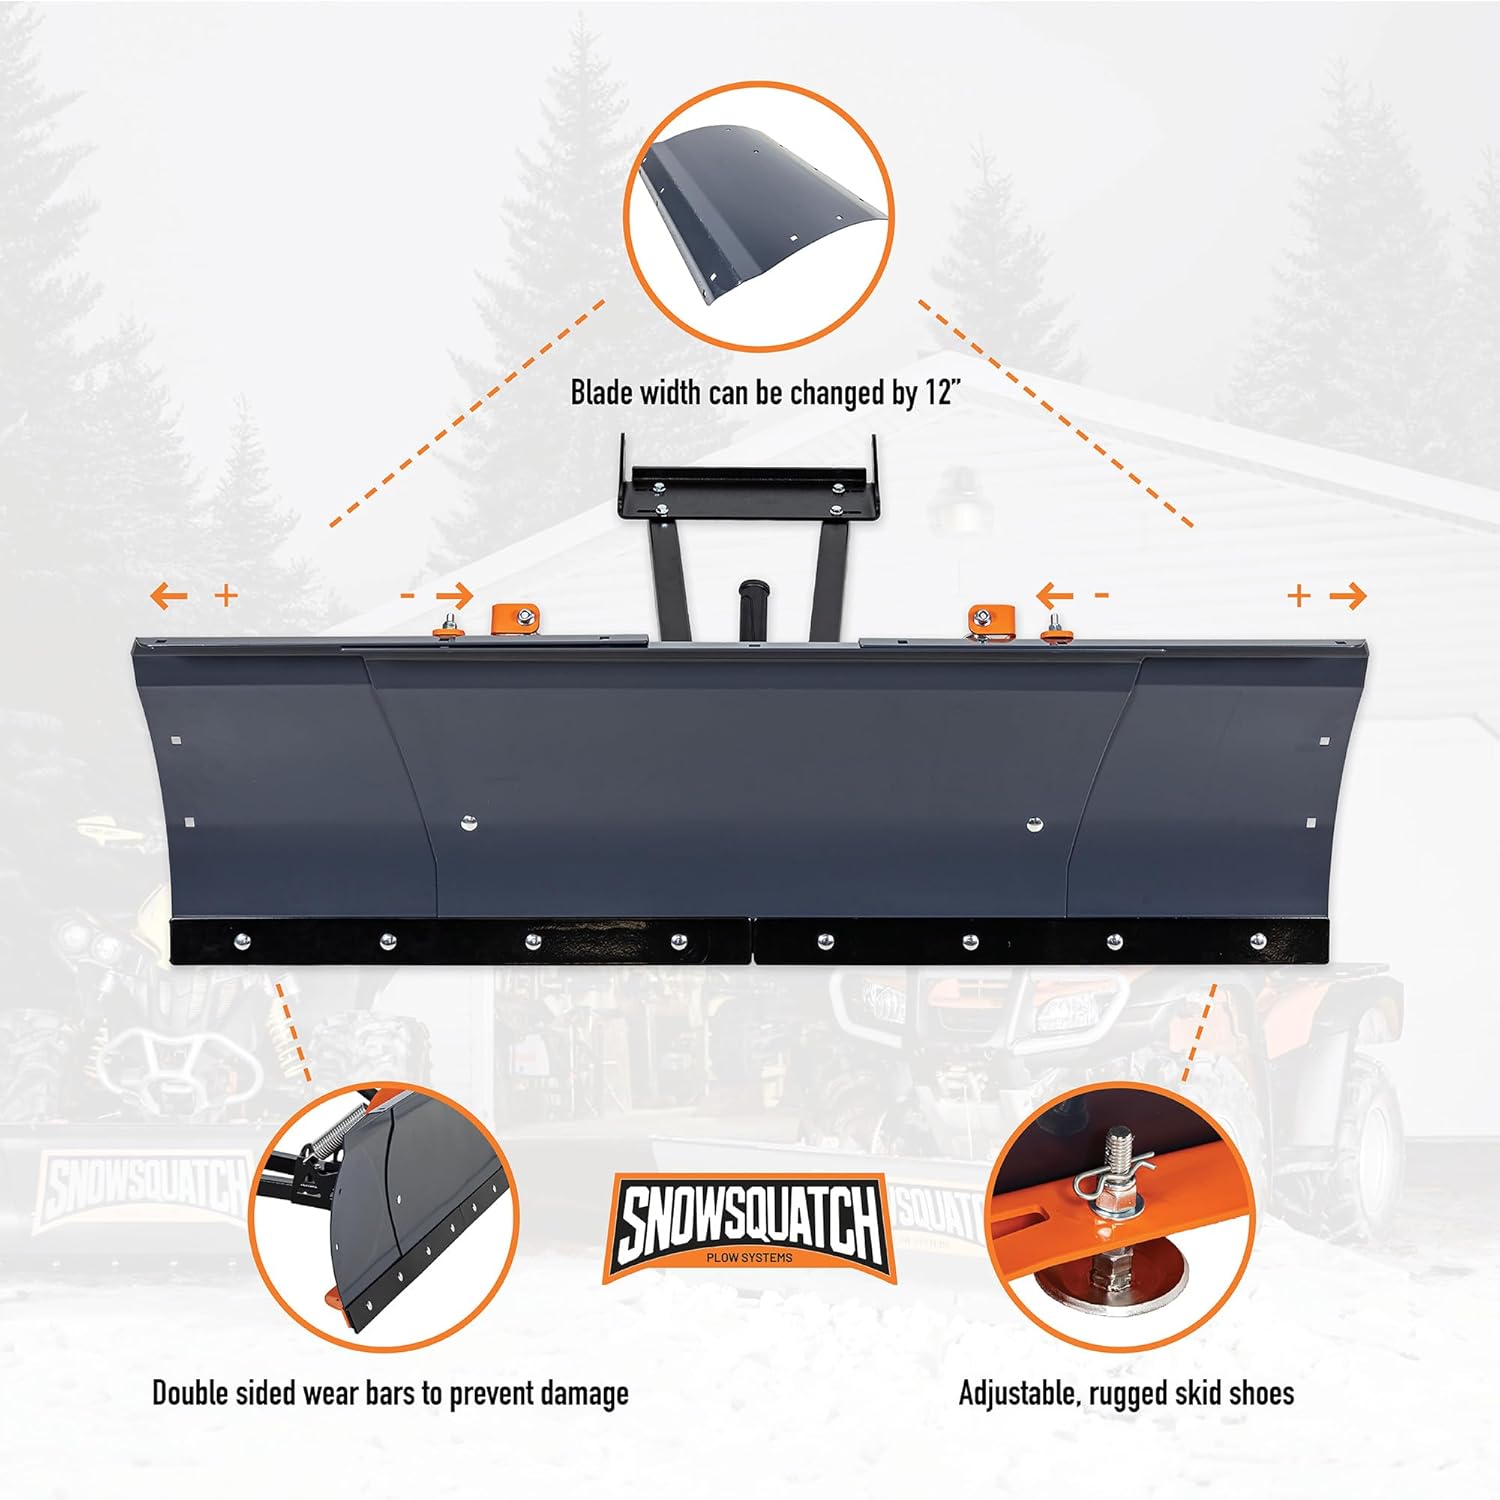
Figure 5.2: Blade width and skid shoe adjustments.
5.2. Winch Operation
A UTV-mounted winch (not included) is essential for raising and lowering the plow blade. Connect the winch cable to the plow's lift point. Operate the winch according to its manufacturer's instructions to control the blade height.
Video 5.3: Short demonstration of a snow plow in action, showing snow being cleared. This video provides a brief visual of the plow's operational capability.
5.3. Plowing Techniques
- Start plowing from the center of the area and push snow outwards.
- Overlap each pass slightly to ensure complete snow removal.
- Use the drift cutter side wings to manage deeper snow and prevent spill-over.
- The rubber deflector helps prevent snow blowback onto the UTV operator.
- Brightly colored plow markers help identify the blade's edge, preventing property damage.

Figure 5.4: Plow markers, rubber deflector, and side wings.
6. Maintenance
Regular maintenance ensures the longevity and reliable performance of your SNOWSQUATCH snow plow system.
- Post-Use Cleaning: After each use, clean the blade and all components to remove snow, ice, and salt. This prevents corrosion and maintains smooth operation.
- Inspect Wear Parts: Regularly check the double-sided wear bars and skid shoes for wear. Replace them when they show significant signs of deterioration to maintain plowing effectiveness and protect the blade.
- Lubrication: Lubricate all pivot points and moving parts with appropriate grease or lubricant to ensure smooth movement and prevent rust.
- Fastener Check: Periodically inspect all bolts, nuts, and pins for tightness. Re-tighten as necessary to prevent components from loosening during operation.
- Spring Tension: Check the tension of the trip springs. Ensure they are properly adjusted to allow the blade to trip over obstacles without damage.
- Storage: When not in use, store the snow plow in a dry, protected area to prevent exposure to elements that could cause rust or damage.
7. Troubleshooting
This section addresses common issues you might encounter with your snow plow system.
| Problem | Possible Cause | Solution |
|---|---|---|
| Plow not fitting UTV frame | Minor frame modifications may be required for specific UTV models. | Consult your UTV manual or a qualified technician for necessary frame adjustments. Ensure the universal mount kit is correctly positioned. |
| Blade not lifting/lowering properly | Winch malfunction or improper cable connection. | Check winch operation and ensure the cable is securely attached to the plow's lift point. Refer to your winch manual for troubleshooting. |
| Plow blade digging into ground or not clearing effectively | Incorrect skid shoe adjustment or blade angle. | Adjust the height of the skid shoes to prevent digging. Adjust the blade angle for optimal snow clearing based on snow depth and type. |
| Excessive snow blowback | Rubber deflector is damaged or improperly installed. | Inspect the rubber deflector for damage and ensure it is securely attached along the top edge of the blade. |
| Plow not holding angle | Adjustment turntable mechanism loose or damaged. | Check all fasteners on the adjustment turntable. Ensure the steering adjustment handle engages correctly with the angle settings. |
8. Specifications
- Brand: Niche
- Model: MK1012658 (SNOWSQUATCH DELUXE UTV STEEL)
- Product Dimensions: 130.56 x 54.86 x 20.32 cm
- Item Weight: 65.8 kg
- Blade Width: Adjustable 60-72 inches
- Blade Material: Steel
- Angle Settings: 5 quick-change positions
- Position: Front-mounted
- Safety Rating: DOT Certified
- Country of Origin: China
- Compatibility: Compatible with most major UTV brands/models (Can-Am, Polaris, Yamaha, Honda, Arctic Cat, CFMOTO, John Deere, Kawasaki, and More)
9. Warranty & Support
The SNOWSQUATCH Deluxe UTV Snow Plow System comes with a 3-year warranty. For warranty claims, technical assistance, or any product-related inquiries, please contact Niche Industries support.
Support Contact: Help@NicheIndustries.com
Video 9.1: Denali Snow Plow by MotoAlliance, highlighting features and a 3-year warranty. This video provides an overview of the product and its warranty information.