1. Introduction
Thank you for choosing the Stanley FATMAX 18V V20 Cordless 13mm Powerfile. This tool is designed for efficient material removal in narrow spaces, offering versatility and power for various applications. This manual provides essential information for the safe and effective operation, maintenance, and troubleshooting of your powerfile. Please read this manual thoroughly before use and retain it for future reference.
The V20 Cordless System utilizes new and improved battery technology, providing no memory effect and minimal self-discharge, ensuring your tool is ready when you are.

Figure 1: Stanley FATMAX 18V V20 Cordless 13mm Powerfile
2. Safety Information
Always observe basic safety precautions to reduce the risk of fire, electric shock, and personal injury when operating power tools.
General Power Tool Safety Warnings:
- Work Area Safety: Keep work area clean and well lit. Do not operate power tools in explosive atmospheres, such as in the presence of flammable liquids, gases or dust.
- Electrical Safety: Avoid body contact with earthed or grounded surfaces. Do not expose power tools to rain or wet conditions.
- Personal Safety: Always wear eye protection, hearing protection, and a dust mask. Dress properly; avoid loose clothing or jewelry.
- Tool Use and Care: Do not force the power tool. Use the correct power tool for your application. Disconnect the battery pack from the power tool before making any adjustments, changing accessories, or storing power tools.
Battery Tool Use and Care:
- Recharge only with the charger specified by the manufacturer.
- Use power tools only with specifically designated battery packs.
- When battery pack is not in use, keep it away from other metal objects.
3. Product Overview
Familiarize yourself with the components of your Stanley FATMAX Powerfile for optimal use and safety.
-
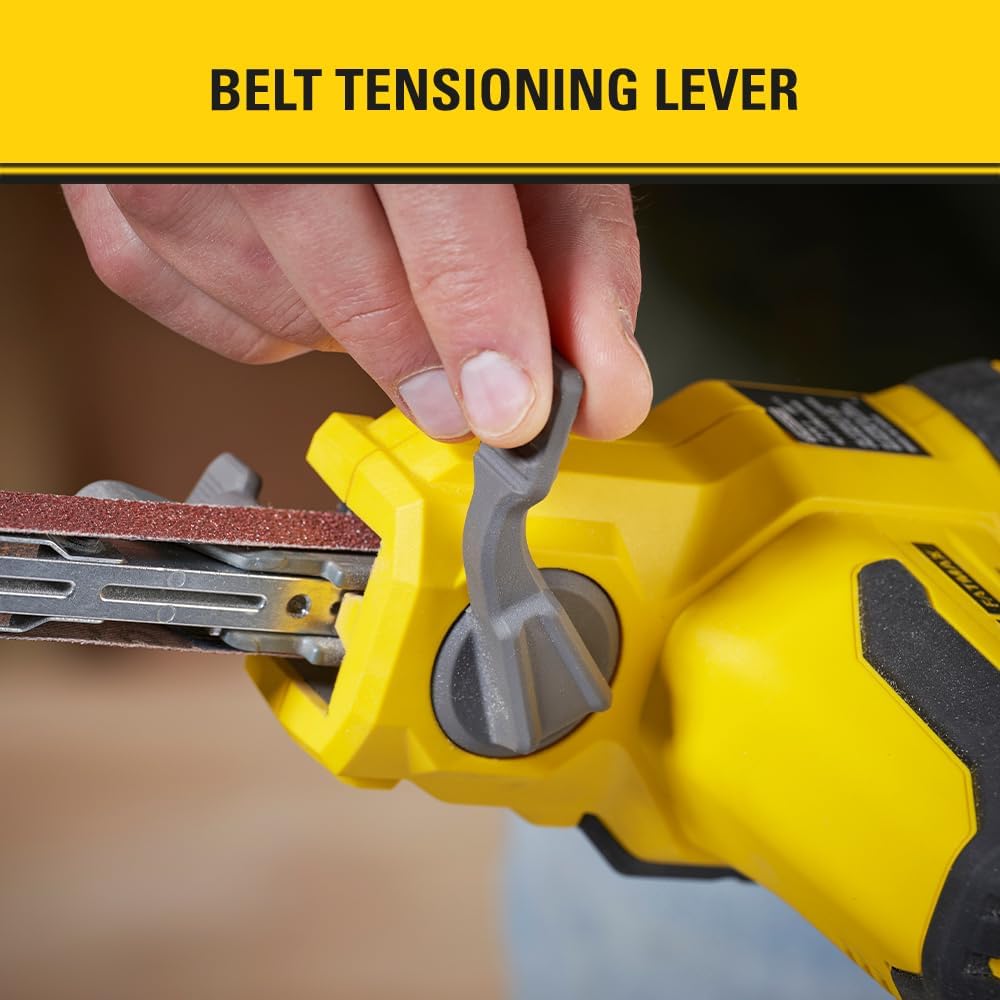
Figure 2: Narrow Arm Size
Narrow Arm Size: The 13mm wide arm allows for precise material removal in confined or intricate spaces, making it ideal for detailed work.
-

Figure 3: Belt Tensioning Lever
Belt Tensioning Lever: This lever provides easy, tool-free changes of sanding belts, ensuring quick and efficient transitions between tasks.
-

Figure 4: Dust Port System
Dust Port System: Connects to a vacuum system to contain dust accumulation, promoting a cleaner work environment and improving visibility.
-

Figure 5: Variable Speed Dial
Variable Speed Dial: Offers 3 speed settings, allowing for precise control and consistency across various applications and materials.
4. Setup
4.1. Battery Installation
- Ensure the powerfile is switched off.
- Align the battery pack with the battery port on the tool handle.
- Slide the battery pack into the port until it clicks securely into place.
- To remove, press the battery release button and slide the battery out.
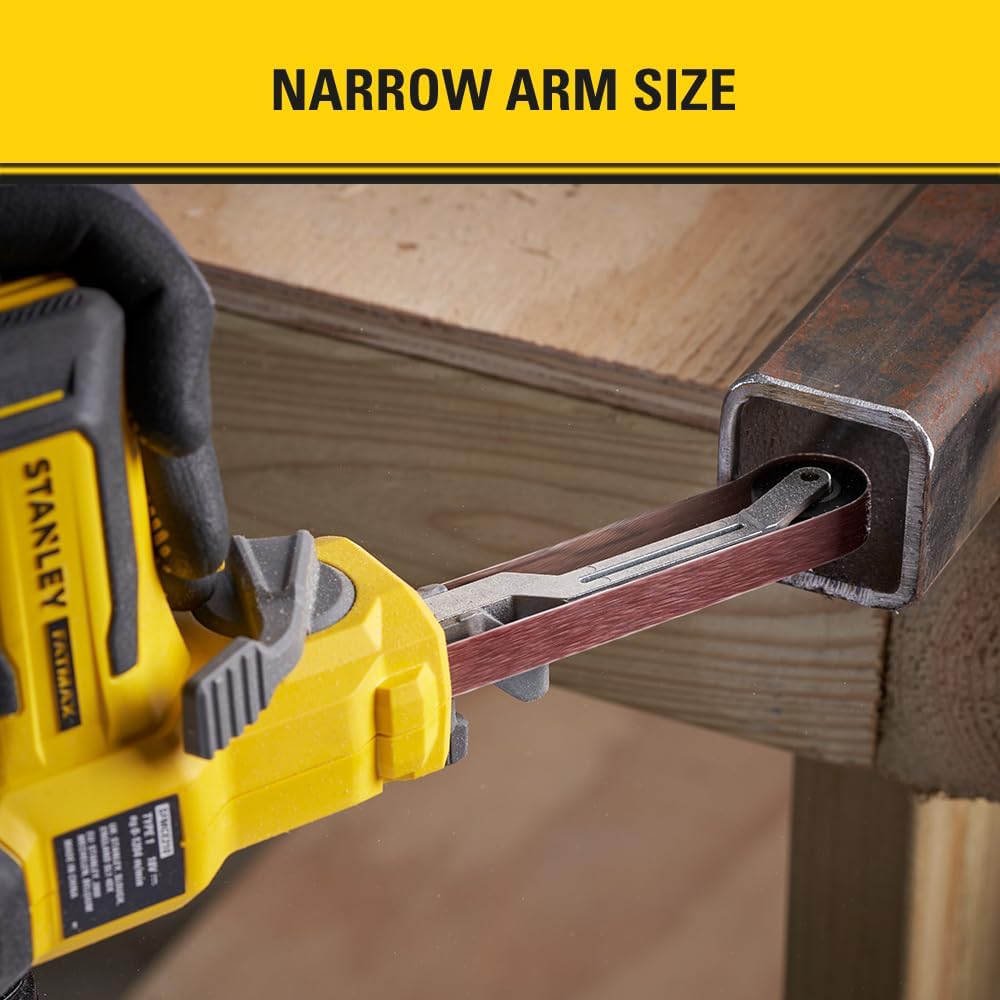
Figure 6: Battery Installation
4.2. Sanding Belt Installation/Replacement
- Ensure the tool is switched off and the battery is removed.
- Locate the belt tensioning lever (Figure 3).
- Push the lever to release tension on the sanding belt.
- Remove the old sanding belt.
- Place the new sanding belt onto the rollers, ensuring the directional arrow on the belt matches the rotation direction of the tool.
- Release the belt tensioning lever to secure the new belt.
4.3. Dust Collection Setup
- Locate the dust port at the rear of the powerfile (Figure 4).
- Connect a suitable vacuum hose or dust bag to the dust port. Ensure a secure connection to minimize dust escape.
5. Operating Instructions
5.1. Turning On/Off
- To turn on the powerfile, depress the trigger switch.
- For continuous operation, engage the lock-on button while the trigger is depressed.
- To turn off, release the trigger switch. If the lock-on button is engaged, depress the trigger fully and then release it to disengage the lock.
5.2. Adjusting Speed
The powerfile features a variable speed dial with 3 settings, allowing you to match the speed to the application and material.
- Rotate the variable speed dial (Figure 5) to select the desired speed setting.
- Lower speeds are suitable for delicate work or finishing, while higher speeds are for rapid material removal.
5.3. Proper Usage Techniques
Always ensure the workpiece is securely clamped before beginning operation.
- Apply light, even pressure to the workpiece. Excessive pressure can reduce efficiency and damage the sanding belt or tool.
- Move the powerfile smoothly and consistently across the surface to achieve an even finish.
- Utilize the narrow arm for accessing tight corners, intricate shapes, and small areas where larger sanders cannot reach.
- The powerful motor delivers up to 1,200 meters per minute, enabling fast material removal.

Figure 7: Powerfile in operation, demonstrating material removal
6. Maintenance
Regular maintenance ensures the longevity and optimal performance of your powerfile.
6.1. Cleaning
- After each use, disconnect the battery and clean the tool with a soft, damp cloth.
- Remove any dust or debris from the ventilation openings to prevent overheating.
- Periodically clean the dust port and ensure it is free from blockages.
6.2. Sanding Belt Inspection
- Inspect the sanding belt before each use for wear, tears, or damage. Replace worn belts promptly.
- Ensure the belt is properly tensioned and centered on the rollers.
6.3. Battery Care
- Store batteries in a cool, dry place away from direct sunlight and extreme temperatures.
- Charge batteries fully before storage if they will not be used for an extended period.
- Do not store batteries in a discharged state.
7. Troubleshooting
| Problem | Possible Cause | Solution |
|---|---|---|
| Tool does not start. | Battery not charged or not properly inserted. | Charge battery. Ensure battery is fully inserted until it clicks. |
| Poor material removal. | Worn or incorrect grit sanding belt. Insufficient pressure. | Replace sanding belt. Use appropriate grit. Apply light, even pressure. |
| Sanding belt slips or comes off. | Belt not properly tensioned. Incorrect belt size. | Ensure belt tensioning lever is engaged. Use correct 13mm belts. |
| Excessive dust. | Dust port blocked or vacuum not connected. | Clear dust port. Connect vacuum system securely. |
8. Specifications
| Feature | Detail |
|---|---|
| Model Number | SFMCE210B-XJ |
| Voltage | 18V |
| Arm Width | 13mm |
| No Load Speed | 0 - 1,200 meters per minute |
| Speed Settings | 3 |
| Power Source | Battery Powered (V20 Lithium-Ion) |
| Item Weight | 1.84 Kilograms (approx. 4.05 pounds) |
| Product Dimensions | 17.13"L x 6.26"W x 6.26"H |
9. Warranty and Support
For warranty information, please refer to the warranty card included with your product or visit the official Stanley website. Keep your proof of purchase for any warranty claims.
For further assistance, technical support, or to explore other Stanley products, please visit the official STANLEY Store:


