
LYNCAST HY300 PRO
LYNCAST HY300 Pro Mini Projector User Manual
Model: HY300 PRO
Introduction
Thank you for choosing the LYNCAST HY300 Pro Mini Projector. This portable projector is designed to provide a versatile and immersive viewing experience, featuring Android 11, dual-band WiFi 6, Bluetooth 5.2, 1080P 4K support, and automatic keystone correction. This manual provides essential information for setting up, operating, maintaining, and troubleshooting your device to ensure optimal performance and longevity.
Important Safety Information
- Do not block the ventilation openings. Ensure adequate airflow around the projector to prevent overheating.
- Do not look directly into the projector lens when the lamp is on. The bright light can cause eye damage.
- Keep the projector away from water or other liquids. Do not operate in wet environments.
- Use only the power adapter provided with the projector.
- Do not attempt to disassemble or repair the projector yourself. Refer all servicing to qualified personnel.
- Keep out of reach of children.
What's in the Box
Upon opening the package, please verify that all items are present and in good condition:
- LYNCAST HY300 Pro Mini Projector
- HDMI Cable
- User Manual
- Power Adapter
- Remote Control
Product Overview
Familiarize yourself with the components and interfaces of your HY300 Pro projector.

Figure 1: Front view of the LYNCAST HY300 Pro Mini Projector, highlighting its key features and supported streaming platforms.
Interfaces and Controls
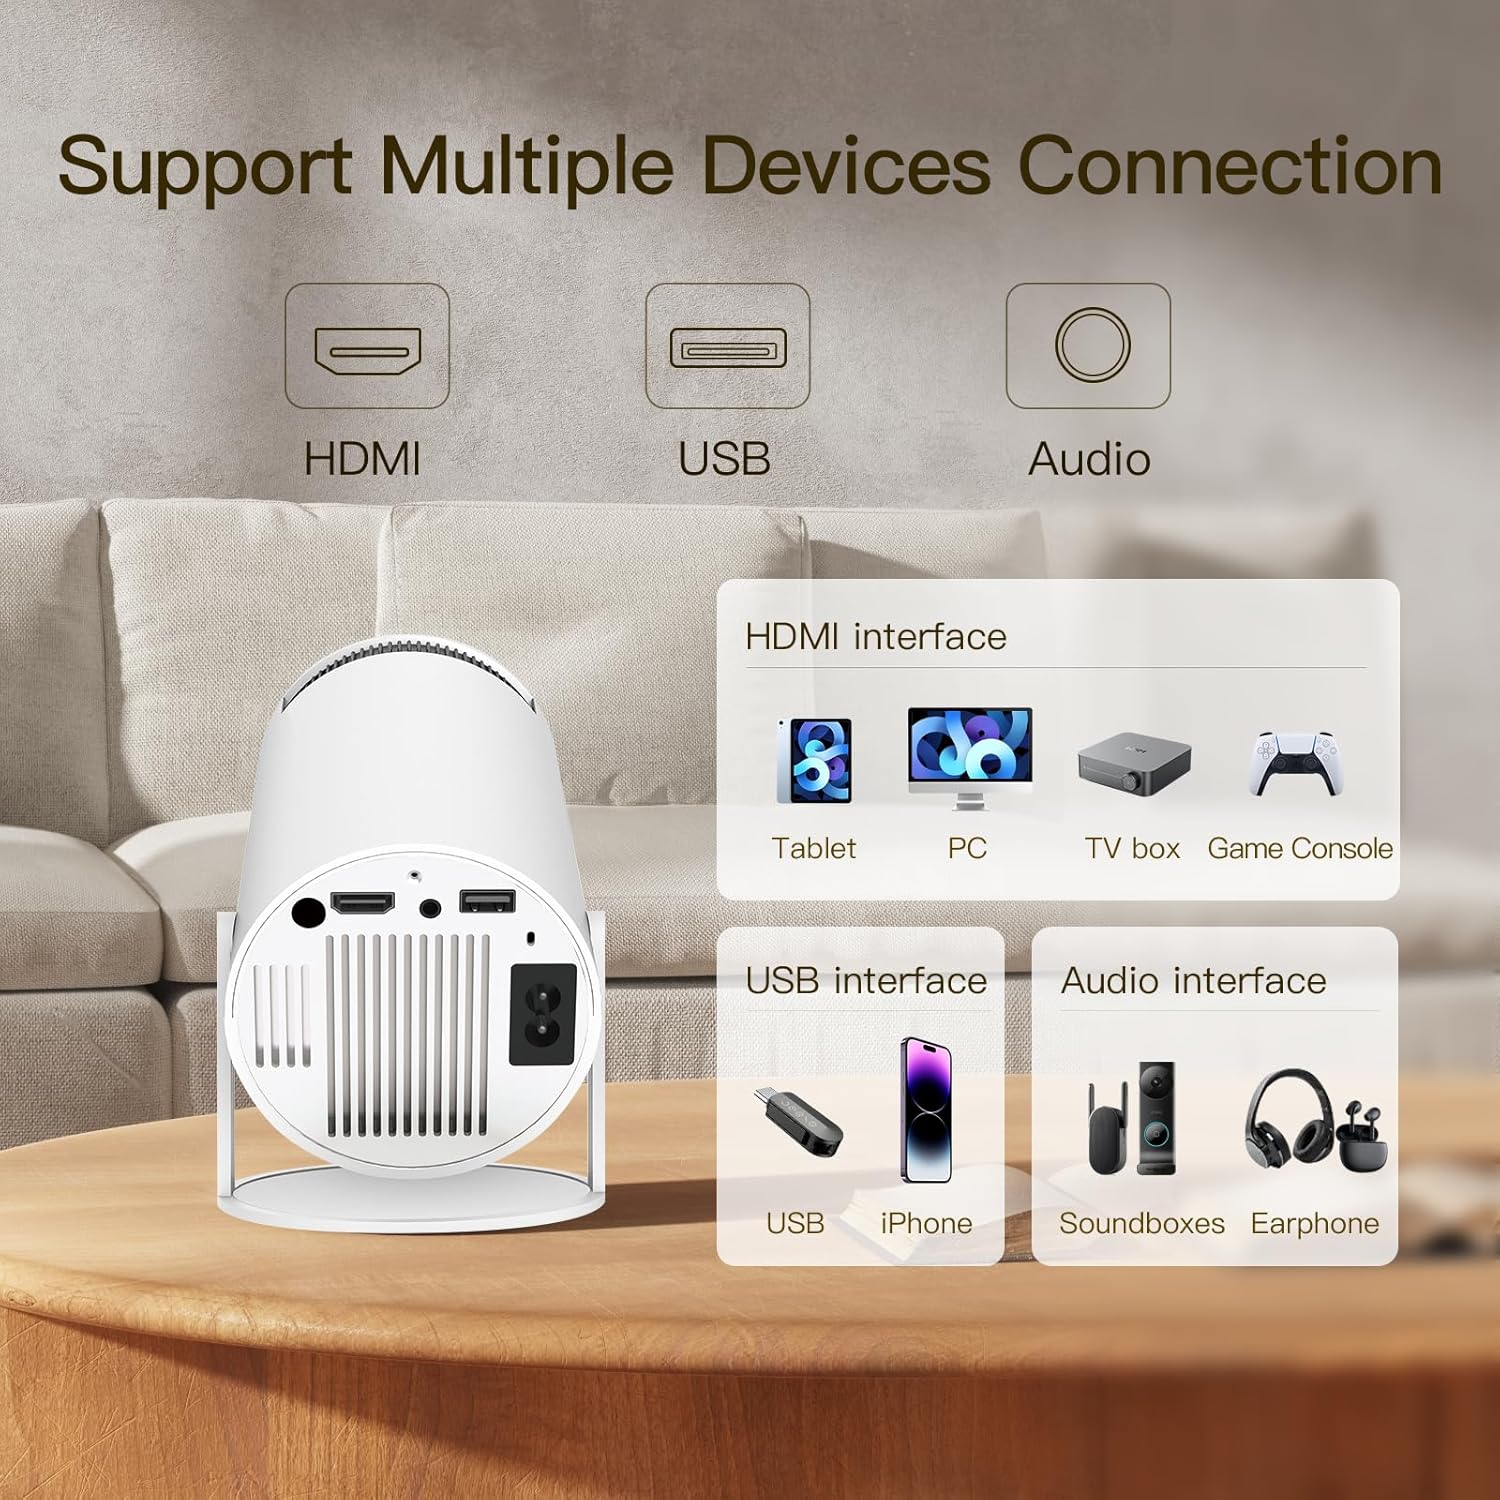
Figure 2: Rear interfaces of the projector, including HDMI, USB, and Audio ports for various device connections.
- HDMI Port: Connects to laptops, TV boxes, game consoles, and other HDMI-enabled devices.
- USB Port: For connecting USB drives, smartphones (for charging or data transfer), or external keyboards/mice.
- Audio Out (3.5mm Jack): Connects to external speakers or headphones.
- Power Input: Connects the power adapter.
- Focus Wheel: Manual adjustment for image clarity.
- Adjustable Stand: Integrated 180° rotatable stand for flexible projection angles.
Setup
1. Placement and Power Connection
Place the projector on a stable, flat surface. The 180° rotatable stand allows for flexible positioning, enabling projection onto walls, ceilings, or floors.

Figure 3: The projector's 180° adjustable stand for versatile placement.
Connect the provided power adapter to the projector's power input and then plug it into a power outlet. Press the power button to turn on the projector.
2. Initial Setup (Android 11, WiFi, Bluetooth)
Upon first power-on, the projector will guide you through the initial Android 11 setup process. Follow the on-screen prompts to:
- Select your language.
- Connect to a Wi-Fi network (supports dual-band WiFi 6 for faster performance).
- Sign in with your Google account to access the app ecosystem.

Figure 4: The Android 11.0 OS interface, providing access to numerous streaming applications.
3. Focus and Keystone Correction
The HY300 Pro features auto keystone correction and manual focus for a clear, rectangular image.
- Auto Keystone Correction: The projector automatically adjusts the image to a standard rectangular shape, even if the projector is placed at an an gle. This feature is controlled via the remote.
- Manual Focus: Use the focus wheel on the projector to fine-tune the image clarity until it is sharp.

Figure 5: Illustration of auto vertical keystone correction and manual focus for optimal image display.

Figure 6: Visual explanation of how auto keystone correction works to square the projected image.
Operating Instructions
1. Connecting External Devices
The projector supports various input sources:
- HDMI: Connect your laptop, game console, or streaming stick to the HDMI port. The projector will automatically detect the input.
- USB: Insert a USB flash drive into the USB port to play media files directly. Navigate through files using the remote control.
2. Using Built-in Apps and Streaming
With Android 11 built-in, you can access a wide range of applications directly from the projector:
- Navigate to the home screen using the remote control.
- Select an app (e.g., Netflix, YouTube, Prime Video) from the installed applications.
- Log in with your account credentials to start streaming content.
- Additional apps can be downloaded from the integrated app store.
3. Screen Mirroring (Wireless Connection)
The projector supports wireless screen mirroring from iOS, Android, and Windows devices via Wi-Fi.

Figure 7: Wireless connectivity options for iOS, Android, and Windows devices.
- Ensure both the projector and your device are connected to the same Wi-Fi network.
- On the projector, select the screen mirroring function (often labeled "Miracast," "AirPlay," or "Screen Share").
- On your device, enable screen mirroring/casting and select the projector from the list of available devices.
4. Audio Output
The projector has a built-in speaker, but you can also connect external audio devices:
- Built-in Speaker: Provides audio directly from the projector.
- Bluetooth 5.2: Pair with Bluetooth headphones or external speakers for enhanced audio experience. Go to Settings > Bluetooth on the projector to pair.
- 3.5mm Audio Jack: Connect wired headphones or speakers using a standard 3.5mm audio cable.

Figure 8: Demonstrating the built-in Bluetooth speaker and connectivity to external audio devices.
5. Adjusting Screen Size
The projector supports screen sizes up to 130 inches. You can adjust the projection size to fit your space.

Figure 9: Using the zoom function on the remote to adjust the screen size.

Figure 10: Various screen sizes achievable with the projector, from 80 to 130 inches.
Maintenance
1. Cleaning the Lens
To maintain optimal image quality, regularly clean the projector lens. Use a soft, lint-free cloth specifically designed for optical lenses. Do not use abrasive cleaners or excessive force.
2. Cooling System
The projector features an advanced cooling system operating at less than 25dB. Ensure the ventilation openings are clear of obstructions to allow proper heat dissipation. Avoid operating the projector in dusty environments.
Troubleshooting
| Problem | Possible Cause | Solution |
|---|---|---|
| No image or blurry image | Power not connected, lens out of focus, keystone not adjusted. | Check power connection. Adjust manual focus wheel. Use auto keystone correction via remote. |
| Apps not working/connection error | No internet connection, weak Wi-Fi signal, app specific issue. | Verify Wi-Fi connection in settings. Ensure strong signal. Restart projector. Reinstall problematic app if necessary. |
| Low brightness | Ambient light too high, projector settings. | Operate in a darker environment. Check brightness settings in the projector menu. |
| No sound | Volume too low, incorrect audio output selected, external device issue. | Increase projector volume. Check if Bluetooth device is connected. Ensure external device audio is working. |
| Remote control not responding | Low battery, obstruction, not paired. | Replace remote batteries. Ensure no obstruction between remote and projector. Re-pair remote if it's a Bluetooth remote. |
Specifications
| Feature | Detail |
|---|---|
| Brand | LYNCAST |
| Model Number | HY300 PRO |
| Operating System | Android 11.0 |
| Native Resolution | 1280 x 720 (720P Full HD Native) |
| Supported Resolution | 1080P, 4K |
| Connectivity Technology | Bluetooth 5.2, HDMI, USB, Wi-Fi 6 (Dual-band) |
| Special Features | Portable Mini Size, Built-In Speaker, Auto Keystone, 180° Rotatable Stand |
| Item Weight | 1.03 pounds |
| Product Dimensions | 6.7 x 3.9 x 3.9 inches |
| Light Source Lifespan | 50,000 hours |
| Recommended Uses | Home Cinema, Outdoor Movie Night, Gaming, Backyard Movie, Remote Work |
Warranty and Support
The LYNCAST HY300 Pro Mini Projector comes with a comprehensive warranty and support:
- 2-Year Warranty: Covers return or exchange for manufacturing defects.
- 30-Day Return Policy: No reason to return within 30 days of purchase.
- 24-Hour Quick Reply: Customer support aims to reply within 24 hours.
- Lifetime Technical Support: Ongoing technical assistance for the product.
For support, please refer to the contact information provided on the product packaging or the official LYNCAST website. You can also visit the LYNCAST Store on Amazon for more information.
Related documentsHY300 PRO


Ask a question about this manual
Ask about setup, troubleshooting, compatibility, parts, safety, or missing instructions. Manuals+ will review the question and use this page’s manual context to help answer it.