
Westclox 71109
Westclox Digital Clock User Manual
Model: 71109
Introduction
This manual provides comprehensive instructions for setting up, operating, and maintaining your Westclox 71109 Digital Clock. Designed for adults, this clock features a vibrant 2-inch RGB color display, an alarm with adjustable volume, and a large snooze button for enhanced convenience. Its sleek black finish and compact design make it a versatile addition to any nightstand, desk, or dresser.
Product Features
- Vibrant RGB Color Display: Enjoy a stunning, customizable rainbow-themed digital screen with the option to select your favorite color or let it automatically cycle through colors. The large, easy-to-read numbers ensure clear visibility from across the room.
- Adjustable Display Brightness: Effortlessly adjust the screen brightness to your comfort with multiple levels, ensuring easy readability day or night.
- Adjustable Alarm Volume: Wake up your way with three adjustable alarm volume levels—High, Medium, and Low—perfect for both light and heavy sleepers. The 12/24-hour time format offers added flexibility.
- Large Snooze Button: The oversized snooze button allows you to extend your rest with just a quick tap, ensuring effortless operation even when half-asleep. The built-in 10-minute snooze function provides extra moments of rest.
- Corded Power with Battery Backup: Reliable and efficient, this alarm clock runs on outlet power while the battery backup (requires 3 AAA batteries, not included) ensures your time and alarm settings stay intact during power outages.
- USB-C Charging Port: Features an additional USB-C port for charging smartphones, tablets, and other devices.
Package Contents
- Westclox 71109 Digital Clock
- USB-C to USB-A Cable (Power adapter not included)
- User Manual (This document)
Setup
1. Power Connection
Connect the provided USB-C to USB-A cable to the "POWER IN" USB-C port on the back of the clock. Plug the USB-A end into a compatible USB power adapter (not included) and then into a wall outlet. The clock display will illuminate.

Figure 1: Power and Charging Ports
2. Battery Backup Installation
For battery backup, open the battery compartment on the back of the clock. Insert 3 AAA batteries (not included), ensuring correct polarity (+/-). The battery backup maintains time and alarm settings during power outages but does not power the display continuously.

Figure 2: Battery Backup Compartment
3. Initial Time Setting
Upon first power-up or after a full power loss without battery backup, the clock may display a default time. Refer to the "Operating Instructions" section to set the correct time.
Operating Instructions
1. Setting Time and 12/24-Hour Format
Locate the "TIME SET" button on the top of the clock. Press and hold this button until the hour digits begin to flash. Use the "+" and "-" buttons to adjust the hour. Press "TIME SET" again to move to minutes, then adjust with "+" and "-". Press "TIME SET" a third time to confirm. To switch between 12-hour and 24-hour format, briefly press the "TIME SET" button when the time is displayed normally (not flashing).
2. Adjusting Display Brightness
The clock features 3 levels of display brightness: Dim, Medium, and Bright. Press the "DIMMER" button on the top of the clock repeatedly to cycle through the brightness levels until your desired setting is reached.

Figure 3: Display Brightness Levels
3. Setting the Alarm
Press and hold the "ALARM SET" button on the top of the clock until the alarm hour digits flash. Use the "+" and "-" buttons to set the desired alarm hour. Press "ALARM SET" again to set the alarm minutes, then adjust with "+" and "-". Press "ALARM SET" a third time to confirm the alarm time. To activate or deactivate the alarm, briefly press the "ALARM" button. An alarm icon will appear or disappear on the display.
4. Adjusting Alarm Volume
While the alarm is sounding or during alarm setup, press the "VOLUME" button on the top of the clock to cycle through High, Medium, and Low volume settings.
5. Using the Snooze Function
When the alarm sounds, press the large "SNOOZE" button located on the top center of the clock. This will temporarily silence the alarm for 10 minutes. The alarm will sound again after the snooze period. To turn off the alarm completely, press any other button (e.g., "ALARM SET", "TIME SET", "+", "-").
6. Changing RGB Display Colors
The clock offers 13 different color modes. Press the "COLOR" button on the top of the clock repeatedly to cycle through the available options, including 7 solid colors, 2 multi-color modes, and 4 color-changing options. Select your preferred display style.
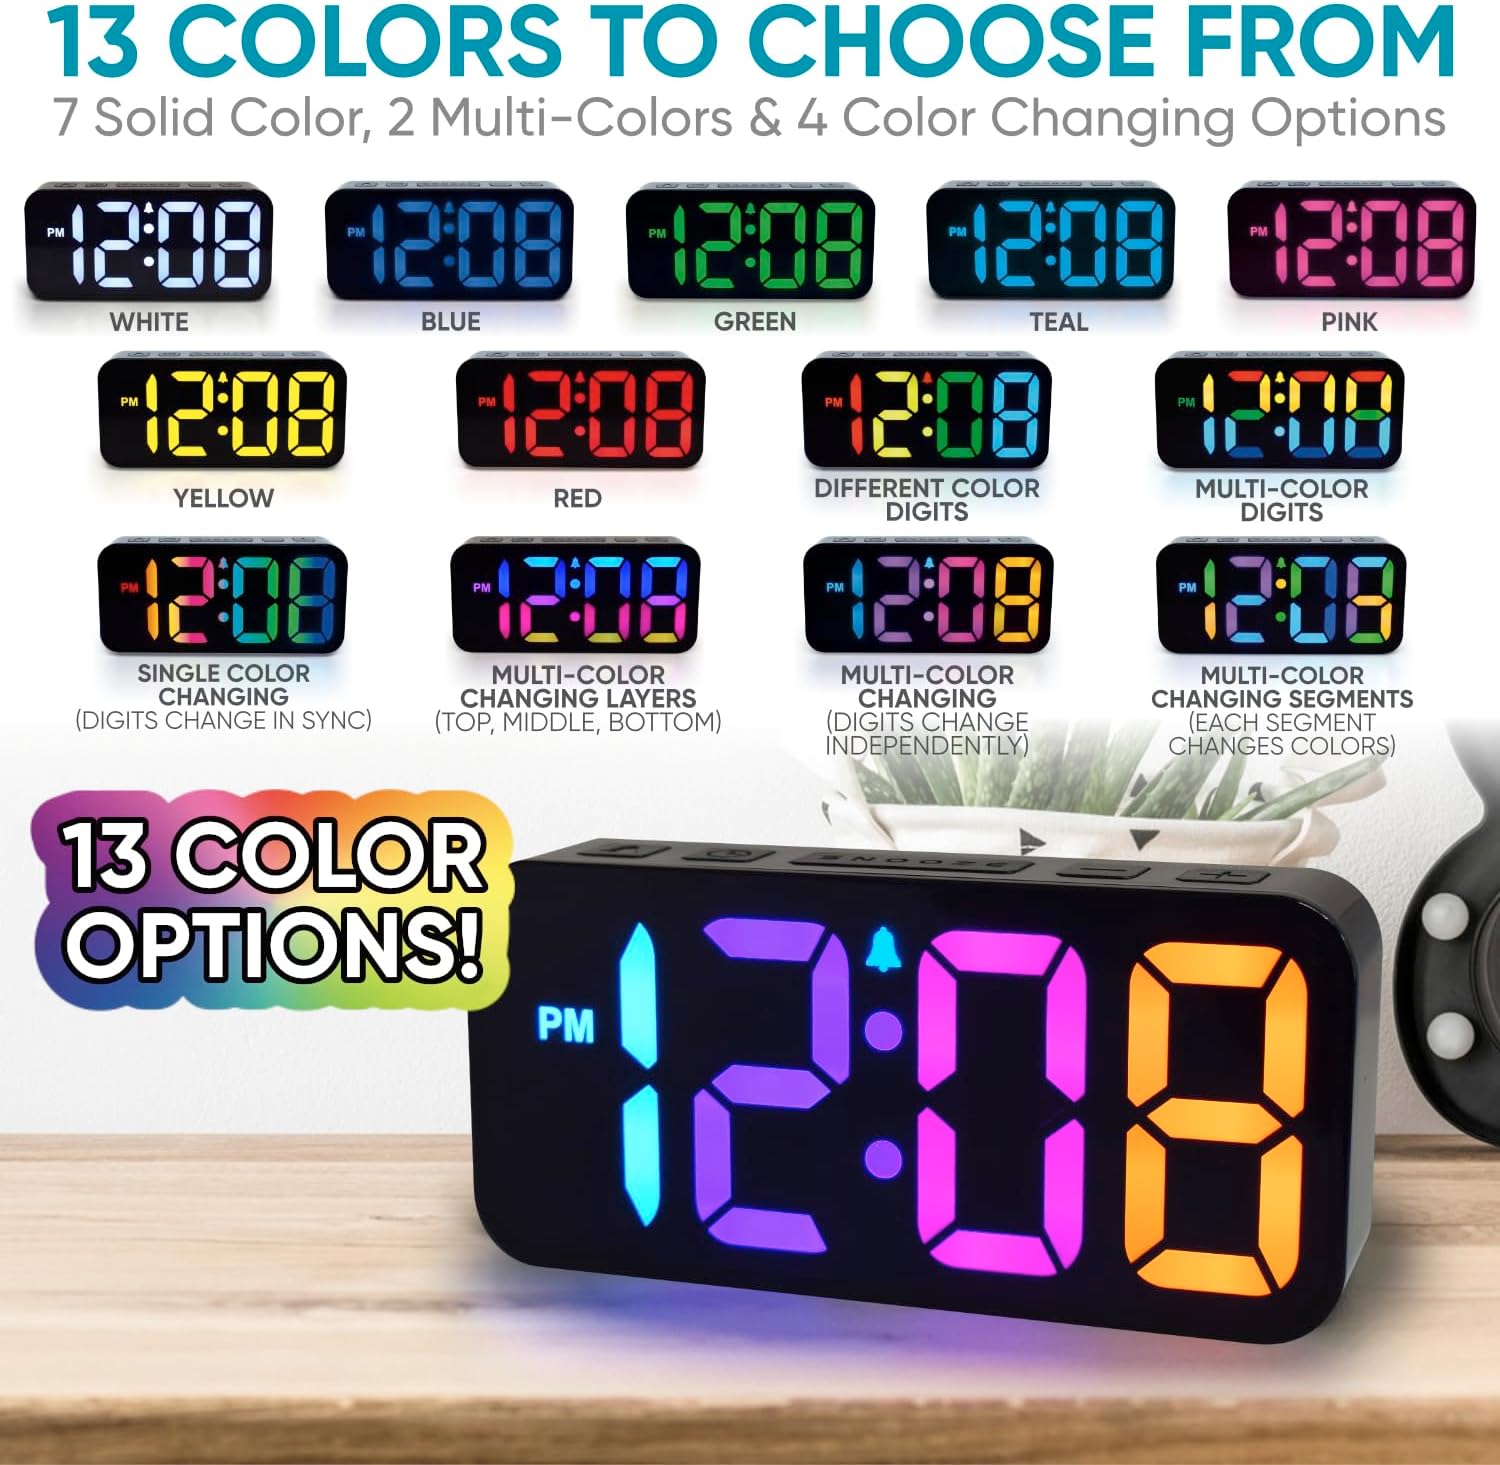
Figure 4: RGB Color Display Options
7. Using the USB-C Charging Port
The clock includes a "CHARGE OUT" USB-C port (Max 5V-3A) on its back. Connect your smartphone, tablet, or other compatible device to this port using a USB-C cable (not included) to charge your device.

Figure 5: USB-C Charging in Use
Maintenance
- Cleaning: Wipe the clock surface with a soft, dry cloth. Avoid using abrasive cleaners or solvents, as they may damage the finish or display.
- Battery Replacement: If using the battery backup, replace the 3 AAA batteries annually or when the clock fails to retain settings during a power outage. Ensure correct polarity.
- Storage: If storing the clock for an extended period, remove the AAA batteries to prevent leakage.
Troubleshooting
| Problem | Possible Cause | Solution |
|---|---|---|
| Clock display is off or flickering. | No power, loose power connection, or power outage. | Ensure the USB-C cable is securely connected to the clock and the power adapter is plugged into a working outlet. Check if the power adapter is functioning. If there was a power outage and no battery backup, reset the time. |
| Alarm does not sound. | Alarm not activated, alarm volume too low, or incorrect alarm time set. | Verify the alarm icon is displayed. Adjust the alarm volume to a higher setting. Double-check the alarm time. |
| Display is too bright or too dim. | Brightness setting is not optimal for current lighting conditions. | Press the "DIMMER" button to cycle through the 3 brightness levels until comfortable. |
| Time or alarm settings are lost after power disconnection. | Battery backup not installed or batteries are depleted. | Install 3 new AAA batteries in the battery compartment. |
| USB-C charging port not working. | Device incompatibility, faulty cable, or clock not powered. | Ensure the clock is powered via its main USB-C input. Try a different USB-C cable. Verify your device is compatible with 5V-3A charging. |
Specifications
| Feature | Detail |
|---|---|
| Brand | Westclox |
| Model Number | 71109 |
| Display Type | Digital, RGB Color |
| Display Size | 2 inches |
| Brightness Levels | 3 (Dim, Medium, Bright) |
| Alarm Volume Levels | 3 (High, Medium, Low) |
| Snooze Duration | 10 minutes |
| Power Source | Corded (USB-C), Battery Backup |
| Battery Type (Backup) | 3 x AAA (not included) |
| Charging Output | USB-C (Max 5V-3A) |
| Product Dimensions | 0.86"W x 2.56"H |
| Item Weight | 6.2 ounces |
| Color | Black |
| UPC | 844220016034 |
Official Product Video
Video 1: Westclox Branded Video. This video provides a brief history of Westclox and showcases various clock models, including digital and traditional designs, highlighting features like sleep aids, white noise, charging alarms, and multi-color displays.
Warranty and Support
For warranty information or technical support, please refer to the warranty card included with your product or visit the official Westclox website. You may also contact Westclox customer support directly for assistance with product inquiries, troubleshooting, or service requests.
Westclox Store: https://www.amazon.com/stores/Westclox/page/4F5377CF-3EAE-46E7-9294-2F04B8C84E7E
Related documents71109


Ask a question about this manual
Ask about setup, troubleshooting, compatibility, parts, safety, or missing instructions. Manuals+ will review the question and use this page’s manual context to help answer it.