
1. Introduction
This manual provides detailed instructions for the operation and maintenance of your OBZ 2D Bluetooth Barcode Scanner, Model OV-40R. This device is designed for efficient scanning of 1D and 2D barcodes from various surfaces, including paper and digital screens. It offers versatile connectivity options, including 2.4G wireless, Bluetooth, and USB wired modes, ensuring compatibility with a wide range of systems such as Windows, Mac OS, iOS, Android, and Linux.
Please read this manual thoroughly before using the scanner to ensure proper setup and optimal performance.

Image 1.1: OBZ 2D Bluetooth Barcode Scanner (Model OV-40R) with its 2.4G USB dongle.
2. Package Contents
Verify that all items are present in the package:
- OBZ 2D Bluetooth Barcode Scanner (Model OV-40R)
- 2.4G USB Wireless Dongle
- USB-A to USB-C Charging Cable
- User Manual (this document)
3. Product Overview
The OBZ OV-40R scanner features a large LCD screen and intuitive controls for ease of use. Familiarize yourself with the components:

Image 3.1: Detailed view of the scanner's LCD screen and control buttons.
- Large LCD Display Screen: Displays total scanned barcodes, total stored barcodes, connection modes (BT HID, BT BLE, 2.4G Wireless, USB Wired), battery level, and time.
- Up Button: Used for navigation and selection within the menu.
- Down Button: Used for navigation and selection within the menu.
- Scan Trigger: Activates the scanning function.
- Scan Indicator Light: Flashes upon successful barcode scanning.
- Voice Broadcasting: The scanner can provide voice feedback for operations; this feature can be enabled or disabled.
4. Setup and Connection
The scanner supports three primary connection methods: 2.4G Wireless, Bluetooth, and USB Wired. Choose the method best suited for your device and environment.
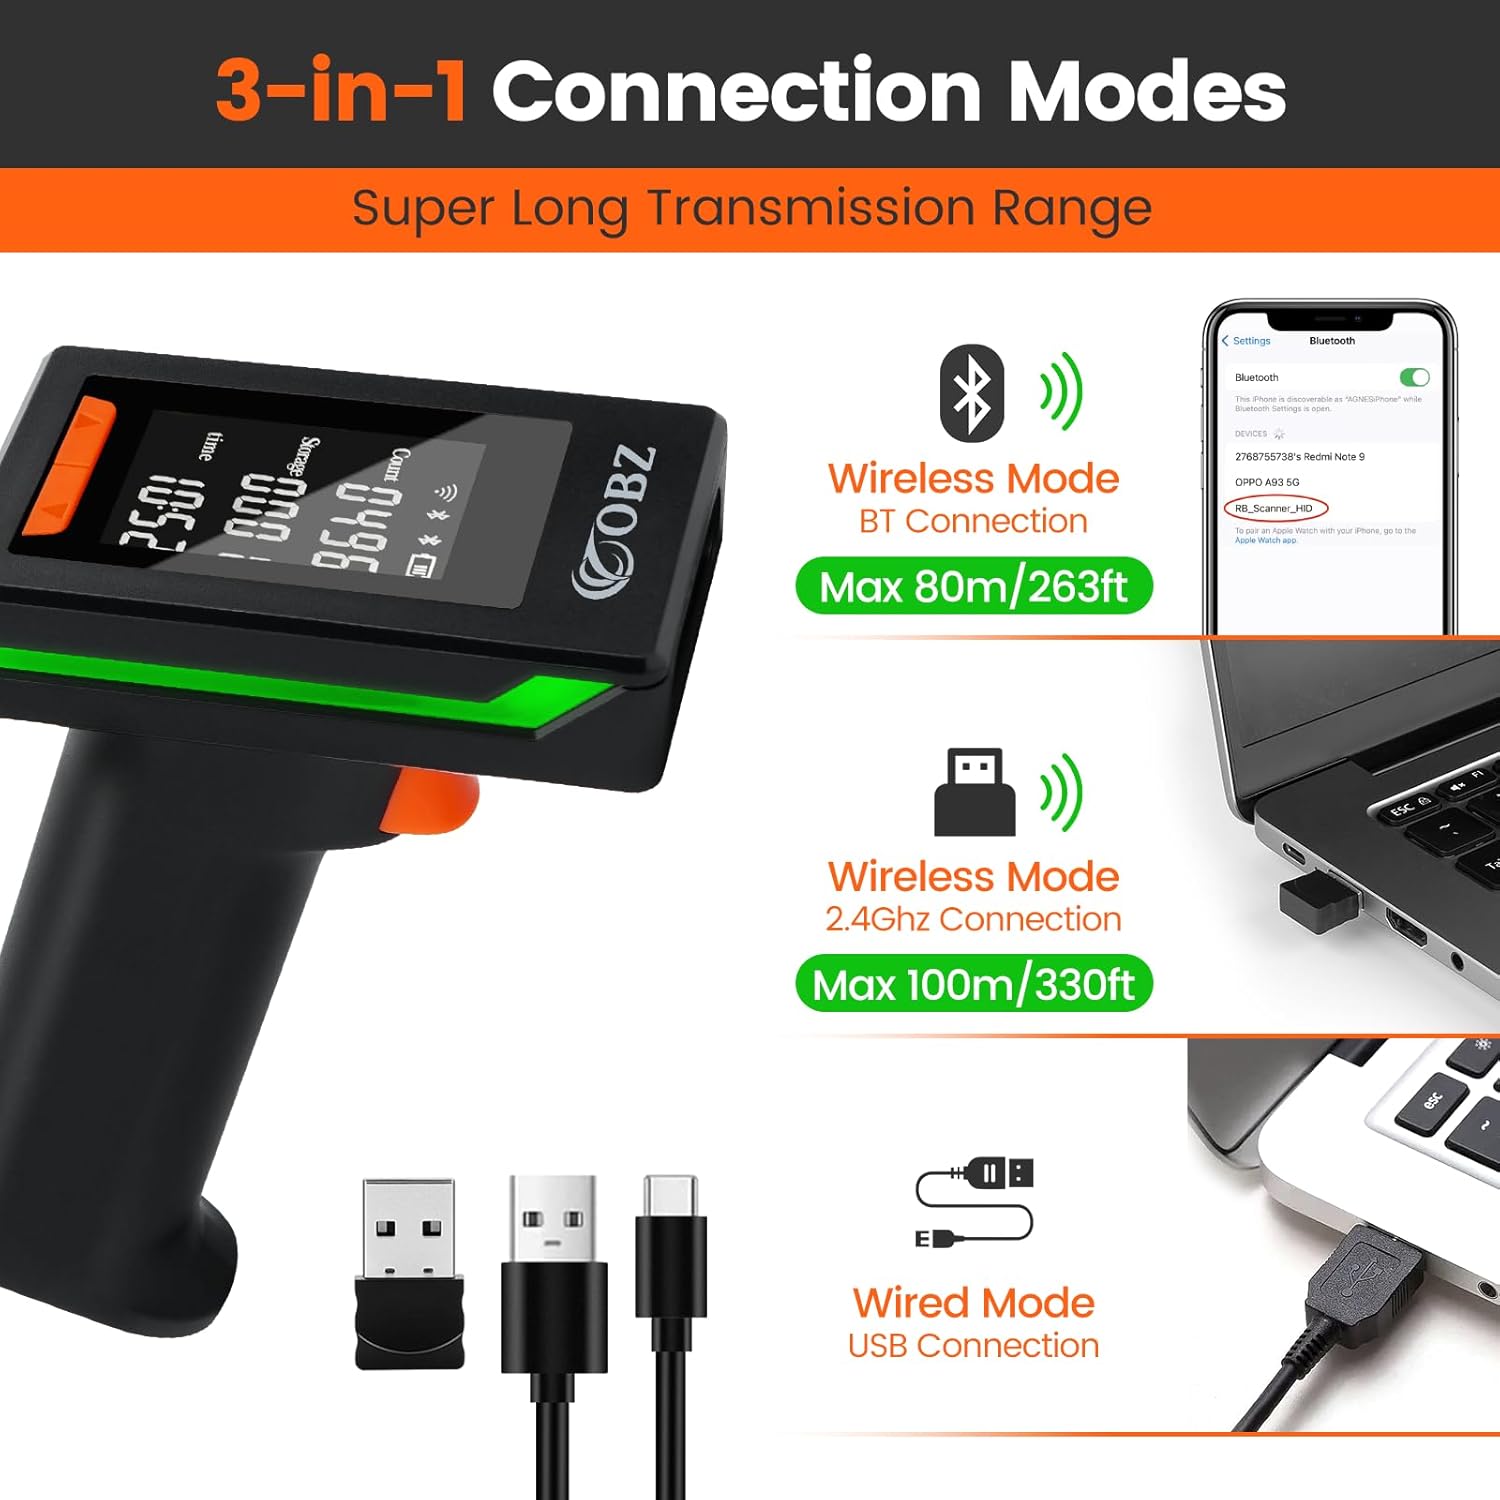
Image 4.1: Overview of the three available connection modes and their typical ranges.
4.1. 2.4G Wireless Mode
This mode uses the included USB dongle for wireless connection to a computer. The wireless transmission distance can reach up to 100m (328ft) in a barrier-free environment.
- Ensure the scanner is powered on.
- Press both the UP and DOWN buttons simultaneously to enter Setup Mode.
- Use the UP or DOWN button to navigate until the 2.4G Wireless Mode icon is selected and blinking on the LCD screen.
- Press the Scan Trigger to confirm and enter 2.4G Wireless pairing mode.
- Plug the 2.4G USB wireless dongle into an available USB port on your computer. The scanner will automatically pair with the dongle.
- The LCD screen will indicate a successful wireless connection. You can now open a text editor or spreadsheet program and begin scanning.
4.2. Bluetooth Mode (HID/BLE)
This mode allows connection to Bluetooth-enabled devices such as smartphones, tablets, and computers. The Bluetooth transmission distance can reach up to 80m (263ft) in a barrier-free environment.
- Ensure the scanner is powered on.
- Press both the UP and DOWN buttons simultaneously to enter Setup Mode.
- Use the UP or DOWN button to select either BT HID Mode or BT BLE Mode on the LCD screen. BT HID (Human Interface Device) is generally recommended for most computers and mobile devices as it emulates a keyboard.
- Press the Scan Trigger to confirm and enter Bluetooth pairing mode. The scanner will announce the selected mode (if voice broadcasting is enabled).
- On your host device (PC, laptop, smartphone, tablet), go to Bluetooth settings and search for new devices.
- Select "RB_Scanner_HID" (or similar name) from the list of available devices to pair.
- Once paired, the LCD screen will indicate a successful Bluetooth connection.
4.3. USB Wired Mode
For a direct and stable connection, use the provided USB cable.
- Connect the USB-C end of the cable to the scanner.
- Connect the USB-A end of the cable to an available USB port on your computer.
- The scanner will automatically switch to USB Wired Mode and begin charging. No additional pairing steps are required.
5. Operating Instructions
5.1. Basic Scanning
To scan a barcode:
- Ensure the scanner is connected to your host device via one of the methods described in Section 4.
- Open an application on your host device where you want the scanned data to appear (e.g., Notepad, Word, Excel, POS software).
- Point the scanner's window at the barcode you wish to scan.
- Press and hold the Scan Trigger. A red aiming line will appear.
- Align the aiming line across the entire barcode.
- Upon a successful scan, the scanner will emit a beep (if enabled), the indicator light will flash, and the barcode data will appear in your application. The LCD screen will also update the 'Count' of scanned barcodes.
5.2. Decoding Capabilities
The OBZ OV-40R is equipped with an advanced CMOS sensor, allowing it to accurately capture a wide range of 1D and 2D barcodes from both paper and electronic screens.

Image 5.1: Examples of 1D and 2D barcode types supported by the scanner.
- 1D Barcodes: Codabar, Code 11, Code128, Code 39, Code 93, UPC/EAN, Industrial 2 of 5, Interleaved 2 of 5, Matrix 2 of 5, MSI Plessey, RSS, etc.
- 2D Barcodes: QR Code, PDF417, DataMatrix, Aztec, Maxicode, Micro QR, Hanxin Code.
- The scanner can also read damaged, distorted, colorful, reflective, or inverse barcodes.
5.3. Data Upload Modes
The scanner offers three data upload modes to suit different operational needs:

Image 5.2: Visual representation of Instant Upload and Automatic Storage modes.
- Instant Upload Mode: Barcode data is synchronously uploaded to your connected device immediately after scanning.
- Automatic Storage Mode / Inventory Mode: Barcodes are stored in the scanner's internal memory (up to 512,000 bytes) and can be uploaded to your device later when needed. This mode is useful for offline scanning.
- Continuous Mode: The scanner continuously scans without requiring trigger presses.
To switch between these modes, refer to the specific setup codes provided in the supplementary PDF manual or contact customer support.
5.4. Compatibility
The scanner is highly compatible with various operating systems and devices.

Image 5.3: The scanner is compatible with a wide range of operating systems and devices.
- Operating Systems: Windows, Mac OS, iOS, Android, Linux.
- Devices: PC, Laptop, Smart Phone, Tablet, POS systems.
6. Advanced Features and Customization
The OBZ OV-40R offers several customization options to enhance its functionality:
- Automatic Sensing: Configures the scanner to automatically detect and scan barcodes without pressing the trigger.
- Prefix/Suffix: Add custom characters before or after scanned data.
- Delete Characters: Remove specific characters from scanned data.
- Volume Control: Adjust or turn off the scanner's audible feedback.
- Barcode Type Enable/Disable: Freely enable or disable specific barcode symbologies to prevent unintended scans.
- Barcode Conversion: Convert certain barcode types.
- Extra Code: Add additional codes.
- Transmission Speed: Adjust the data transmission speed.
- Multi-language Keyboard: Support for various keyboard layouts.
- Keyboard Keys: Add special keyboard keys like CR&LF (Carriage Return & Line Feed) or TAB after each scan.
These advanced settings are typically configured by scanning specific setup barcodes found in the comprehensive PDF manual. Please refer to that document for detailed instructions on each customization option.

Image 6.1: The scanner features adjustable sound, vibration, and light indicators.
7. Maintenance
7.1. Cleaning
To maintain optimal scanning performance, keep the scanner's window clean. Use a soft, lint-free cloth, slightly dampened with water or a mild cleaning solution. Avoid abrasive materials or harsh chemicals that could scratch the window or damage the device.
7.2. Battery Charging
The scanner is powered by a rechargeable Lithium Ion battery. Connect the scanner to a USB power source using the provided USB-A to USB-C cable. The battery level is displayed on the LCD screen. A full charge provides approximately 20 hours of continuous operation.
7.3. Storage
Store the scanner in a cool, dry place away from direct sunlight and extreme temperatures. Avoid dropping the scanner; it is designed with environmentally friendly drop-resistant material but excessive force can cause damage.

Image 7.1: The scanner is designed to withstand drops from up to 3 meters.
8. Troubleshooting
If you encounter issues with your scanner, refer to the following common problems and solutions:
- Scanner not connecting/pairing:
- Ensure the scanner is in the correct connection mode (2.4G, BT HID, BT BLE).
- For 2.4G, ensure the USB dongle is properly inserted and recognized by the computer.
- For Bluetooth, ensure your host device's Bluetooth is enabled and discoverable. Try unpairing and re-pairing the device.
- If switching between wireless and Bluetooth modes, you may need to re-pair the scanner each time.
- Try connecting via USB wired mode to verify basic functionality.
- Scanner not reading barcodes:
- Ensure the barcode is not severely damaged, smudged, or poorly printed.
- Check if the barcode type is supported by the scanner (refer to Section 5.2).
- Ensure the scanner's window is clean.
- Adjust the distance and angle of the scanner to the barcode.
- Verify that the scanner is in Instant Upload Mode if you expect immediate data transmission.
- Scanned data appears incorrectly:
- Check keyboard language settings on your host device and scanner.
- Review advanced settings for prefixes, suffixes, or character deletions that might be altering the data.
- Scanner goes to sleep too quickly:
- The scanner enters sleep mode after 2 minutes of inactivity to conserve battery. This setting can usually be adjusted via setup codes in the full manual.
For more complex issues or specific configuration settings, please refer to the detailed PDF manual or contact OBZ customer support.
9. Specifications
| Feature | Specification |
|---|---|
| Model Number | OV-40R |
| Package Dimensions | 8.03 x 4.06 x 3.23 inches |
| Item Weight | 6.1 ounces |
| Batteries | 1 Lithium Ion battery (included) |
| Connectivity Technology | Bluetooth, 2.4G Wireless, USB Cable |
| Wireless Transmission Range | Up to 100m (328ft) in barrier-free environment (2.4G Wireless) Up to 80m (263ft) in barrier-free environment (Bluetooth) |
| Decoding Capability | 1D (Codabar, Code 11, Code128, Code 39, Code 93, UPC/EAN, etc.) 2D (QR Code, PDF417, DataMatrix, Aztec, Maxicode, Micro QR, Hanxin Code) |
| Offline Storage | Up to 512,000 bytes |
| Compatible Devices | Computer, Laptop, POS, Smartphone, Tablet |
| Operating Systems | Windows, Mac OS, iOS, Android, Linux |
| Power Source | Battery Powered, Corded Electric |

Image 9.1: The scanner offers a wireless transmission range of up to 100 meters.
10. Warranty and Support
OBZ is committed to providing high-quality products and customer satisfaction. If you require further assistance, have questions about specific configuration settings, or need to scan additional barcode types not covered in this manual, please contact OBZ customer support.
You may also be provided with specific setup codes and a detailed PDF manual upon request to address advanced customization needs.


