Introduction
This manual provides detailed instructions for the installation, operation, and maintenance of your MOUNT PRO Dual Monitor Arm Desk Mount. Please read this manual thoroughly before installation and retain it for future reference. Proper installation and use will ensure optimal performance and longevity of the product.

Image: The MOUNT PRO Dual Monitor Arm Desk Mount, shown with two monitors mounted, illustrating its design and functionality. The base includes options for both C-clamp and grommet mounting.
Product Features
- Universal Compatibility: Supports two monitors ranging from 13 to 32 inches, with a weight capacity of 4.4 to 19.8 lbs per arm. Compatible with VESA 75x75mm and 100x100mm mounting patterns.
- Full Motion Adjustment: Offers extensive adjustability including tilt (+70° to -45°), swivel (180°), and rotation (360° for landscape to portrait orientation).
- Ergonomic Design: Max height up to 17.3 inches and max extension up to 18.5 inches, allowing for ergonomic positioning of monitors at eye level.
- Space Saving: Lifts monitors off the desk, freeing up valuable workspace.
- Integrated Cable Management: Conceals cables for a tidy and organized desktop.
- Two Installation Options: Can be installed using either a C-clamp or a grommet mount, suitable for desk thicknesses between 0.39 to 2.76 inches.

Image: A diagram illustrating the universal compatibility of the monitor mount, specifying a maximum screen size of 32 inches, a maximum load of 19.8 lbs, and VESA patterns of 75x75mm and 100x100mm.
Setup Instructions
1. Pre-Installation Checklist
- Ensure your monitors are compatible with VESA 75x75mm or 100x100mm mounting patterns.
- Verify each monitor's weight is between 4.4 lbs and 19.8 lbs.
- Check your desk thickness: it must be between 0.39 and 2.76 inches for both C-clamp and grommet mounting.
- For grommet mounting, the hole diameter should be between 0.39 and 2.36 inches.
- Gather all included hardware and tools.
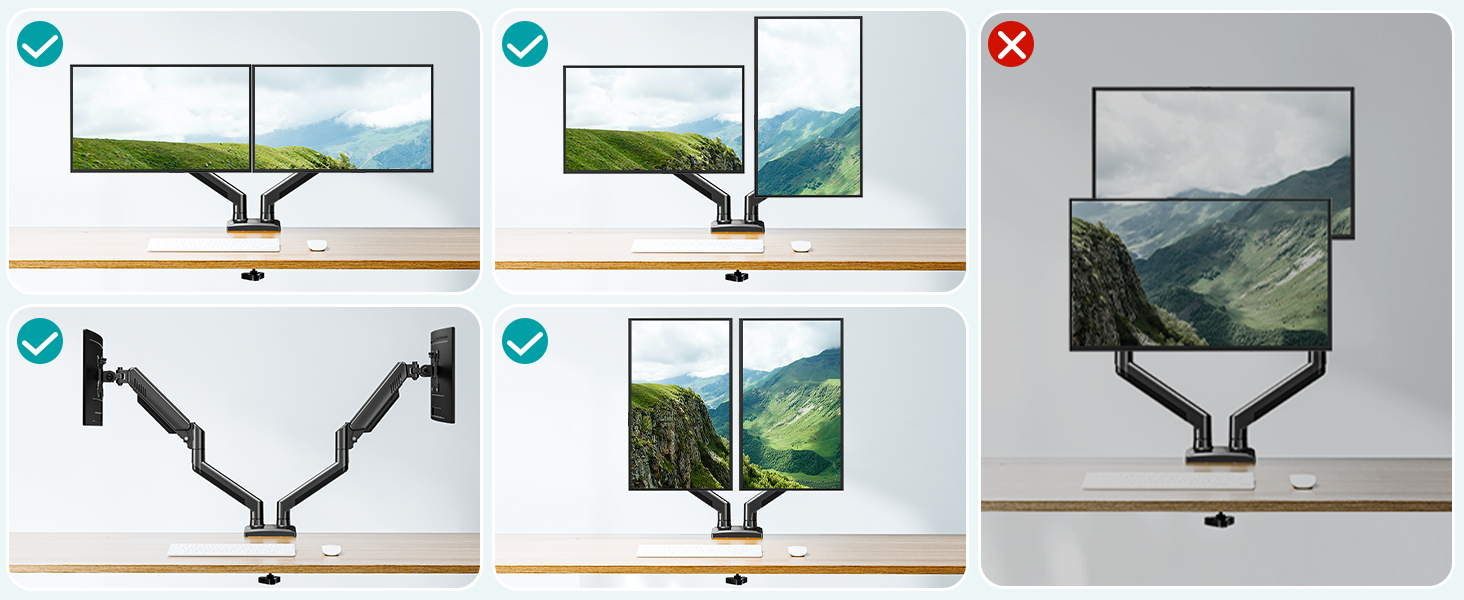
Image: A visual guide for checking desk compatibility, including considerations for desks with underframes, side panels, or back panels, specifying minimum contact surface width, width, and height requirements for stable mounting.
2. Choose Your Mounting Method
The monitor arm offers two installation options: C-clamp or Grommet mounting.

Image: A comparison of the two installation methods: Grommet Mounting, which requires a hole in the desk, and C-Clamp Mounting, which clamps to the edge of the desk. Both methods specify a desk thickness range of 0.39 to 2.76 inches.
C-Clamp Mounting:
- Attach the C-clamp base to the edge of your desk.
- Tighten the clamp securely until the base is stable.
Grommet Mounting:
- Insert the grommet bolt through the pre-drilled hole in your desk.
- Secure the base from underneath the desk using the provided washer and nut.
3. Attach Monitor Arms to Base
Once the base is securely installed, attach the monitor arms to the central pole according to the instructions provided in the packaging.
4. Attach Monitors to VESA Plates
- Attach the VESA plates to the back of your monitors using the appropriate screws. Ensure the VESA pattern (75x75mm or 100x100mm) matches.
- Carefully slide the monitors (with VESA plates attached) onto the monitor arms until they click into place.

Image: A visual representation of how to attach a VESA plate to a monitor arm, showing the plate sliding into the arm's connector for secure attachment.
5. Cable Management
Route monitor cables through the integrated cable management channels on the arms to maintain a clean and organized workspace.
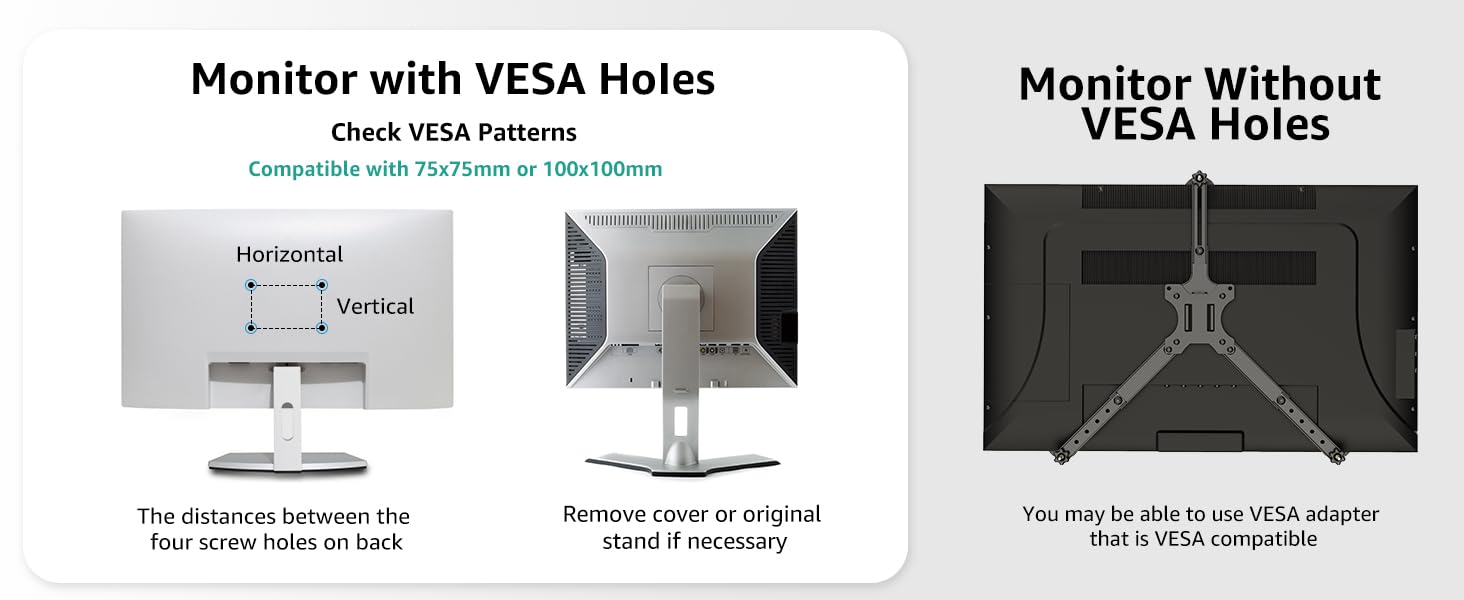
Image: The monitor arm with cables neatly routed through its integrated cable management system, demonstrating how to achieve a clutter-free desk.
Operating Instructions
1. Adjusting Monitor Position
The gas spring arms allow for smooth and effortless adjustment of your monitors. Each arm can be independently adjusted.
- Height Adjustment: Gently push or pull the monitor up or down to achieve your desired ergonomic height. The maximum height is 17.3 inches.
- Extension/Retraction: Extend or retract the arms to adjust the distance of your monitors from your eyes. The maximum extension is 18.5 inches.
- Tilt: Tilt your monitor screen up to 70° or down to 45° to reduce glare and optimize viewing angles.
- Swivel: Swivel the monitor 180° left or right to share your screen with others or adjust for different tasks.
- Rotation: Rotate your monitor 360° to switch between landscape and portrait orientations.

Image: A multi-panel image demonstrating the full range of motion: 180° swivel, 5.1-17.3" height range, +70° to -45° tilt, and 360° rotation, showcasing the flexibility of the monitor arm.

Image: An overhead view illustrating the flexible screen adjustment, highlighting the 180°, 270°, and 360° swivel points on the monitor arms for precise positioning.
2. Gas Spring Tension Adjustment
The gas spring tension may need to be adjusted to properly support your monitor's weight. This ensures the monitor stays in place after adjustment.

Image: Instructions for gas spring adjustment and tilt adjustment. For gas spring, turn clockwise to reduce tension for lighter monitors and counter-clockwise to increase tension for heavier monitors. For tilt, loosen the bolt, adjust, then retighten.
- Monitor Raises Up Too Easily (Too Light): Turn the adjustment screw clockwise (towards the "-" symbol) to reduce tension.
- Monitor Drops Down (Too Heavy): Turn the adjustment screw counter-clockwise (towards the "+" symbol) to increase tension.
- Important: Keep the arm in a horizontal position during gas spring adjustment.
Maintenance
To ensure the longevity and proper functioning of your MOUNT PRO Dual Monitor Arm Desk Mount, follow these simple maintenance guidelines:
- Regular Cleaning: Wipe down the arms and base with a soft, damp cloth to remove dust and debris. Avoid abrasive cleaners or solvents.
- Check Connections: Periodically check all screws and bolts to ensure they are tight and secure. Retighten if necessary.
- Lubrication: The gas spring mechanism is designed for maintenance-free operation. Do not attempt to lubricate internal components.
- Weight Limits: Do not exceed the maximum weight capacity of 19.8 lbs per arm. Overloading can damage the mount and monitors.
Troubleshooting
| Problem | Possible Cause | Solution |
|---|---|---|
| Monitor sags or drops after adjustment. | Gas spring tension is too low for the monitor's weight. | Increase gas spring tension by turning the adjustment screw counter-clockwise (towards "+"). Refer to "Gas Spring Tension Adjustment" in the Operating section. |
| Monitor is difficult to move up or down. | Gas spring tension is too high for the monitor's weight. | Decrease gas spring tension by turning the adjustment screw clockwise (towards "-"). Refer to "Gas Spring Tension Adjustment" in the Operating section. |
| Monitor does not hold its tilted position. | Tilt mechanism bolt is not tight enough. | Loosen the tilt bolt, adjust the monitor to the desired angle, then retighten the bolt firmly. |
| Mount feels unstable on the desk. | C-clamp or grommet base is not securely tightened, or desk is not suitable. | Ensure the C-clamp or grommet base is tightened firmly. Verify your desk meets the thickness and stability requirements. |
| Monitors are not level. | Minor variations in arm position or monitor weight distribution. | Adjust the height of each arm independently. Some VESA plates may also have minor leveling adjustments. |
Specifications
- Model: B0DHGVSFWV
- Brand: MOUNT PRO
- Material: Aluminum
- Color: Black
- Compatible Screen Size: 13 to 32 inches
- Weight Capacity (per arm): 4.4 to 19.8 lbs
- VESA Compatibility: 75x75mm, 100x100mm
- Tilt Angle: +70° to -45°
- Swivel Angle: 180°
- Rotation: 360° (Landscape to Portrait)
- Maximum Height: 17.3 inches
- Maximum Extension: 18.5 inches
- Desk Thickness (C-clamp/Grommet): 0.39 to 2.76 inches
- Grommet Hole Diameter: 0.39 to 2.36 inches
- Item Weight: Approximately 8.05 pounds
- Package Dimensions: 15.83 x 9.88 x 4.09 inches
Warranty and Support
For any questions, concerns, or assistance with your MOUNT PRO Dual Monitor Arm Desk Mount, please refer to the following resources:
- Official User Manual (PDF): For a downloadable version of the manual, please visit: MOUNT PRO User Manual PDF
- Contact Support: If you have specific questions regarding product suitability or require technical assistance, please contact MOUNT PRO customer support through the retailer's platform or the official MOUNT PRO website.


