
Introduction
This manual provides detailed instructions for the installation, configuration, operation, and maintenance of your TP-Link Omada network system, comprising the EAP610 Ultra-Slim Wireless Access Point and the ER7206 Multi-WAN Professional Wired Gigabit VPN Router. These devices are designed to work seamlessly together within the Omada Software Defined Networking (SDN) platform, offering centralized management and robust network performance for business and home environments.
Product Overview
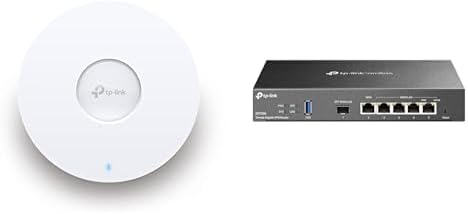
Image: The TP-Link EAP610 Ultra-Slim Wireless Access Point (left) and the TP-Link ER7206 Multi-WAN Professional Wired Gigabit VPN Router (right).
TP-Link EAP610 Ultra-Slim Wireless Access Point
The EAP610 is an Omada Wi-Fi 6 AX1800 access point designed for high-density environments. It supports dual-band Wi-Fi speeds up to 1800 Mbps, leveraging 1024-QAM and Long OFDM Symbol for enhanced performance. With 4 spatial streams, it significantly increases multi-user throughput, making it ideal for demanding applications. Its ultra-slim design allows for discreet ceiling or wall mounting.
TP-Link ER7206 Multi-WAN Professional Wired Gigabit VPN Router
The ER7206 is a robust Gigabit VPN router featuring multiple WAN ports for load balancing and failover, ensuring reliable internet connectivity. It includes a powerful SPI Firewall for network security and supports various VPN protocols, including up to 100 LAN-to-LAN IPsec, 50 OpenVPN, 50 L2TP, and 50 PPTP VPN connections. It integrates seamlessly into the Omada SDN platform for centralized management.
Setup Guide
1. Unboxing and Physical Connection
- Carefully unbox both the EAP610 and ER7206 devices and their accessories.
- ER7206 Router: Connect your internet service provider's modem to one of the WAN ports (e.g., WAN1) on the ER7206 using an Ethernet cable. Connect your local network devices (e.g., switches, computers) to the LAN ports.
- EAP610 Access Point: The EAP610 supports Power over Ethernet (PoE). Connect an Ethernet cable from a PoE-enabled switch or a PoE injector (not included) to the EAP610's Ethernet port. This cable will provide both power and data.
2. Mounting the EAP610
The EAP610 can be mounted on a ceiling or wall. Use the provided mounting bracket and hardware. Ensure the mounting location is central to the desired Wi-Fi coverage area and has access to an Ethernet cable for PoE.
3. Omada SDN Controller Setup
For centralized management, it is recommended to set up an Omada SDN Controller. This can be a hardware controller (e.g., OC200/OC300), software controller (installed on a PC/server), or a cloud-based controller.
- Hardware Controller: Connect the Omada Hardware Controller to your network. Follow its quick installation guide to power it on and access its web interface.
- Software Controller: Download and install the Omada Software Controller from the TP-Link website on a dedicated computer within your network.
- Cloud-Based Controller: Contact TP-Link for details on cloud-based controller options.
Once the controller is running, log in to its interface. The EAP610 and ER7206 should be automatically discovered. Adopt them into the controller to begin centralized configuration.
Operating Instructions
1. Omada SDN Centralized Management
The Omada SDN Controller provides a unified interface to manage both your EAP610 access points and ER7206 router. From the controller dashboard, you can:
- Monitor network status, connected clients, and device health.
- Configure Wi-Fi settings for the EAP610 (SSIDs, security, guest networks).
- Manage router settings for the ER7206 (WAN/LAN, DHCP, firewall rules, VPN).
- Perform firmware upgrades for all Omada devices.
- Set up mesh networks and seamless roaming for Wi-Fi clients.
2. EAP610 Wi-Fi Configuration
Within the Omada Controller, navigate to the Wireless settings to configure your EAP610:
- SSID Creation: Create one or more Wi-Fi network names (SSIDs) for your 2.4 GHz and 5 GHz bands.
- Security: Set strong WPA2/WPA3 passwords for your SSIDs.
- Guest Network: Configure isolated guest networks with captive portals or simple passwords.
- Mesh & Roaming: If deploying multiple EAP610s, enable Omada Mesh for wireless backhaul and Fast Roaming (802.11k/v/r) for seamless client transitions.
3. ER7206 Router Configuration
Access the router settings via the Omada Controller to manage your ER7206:
- WAN Settings: Configure multiple WAN ports for load balancing (distributing traffic across multiple internet connections) or failover (automatically switching to a backup connection if the primary fails).
- VPN Setup: Create and manage VPN tunnels (IPsec, OpenVPN, L2TP, PPTP) for secure remote access or site-to-site connectivity. Refer to the Omada Controller's VPN section for detailed protocol-specific configurations.
- Firewall Rules: Implement security policies by configuring firewall rules to control network traffic flow.
- VLANs: Create Virtual LANs to segment your network for improved security and management.
Maintenance
1. Firmware Updates
Regularly check for and apply firmware updates for both the EAP610 and ER7206 via the Omada SDN Controller. Firmware updates often include security patches, bug fixes, and new features. Always back up your configuration before performing a firmware upgrade.
2. Configuration Backup
Periodically back up your Omada Controller configuration. This allows for quick restoration of your network settings in case of unforeseen issues or device replacement.
3. Physical Cleaning
Keep the devices clean and free from dust. Use a soft, dry cloth to wipe the exterior. Ensure ventilation holes are not obstructed to prevent overheating.
4. Network Monitoring
Utilize the Omada Controller's monitoring tools to regularly check network performance, device status, and client connectivity. Address any alerts or warnings promptly.
Troubleshooting
1. Device Not Appearing in Omada Controller
- Ensure the device is powered on and connected to the same network segment as the Omada Controller.
- Verify network connectivity between the device and the controller (ping test).
- Check if the device's LED indicators are showing normal operation.
- If the device was previously adopted by another controller or in standalone mode, you may need to reset it to factory defaults.
2. No Internet Access
- ER7206: Check the WAN port connection and status. Verify your ISP modem is working correctly. Ensure WAN settings (DHCP, Static IP, PPPoE) are configured correctly on the ER7206.
- EAP610: Ensure the EAP610 is adopted by the Omada Controller and has a valid IP address. Check the Ethernet cable connection to the PoE source.
- Verify that DHCP is enabled on the ER7206 or that clients have valid static IP configurations.
3. VPN Connection Issues
- Verify VPN server settings on the ER7206 (IP addresses, authentication methods, pre-shared keys).
- Check client-side VPN configurations for accuracy.
- Ensure necessary ports for VPN protocols are open on any firewalls between the client and the ER7206.
4. Slow Wi-Fi Speed
- Check for Wi-Fi interference from other devices or networks. Consider changing Wi-Fi channels.
- Ensure the EAP610 is optimally placed and not obstructed.
- Verify that client devices support Wi-Fi 6 (802.11ax) to fully utilize the EAP610's capabilities.
- Check the wired backhaul connection speed to the EAP610.
Technical Specifications
| Feature | Specification |
|---|---|
| Brand | TP-Link |
| Model Names | EAP610, ER7206 |
| Wireless Type (EAP610) | 802.11ax (Wi-Fi 6) |
| Frequency Band Class (EAP610) | Dual-Band |
| Operating System | Omada OS |
| Special Features | VPN Support, Remote Access, Network Optimization |
| Connectivity Technology | Ethernet, Wi-Fi |
| Antenna Type (EAP610) | Internal |
| Compatible Devices | Laptop, Personal Computer, Smartphone, Tablet |
| Recommended Uses | Home, Business, Gaming, Streaming |
| VPN Connections (ER7206) | Up to 100x LAN-to-LAN IPsec, 50x OpenVPN, 50x L2TP, 50x PPTP |
Warranty Information
TP-Link products typically come with a limited warranty. For specific warranty terms and conditions applicable to your EAP610 and ER7206 devices, please refer to the warranty card included with your product packaging or visit the official TP-Link website. Keep your proof of purchase for warranty claims.
Support
For technical support, product registration, and additional resources, please visit the official TP-Link support website. The website provides access to FAQs, troubleshooting guides, firmware downloads, and contact information for customer service.
TP-Link Official Website: www.tp-link.com
Omada SDN Information: www.tp-link.com/omada_sdn/


