1. Introduction
This manual provides essential information for the safe and efficient installation, operation, and maintenance of your Philips BVP167 10W LED Floodlight. Please read this manual thoroughly before installation and keep it for future reference.
The Philips BVP167 is a high-quality, energy-efficient LED floodlight designed for various indoor and outdoor applications. It features adjustable color temperature, a robust aluminum housing, and an IP65 rating for protection against dust and water.

Image 1.1: Philips BVP167 10W LED Floodlight, showing its compact design and integrated bracket.
2. Safety Information
WARNING: Risk of electric shock. Installation must be performed by a qualified electrician in accordance with all local and national electrical codes.
- Always disconnect power before installation, maintenance, or cleaning.
- Ensure the supply voltage matches the product's requirements (220-240V).
- Do not modify the product in any way. Unauthorized modifications may void the warranty and create safety hazards.
- Do not look directly into the operating LED light source.
- Ensure proper grounding of the fixture.
- Keep packaging materials out of reach of children.
3. Package Contents
Carefully unpack the box and ensure all items are present and undamaged. If any items are missing or damaged, contact your retailer.
- Philips BVP167 10W LED Floodlight
- Mounting bracket (pre-attached or separate)
- Instruction Manual (this document)
Note: Mounting hardware (screws, anchors) may not be included and should be selected based on the mounting surface.
4. Setup and Installation
4.1. Physical Dimensions and Mounting
Refer to the diagram below for the physical dimensions of the floodlight. The integrated mounting bracket allows for versatile installation on walls, poles, or other suitable surfaces.
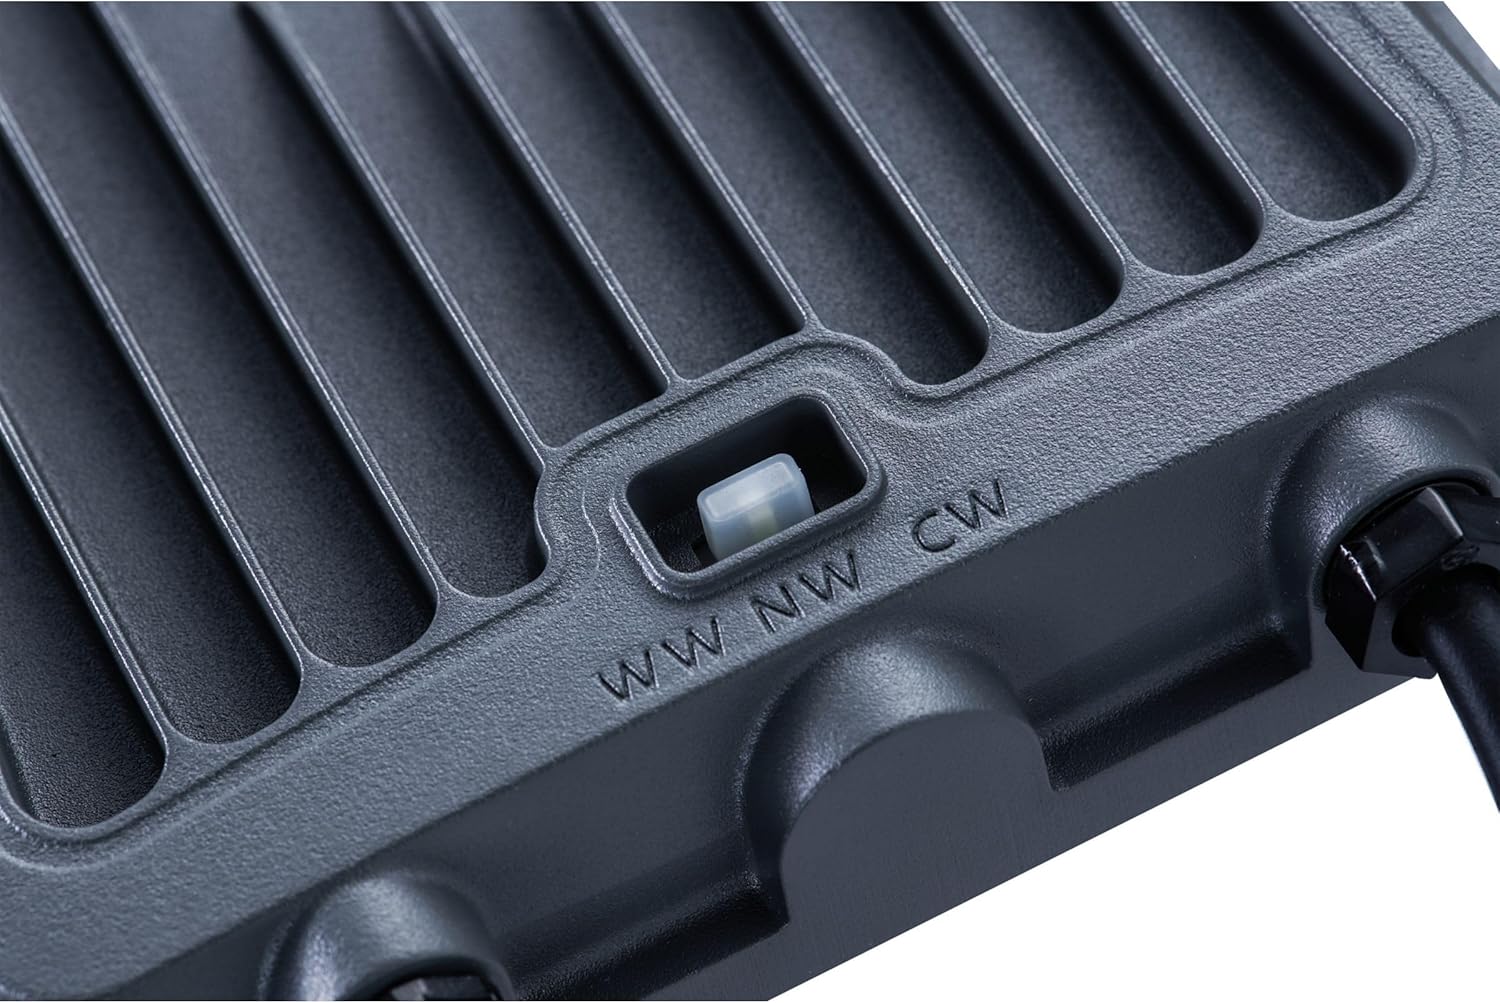
Image 4.1: Technical drawing showing the dimensions (A, B, C, D, E, a, b, c, d) of the Philips BVP167 LED Floodlight for various wattages. For the 10W model, refer to the '10W' column in the table.
Mounting Steps:
- Choose Location: Select a stable mounting surface capable of supporting the floodlight's weight. Ensure the location provides adequate clearance for light distribution and access for maintenance.
- Mark Drilling Points: Use the mounting bracket as a template to mark the drilling points on the surface.
- Drill Holes: Drill appropriate holes for your chosen mounting hardware (not supplied).
- Secure Bracket: Attach the mounting bracket securely to the surface using suitable screws and anchors.
- Adjust Angle: Once mounted, the floodlight's angle can be adjusted by loosening the side screws on the bracket, setting the desired angle, and then tightening the screws firmly.
4.2. Electrical Connection
IMPORTANT: Ensure power is OFF at the circuit breaker before making any electrical connections.
- The floodlight comes with free cable ends for connection.
- Connect the live (brown), neutral (blue), and ground (green/yellow) wires from the floodlight to your main power supply wires according to local electrical codes.
- Use an appropriate IP-rated junction box or connector for outdoor installations to ensure water resistance.
- Verify all connections are secure and properly insulated.
4.3. Color Temperature Selection
The Philips BVP167 floodlight allows you to select between three color temperatures: 3000K (Warm White), 4000K (Neutral White), and 6500K (Cool White). This selection is made via a switch located on the back of the fixture.

Image 4.2: Close-up view of the color temperature selection switch (WW, NW, CW) on the back of the floodlight.
To change the color temperature:
- Ensure the floodlight is powered off.
- Locate the switch on the back of the floodlight.
- Slide the switch to your desired setting:
- WW: Warm White (3000K)
- NW: Neutral White (4000K)
- CW: Cool White (6500K)
- Restore power to the floodlight. The light will illuminate with the selected color temperature.
5. Operating Instructions
Once properly installed and connected, the Philips BVP167 LED Floodlight operates simply by applying power. There are no complex controls for daily use.
- Power On/Off: The floodlight will turn on when power is supplied to its circuit and turn off when power is removed. This is typically controlled by a wall switch or an external timer/sensor (not included).
- Brightness Adjustment: The product description mentions brightness adjustment via a switch. However, the provided images and common features for this type of floodlight primarily indicate color temperature selection. If your specific model includes a separate switch for brightness (e.g., a dip switch inside a sealed compartment), consult the specific documentation provided with your unit for instructions on accessing and adjusting it. For most standard installations, the brightness is fixed at 1200 lumens.
6. Maintenance
WARNING: Always disconnect power before performing any maintenance.
- Cleaning: Periodically clean the exterior of the floodlight with a soft, damp cloth. Do not use abrasive cleaners, solvents, or harsh chemicals, as these can damage the finish or optical components.
- Inspection: Regularly inspect the floodlight for any signs of damage, such as cracked housing, frayed cables, or loose mounting. If any damage is found, disconnect power immediately and have the unit inspected by a qualified technician.
- No User-Serviceable Parts: The Philips BVP167 LED Floodlight contains no user-serviceable parts. Do not attempt to open the housing or repair the internal components.
7. Troubleshooting
If you encounter issues with your floodlight, refer to the following common problems and solutions:
| Problem | Possible Cause | Solution |
|---|---|---|
| Light does not turn on. | No power supply. Loose wiring connection. Faulty switch/circuit breaker. | Check power supply to the circuit. Verify all electrical connections are secure (with power off). Test the switch or circuit breaker. |
| Light flickers or dims. | Unstable power supply. Loose wiring. | Ensure stable power supply. Check wiring connections (with power off). |
| Incorrect color temperature. | Color temperature switch set incorrectly. | Turn off power, adjust the color temperature switch to the desired setting (WW, NW, or CW), then restore power. |
| Water ingress/condensation inside fixture. | Improper installation or damaged seal. | Disconnect power immediately. Inspect for damage or improper sealing. Contact a qualified electrician or Philips support. |
If the problem persists after attempting these solutions, contact Philips customer support or a qualified electrician.
8. Specifications
| Model | BVP167 (8720169736016) |
| Power Consumption | 10 Watts |
| Luminous Flux | 1200 Lumens |
| Lumen per Watt | 120 lm/W |
| Color Temperature | Selectable: 3000K (Warm White), 4000K (Neutral White), 6500K (Cool White) |
| Color Rendering Index (CRI) | 80-89 |
| Input Voltage | 220-240V |
| Power Factor | 0.95 |
| Beam Angle | 110 degrees (Symmetric) |
| IP Rating | IP65 (Dust tight and protected against water jets) |
| IK Rating | IK07 (Protection against mechanical impacts) |
| Operating Temperature | -25°C to +40°C |
| Housing Material | Aluminum |
| Lens Material | Glass |
| Lifespan (L80B50) | 50,000 hours |
| Dimensions (L x W x H) | Approx. 130mm x 85mm x 31mm (for 10W model, refer to diagram for exact measurements) |
| Weight | 1 kg |
9. Warranty & Support
9.1. Warranty Information
This Philips BVP167 LED Floodlight comes with a 3-year warranty from the date of purchase. This warranty covers defects in materials and workmanship under normal use. It does not cover damage resulting from improper installation, misuse, abuse, accidents, or unauthorized repairs.
Please retain your proof of purchase for warranty claims.
9.2. Customer Support
For technical assistance, warranty claims, or further information, please contact Philips customer support through their official website or the contact details provided with your purchase documentation.
You can visit the official Philips website for support resources: www.philips.com/support


