
1. Product Overview
The Leakbee R503 is a 2-in-1 RV Carbon Monoxide (CO) and Propane (LP) Gas Detector designed for recreational vehicles, motorhomes, travel trailers, and truck campers. It features two independent, highly sensitive sensors to detect both carbon monoxide and propane gas leaks, providing visual and audible alarms for enhanced safety.
The device operates on a wide 9-24V DC voltage and includes a digital LED display to show gas levels and alarm statuses. It is designed to replace older RV gas detectors, including models like #31011, #36636, and #36681, with compatible screw hole distances for easy installation.

Image: Overview of the Leakbee R503 detector highlighting its 2-in-1 functionality, wide voltage range, audible/visual alarm, and 24/7 monitoring.
2. Safety Information
- Replacement: The detector must be replaced 60 months (5 years) after its initial power-on date to ensure optimal performance and accuracy.
- Power Requirement: The alarm will not operate without continuous 9-24V DC power. Ensure the green power light is always on.
- Do Not Paint: Do not paint the detector. Paint can clog the sensor openings and interfere with the unit's ability to detect gases.
- Installation Location: Install the detector approximately 4-12 inches (10-30 cm) from the floor, as propane gas is heavier than air and tends to settle lower.
- Alarm Activation: If the alarm sounds, immediately ventilate the area, turn off gas appliances, and evacuate the RV. Do not re-enter until the alarm has ceased and the area is deemed safe.
3. Package Contents
Upon opening the package, verify that all the following items are included:
- 1x Leakbee R503 RV 2-in-1 Carbon Monoxide & Propane Gas Detector (Black)
- 1x Flush Mount Bracket
- 1x Lever-nut Connector
- 1x User Manual
- 4x Mounting Screws

Image: The Leakbee R503 detector, user manual, lever-nut connector, and mounting screws, illustrating the complete package contents.
4. Setup and Installation
4.1 Choosing an Installation Location
Select a location on an interior wall where the detector will be approximately 4-12 inches (10-30 cm) from the floor. Avoid installing near windows, vents, or direct sunlight, which could affect sensor accuracy. Ensure the location allows for easy visibility of the display and access to the test/mute button.
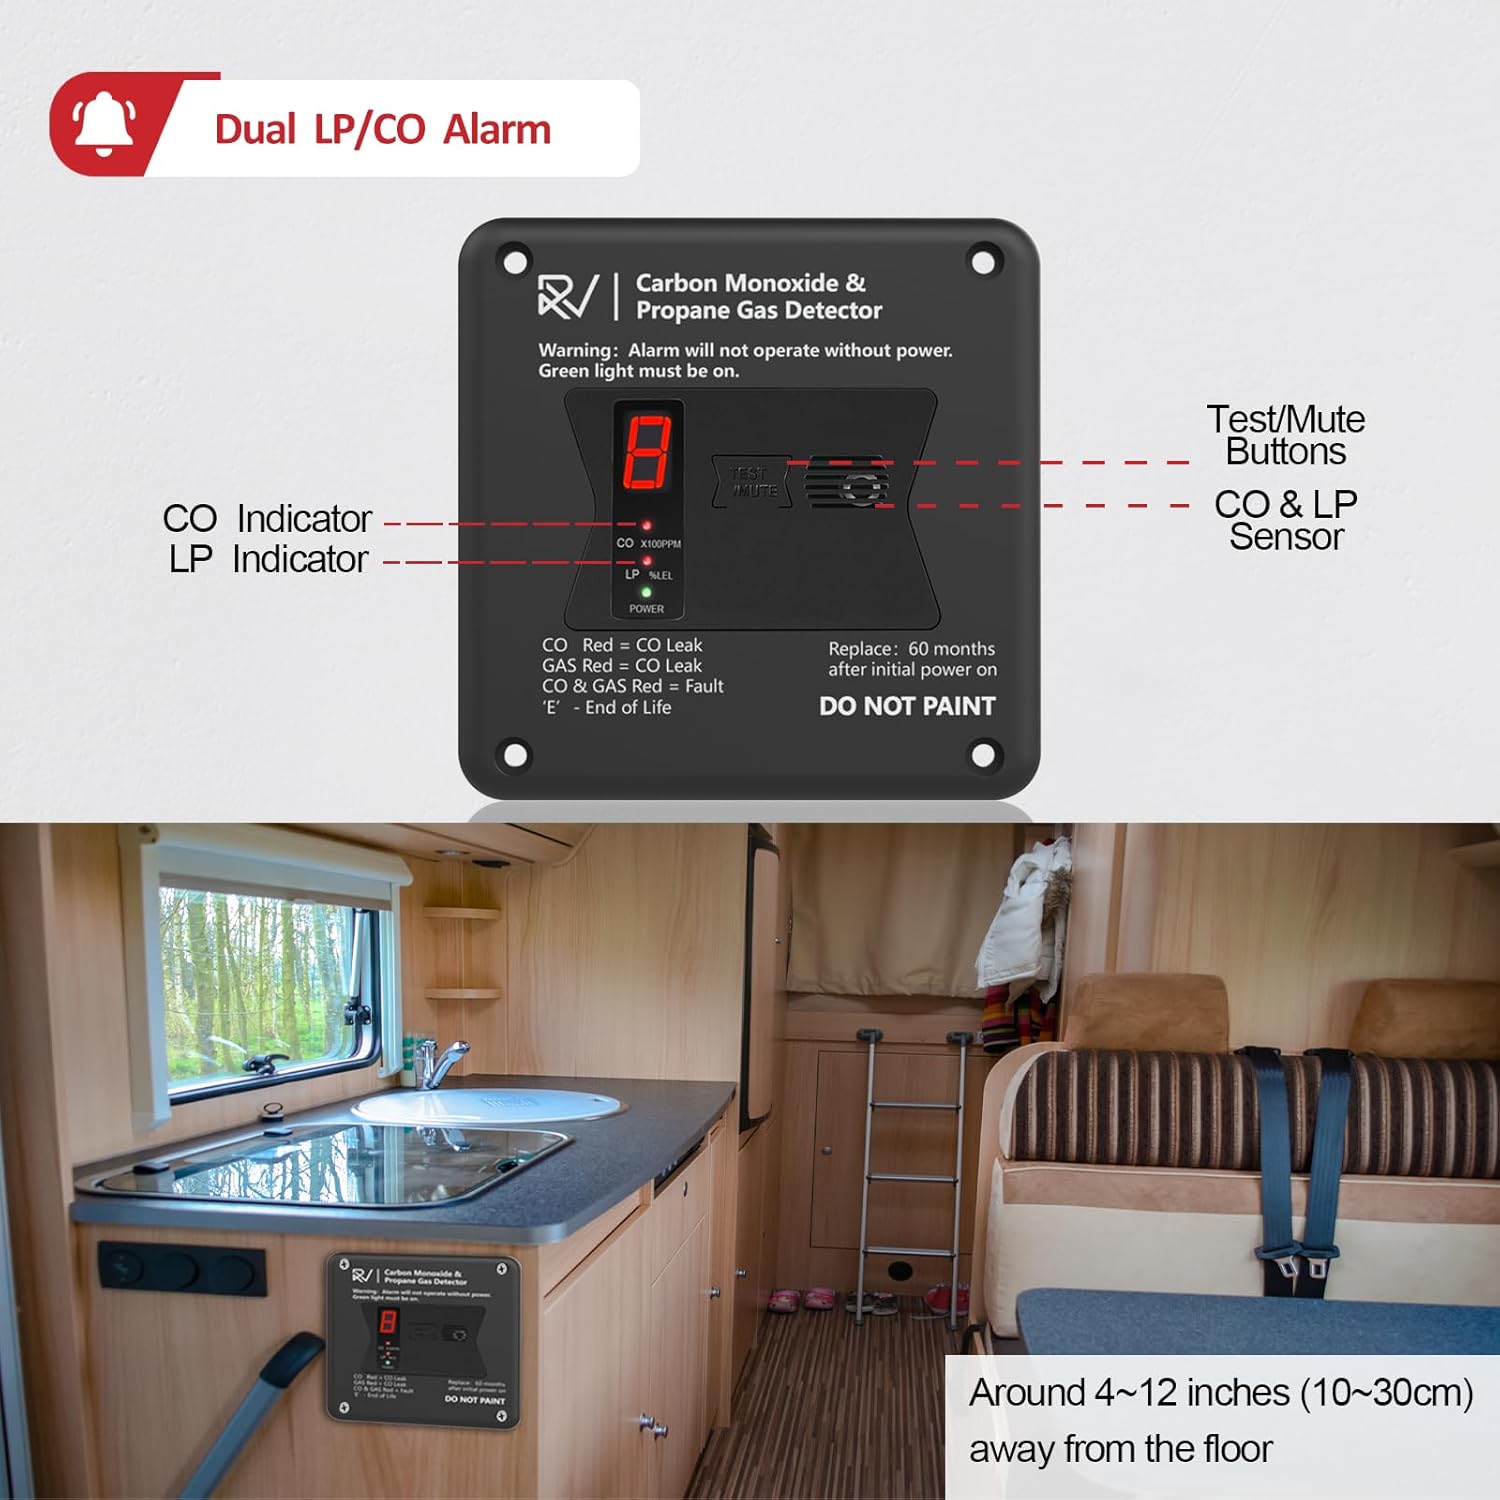
Image: The Leakbee R503 detector mounted inside an RV, demonstrating its recommended placement between 4-12 inches from the floor.
4.2 Preparing the Mounting Area
The R503 is designed for flush mounting and is compatible with the cutout and screw hole distances of older models like #31011. The face cover size is 4 5/8" Width x 4 5/8" Length. The recommended wall cutout size is 2"~3 15/16" Width x 3 3/8"~3 15/16" Length.

Image: A detailed diagram illustrating the external dimensions of the R503 detector and the necessary wall cutout measurements for a flush installation.
4.3 Wiring Connection
The unit comes with a lever-nut connector for easy, tape-free wiring. Follow these steps:
- Strip approximately 1/2 inch (12mm) of insulation from the ends of your RV's 12V DC power wires.
- Lift the orange levers on the lever-nut connector.
- Insert the red wire from the detector into the positive (+) terminal of the RV's power supply.
- Insert the black wire from the detector into the negative (-) or ground terminal of the RV's power supply.
- Push the orange levers down to secure the wires.

Image: Visual instructions demonstrating the simple wiring process using the included lever-nut connector, showing wire stripping and connection.
4.4 Mounting the Detector
Once wired, secure the detector into the wall cutout using the provided mounting screws. Ensure it is firmly attached and flush with the wall surface.
Video: A 3D rotation of the Leakbee R503 RV Carbon Monoxide and Propane Gas Detector, showcasing its design and form factor from various angles.
5. Operating Instructions
The Leakbee R503 detector provides clear visual and audible indicators for different statuses:
- Power Indicator: A green light indicates the unit is powered on and functioning correctly.
- CO Leak: If carbon monoxide is detected, the CO indicator will turn red, and an audible alarm will sound. The digital display may show 'CO' or a numerical value.
- LP Leak: If propane gas is detected, the LP indicator will turn red, and an audible alarm will sound. The digital display may show 'LP' or a numerical value.
- Fault: If both CO and LP indicators turn red, it signifies a fault with the unit.
- End of Life: An 'E' displayed on the screen indicates the unit has reached its end of life and requires replacement.
5.1 Test/Mute Button
Press the 'TEST/MUTE' button to perform a self-test of the alarm. During an alarm, pressing this button will temporarily mute the audible alarm for a short period, allowing you to address the situation. The visual indicators will remain active until the gas levels return to normal or the fault is resolved.

Image: The detector displaying a red CO indicator, signaling a Carbon Monoxide leak.

Image: The detector displaying a red LP indicator, signaling a Propane Gas leak.
6. Maintenance
- Regular Testing: It is recommended to test the detector at least once a week by pressing the 'TEST/MUTE' button. This verifies the alarm's functionality.
- Cleaning: Periodically clean the exterior of the detector with a soft, damp cloth. Do not use harsh chemicals or abrasive cleaners. Ensure no dust or debris obstructs the sensor openings.
- Replacement: Replace the unit every 60 months (5 years) from the initial power-on date. The 'E' indicator will appear when it reaches its end of life.
7. Troubleshooting
| Indicator/Symptom | Possible Cause | Action |
|---|---|---|
| CO Red & Audible Alarm | Carbon Monoxide Leak | Ventilate immediately, turn off CO sources, evacuate. Seek fresh air. |
| LP Red & Audible Alarm | Propane Gas Leak | Ventilate immediately, turn off LP sources, evacuate. Seek fresh air. |
| CO & LP Red (Fault) | Internal Fault / Malfunction | Ensure proper power connection. If issue persists, contact customer support or replace unit. |
| 'E' on Display | End of Life | The detector has reached its operational lifespan. Replace the unit immediately. |
| No Power / Green Light Off | No 12V DC power supply | Check RV's 12V power source and wiring connections. |

Image: The detector displaying both CO and LP indicators in red, indicating a fault condition.

Image: The detector displaying 'E' on its digital screen, signaling that the unit has reached its end of operational life.
8. Specifications
| Feature | Detail |
|---|---|
| Brand | Leakbee |
| Model Number | R503 |
| Power Source | DC 9~24V |
| Color | Black |
| Product Dimensions | 4.64"D x 4.64"W x 0.78"H |
| Item Weight | 0.25 Pounds (4 ounces) |
| Alarm Type | Visual & Audible Alarm (100dB) |
| Compatible Devices | 31011, 36636, 36681 RV CO and LP gas detectors |
| Manufacturer | Shenzhen Yeezou Technology Co., Ltd |
| UPC | 762736661022 |
| Batteries Included/Required | No |
9. Warranty and Support
Leakbee, a company founded and managed by gas company technicians and engineers, offers a lifetime warranty and technical support for the R503 detector. If you experience any issues within 60 months of purchase, a replacement service will be provided.
For technical assistance or warranty claims, please refer to the contact information provided in your product packaging or visit the official Leakbee website.