1. Introduction
The FriendlyElec NanoPi M6 is a versatile, open-source mini router and smart gateway device. It is designed for various applications including IoT development, network-attached storage (NAS), smart home gateways, and cloud servers. This manual provides essential information for setting up, operating, and maintaining your NanoPi M6.

Image 1.1: The NanoPi M6 device, accompanied by its power adapter and a USB-C cable.
2. Product Overview
2.1 Package Contents
Verify that all items listed below are included in your package:
- 1x FriendlyElec NanoPi M6 Computer Mini Router (32GB Metal Case variant)
- 1x 20W PD Power Supply
- 1x Black CNC Metal Case (pre-installed)
- 1x 3.5 inch HD LCD Screen (if applicable to your specific model variant)
2.2 Hardware Features
The NanoPi M6 is built around the Rockchip RK3588S System-on-Chip (SoC), offering robust performance for various computing tasks.
- SoC: Rockchip RK3588S
- CPU: Quad-core ARM Cortex-A76 (up to 2.4GHz) and quad-core Cortex-A55 CPU (up to 1.8GHz)
- GPU: Mali-G610 MP4, compatible with OpenGLES 1.1, 2.0, 3.2, OpenCL up to 2.2, and Vulkan 1.2
- VPU: 8K 60fps H.265 and VP9 decoder, 8K 30fps H.264 decoder, 4K 60fps AV1 decoder, 8K 30fps H.264 and H.265 encoder
- NPU: 6TOPs, supports INT4/INT8/INT16/FP16
- RAM: 64-bit LPDDR5 at 2400MHz (32GB in this model)
- Flash: eMMC module socket, HS400 mode (no onboard eMMC, supports TF cards)
- Ethernet: 1x Native Gigabit Ethernet port
- USB: 1x USB 3.0 Type-A, 2x USB 2.0 Type-A
- M.2 Connectors:
- 1x M.2 M-Key connector with PCIe 2.1 x1 for SSDs
- 1x M.2 E-key connector with PCIe 2.1 x1 and USB2.0 Host for Wi-Fi & BT modules
- microSD: Supports up to SDR104 mode
- Video Input:
- 1x 4-lane MIPI-CSI V1.2
- 1x 4-lane MIPI-CSI D/C PHY
- Video Output:
- 1x Standard HDMI output port (compatible with HDMI2.1, HDMI2.0, HDMI1.4), supports displays up to 7680x4320 60Hz, RGB/YUV (up to 10bit) format
- 2x 4-lane MIPI-DSI, compatible with MIPI DPHY 2.0 or CPHY 1.1
- Audio:
- 1x 3.5mm jack for stereo headphone output
- 1x 2.0mm PH-2A connector for analog microphone input
- GPIO: 30-pin 2.54mm header connector (up to 1x SPI, 6x UARTs, 3x I2Cs, 1x SPDIFs, 4x PWMs, 20x GPIOs)
- Debug: UART via 3-Pin 2.54mm header
- LEDs: 2 x GPIO Controlled LED (SYS, LED1)
- Other Features:
- 2 Pin 1.27/1.25mm RTC battery input connector for low power RTC IC HYM8563TS
- Buttons: MASK, Reset, Recovery, Power
- One 5V Fan connector
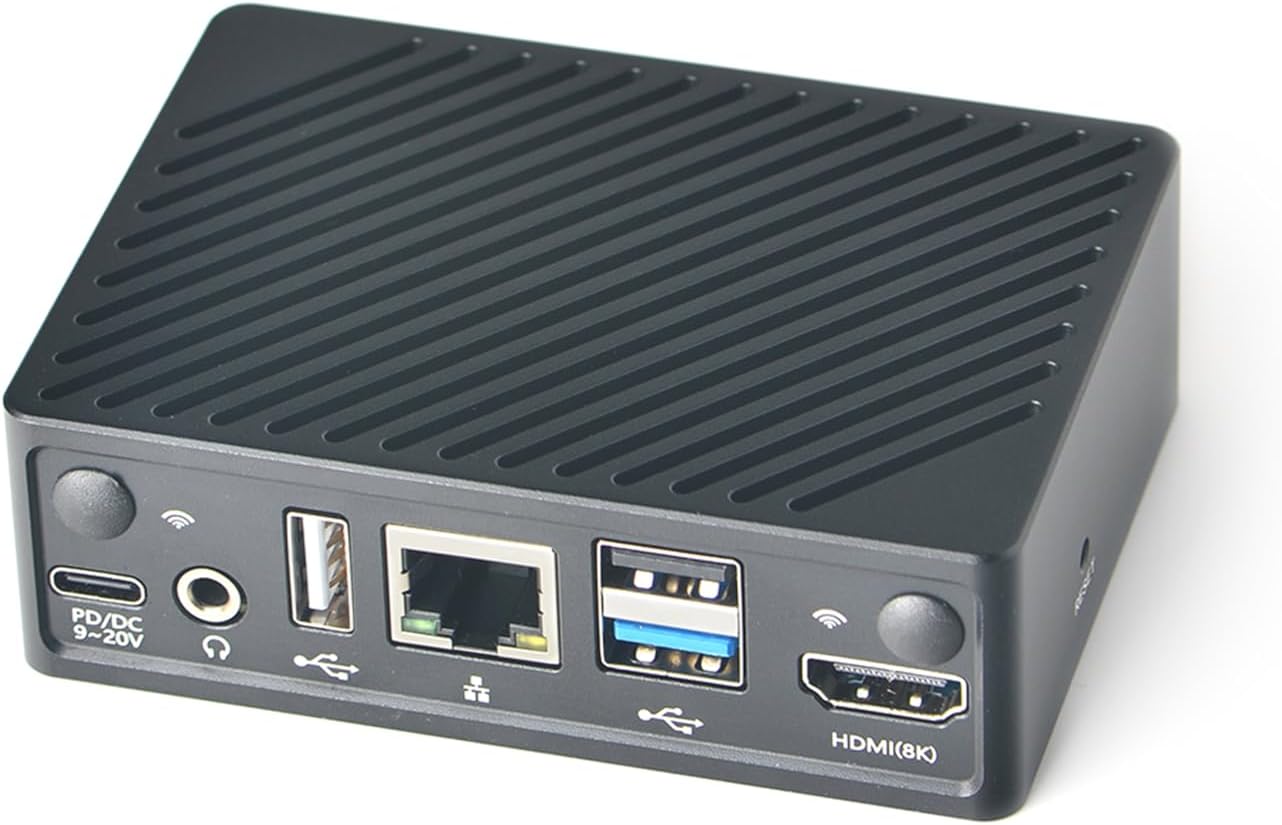
Image 2.1: Front view of the NanoPi M6, showing USB-C power, audio jack, USB 2.0, Gigabit Ethernet, USB 3.0, and HDMI ports.

Image 2.2: Rear view of the NanoPi M6, displaying the power button, system LEDs (SYS, LED1), and other control buttons.

Image 2.3: An illustration of the NanoPi M6 bare board and an optional LCD combo, highlighting key features like the RK3588S SoC, LPDDR5 RAM, eMMC socket, Gigabit Ethernet, HDMI 2.1, USB 3.0, and various OS support.
3. Setup and Initial Configuration
Before operating your NanoPi M6, you will need to install an operating system. There are several methods available:
3.1 System Installation Options

Image 3.1: Visual representation of the three primary methods for installing an operating system on the NanoPi M6.
Option 1: Installing an OS with a Cable (Recommended for Developers)
This method is typically preferred by developers. It requires a USB Type-A to male-to-male cable and a personal computer (PC).
- Connect the NanoPi M6 to your PC using the USB Type-A to male-to-male cable.
- Follow the specific instructions provided in the official FriendlyElec Wiki for flashing the OS image to the device via USB.
Option 2: Installing an OS via a Web Browser (Recommended for Regular Users)
This method is suitable for regular users and requires a TF card and a web browser.
- Insert a TF card with the desired OS image into the NanoPi M6.
- Connect the NanoPi M6 to your network.
- Access the device's web interface via a web browser on another computer.
- Use the eMMC Tools section within the web interface to upload and write the OS image to the internal eMMC.
Option 3: Installing an OS with a Card Only
This method is preferred by those who need to install an OS for a batch of NanoPi M6 boards. It requires a TF card and either an LCD screen or an HDMI display for visual feedback.
- Prepare a TF card with the desired OS image.
- Insert the TF card into the NanoPi M6.
- Connect an LCD screen or HDMI display to monitor the installation progress.
- Power on the device. The system will boot from the TF card and proceed with the installation.
For detailed, step-by-step instructions and OS images, please refer to the official FriendlyElec Wiki: wiki.friendlyelec.com/wiki/index.php/NanoPi_M6#Get_Started
4. Operating Instructions
4.1 Powering On and Off
- Power On: Connect the 20W PD Power Supply to the USB-C port (PD/DC 9~20V) on the NanoPi M6. The device should power on automatically, or you may need to press the Power button.
- Power Off: It is recommended to perform a graceful shutdown through the operating system before disconnecting power. Alternatively, press and hold the Power button for a few seconds to force a shutdown.
4.2 Connecting Peripherals
- Display: Connect an HDMI cable to the HDMI (8K) port for video output.
- Network: Connect an Ethernet cable to the Gigabit Ethernet port for wired network access.
- USB Devices: Use the USB 3.0 Type-A and USB 2.0 Type-A ports for connecting keyboards, mice, storage devices, or other USB peripherals.
- Audio: Connect headphones to the 3.5mm audio jack or an analog microphone to the 2.0mm PH-2A connector.
4.3 Software Support
The NanoPi M6 supports a variety of operating systems, providing flexibility for different applications:
- FriendlyWrt (custom OpenWrt distribution)
- Android
- Debian
- Ubuntu
The device also supports headless systems, offering more flexibility for server and embedded applications.

Image 4.1: Examples of the NanoPi M6 running various operating systems, including Android TV, Debian Bullseye Desktop, and Ubuntu 22.04 LTS Desktop, demonstrating hardware-accelerated video decoding.
The NanoPi M6 is also designed to support Docker, enabling the deployment of containerized applications. This allows for running various services like WordPress, Home Assistant, Jellyfin, Nextcloud, GitLab, Matomo, Emby, Cloud Torrent, and Minecraft Server.

Image 4.2: Details of the Rockchip RK3588S Quad-Core SoC, highlighting its powerful performance, hardware acceleration with AES encryption, and support for 8K video decoding.

Image 4.3: An internal view of the NanoPi M6 board, indicating the locations of the M.2 E-Key, M.2 M-Key, and eMMC Socket. A table details USB WiFi chipset support across FriendlyWrt and Ubuntu Core distributions.
5. Specifications
| Feature | Detail |
|---|---|
| Package Dimensions | 4.72 x 3.15 x 1.57 inches |
| Item Weight | 10.6 ounces |
| Item Model Number | NanoPi M6 |
| RAM Memory Installed Size | 32 GB LPDDR5 |
| Total USB Ports | 3 (1x USB 3.0, 2x USB 2.0) |
| Resolution | 7680x4320 (8K) |
| Maximum Memory Speed | 2400 MHz (LPDDR5) |
| Brand | WayPonDEV (FriendlyElec) |
| Operating System Support | FriendlyWrt, Android, Debian, Ubuntu |
| CPU Model | Rockchip RK3588S (Quad-core Cortex-A76, Quad-core Cortex-A55) |
| CPU Speed | Up to 2.4 GHz (Cortex-A76) |
| Graphics Coprocessor | Mali-G610 MP4 |
| Personal Computer Design Type | Mini PC |
| Manufacturer | WayPonDEV |
| Date First Available | August 20, 2024 |

Image 5.1: Dimensional diagrams for the NanoPi M6 in a metal case, both with and without an integrated LCD screen, showing various views and measurements.
6. Troubleshooting
This section addresses common issues you might encounter with your NanoPi M6.
6.1 General Issues
- Device not powering on:
- Ensure the 20W PD Power Supply is correctly connected to the USB-C port and plugged into a working power outlet.
- Verify the power supply is providing the correct voltage (9-20V).
- Press the Power button if the device does not automatically start.
- No display output:
- Check the HDMI cable connection to both the NanoPi M6 and the display.
- Ensure the display is set to the correct input source.
- If using an LCD, ensure it is properly connected and configured in the OS.
- Network connectivity problems:
- For wired connections, check the Ethernet cable and router status.
- For Wi-Fi, ensure a compatible M.2 Wi-Fi module is installed and drivers are loaded in the operating system. Refer to the "NanoPi M6 USB WiFi Support List" (Image 4.3) for compatibility.
- OS not booting:
- Verify that the OS image was correctly flashed to the eMMC or TF card.
- Ensure the TF card is properly inserted if booting from it.
- Try re-flashing the OS image using one of the methods described in Section 3.1.
For more advanced troubleshooting or specific OS-related issues, consult the FriendlyElec Wiki or community forums.
7. Maintenance
To ensure the longevity and optimal performance of your NanoPi M6, consider the following maintenance guidelines:
- Environmental Conditions: Operate the device in a well-ventilated area, away from direct sunlight, excessive heat, dust, and moisture.
- Cleaning: Use a soft, dry cloth to clean the exterior of the device. Avoid using liquid cleaners or solvents. For internal components, use compressed air to remove dust if necessary, ensuring the device is powered off.
- Software Updates: Regularly update the operating system and installed software to benefit from security patches, bug fixes, and performance improvements.
- Firmware Updates: Check the FriendlyElec Wiki for any available firmware updates for the NanoPi M6. Follow instructions carefully when performing firmware updates.
- Data Backup: Periodically back up important data stored on the device, especially if using it for critical applications like NAS.
8. Warranty and Support
For after-sales problems, technical assistance, or further inquiries, please contact WayPonDEV directly through their store on the platform where you purchased the product. You can typically find a "Ask A Question" link on their seller page.
Additionally, a community forum is available for support and discussions:
- FriendlyElec Wiki: wiki.friendlyelec.com/wiki/index.php/NanoPi_M6
- Community Forum: forum.youyeetoo.com/
Information regarding extended protection plans may be available from your retailer at the time of purchase. Standard product warranty details are typically provided with the product packaging or on the manufacturer's official website.


