
HTRC T240 DUO
HTRC T240 DUO Lipo Battery Charger User Manual
Model: T240 DUO
1. Product Overview
The HTRC T240 DUO is a versatile dual-channel balance charger and discharger designed for a wide range of RC battery types. It features a touch screen interface for easy operation and supports both AC and DC power inputs, making it suitable for various charging environments. This charger is capable of handling LiPo, LiHV, Li-Ion, LiFe, NiCD, NiMH, PB, and Smart batteries with multiple charging and discharging modes.

Image 1.1: The HTRC T240 DUO charger with its comprehensive set of included cables and connectors.
2. Safety Instructions
WARNING: Failure to follow these safety instructions can result in fire, property damage, or serious injury.
- Always operate the charger in a well-ventilated area, away from flammable materials.
- Never leave the charger unattended while in use.
- Ensure the correct battery type and charging parameters are selected before starting any operation. Incorrect settings can damage batteries or cause hazards.
- Do not charge two different batteries on the same channel simultaneously. Each channel is designed to charge one battery at a time.
- Avoid using the AC power cable and DC cable simultaneously.
- Keep the charger away from water, moisture, and extreme temperatures.
- The cooling fan may produce sound during operation; this is normal for heat dissipation. Do not obstruct the fan vents.
- Always use appropriate fire-resistant charging bags or containers for LiPo batteries.

Image 2.1: Illustration of correct and incorrect battery connection. Each channel supports one battery at a time.
3. Package Contents
Upon opening the package, please verify that all the following items are included:
- 1x HTRC T240 DUO RC Battery Charger
- 1x AC Power Cable
- 1x XT60 DC Cable
- 2x XT60 Plugs
- 2x T-Banana Connectors
- 2x T-Crocodile Clips
- 2x T-Tamiya Plugs
- 2x Balance Extension Cords
- 1x User Manual

Image 3.1: All components included in the HTRC T240 DUO charger package.
4. Product Features
The HTRC T240 DUO charger offers a comprehensive set of features for efficient and safe battery management:
- Dual Channel Operation: Simultaneously charge two different batteries independently.
- Touch Screen Interface: A 3.2-inch color touch screen provides intuitive navigation and control over charging parameters.
- Multi-Chemistry Support: Compatible with LiPo, LiHV, Li-Ion, LiFe (1S-6S), NiCD, NiMH (1S-15S), PB (2V-20V), and Smart batteries.
- Multiple Modes: Supports Charge, Balance Charge, Discharge, Storage, and Cycling modes.
- High Power Output: AC input max power 150W (CH1+CH2=150W), DC input max power 240W (CH1+CH2=240W).
- Adjustable Current: Charge current adjustable from 0.1-10A*2, discharge current from 0.1-2A*2.
- Integrated Protections: Features overcurrent, overtemperature, overcharge, short circuit, reverse polarity, and overvoltage protection.
- Data Storage: Ability to store and load up to 6 operation data sets.
- Internal Resistance Meter: Monitor battery cell internal resistance.

Image 4.1: Overview of the charger's multifunctional capabilities, including monitoring, settings, cycling, and balancing.
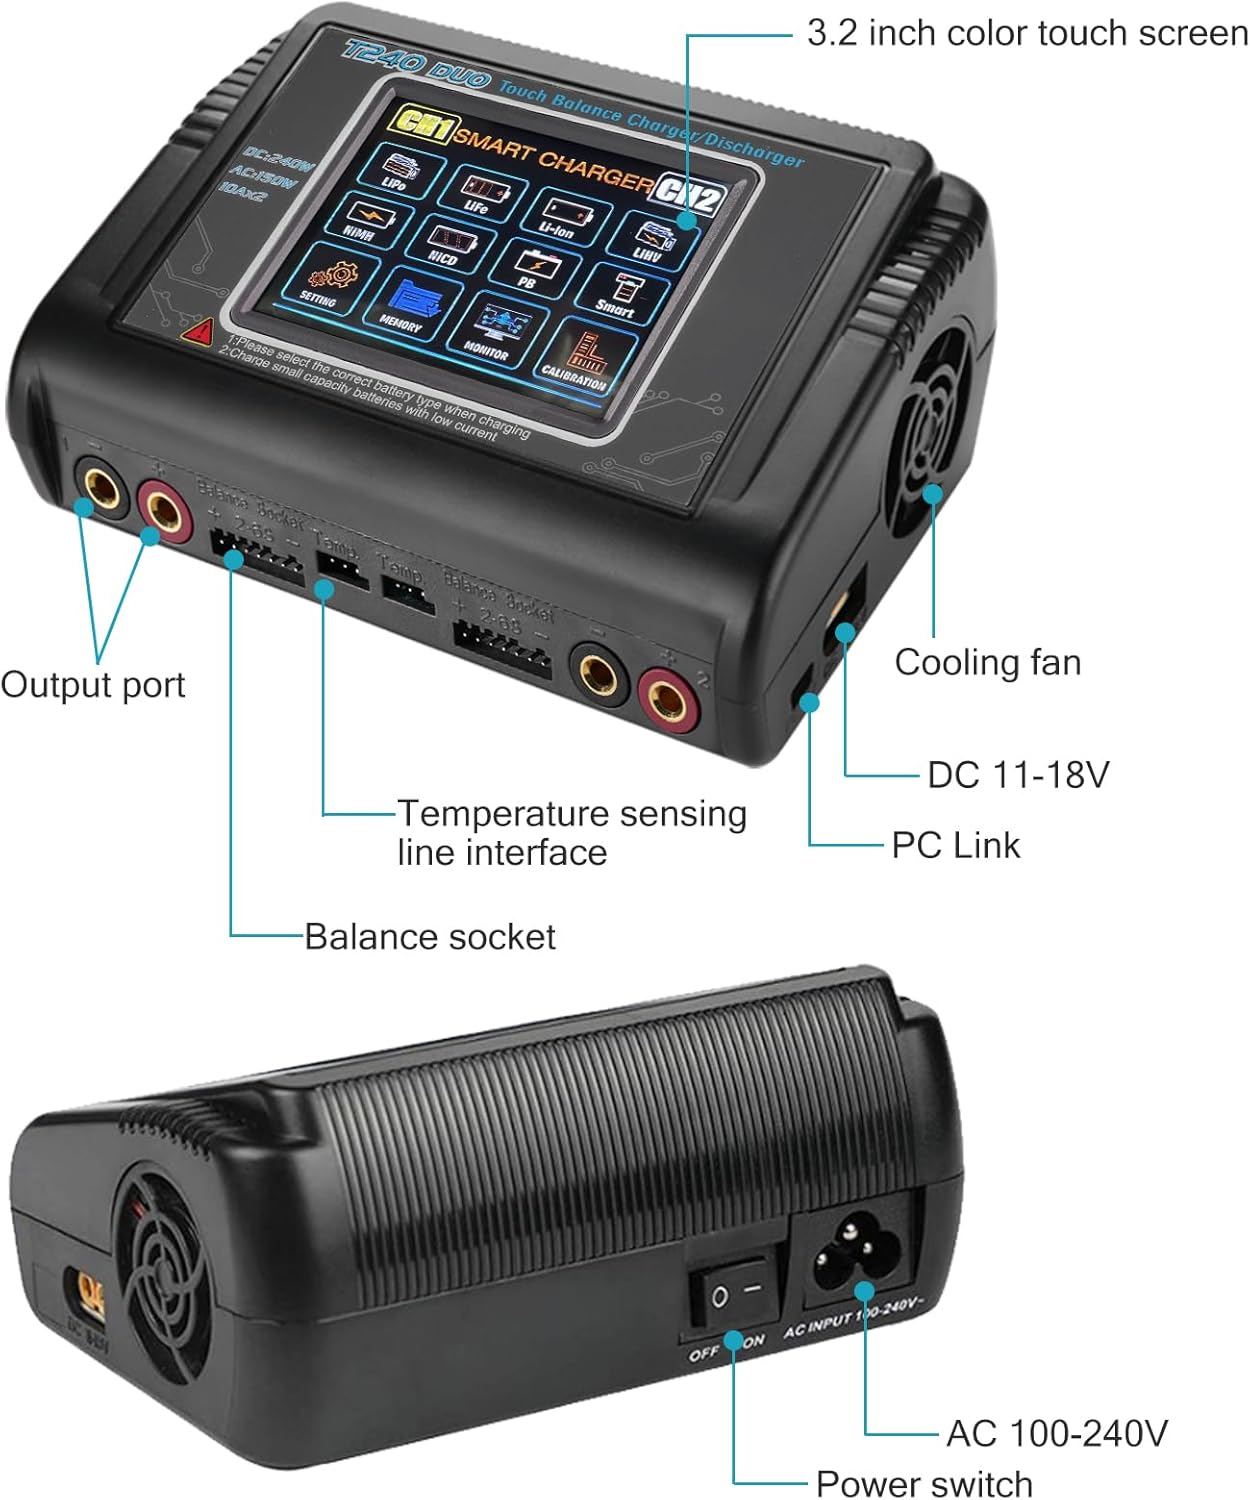
Image 4.2: Detailed view of the charger's 3.2-inch color touch screen, output ports, balance sockets, cooling fan, and power inputs.

Image 4.3: The built-in powerful cooling fan ensures efficient heat dissipation during charging, enhancing safety and longevity.
5. Setup
Follow these steps to set up your HTRC T240 DUO charger:
- Connect Power: Plug the AC power cable into the AC input port (100-240V) on the back of the charger and then into a wall outlet. Alternatively, for DC input (11-18V), connect the XT60 DC cable to the DC input port and to a suitable DC power source. Ensure only one power source is connected at a time.
- Power On: Flip the ON/OFF switch on the back of the charger to the 'ON' position. The touch screen will illuminate.
- Connect Main Plug: Connect the main plug of your battery to the output port (CH1 or CH2) on the front of the charger.
- Connect Balance Extension Cord: For balance charging, connect the balance extension cord from your battery to the corresponding balance socket on the charger. Ensure the connection is correct, typically from right to left (negative to positive).

Image 5.1: Visual guide for connecting the power cable, main plug, and balance extension cord to the charger and battery.
6. Operating Instructions
The T240 DUO features a user-friendly touch screen for operation:
- Select Channel: On the main screen, tap on 'CH1' or 'CH2' to select the desired charging channel.
- Choose Battery Type: From the main menu, select the correct battery chemistry (e.g., LiPo, LiFe, NiMH) that matches your connected battery.
- Select Operation Mode: Choose your desired operation mode (e.g., Charge, Balance Charge, Discharge, Storage).
- Adjust Parameters: Set the charging current (Amps) and cell count (S-number) according to your battery's specifications. For balance charging, ensure the cell count matches the battery.
- Start Operation: Confirm your settings and press 'Start' to begin the process. The screen will display real-time charging data.
- Monitor Progress: You can monitor the charging progress, voltage, current, and capacity on the screen.
- Stop Operation: To stop the process at any time, press 'Stop'.
For detailed instructions on specific modes (e.g., Storage, Cycling, Battery Meter), refer to the on-screen menus or the included manual.

Image 6.1: The clear 3.2-inch color touch screen provides a sensitive and easy-to-use operation interface.
7. Supported Battery Types
The HTRC T240 DUO charger supports a wide range of battery chemistries and configurations:

Image 7.1: The charger supports a variety of battery packs including LiPo, LiHV, Li-ion, LiFe, NiMH, NiCD, Smart, and PB/SLA.
| Battery Type | Voltage Range | Series (Cells) |
|---|---|---|
| LiPo | 3.7V to 22.2V | 1-6S |
| Li-ion | 3.6V to 22.2V | 1-6S |
| NiMH/NiCD | 1.2V to 18V | 1-15S |
| LiFePO4 | 3.2V to 19.2V | 1-6S |
| LiHV | 3.85V to 23.1V | 1-6S |
| PB/SLA | 2V to 20V | N/A |
8. Specifications
| Specification | Value |
|---|---|
| Product Dimensions | 4 x 6 x 2 inches |
| Item Weight | 1.96 pounds |
| Input Voltage (AC) | 100-240 Volts |
| Input Voltage (DC) | 11-18 Volts |
| Max Charge Power (AC) | 150W (CH1+CH2) |
| Max Charge Power (DC) | 240W (CH1+CH2) |
| Charge Current Range | 0.1-10A * 2 |
| Discharge Power | 10W |
| Discharge Current Range | 0.1-2A * 2 |
| Output Voltage (DC) | 22.2 Volts (Max) |
| Display | 3.2-inch Color Touch Screen |
| Manufacturer | Huituo |
9. Maintenance
Proper maintenance ensures the longevity and optimal performance of your charger:
- Cleaning: Regularly wipe the charger's exterior with a soft, dry cloth. Do not use abrasive cleaners or solvents. Ensure no dust or debris accumulates in the cooling vents.
- Storage: Store the charger in a cool, dry place away from direct sunlight, moisture, and extreme temperatures when not in use.
- Cable Inspection: Periodically inspect all cables and connectors for any signs of wear, damage, or corrosion. Replace damaged cables immediately.
- Ventilation: Always ensure adequate airflow around the charger during operation to prevent overheating. Do not block the cooling fan or vents.
10. Troubleshooting
Here are some common issues and their potential solutions:
- Charger Not Powering On:
- Check if the power cable is securely connected to both the charger and the power outlet.
- Ensure the ON/OFF switch on the back of the charger is in the 'ON' position.
- Verify the power source is active.
- Battery Not Charging / Error Message:
- Ensure the correct battery type and cell count are selected on the charger's screen.
- Check all battery connections (main plug and balance plug) for secure and correct polarity.
- Inspect the battery for any physical damage or swelling. Do not charge damaged batteries.
- If an error code is displayed, consult the charger's on-screen help or the full user manual for specific meanings.
- Loud Fan Noise:
- The cooling fan is designed to activate when the charger reaches a certain temperature to dissipate heat. This is normal operation, especially during high-power charging.
- Ensure the fan vents are not obstructed, allowing for proper airflow.
- Touch Screen Unresponsive:
- Try restarting the charger by turning it off and on.
- Ensure your fingers are clean and dry when operating the touch screen.
11. Warranty and Support
For warranty information, technical support, or service inquiries, please contact HTRC customer service through the retailer where the product was purchased or visit the official HTRC website. Please have your product model number (T240 DUO) and purchase details ready when contacting support.
Related documentsT240 DUO


Ask a question about this manual
Ask about setup, troubleshooting, compatibility, parts, safety, or missing instructions. Manuals+ will review the question and use this page’s manual context to help answer it.