1. Introduction
Thank you for choosing the ROBERTS 25-inch PrecisionCuts Pro Multi-Floor Cutter. This professional-grade tool is engineered for precise and efficient cutting of a wide range of flooring materials. This manual provides essential information for the safe and effective operation, maintenance, and care of your cutter. Please read it thoroughly before initial use and retain it for future reference.

Image 1.1: The ROBERTS 25-inch PrecisionCuts Pro Multi-Floor Cutter, showcasing its robust design and extended handle.
2. Safety Information
Always prioritize safety when operating any power or hand tool. Failure to follow these safety guidelines may result in serious injury or damage to the tool.
- Read the Manual: Understand all instructions and warnings before operating the cutter.
- Wear Personal Protective Equipment (PPE): Always wear safety glasses or goggles to protect against flying debris. Gloves are recommended to protect hands from sharp edges.
- Keep Work Area Clear: Ensure the work area is well-lit and free of clutter. Keep bystanders, especially children, away from the operating area.
- Secure Material: Always ensure the material to be cut is stable and properly positioned on the cutter's table.
- Sharp Blade: The tungsten blade is extremely sharp. Handle with extreme care during operation, cleaning, and replacement.
- Stable Surface: Place the cutter on a firm, level surface to prevent tipping or movement during operation.
- Proper Grip: Maintain a firm grip on the handle during cutting.
- Battery Safety: If installing a 9-volt battery for the built-in light, ensure correct polarity and use only recommended battery types. Remove battery during extended storage.
3. Product Overview and Components
Familiarize yourself with the main components of your Multi-Floor Cutter:
- Extended Handle: Provides leverage for cutting.
- Steel-Encased Cams with Ball Bearings: Ensures smooth and powerful cutting action.
- 4 mm Thick Tungsten Blade: Durable, resharpenable, and replaceable blade for various materials.
- Repositionable Guide Bar with Locking Screw: Allows for precise straight or angled cuts.
- Built-in Ruler: Features both inches and millimeters for accurate measurements.
- Built-in Light: Illuminates the cutting line for enhanced precision (requires 9-volt battery, sold separately).
- Transport Wheels: Facilitates easy movement and portability of the cutter.
- Large Hand Grip Opening: Integrated into the table for convenient carrying.

Image 3.1: Key components of the ROBERTS PrecisionCuts Pro Multi-Floor Cutter, including the extended handle, steel-encased cams, tungsten blade, and transport wheels.
4. Setup
Follow these steps to prepare your cutter for use:
- Unpacking: Carefully remove the cutter from its packaging. Inspect for any shipping damage.
- Placement: Position the cutter on a stable, level, and sturdy work surface capable of supporting its weight (approximately 51.9 pounds).
- Battery Installation (for Built-in Light):
- Locate the battery compartment, typically near the built-in light mechanism.
- Insert a 9-volt battery (sold separately), ensuring correct polarity (+/-).
- Close the battery compartment securely.
- Guide Bar Adjustment: The guide bar can be moved for straight or angled cuts. Loosen the locking screw, position the guide bar as needed, and then tighten the screw firmly.

Image 4.1: Side view of the cutter, showing the transport wheels for easy repositioning.
5. Operating Instructions
This cutter is designed to cut various materials up to 25 inches wide and 5/8 inch (16mm) thick. Compatible materials include:
- Engineered Wood Flooring
- Laminate Flooring
- Vinyl Flooring
- Carpet Tile
- VCT Tile
- Parquet
- Vinyl Siding
- Cement Siding
- Rubber
- Foam
- PVC

Image 5.1: Visual representation of the diverse materials compatible with the ROBERTS Multi-Floor Cutter.
5.1. Making a Straight Cut
- Position Guide Bar: Ensure the guide bar is set for a 90-degree straight cut. Use the built-in ruler for precise measurement. Tighten the locking screw.
- Measure and Mark: Measure and mark your desired cut line on the material.
- Place Material: Place the material on the cutter's table, aligning your mark with the blade's cutting path. Ensure the material is flush against the guide bar.
- Activate Light (Optional): If desired, turn on the built-in light to illuminate the cutting line for enhanced visibility.
- Cut: Firmly grasp the handle and apply steady, downward pressure to make the cut. Allow the blade to pass completely through the material.
- Remove Material: Carefully remove the cut material.
5.2. Making an Angled Cut
- Adjust Guide Bar: Loosen the locking screw on the guide bar. Pivot the guide bar to the desired angle (e.g., 45 degrees). Use the angle markings on the table for reference. Tighten the locking screw securely.
- Measure and Mark: Measure and mark your desired angled cut line on the material.
- Place Material: Place the material on the cutter's table, aligning your mark with the blade's cutting path and flush against the angled guide bar.
- Activate Light (Optional): Turn on the built-in light for better visibility of the angled cut line.
- Cut: Apply steady, downward pressure on the handle to execute the angled cut.
- Remove Material: Carefully remove the cut material.

Image 5.2: Detail of the repositionable guide bar, built-in ruler with inches and millimeters, and angle settings for precise cuts.

Image 5.3: Demonstrating the activation of the built-in light for improved cutting precision.
6. Maintenance
Regular maintenance ensures the longevity and optimal performance of your cutter.
- Cleaning: After each use, wipe down the cutter with a dry cloth to remove dust and debris. For stubborn residue, use a damp cloth and mild detergent, then dry thoroughly. Do not use harsh chemicals or abrasive cleaners.
- Blade Care: The 4 mm thick tungsten blade is resharpenable. If cuts become less clean or require excessive force, the blade may need sharpening or replacement. Consult a professional sharpening service or replace with a genuine ROBERTS replacement blade.
- Lubrication: Periodically apply a light machine oil to the moving parts, such as the cam mechanisms and guide bar slides, to ensure smooth operation.
- Storage: Store the cutter in a clean, dry place, away from moisture and extreme temperatures. Ensure the handle is in the down position and the blade is protected. Remove the 9-volt battery if storing for an extended period.
7. Troubleshooting
Refer to this section for common issues and their solutions:
| Problem | Possible Cause | Solution |
|---|---|---|
| Cuts are rough or uneven. | Dull blade; material not properly secured; uneven pressure. | Sharpen or replace blade; ensure material is flush against guide bar; apply consistent, firm pressure. |
| Difficulty cutting through material. | Dull blade; material too thick or hard for cutter; insufficient leverage. | Sharpen or replace blade; verify material thickness is within 5/8" (16mm) limit; ensure full downward force is applied. |
| Built-in light not working. | Dead battery; incorrect battery installation. | Replace 9-volt battery; check battery polarity. |
| Guide bar slips during cutting. | Locking screw not tightened sufficiently. | Ensure locking screw is firmly tightened after positioning the guide bar. |
8. Specifications
| Feature | Detail |
|---|---|
| Model Number | 10-959 |
| Brand | ROBERTS |
| Material | Alloy Steel (Body), Metal/Tungsten (Blade) |
| Blade Thickness | 4 mm |
| Max Cutting Width | 25 inches (630 mm) |
| Max Cutting Thickness | 5/8 inch (16 mm) |
| Handle Material | Metal, Plastic |
| Item Weight | 51.9 pounds |
| Built-in Light | Yes (requires 9-volt battery, sold separately) |
| Included Components | 1 flooring cutter |
| UPC | 075378100959 |
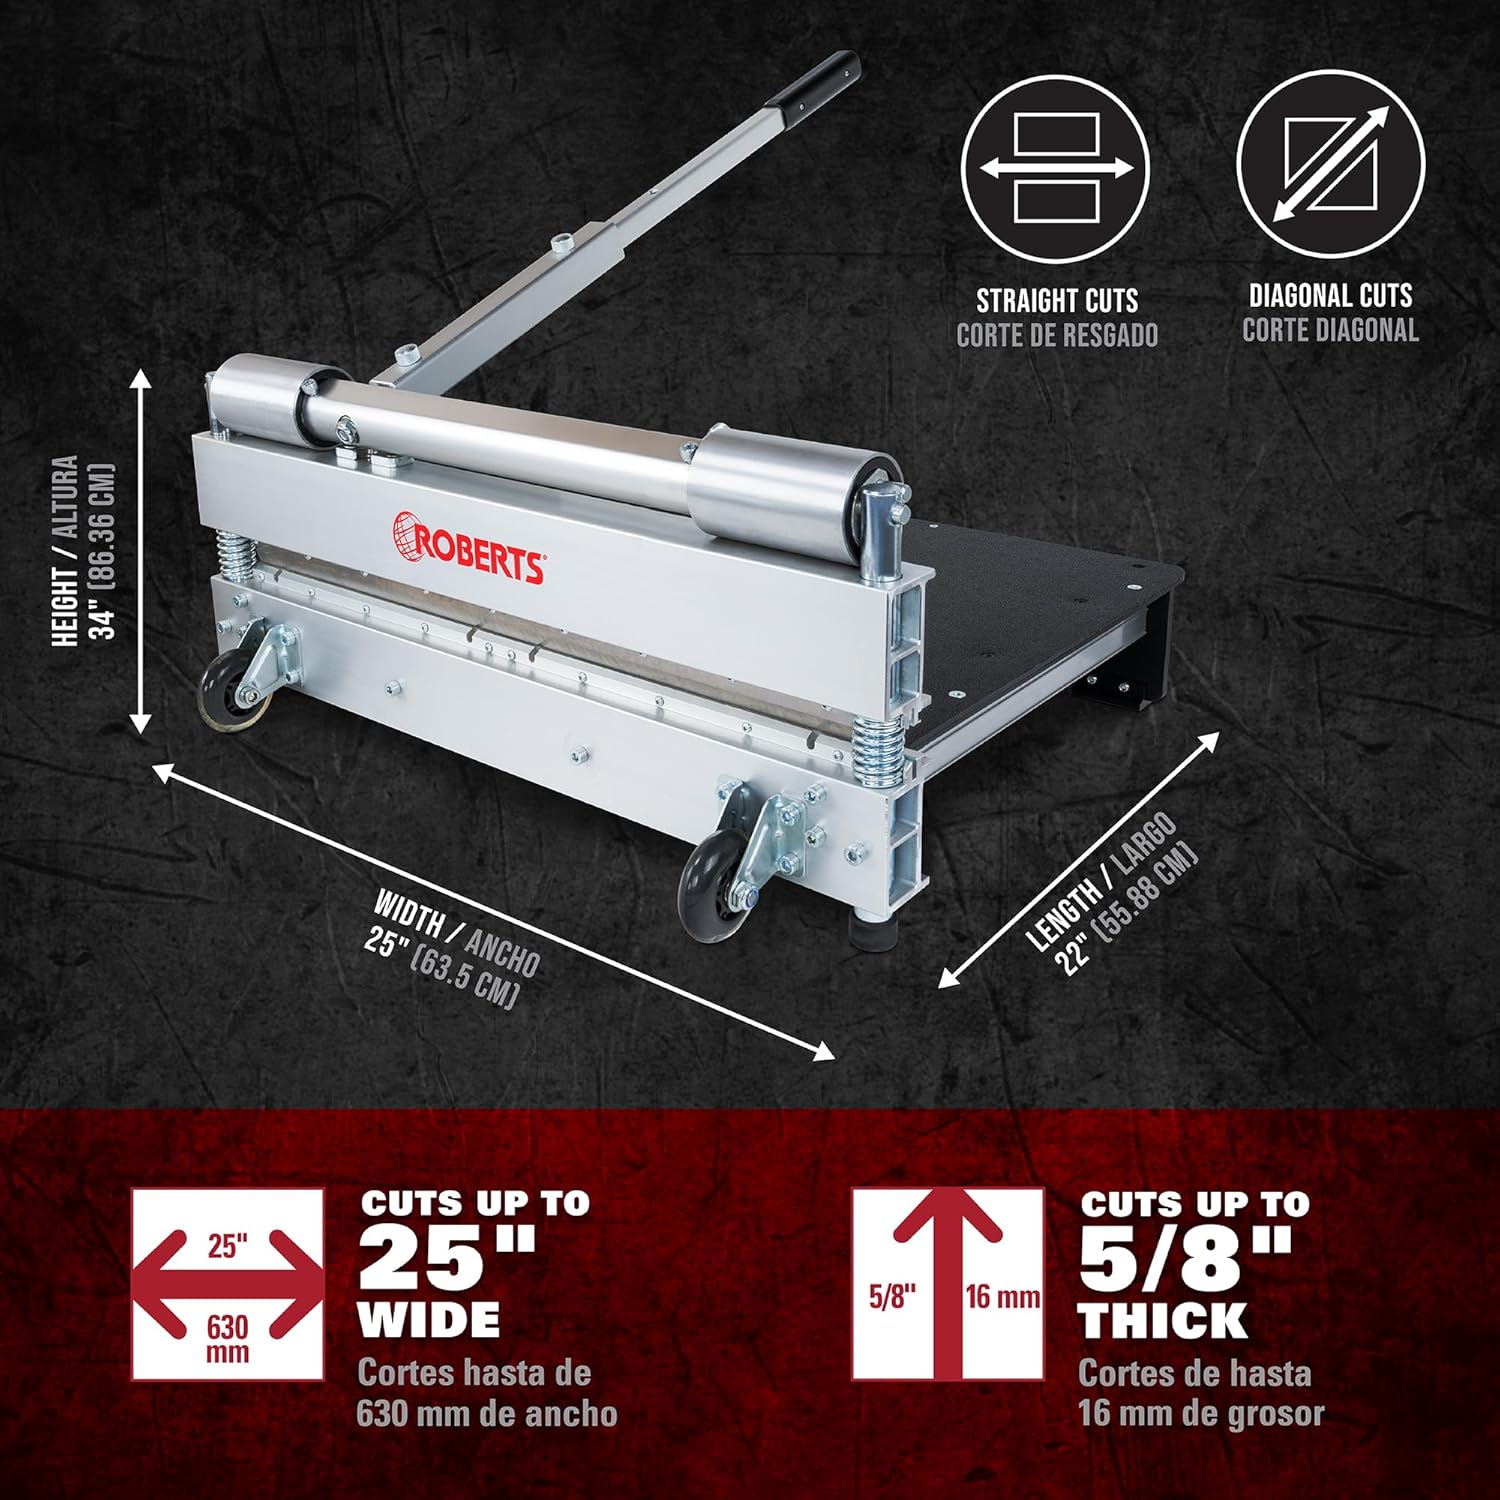
Image 8.1: Key dimensions and cutting capacities of the ROBERTS PrecisionCuts Pro Multi-Floor Cutter.
9. Warranty and Support
For information regarding warranty coverage, product support, or to purchase replacement parts, please refer to the official ROBERTS website or contact their customer service department. Specific warranty terms may vary and are typically provided with the product at the time of purchase or available on the manufacturer's official channels.
ROBERTS Official Website: www.robertsconsolidated.com


