1. Introduction
The EnhanBili X2m is a professional LED display control device designed for robust video signal processing and display management. It offers powerful capabilities for handling high-definition digital signals, supporting resolutions up to 1920x1080. The X2m integrates various HD digital interfaces and provides flexible options for arbitrary zooming and clipping of video sources. Additionally, it supports direct content playback from USB flash drives, enhancing its versatility for various display applications.

Figure 1: Front and rear view of the X2m Colorlight LED Video Controller, showing the control panel, display, and various input/output ports.
2. Key Features
- Supports HD digital signals up to 1920x1080 resolution.
- Multiple HD digital interfaces for versatile connectivity.
- Arbitrary zooming and clipping of video sources.
- USB flash drive content playback capability.
- Operating temperature range: -20℃ to 65℃.
- Overall power consumption: 10W.
- Net Weight: 3.2 Kg (7.04 pounds).
- Gross Weight: 4.2 Kg.
- Certifications: CE, FCC, RoHS.
3. Specifications
| Attribute | Value |
|---|---|
| Product Dimensions (L x W x H) | 19.09 x 11.42 x 1.77 inches |
| Item Weight | 3.2 Kilograms (7.04 pounds) |
| Model Name | X2m |
| Brand | EnhanBili |
| Compatible Devices | Laptop |
| Connector Type | DVI |
| Output Wattage | 10 Watts |
| Cooling Method | Air |
| Operating Temperature | -20℃ to 65℃ |
| Overall Consumption | 10W |
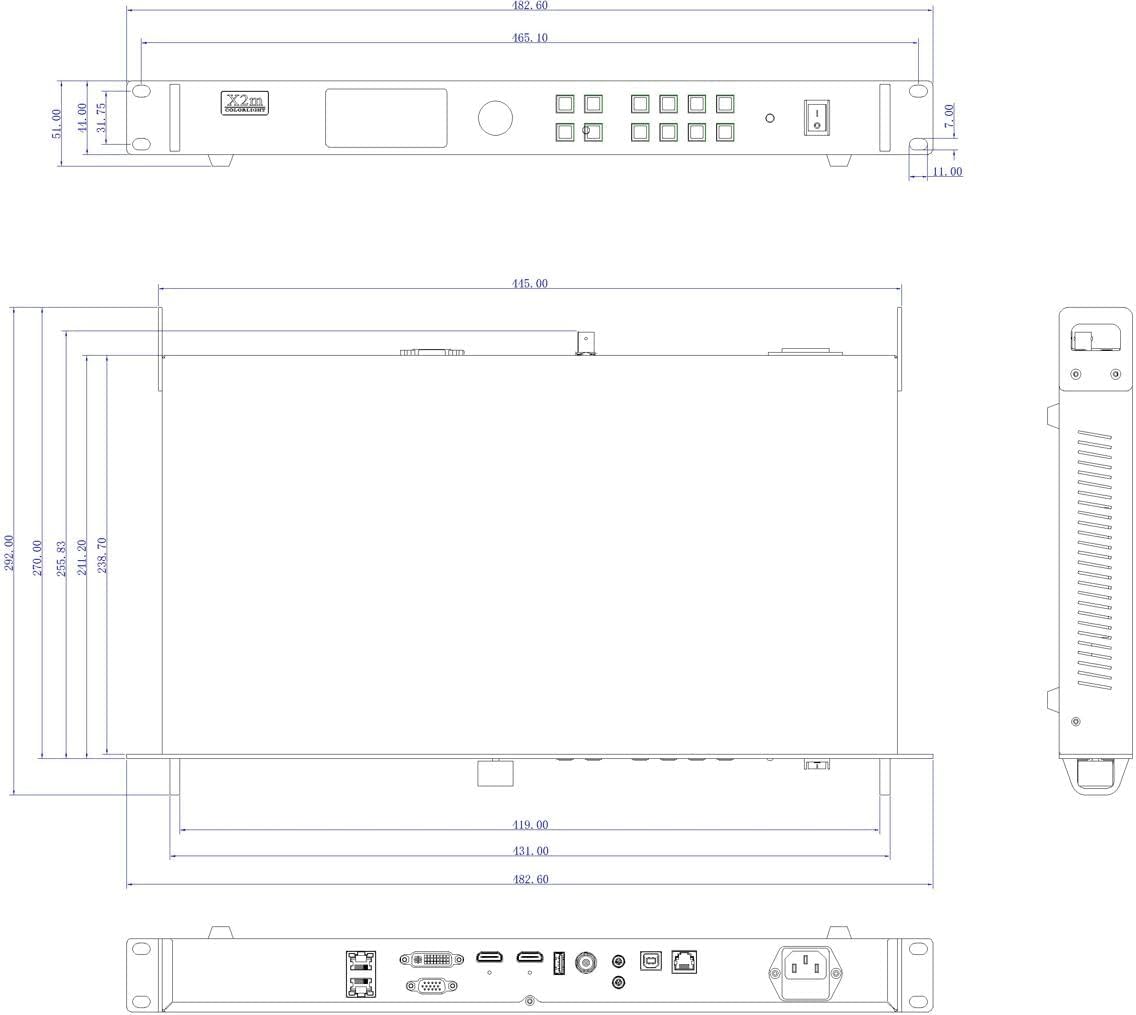
Figure 2: Detailed technical drawing showing the precise dimensions of the X2m controller.
4. Setup Guide
4.1 Unpacking and Inspection
Carefully remove the X2m controller from its packaging. Inspect the device for any signs of physical damage during transit. Ensure all accessories are present.
4.2 Physical Installation
The X2m is designed for rack mounting or placement on a stable surface. Ensure adequate ventilation around the unit to prevent overheating. Maintain clear space around air vents.

Figure 3: Top-back view of the X2m controller, detailing the rear panel with power input, audio ports, USB, RS232, VGA, DVI, HDMI, and Ethernet output ports.
4.3 Connecting Inputs and Outputs
Refer to the connection diagram below for proper wiring. The X2m supports various input sources and outputs to an LED screen via Ethernet.
- Video Inputs: Connect your video sources (e.g., laptop, media player) to the HDMI, DVI, VGA, CVBS, or U-DISK ports.
- Audio Inputs/Outputs: Use the audio IN/OUT ports for sound integration if required.
- Control Ports: RS232 and USB (for configuration) ports are available.
- LED Screen Output: Connect the Ethernet output ports (LAN 1, LAN 2) to your LED display receiving cards.
- Power Connection: Connect the AC power cable to the power inlet (AC100-240V~ 50/60Hz) and then to a suitable power outlet.

Figure 4: Diagram illustrating the typical connection flow from various video sources (CVBS, U-DISK, HDMI, DVI, VGA) through the X2m controller to an LED screen via Ethernet output.
5. Operating Instructions
5.1 Powering On/Off
Locate the ON/OFF switch on the front panel of the device. Flip the switch to the "ON" position to power on the controller. The front display will illuminate. To power off, flip the switch to the "OFF" position.

Figure 5: Top-front view of the X2m controller, showing the front panel with the display, rotary encoder, input selection buttons, and power switch.
5.2 Input Source Selection
Use the dedicated input buttons on the front panel (e.g., HDMI 1, HDMI 2, DVI 1/VGA, CVBS, USB) to select the desired video source. The active input will typically be indicated on the front display.
5.3 Basic Display Configuration
The X2m allows for basic display adjustments directly from the front panel. Use the rotary encoder and "OK", "ESC" buttons to navigate menus and adjust settings such as brightness. For advanced configurations, connect the device to a computer via the CONFIG USB port and use the dedicated software (not included, refer to manufacturer's website for download).
5.4 USB Playback
Insert a USB flash drive containing compatible media files into the U-DISK port. Use the "USB" button on the front panel to switch to USB playback mode. Navigate and select files using the front panel controls.
6. Maintenance
6.1 Cleaning
Regularly clean the exterior of the X2m controller with a soft, dry cloth. Do not use liquid cleaners or abrasive materials. Ensure air vents are free from dust and obstructions to maintain proper airflow and cooling.
6.2 Environmental Conditions
Operate the device within the specified temperature range of -20℃ to 65℃. Avoid exposing the unit to excessive moisture, direct sunlight, or extreme temperature fluctuations. Ensure the installation environment is free from excessive dust and vibrations.
7. Troubleshooting
7.1 No Signal on LED Screen
- Verify that the X2m controller is powered on.
- Check all video input cables (HDMI, DVI, VGA, CVBS) are securely connected to both the source and the X2m.
- Ensure the correct input source is selected on the X2m's front panel.
- Confirm that the Ethernet cables connecting the X2m to the LED screen are properly connected and not damaged.
- Check the LED screen's power and input settings.
7.2 Distorted or Flickering Image
- Check the resolution and refresh rate of the input source. Ensure it is compatible with the X2m and the LED screen.
- Inspect video cables for damage or loose connections. Try replacing cables if necessary.
- Ensure the X2m is receiving adequate power.
- If using advanced features like zooming/clipping, ensure settings are correctly configured.
7.3 USB Playback Issues
- Ensure the USB flash drive is properly inserted into the U-DISK port.
- Verify that the media files on the USB drive are in a supported format.
- Check if the "USB" input is selected on the X2m.
8. Warranty and Support
This EnhanBili X2m LED Video Controller is covered by a standard manufacturer's warranty. For specific warranty terms and conditions, please refer to the documentation provided with your purchase or contact EnhanBili customer support directly. Keep your proof of purchase for warranty claims.
For technical support, troubleshooting assistance beyond this manual, or service inquiries, please contact EnhanBili customer service through their official website or the contact information provided at the time of purchase.


