1. Introduction
This manual provides essential information for the safe and efficient operation, installation, and maintenance of your new Amax FL12AX Automatic Front Loading Washing Machine. Please read this manual thoroughly before using the appliance and retain it for future reference. Proper use and care will ensure optimal performance and extend the lifespan of your washing machine.
2. Safety Information
Important Safety Instructions:
- Read all instructions before using the appliance.
- This appliance is intended for household use only.
- Do not allow children to play on or in the appliance. Close supervision is necessary when the appliance is used near children.
- Never operate the washing machine if the power cord is damaged or if the machine is malfunctioning. Contact qualified service personnel.
- Ensure the machine is properly grounded to prevent electric shock.
- Do not wash items that are soiled with gasoline, dry-cleaning solvents, or other flammable or explosive substances.
- Always unplug the appliance from the power supply before cleaning, performing maintenance, or if it will be unused for an extended period.
- Do not attempt to repair or replace any part of the appliance unless specifically recommended in this manual. All other servicing should be referred to a qualified technician.
3. Product Overview
Familiarize yourself with the main components of your Amax FL12AX washing machine.
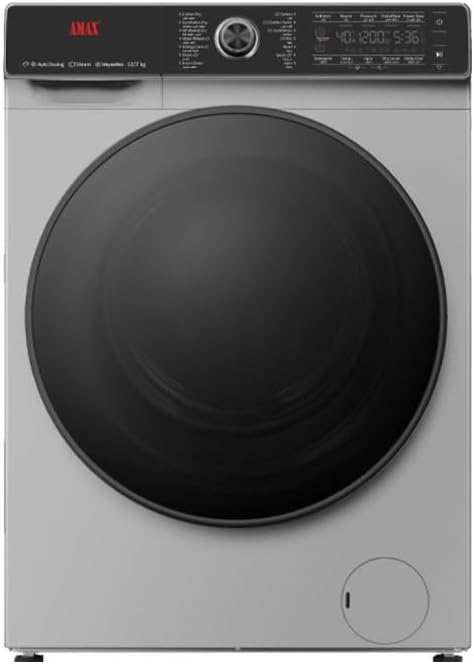
Image 1: Front view of the Amax FL12AX Automatic Front Loading Washing Machine. The machine features a silver-grey body, a large black front-loading door, and a control panel located at the top. The control panel includes a central rotary dial for program selection, a digital display, and various push buttons for settings. A small circular access panel is visible at the bottom right for the drain filter.
Key Components:
- Control Panel: Used to select wash programs, adjust settings, and monitor cycle progress.
- Detergent Dispenser: Compartments for pre-wash, main wash detergent, and fabric softener.
- Drum: Stainless steel drum for washing and drying clothes.
- Front Loading Door: Provides access to the drum.
- Drain Filter Access: Located at the bottom right, for periodic cleaning of the drain filter.
4. Installation and Setup
Proper installation is crucial for the performance and safety of your washing machine.
4.1 Unpacking
- Carefully remove all packaging materials.
- Remove all transit bolts from the rear of the machine. These bolts secure the drum during transport and must be removed before operation. Refer to the diagram in the separate installation guide for bolt locations.
- Keep packaging materials out of reach of children.
4.2 Location Requirements
- Place the washing machine on a firm, level surface to minimize vibration and noise.
- Ensure adequate space around the machine for ventilation and maintenance.
- Avoid direct sunlight or extreme temperatures.
4.3 Water Connection
- Connect the inlet hose to a cold water tap with a 3/4-inch thread.
- Ensure all connections are tight to prevent leaks.
- The water pressure should be between 0.1 MPa and 1 MPa.
4.4 Drain Hose Connection
- Securely attach the drain hose to a standpipe or laundry tub.
- Ensure the drain hose is not kinked or blocked. The end of the drain hose should be positioned at a height between 60 cm and 100 cm from the floor.
4.5 Electrical Connection
- Plug the power cord into a grounded electrical outlet.
- The appliance requires a 220-240V, 50/60Hz power supply.
- Do not use extension cords or adapters.
4.6 Leveling the Machine
- Use a spirit level to check if the machine is perfectly level.
- Adjust the adjustable leveling legs at the bottom of the machine until it is stable and level.
5. Operating Instructions
Follow these steps for effective and safe operation of your Amax FL12AX washing machine.
5.1 Preparing Laundry
- Sort laundry by fabric type, color, and degree of soiling.
- Check pockets for small items that could damage the machine.
- Close zippers and hooks, and tie loose strings.
5.2 Loading Laundry
- Open the front loading door.
- Place laundry loosely into the drum, ensuring not to overload the machine. The 12 kg capacity refers to dry laundry weight.
- Close the door firmly until it clicks.
5.3 Adding Detergent and Softener
- Pull out the detergent dispenser drawer.
- Add appropriate amounts of detergent to the main wash compartment and fabric softener to its designated compartment.
- Close the dispenser drawer gently.
5.4 Selecting a Wash Program
- Turn the program selector dial on the control panel to choose one of the 15 available wash programs (e.g., Cotton, Synthetics, Delicates, Quick Wash, etc.).
- The digital display will show the default settings for the selected program.
5.5 Adjusting Settings (Optional)
- Use the control buttons to adjust temperature, spin speed, or add special features like extra rinse, if desired and available for the selected program.
- The machine features temperature control and vibration reduction for enhanced performance.
5.6 Starting the Cycle
- Press the 'Start/Pause' button to begin the wash cycle.
- The machine will automatically proceed through the wash, rinse, and spin phases, including the 100% drying function if selected or part of the program.
5.7 After the Cycle
- Once the cycle is complete, the machine will signal with an audible alert or display a 'End' message.
- Open the door and remove the laundry promptly to prevent wrinkles and odors.
- Leave the door slightly ajar to allow the drum to air dry.
6. Maintenance and Care
Regular cleaning and maintenance will help keep your washing machine in optimal condition.
6.1 Cleaning the Exterior
- Wipe the exterior surfaces with a soft, damp cloth.
- Do not use abrasive cleaners or solvents.
6.2 Cleaning the Detergent Dispenser
- Remove the dispenser drawer and rinse it under running water to remove any detergent residue.
- Clean the housing of the dispenser drawer with a brush.
- Reinsert the drawer.
6.3 Cleaning the Drum
- Periodically run a maintenance wash cycle (e.g., a hot wash with no laundry and a washing machine cleaner) to prevent odor and residue buildup.
6.4 Cleaning the Drain Filter
- Locate the drain filter access panel at the bottom right of the machine.
- Place a shallow container beneath the filter to catch any residual water.
- Carefully unscrew and remove the filter.
- Clean any lint, debris, or foreign objects from the filter and its housing.
- Screw the filter back in securely.
7. Troubleshooting
Before contacting service, refer to this section for common issues and their solutions.
| Problem | Possible Cause | Solution |
|---|---|---|
| Machine does not start | Power cord unplugged; Door not closed properly; Program not selected; 'Start' button not pressed. | Check power connection; Ensure door is latched; Select a program; Press 'Start'. |
| No water filling | Water tap closed; Inlet hose kinked or blocked; Water pressure too low. | Open water tap; Straighten hose; Check household water pressure. |
| Water not draining | Drain hose kinked or blocked; Drain filter clogged. | Straighten hose; Clean drain filter (refer to Section 6.4). |
| Excessive vibration/noise | Transit bolts not removed; Machine not level; Uneven load. | Remove transit bolts; Adjust leveling legs; Redistribute laundry in the drum. |
| Poor washing results | Incorrect program/temperature; Too much/too little detergent; Overloading. | Select appropriate program; Use correct detergent amount; Do not overload. |
| Clothes not fully dry | Drying program not selected or interrupted; Overloading. | Ensure drying function is active; Reduce load size for drying. |
If the problem persists after attempting these solutions, please contact qualified service personnel.
8. Specifications
Detailed technical specifications for the Amax FL12AX Automatic Front Loading Washing Machine.
| Feature | Specification |
|---|---|
| Brand | Amax |
| Model Number | FL12AX |
| Capacity | 12 Kilograms |
| Product Dimensions (D x W x H) | 65D x 70W x 88.3H centimeters |
| Item Weight | 73 Kilograms |
| Color | Black (Note: Product image shows silver-grey, but specification lists Black) |
| Access Location | Front Load |
| Laundry Appliance Drum Material | Stainless Steel |
| Number of Washing Programs | 15 |
| Drying Function | 100% Drying |
| Voltage | 220-240 Volts |
| Frequency | 50-60 Hz |
| Type of Controls | Push Button, Rotary Dial |
| Special Features | Adjustable Leveling Legs, Temperature Control, Vibration Reduction |
| Included Components | Drain Hose |
| Manufacturer | AlRabee & AlSaif |
9. Warranty and Support
Specific warranty details for the Amax FL12AX washing machine are not provided within this manual. For information regarding warranty coverage, terms, and conditions, please refer to the warranty card included with your purchase or contact the retailer or manufacturer directly.
For technical support, service requests, or to purchase genuine spare parts, please contact the authorized Amax service center or your local dealer. Ensure you have your model number (FL12AX) and purchase date available when contacting support.


