1. Introduction
Thank you for choosing the SURAIELEC 20 AMP 24 Hour Mechanical Timer Switch. This device is designed to provide reliable and automatic control for various outdoor electrical applications. Its robust, weatherproof construction ensures consistent performance in diverse environmental conditions. Please read this manual thoroughly before installation and operation to ensure proper use and safety.
Key Features:
- 20A, 120V Power Control: Suitable for heavy-duty electrical loads.
- 24-Hour Programmable: Offers up to 24 ON/OFF settings with 30-minute intervals.
- Weatherproof Design: Constructed from durable, insulating, and flame-retardant materials for outdoor use.
- Easy Installation: Includes 2.2FT long cables and mounting hardware for straightforward setup.
- Versatile Application: Ideal for outdoor lights, pool lights, security systems, holiday decorations, and more.
2. Safety Information
WARNING: Risk of electric shock or fire. Improper installation or use can lead to serious injury or death. Always follow these safety guidelines:
- Disconnect Power: Always turn off power at the circuit breaker or fuse box before installing or servicing the timer.
- Qualified Electrician: If you are unsure about any part of the installation process, consult a qualified electrician.
- Grounding: Ensure the timer is properly grounded according to local electrical codes.
- Voltage and Current: Do not exceed the specified electrical ratings (20A, 120V, 2400W).
- Outdoor Use: This timer is designed for outdoor use and is weatherproof. Ensure all connections are sealed and protected from moisture.
- Neutral Wire Required: This device requires a neutral wire for proper operation.
3. Package Contents
Verify that all items are present in the package:
- SURAIELEC 20 AMP 24 Hour Mechanical Timer Switch (Model TM01A)
- Pre-wired 2.2 ft cables (Black, White, Red)
- Mounting Screws and Wall Anchors
- Wire Nuts
- Conduit Connectors and Gaskets
- Instruction Manual

4. Specifications
| Specification | Value |
|---|---|
| Model Number | TM01A |
| Current Rating | 20 Amps |
| Operating Voltage | 120 Volts (AC) |
| Power Rating | 2400 Watts, 1 HP |
| Frequency | 60 Hz |
| Operation Mode | Automatic (Mechanical) |
| Contact Type | Normally Open |
| Connector Type | Wire Leads |
| Terminal | Screw |
| Circuit Type | 1-way |
| Mounting Type | Wall Mount |
| Product Dimensions (L x W x H) | 2 x 3.9 x 5.9 inches |
| Weight | 11.99 ounces |
5. Installation
5.1 Pre-Installation Checklist
- Ensure power is OFF at the main circuit breaker.
- Confirm the timer's electrical ratings match your application's requirements.
- Gather necessary tools: screwdriver, wire strippers, drill, level, safety glasses.
5.2 Mounting the Timer
- Choose a suitable outdoor location for mounting, ensuring it is accessible and protected from direct impact.
- Use the timer as a template to mark the positions for the three mounting holes.
- Drill pilot holes at the marked locations. Insert wall anchors if mounting into drywall or masonry.
- Secure the timer to the wall using the provided mounting screws.

5.3 Wiring Instructions
IMPORTANT: Ensure power is OFF before proceeding with wiring.
- Open the timer's cover to access the wiring terminals.
- Connect the BLACK wire (Supply In) from the timer to the incoming LINE (HOT) wire from your power source.
- Connect the WHITE wire (Neutral) from the timer to the NEUTRAL wire from your power source. A neutral wire is required.
- Connect the RED wire (Supply Out) from the timer to the LOAD (HOT) wire of the device you wish to control (e.g., outdoor light, pump).
- Ensure all connections are secure using wire nuts and that no bare wires are exposed.
- Route wires through appropriate conduit and use the provided conduit connectors and gaskets to maintain weatherproof integrity.
- Close the timer's cover securely.

After wiring, restore power at the circuit breaker.
6. Operation
6.1 Setting the Current Time
- Locate the rotating dial on the timer. The dial is marked with hours (1-12 AM/PM).
- Rotate the entire dial clockwise until the current time aligns with the small arrow or indicator on the timer's face.
6.2 Setting ON/OFF Times
The timer dial has 48 pins around its circumference, each representing a 30-minute interval.
- To set an ON period: Push the pins corresponding to the desired ON duration downwards towards the center of the dial.
- To set an OFF period: Leave the pins corresponding to the desired OFF duration in the upwards position.
For example, if you want the device to turn ON from 6:00 PM to 10:00 PM, push down all pins between 6 PM and 10 PM on the dial.
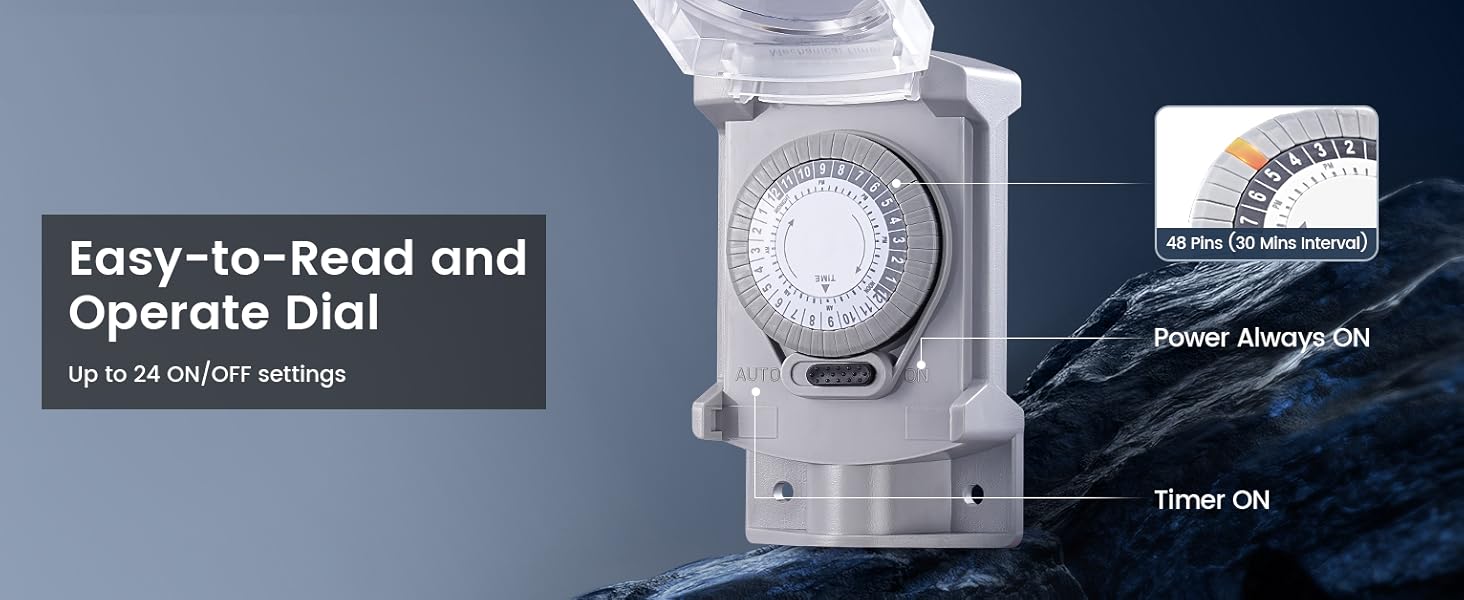
6.3 Manual Override Switch
The timer features a slide button, typically labeled 'AUTO' and 'ON', allowing you to manually override the programmed settings:
- AUTO: The timer operates according to the programmed ON/OFF settings.
- ON: The connected device will remain continuously ON, bypassing the timer settings.

7. Maintenance
- Cleaning: Periodically wipe the exterior of the timer with a soft, damp cloth. Do not use abrasive cleaners or solvents.
- Inspection: Regularly inspect the timer and its wiring for any signs of damage, wear, or loose connections. Address any issues promptly.
- Weather Protection: While weatherproof, ensure the timer's cover is always securely closed to prevent water ingress.
8. Troubleshooting
| Problem | Possible Cause | Solution |
|---|---|---|
| Device does not turn ON/OFF at programmed times. |
|
|
| Device remains continuously ON or OFF. |
|
|
| No power to the connected device. |
|
|
9. Warranty and Support
SURAIELEC products are designed for reliability and performance. This product comes with a standard manufacturer's warranty against defects in materials and workmanship. For specific warranty details, please refer to the warranty card included with your purchase or visit the official SURAIELEC website.
If you encounter any issues or have questions regarding the installation, operation, or maintenance of your SURAIELEC Mechanical Timer Switch, please contact our customer support team. Our representatives are available to assist you.
Contact Information:
- Website: Visit the SURAIELEC Store on Amazon
- Refer to your product packaging for direct customer service contact details.


