Important Safety Instructions
Please read all instructions carefully before using this appliance. Retain this manual for future reference.
- Ensure the voltage indicated on the appliance corresponds with the mains voltage in your home.
- Do not immerse the appliance, cord, or plug in water or any other liquid.
- Close supervision is necessary when any appliance is used by or near children.
- Unplug from outlet when not in use and before cleaning. Allow to cool before putting on or taking off parts.
- Do not operate any appliance with a damaged cord or plug, or after the appliance malfunctions or has been damaged in any manner.
- The use of accessory attachments not recommended by the appliance manufacturer may cause injuries.
- Do not use outdoors.
- Do not let the cord hang over the edge of a table or counter, or touch hot surfaces.
- Do not place on or near a hot gas or electric burner, or in a heated oven.
- Extreme caution must be used when moving an appliance containing hot oil or other hot liquids.
- Always attach the plug to the appliance first, then plug the cord into the wall outlet. To disconnect, turn any control to "OFF", then remove the plug from the wall outlet.
- Do not use the appliance for other than intended household use.
- The appliance is not intended to be operated by means of an external timer or separate remote-control system.
- Surfaces are liable to get hot during use.
Product Overview
The Mellerware 30L Mini Oven with 2 Solid Hot Plates is a versatile kitchen appliance designed for baking, grilling, and cooking with its integrated hot plates. It features a 30-liter oven capacity and two solid cooking plates.
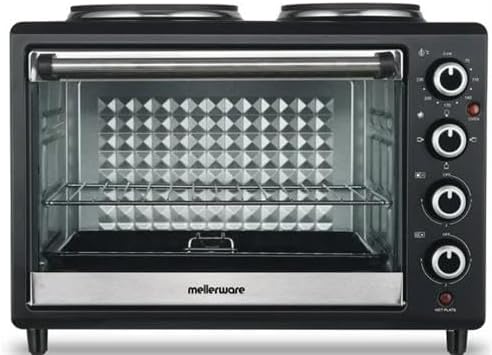
Figure 1: Front view of the Mellerware 30L Mini Oven, showing the oven door, control knobs on the right, and two hot plates on top.
Components:
- Oven Cavity: 30-liter capacity for baking and grilling.
- Drop-Down Oven Door: For easy access to the oven interior.
- Control Knobs: For temperature, function selection, and hot plate control.
- Solid Hot Plates: Two cooking plates located on top of the unit.
- Baking Tray: Included for oven use.
- Wire Rack: Included for oven use.
Setup
- Unpacking: Carefully remove the mini oven and all accessories from its packaging. Retain packaging for future storage or transport.
- Placement: Place the oven on a stable, heat-resistant, and level surface. Ensure there is adequate ventilation around the appliance (at least 10-15 cm clearance on all sides). Do not place it near flammable materials or under cabinets.
- Initial Cleaning: Before first use, wipe the exterior with a damp cloth. Wash the baking tray and wire rack in warm, soapy water, rinse, and dry thoroughly.
- First Use (Burn-off): To eliminate any manufacturing odors, operate the empty oven at its maximum temperature setting for approximately 15 minutes. Ensure the area is well-ventilated during this process. A slight smoke or odor is normal during initial use.
- Power Connection: Ensure the oven is switched off (all knobs to "OFF") before plugging the power cord into a grounded electrical outlet.
Operating Instructions
This appliance features both oven functions and independent hot plates. Familiarize yourself with the control knobs before operation.

Figure 2: Detail of the control panel, showing the hot plate power selectors and oven function/temperature knobs.
Oven Operation:
- Place Food: Open the drop-down door and place your food on the baking tray or wire rack inside the oven cavity. Close the door securely.
- Select Function: Use the function knob (typically the second from the top) to select the desired cooking mode (e.g., Bake, Grill, Toast).
- Set Temperature: Use the temperature knob (typically the top knob) to set the desired cooking temperature.
- Set Timer: Use the timer knob (if available, usually the bottom knob) to set the cooking duration. The oven will turn off automatically when the timer expires. If no timer is present, manually turn off the oven when cooking is complete.
- Preheating: For best results, preheat the oven for 5-10 minutes before placing food inside, especially for baking.
Hot Plate Operation:
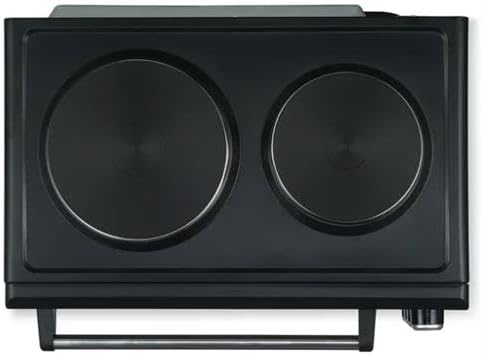
Figure 3: Top view of the appliance, highlighting the two solid hot plates for independent cooking.
- Place Cookware: Place appropriate cookware (flat-bottomed pots or pans) directly onto the solid hot plates.
- Select Power Level: Use the dedicated hot plate control knobs (typically the two middle knobs on the control panel) to select the desired power level (e.g., 1, 2, 3 or Low, Medium, High).
- Cooking: The hot plates will heat up. Adjust the power level as needed for your cooking requirements.
- Turn Off: After cooking, turn the hot plate control knobs to the "OFF" position. The hot plates will remain hot for some time after being turned off.
Note: The oven and hot plates can be used simultaneously, but this may affect the heating performance of both due to shared power. Monitor cooking times accordingly.
Maintenance and Cleaning
Regular cleaning and maintenance will ensure the longevity and optimal performance of your Mellerware Mini Oven.
- Always Unplug: Before cleaning, always unplug the appliance from the power outlet and allow it to cool completely.
- Exterior Cleaning: Wipe the exterior surfaces with a soft, damp cloth. Do not use abrasive cleaners or scouring pads, as these can damage the finish.
- Interior Cleaning: For the oven interior, wipe with a damp cloth and mild detergent. For stubborn stains, a non-abrasive oven cleaner designed for conventional ovens can be used, following the product instructions carefully. Ensure all cleaner residue is removed.
- Accessories: The baking tray and wire rack can be washed in warm, soapy water. Rinse thoroughly and dry completely before storing or reusing.
- Hot Plates: Wipe the solid hot plates with a damp cloth once they have cooled. For burnt-on food, use a non-abrasive scraper or a specialized hot plate cleaner. Do not pour water directly onto the hot plates.
- Storage: When not in use, ensure the appliance is clean and dry. Store it in a cool, dry place.
Troubleshooting
If you encounter issues with your mini oven, refer to the following common problems and solutions:
| Problem | Possible Cause | Solution |
|---|---|---|
| Appliance does not turn on. | Not plugged in; power outlet faulty; controls not set correctly. | Ensure the plug is securely in a working outlet. Check circuit breaker. Verify all control knobs are turned from "OFF" to a desired setting. |
| Oven not heating properly. | Temperature or function knob set incorrectly; oven door not closed properly. | Check that the temperature and function knobs are set to the desired cooking mode and temperature. Ensure the oven door is fully closed. |
| Hot plates not heating. | Hot plate control knob set to "OFF" or low setting. | Turn the hot plate control knob to a higher power setting (e.g., 1, 2, or 3). |
| Smoke or odor during first use. | Normal burn-off of manufacturing oils. | This is normal. Ensure good ventilation. It should dissipate after initial use. |
| Food cooking unevenly. | Incorrect temperature/time; food placement; shared power with hot plates. | Adjust temperature or cooking time. Ensure food is centered. If using hot plates simultaneously, cooking performance may be affected; adjust accordingly. |
If the problem persists after trying these solutions, please contact customer support.
Specifications
- Brand: Mellerware
- Model: 30L Mini Oven (Horizon 30)
- Capacity: 30 Litres
- Rated Power: 3250W
- Functions: Grill and Bake
- Hot Plates: 2 Solid Cooking Hot Plates
- Color: Black
- Product Dimensions: 30D x 30W x 30H centimetres (approximate, based on provided data)
- Included Accessories: Baking Tray, Wire Rack
Warranty and Support
This Mellerware appliance is covered by a manufacturer's warranty against defects in material and workmanship under normal household use. The specific duration and terms of the warranty may vary by region and retailer.
To claim warranty or for technical support:
- Please retain your proof of purchase (receipt or invoice) as it will be required for any warranty claims.
- Contact the retailer from whom you purchased the product.
- Alternatively, visit the official Mellerware website for contact information for their customer service department.
- Do not attempt to repair the appliance yourself, as this may void the warranty.
For further assistance, please refer to the contact details provided with your purchase documentation or on the manufacturer's official website.


