
ZTE MC888D
ZTE MC888D 5G LTE Wi-Fi Router User Manual
Model: MC888D
1. Introduction
This user manual provides comprehensive instructions for the installation, operation, and maintenance of your ZTE MC888D 5G LTE Wi-Fi Router. The MC888D is designed to provide high-speed internet access using 5G and LTE cellular networks, distributing connectivity via Wi-Fi 6 (802.11ax) and Gigabit Ethernet ports. Please read this manual thoroughly before using the device to ensure proper setup and optimal performance.
2. Safety Information
- Use only the power adapter supplied with the device.
- Do not expose the device to water, moisture, or high humidity.
- Avoid placing the device near heat sources or in direct sunlight.
- Ensure proper ventilation around the device to prevent overheating.
- Do not open or attempt to repair the device yourself. Refer all servicing to qualified personnel.
- Keep the device out of reach of children.
- Dispose of the device and its components responsibly according to local regulations.
3. Package Contents
Verify that all items are present in your package:
- ZTE MC888D 5G LTE Wi-Fi Router
- Power Adapter
- Ethernet Cable
- Quick Start Guide (if applicable)
- Warranty Card (if applicable)
4. Product Overview
Familiarize yourself with the components and indicators of your ZTE MC888D router.
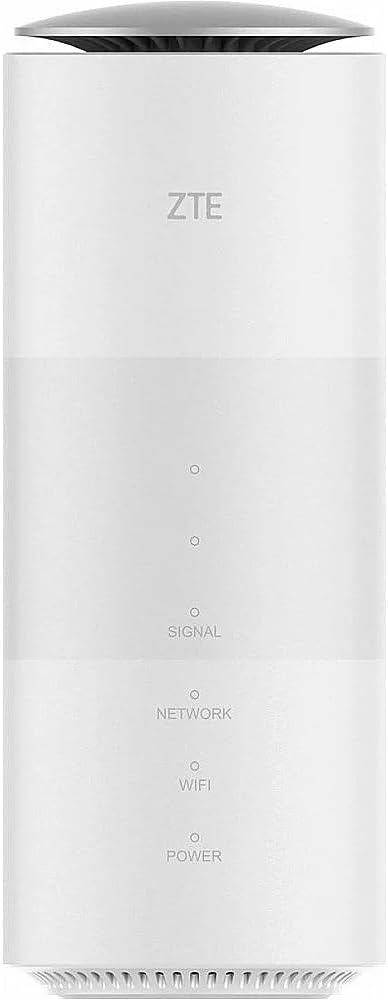
Figure 4.1: Front View of the Router
This image displays the front of the ZTE MC888D router, highlighting the LED indicators for Signal, Network, Wi-Fi, and Power status. The ZTE logo is visible at the top.
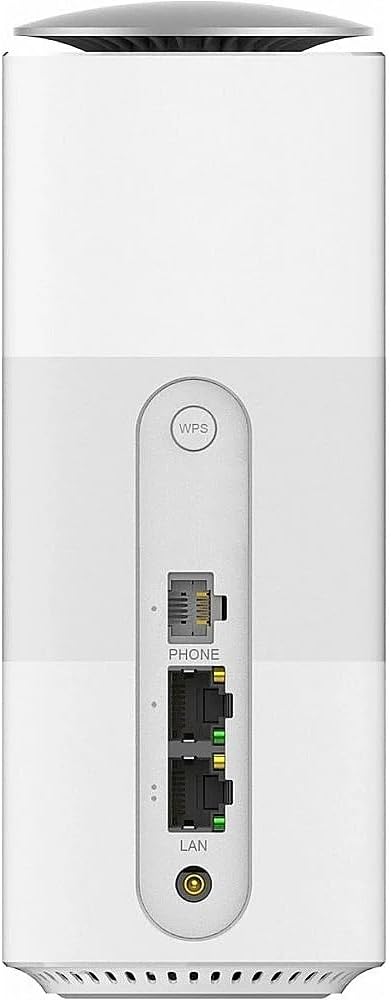
Figure 4.2: Rear View of the Router
This image shows the rear panel of the ZTE MC888D router, featuring the WPS button, Phone port, two LAN (Gigabit Ethernet) ports, and the power input port.

Figure 4.3: Side View of the Router
This image presents a side view of the ZTE MC888D router, prominently displaying the "5G" logo, indicating its 5G connectivity capability.
LED Indicators:
- Power LED: Indicates the power status of the device.
- Wi-Fi LED: Indicates the status of the Wi-Fi network.
- Network LED: Indicates the status of the cellular network connection (5G/LTE).
- Signal LED: Indicates the strength of the cellular signal.
Ports and Buttons:
- SIM Card Slot: Located at the bottom or side, for inserting the Nano-SIM card.
- Power Port: Connects to the supplied power adapter.
- LAN Ports (Gigabit Ethernet): For connecting wired devices such as computers or other network devices.
- Phone Port: For connecting a telephone for VoIP services (if supported by your carrier).
- WPS Button: For quick and secure Wi-Fi connection setup.
- Reset Button: A small pinhole button to restore factory default settings.
5. Setup
5.1. SIM Card Installation
- Ensure the router is powered off.
- Locate the SIM card slot, usually at the bottom or side of the device.
- Insert a standard Nano-SIM card into the slot with the gold contacts facing down and the notched corner aligned correctly. Push until it clicks into place.
- Ensure the SIM card is securely seated.
5.2. Power Connection
- Connect one end of the supplied power adapter to the Power port on the router.
- Plug the other end of the power adapter into a standard electrical outlet.
- The Power LED indicator on the front of the router should illuminate.
5.3. Initial Network Connection
You can connect to the router via Wi-Fi or Ethernet cable.
Via Wi-Fi:
- Wait for the Wi-Fi LED indicator to turn solid, indicating the Wi-Fi network is active.
- On your computer or mobile device, search for available Wi-Fi networks.
- Select the Wi-Fi network name (SSID) printed on the label at the bottom of the router.
- Enter the Wi-Fi password (Wi-Fi Key) also found on the router's label.
- Once connected, the Wi-Fi LED should indicate a successful connection.
Via Ethernet Cable:
- Connect one end of the Ethernet cable to a LAN port on the router.
- Connect the other end of the Ethernet cable to the Ethernet port on your computer.
- Your computer should automatically obtain an IP address from the router.
6. Operating the Router
6.1. Accessing the Web Management Interface
- Open a web browser (e.g., Chrome, Firefox, Edge) on a device connected to the router.
- In the address bar, type the default IP address of the router (usually
192.168.0.1or192.168.1.1). Refer to the label on your router for the exact address. - Press Enter. A login page will appear.
- Enter the default username and password, which are typically
adminfor both, or as specified on the router's label. - You will now have access to the router's settings.
6.2. Basic Wi-Fi Settings
It is recommended to change the default Wi-Fi name (SSID) and password for security.
- Log in to the web management interface.
- Navigate to the "Wi-Fi Settings" or "Wireless Settings" section.
- Change the SSID (Wi-Fi Network Name) to a name of your choice.
- Change the Wi-Fi Password (WPA/WPA2 Key) to a strong, unique password.
- Save the changes. Your devices will disconnect and you will need to reconnect using the new Wi-Fi name and password.
6.3. Connecting Devices
- Wi-Fi Devices: Use the new SSID and password to connect smartphones, tablets, laptops, and other Wi-Fi enabled devices.
- Wired Devices: Connect gaming consoles, desktop computers, smart TVs, or network storage devices to the LAN ports using Ethernet cables.
7. Maintenance
- Regular Cleaning: Keep the router clean and free from dust. Use a soft, dry cloth.
- Firmware Updates: Periodically check the router's web management interface for available firmware updates. Keeping the firmware updated ensures optimal performance and security.
- Optimal Placement: Place the router in a central location, away from obstructions and other electronic devices that may cause interference.
- Power Cycle: If you experience minor network issues, try power cycling the router (unplugging it from power for 10 seconds and then plugging it back in).
8. Troubleshooting
| Problem | Possible Cause | Solution |
|---|---|---|
| No Power LED | Power adapter not connected or faulty. | Check power connections. Ensure the power outlet is working. Use the original power adapter. |
| No Internet Connection | No SIM card, incorrect SIM, no cellular signal, or network issue. | Ensure SIM card is correctly inserted. Check Signal LED. Contact your mobile operator for network status. Restart the router. |
| Wi-Fi Not Visible or Cannot Connect | Wi-Fi disabled, incorrect password, or interference. | Check Wi-Fi LED. Verify Wi-Fi settings in the web interface. Ensure correct password. Try changing Wi-Fi channel. |
| Slow Internet Speed | Poor signal strength, network congestion, or too many connected devices. | Relocate the router for better signal. Limit simultaneous high-bandwidth activities. Check for firmware updates. |
| Cannot Access Web Interface | Incorrect IP address, device not connected to router, or browser issue. | Verify router's IP address. Ensure your device is connected to the router (Wi-Fi or Ethernet). Try a different browser. |
9. Specifications
| Feature | Detail |
|---|---|
| Model Name | MC888D |
| Brand | ZTE |
| Wireless Standard | 802.11ac (Wi-Fi 6/AX3600 compatible) |
| Frequency Band Class | Dual-Band |
| Ethernet Ports | Gigabit Ethernet Ports |
| Special Features | Access Point Mode |
| Dimensions (approx.) | 21.5 x 20 x 9.7 cm |
| Weight (approx.) | 960 g |
10. Warranty and Support
For warranty information and technical support, please refer to the warranty card included in your product package or visit the official ZTE website. Keep your purchase receipt as proof of purchase for warranty claims.
ZTE Official Website: www.zte.com.cn
Related documentsMC888D


Ask a question about this manual
Ask about setup, troubleshooting, compatibility, parts, safety, or missing instructions. Manuals+ will review the question and use this page’s manual context to help answer it.