
1. Introduction
Thank you for choosing the JULIAQUA Aquarium Heater. This manual provides essential information for the safe and efficient operation of your new heater. The Q-50W model is designed for aquariums with a capacity of 5 to 50 liters, offering precise temperature control between 18°C and 35°C. It is suitable for both freshwater and saltwater environments and operates on AC220-240V 50-60Hz. Its compact design ensures minimal intrusion into your aquarium space, allowing more room for your aquatic life and plants.
2. Safety Information
- Always ensure the heater is fully submerged in water before plugging it into a power outlet. Operating the heater out of water can cause damage and pose a safety risk.
- The external controller unit is NOT waterproof. Keep it dry and away from water splashes.
- Before performing any maintenance, cleaning, or handling the heater, always unplug it from the power source.
- Inspect the heater for any signs of damage (cracks, frayed wires) before each use. Do not use if damaged.
- This heater is equipped with over-temperature protection to prevent overheating and potential harm to your aquatic inhabitants.
- Keep out of reach of children.
3. Product Overview


4. Specifications
The JULIAQUA Aquarium Heater is available in various wattages to suit different aquarium sizes. Refer to the table below for detailed specifications.
| Model | Power | Size (L×W×H) | Cable Length | Temperature Range | Suitable Water Volume |
|---|---|---|---|---|---|
| Q25 | 25W | 11x6x2.2cm | 1.3m | 18~35°C | <20L |
| Q50 | 50W | 11x6x2.2cm | 1.3m | 18~35°C | <50L |
| Q100 | 100W | 11x6x2.2cm | 1.3m | 18~35°C | <75L |
| Q150 | 150W | 11x6x2.2cm | 1.3m | 18~35°C | <100L |
Additional Specifications:
- Voltage: AC220-240V
- Frequency: 50-60Hz
- Color: Grey/Black
- Energy Label: A+
5. Setup Instructions
- Unpack and Inspect: Carefully remove the heater from its packaging. Check for any visible damage to the heater unit or its cable. Do not proceed with installation if any damage is found.
- Placement in Aquarium: Position the heater fully submerged within your aquarium. For optimal temperature distribution and accuracy, it is recommended to place the heater near the water outlet of your filter, where water circulation is strongest. Avoid placing it directly in the substrate.
- Secure the Heater: Use the provided suction cups to firmly attach the heater to the inside wall of your aquarium. Ensure it is securely fixed and cannot float or move freely.
- Power Connection: Once the heater is securely placed and fully submerged, connect the power plug to a suitable AC220-240V 50-60Hz power outlet. Ensure your hands are dry when handling the plug.



6. Operating Instructions
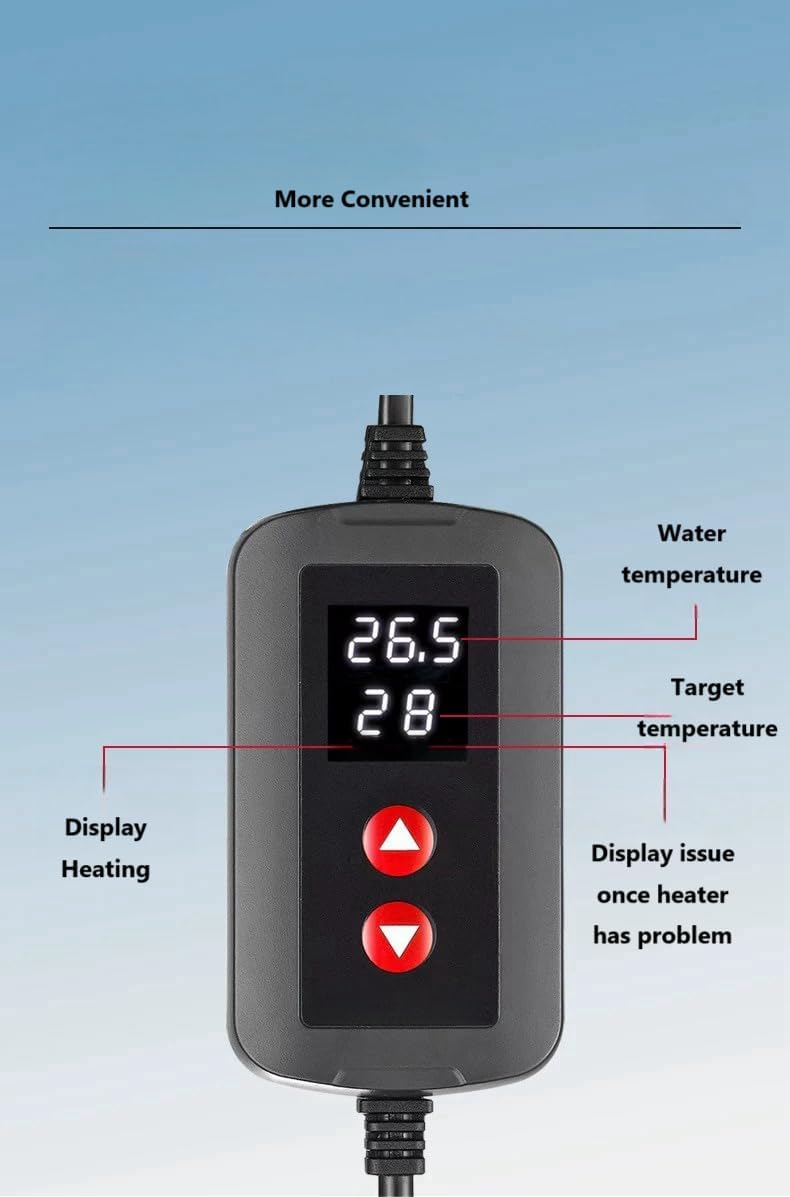
- Power On: Once plugged in, the controller display will illuminate, showing the current water temperature and the default target temperature.
- Setting Temperature: Use the 'Up' and 'Down' arrow buttons on the controller to adjust your desired target temperature. The display will show both the current water temperature and your set target temperature. The heater will automatically begin heating if the current temperature is below the target.
- Automatic Operation: The heater features an energy-saving function, automatically turning on and off to maintain the set temperature. It will cease operation once the target temperature is reached, conserving electricity.
- Temperature Accuracy: For the most accurate temperature control, ensure good water circulation around the heater. If your desired temperature is significantly higher (e.g., 10°C or more) than the ambient room temperature, consider using a higher wattage heater to achieve and maintain the target temperature effectively.
7. Maintenance
- Always unplug the heater from the power outlet before performing any maintenance or cleaning.
- Periodically clean the heater surface to remove algae or mineral buildup. Use a soft brush or cloth and aquarium-safe cleaning solutions if necessary. Avoid abrasive materials that could scratch the heater's surface.
- Ensure the suction cups remain firmly attached. Replace them if they lose their grip.
- Do not attempt to open or repair the heater unit yourself. This will void the warranty and may pose a safety hazard.
8. Troubleshooting
If you encounter issues with your JULIAQUA Aquarium Heater, refer to the following common problems and solutions:
| Display | Problem | Solution |
|---|---|---|
| E1 | Heater is out of water | Ensure the heater is fully submerged in water. |
| E2 | Heater malfunction | Unplug the heater, wait a few minutes, then plug it back in. If the error persists, contact customer support. |
| Heating but not accurate | Possible causes: too much water for heater wattage, insufficient water circulation, or ambient room temperature is too low. | Ensure heater wattage matches tank size. Improve water circulation. Consider a higher wattage heater if ambient temperature is consistently low. |

9. Warranty and Support
The JULIAQUA Aquarium Heater comes with a one-year warranty from the date of purchase. This warranty covers manufacturing defects under normal use.
If you encounter any problems, have questions, or require assistance with your product, please do not hesitate to contact JULIAQUA customer support. We are committed to providing excellent service and support.
Please refer to your purchase documentation for specific contact details or visit the official JULIAQUA store on Amazon: JULIAQUA Store