1. Important Safety Information
Please read this manual thoroughly before operating your PEXMOR Electric Bike. Failure to follow safety instructions can result in serious injury or damage to the product.
- Always wear a helmet: Ensure your helmet meets local safety standards and is properly fitted.
- Pre-ride inspection: Before each ride, check tire pressure, brake function, battery charge, and ensure all quick releases and fasteners are secure.
- Obey traffic laws: Ride responsibly and adhere to all local traffic laws and regulations.
- Weather conditions: Exercise caution when riding in wet conditions, low light, or on slippery surfaces.
- Battery safety:
- Only use the charger provided by PEXMOR.
- Do not expose the battery to extreme temperatures or direct sunlight.
- Do not attempt to open or modify the battery pack.
- Charge the battery in a well-ventilated area, away from flammable materials.
- Weight limit: Do not exceed the maximum load capacity of 396 lbs (180 kg).
- Children: This electric bike is intended for adult use only.
2. Package Contents
Upon unpacking, please verify that all components are present and in good condition:
- PEXMOR Electric Bike (Main Frame with Rear Wheel)
- Front Wheel
- Handlebar Assembly
- Seat Post and Saddle
- Pedals (Left and Right)
- 48V 13AH Removable Lithium Battery
- Battery Charger
- Tool Kit
- User Manual

Image: The PEXMOR Electric Bike in its fully assembled, unfolded state, showcasing its robust frame and fat tires.
3. Setup and Assembly
Your PEXMOR Electric Bike arrives approximately 85% assembled. Follow these steps to complete the assembly and prepare for your first ride.
- Unfolding the Frame:
Locate the folding mechanism on the main frame. Release the safety latch and unfold the frame until it locks securely into place. Ensure the locking mechanism is fully engaged before proceeding.

Image: The electric bike shown in both its folded and unfolded configurations, highlighting the compact design for storage and transport.
- Handlebar Installation:
Insert the handlebar stem into the head tube. Adjust the height to a comfortable riding position and tighten the quick release or bolts securely. Ensure the handlebars are aligned with the front wheel.
- Front Wheel Attachment:
Carefully align the front wheel with the fork dropouts. Insert the quick release skewer or axle through the hub and tighten securely. Ensure the wheel spins freely without rubbing the brake pads.
- Pedal Installation:
Identify the Left (L) and Right (R) pedals. The left pedal has a reverse thread. Apply a small amount of grease to the threads and screw the pedals into the crank arms. Tighten firmly with a wrench.
- Seat and Seat Post Adjustment:
Insert the seat post into the frame's seat tube. Adjust the seat height so your leg has a slight bend at the knee when the pedal is at its lowest point. Secure the seat post with the quick release lever.
- Battery Installation:
Slide the 48V 13AH removable lithium battery into its designated compartment on the frame. Ensure it clicks into place and is securely locked to prevent dislodgement during riding.

Image: A close-up view of the electric bike's frame, showing the integrated battery compartment and the removable 48V 13AH lithium battery.
- Pre-Ride Checks:
Before your first ride, double-check all bolts, quick releases, and connections. Test the brakes, gears, and ensure the tires are inflated to the recommended pressure (refer to tire sidewall for PSI).
4. Operating Instructions
Familiarize yourself with the controls and riding modes of your PEXMOR Electric Bike for an optimal riding experience.
4.1 Riding Modes
Your bike offers three distinct riding modes:
- Electric Mode: Pure electric power, activated via the throttle. The motor provides propulsion without pedaling.
- Pedal Assist System (PAS) Mode: The motor provides assistance as you pedal. You can adjust the level of assistance via the display.
- Normal Bike Mode: The electric system is off, and the bike functions as a traditional bicycle, propelled solely by pedaling.
4.2 Smart Display and Controls
The HD smart meter display provides essential riding information and allows you to control the electric system.

Image: A detailed view of the handlebar controls, including the multifunction LCD display showing speed and battery, and the Shimano 21-speed shifter.
- Power On/Off: Press and hold the power button on the display to turn the system on or off.
- Information Display: The display shows current speed, battery power level, and mileage.
- Assist Level Adjustment: Use the '+' and '-' buttons to cycle through different levels of pedal assistance in PAS mode.
- Throttle: The twist throttle on the handlebar activates the pure electric mode.
4.3 Shifting Gears
Your bike is equipped with a Shimano 21-speed gear system for versatile riding on various terrains.
- Use the shifters on the handlebars to change gears. The left shifter controls the front derailleur (3 speeds), and the right shifter controls the rear derailleur (7 speeds).
- Shift gears smoothly, especially when pedaling, to avoid strain on the drivetrain.
4.4 Braking System
The mechanical dual disc brakes provide reliable stopping power.

Image: Close-up views of the front and rear mechanical dual disc brakes, emphasizing their design for reliable stopping power, alongside the bright LED headlight.
- The left brake lever controls the front brake, and the right brake lever controls the rear brake.
- Apply both brakes simultaneously for effective and controlled stopping.
- Avoid sudden, hard braking, especially the front brake, to prevent skidding.
4.5 Battery Charging
To charge the 48V 13AH battery:
- Ensure the bike is turned off.
- Connect the charger to the charging port on the battery (or remove the battery to charge it separately).
- Plug the charger into a standard wall outlet.
- The charger indicator light will show charging status (typically red for charging, green for fully charged).
- Charging time is approximately 5-6 hours for a full charge.
- Disconnect the charger once charging is complete.
5. Maintenance
Regular maintenance ensures the longevity and safe operation of your PEXMOR Electric Bike.
- Tire Pressure: Check tire pressure before each ride. Maintain the recommended PSI (usually found on the tire sidewall) for optimal performance and safety.
- Brake Inspection: Regularly inspect brake pads for wear and brake cables for proper tension. Adjust or replace as needed.
- Chain Lubrication: Keep the chain clean and lubricated to ensure smooth shifting and prevent rust.
- Fastener Checks: Periodically check all bolts, nuts, and quick releases for tightness. Loose fasteners can lead to accidents.
- Cleaning: Clean the bike regularly with a damp cloth. Avoid high-pressure washing directly on electrical components.
- Battery Care: Store the battery in a cool, dry place. If storing for extended periods, charge it to about 50-70% every few months.
- Suspension System: Inspect the front adjustable hydraulic suspension and rear shock for proper function and cleanliness.
6. Troubleshooting
This section addresses common issues you might encounter with your electric bike. For problems not listed here, please contact customer support.
| Problem | Possible Cause | Solution |
|---|---|---|
| Bike does not power on. | Battery not charged; Battery not properly installed; Loose electrical connection. | Charge the battery; Ensure battery is fully seated and locked; Check all visible cable connections. |
| Motor not assisting. | PAS level set to zero; Brake levers engaged; Motor cable loose. | Increase PAS level on display; Release brake levers fully; Check motor cable connection. |
| Battery not charging. | Charger not plugged in correctly; Faulty charger; Battery issue. | Ensure secure connection to outlet and battery; Try another outlet; Contact support if charger light doesn't indicate charging. |
| Brakes feel weak. | Worn brake pads; Loose brake cable; Disc rotor dirty. | Inspect and replace brake pads if worn; Adjust brake cable tension; Clean disc rotors with rubbing alcohol. |
| Gears are not shifting smoothly. | Dirty or unlubricated chain; Derailleur out of adjustment; Bent hanger. | Clean and lubricate chain; Consult a bike mechanic for derailleur adjustment. |
If you encounter damage or failure with your bike, please refer to your order details and send relevant photos and videos of the problem to PEXMOR customer service for assistance.
7. Specifications
| Feature | Detail |
|---|---|
| Model Name | FLEMB-89BLK |
| Bike Type | Electric Bike |
| Motor | 750W High-Speed Brushless (Peak 1000W) |
| Max Speed | 30 MPH (50 KM/H) |
| Battery | 48V 13AH Removable Lithium Battery |
| Charging Time | 5-6 hours |
| Range (Electric Mode) | 45-75 km (28-47 miles) |
| Range (PAS Mode) | 100-110 km (62-68 miles) |
| Gears | Shimano 21-Speed |
| Brakes | Mechanical Dual Disc Brakes |
| Suspension | Front Adjustable Hydraulic Suspension & Rear Shock Dual Suspension |
| Tires | 26" x 4.0" Fat Tires |
| Frame Material | Aluminum Alloy, Foldable |
| Max Load Capacity | 396 lbs (180 kg) |
| Bike Weight | 80 lbs (36.2 kg) |
| Display | HD Smart Meter LCD Display |
| Special Feature | Foldable |
| Included Components | Tool Kit |
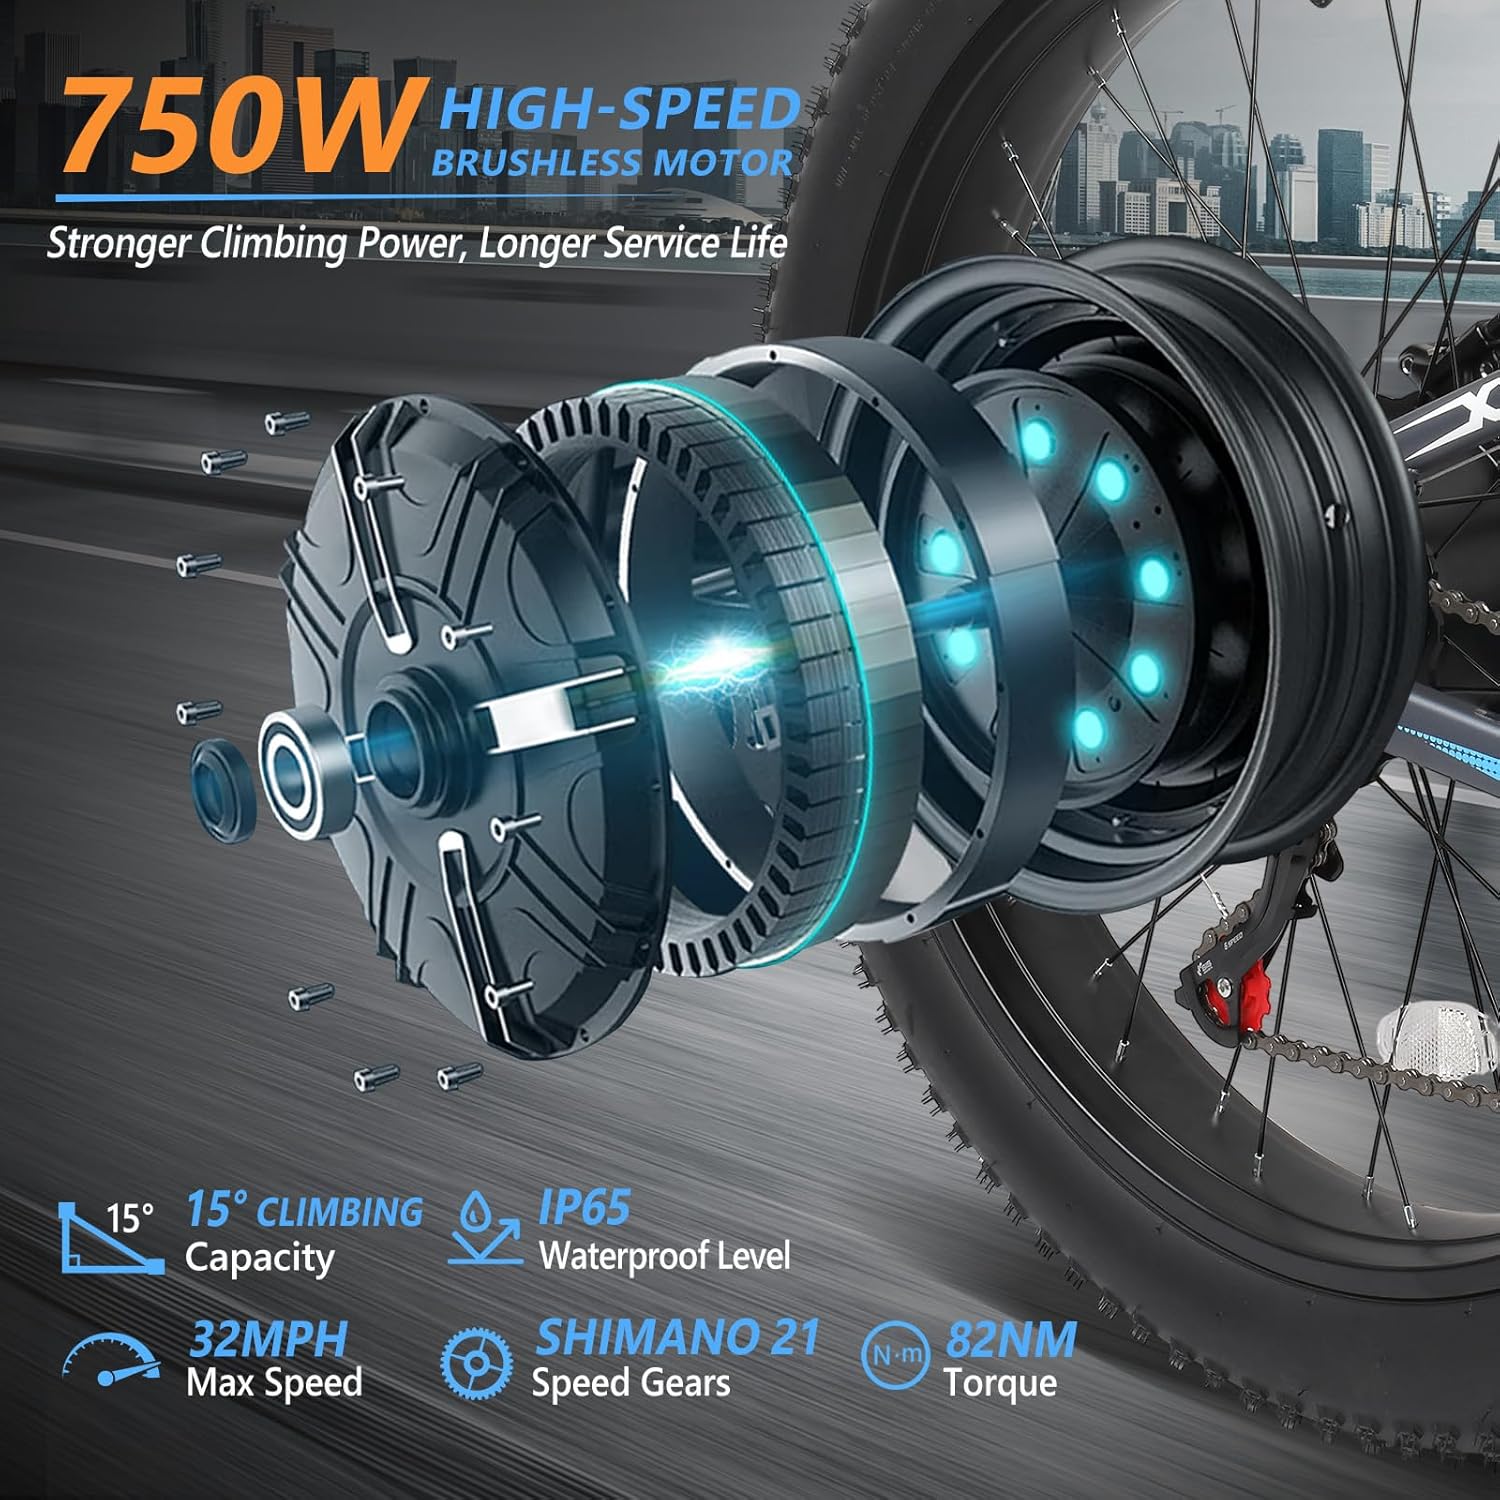
Image: An exploded view diagram of the 750W high-speed brushless motor, illustrating its internal components and power delivery.

Image: A visual representation of the full suspension system, highlighting the lockable hydraulic suspension fork and the central shock absorber for enhanced riding comfort.

Image: The 26-inch fat tire shown with examples of various terrains it can adapt to, including snow, sand, mountain, and city roads.
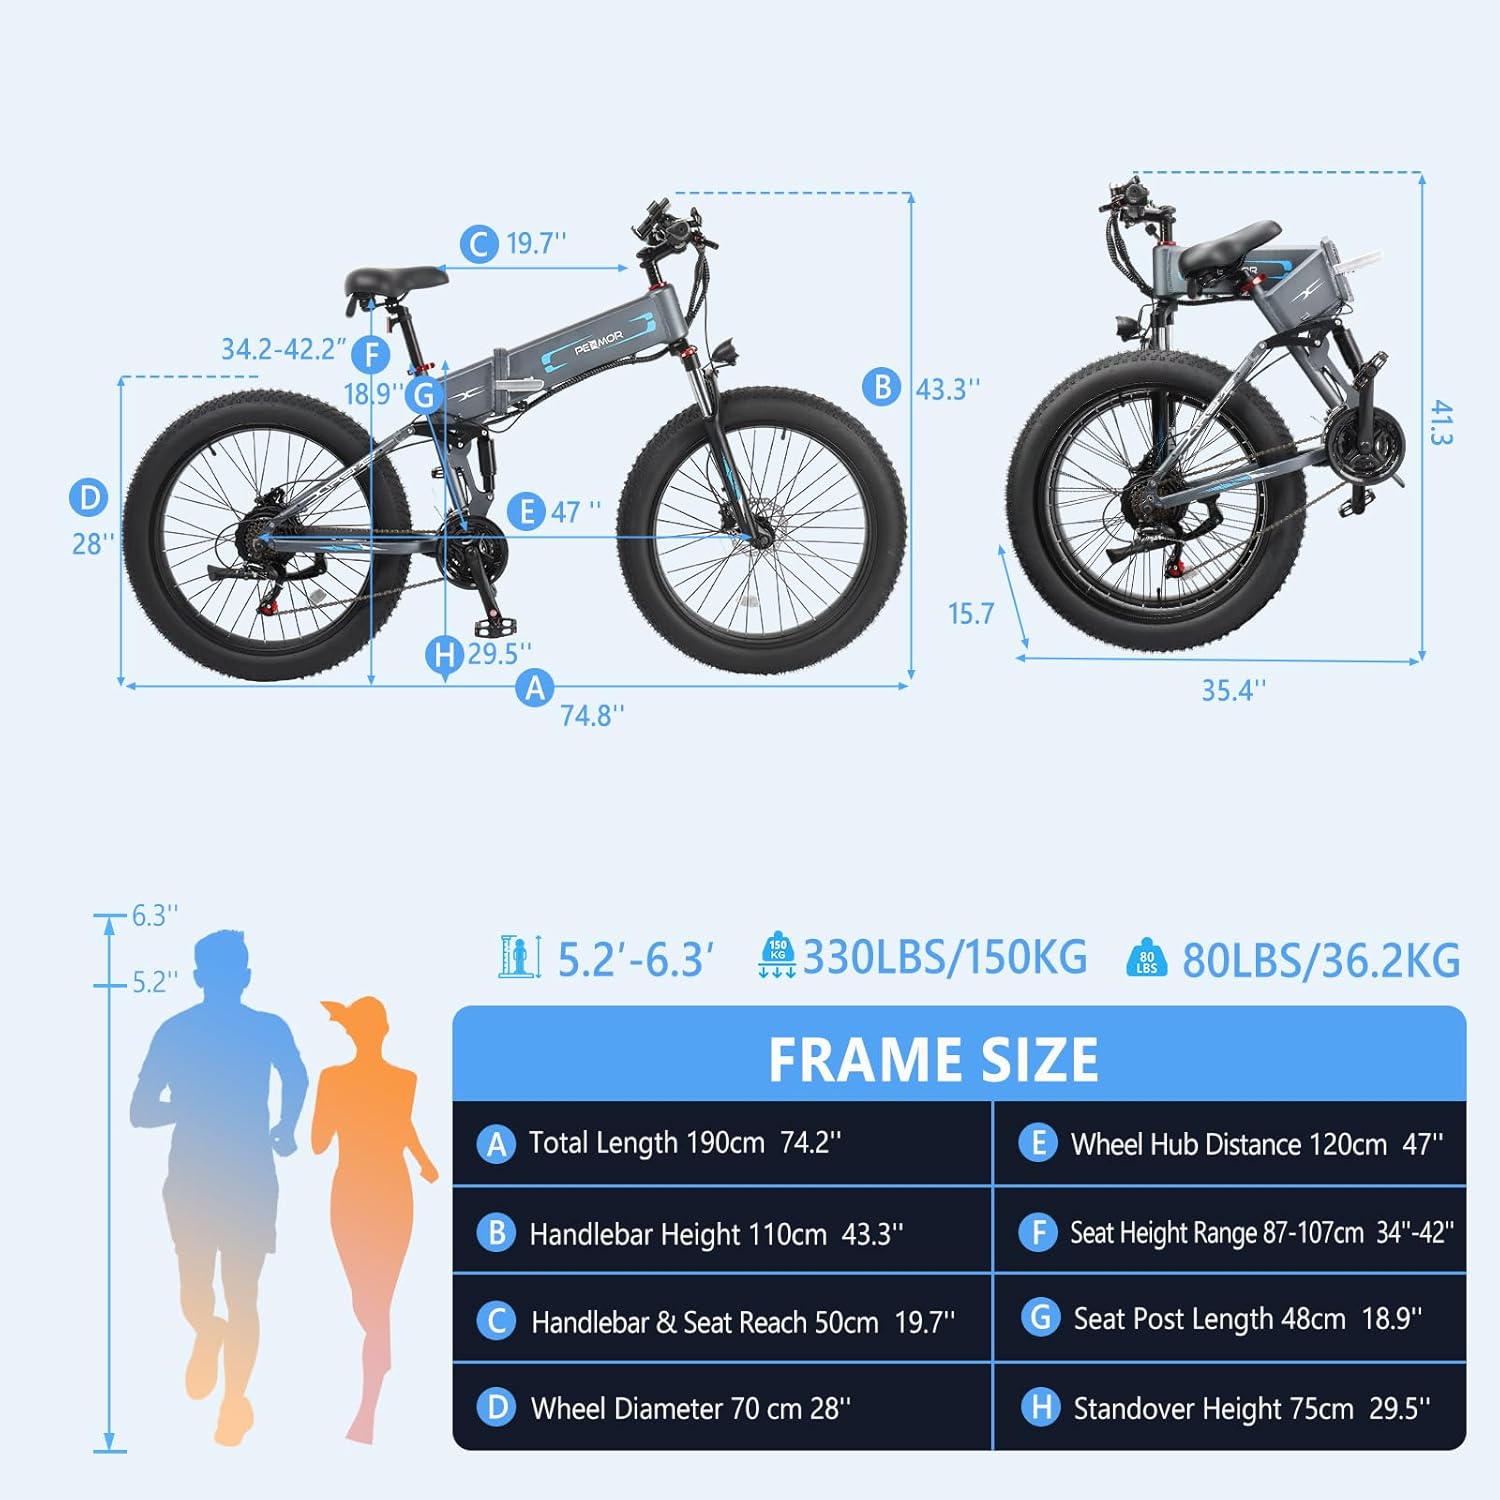
Image: A diagram illustrating the key dimensions and frame size of the PEXMOR Electric Bike, including total length, handlebar height, and wheel diameter.
8. Warranty and Support
PEXMOR provides a limited warranty for this electric bike. For specific warranty terms and conditions, please refer to the documentation included with your purchase or contact PEXMOR customer service.
If you experience any issues, damage, or failure with your PEXMOR Electric Bike, please contact our customer support team. It is helpful to have your order details, relevant photos, and videos of the problem ready when you contact us.
For support, please visit the official PEXMOR website or contact us through your purchase platform.


