
1. Important Safety Instructions
Please read all instructions carefully before using this appliance and retain them for future reference. Failure to follow these instructions may result in electric shock, fire, or serious injury.
- Always connect the unit to a grounded power outlet with the correct voltage.
- Do not operate the unit with a damaged power cord or plug.
- Do not block the air inlets or outlets. Ensure adequate clearance around the unit.
- Do not insert fingers or foreign objects into the air vents.
- Keep the unit away from water and other liquids. Do not use in wet environments.
- Unplug the unit before cleaning or performing any maintenance.
- This appliance is not intended for use by persons (including children) with reduced physical, sensory, or mental capabilities, or lack of experience and knowledge, unless they have been given supervision or instruction concerning use of the appliance by a person responsible for their safety.
- Children should be supervised to ensure that they do not play with the appliance.
2. Product Overview
The Acekool 8,000BTU Portable Air Conditioner is a versatile 3-in-1 unit designed to provide cooling, dehumidification, and fan functions for rooms up to 350 square feet.
Key Features:
- 3-in-1 Functionality: Cooling, Dehumidifying, and Fan modes.
- Cooling Capacity: 8,000 BTU for effective cooling in areas up to 350 sq. ft.
- Temperature Range: Adjustable thermostat control from 61°F to 88°F.
- Quiet Operation: Noise level of approximately 54dB, with a dedicated Sleep Mode for reduced noise.
- Timer Function: 24-hour programmable timer for energy efficiency.
- Portability: Equipped with 360° rotating castor wheels and built-in handles for easy movement.
- Remote Control: Full-function remote for convenient operation.
Included Components:
- 1 x Portable Air Conditioner Unit
- 1 x Window Isolation Panel Kit (slider bracket)
- 1 x Exhaust Duct (hose)
- 1 x Exhaust Duct Joint
- 1 x Isolation Board Joint
- 1 x Drainage Pipe
- 1 x Remote Control

Image 2.1: The Acekool 8,000BTU Portable Air Conditioner unit with its remote control, illustrating cool air output.

Image 2.2: Visual representation of the unit's three comfort modes: cooling, dehumidification, and fan operation.
3. Installation Guide
Proper installation is crucial for the efficient operation of your portable air conditioner. This unit is designed for use with double-hung or sliding windows.
Window Kit Installation Steps:
- Prepare the Window: Open the window to the desired width. The window kit is adjustable for windows between 26.5 inches (Min) and 48.5 inches (Max).
- Assemble the Window Slider Kit: Connect the slider bracket pieces if necessary to fit your window opening. Secure them with the provided locking screws.
- Install the Exhaust Hose: Attach one end of the exhaust duct to the exhaust duct joint.
- Connect to Window Kit: Insert the exhaust duct joint into the opening of the window slider kit.
- Connect to AC Unit: Attach the other end of the exhaust duct to the air outlet on the back of the portable AC unit. Ensure all connections are secure to prevent air leakage.
- Position the Unit: Place the portable AC unit on a flat, stable surface near the window, ensuring the exhaust hose is not kinked or excessively bent.
- Drainage Pipe (Optional): For continuous drainage in dehumidifier mode, connect the drainage pipe to the drain port on the unit and direct it to a suitable drain or container.

Image 3.1: Visual guide demonstrating the assembly and installation of the window kit and exhaust hose.
4. Operation
Your Acekool portable air conditioner can be operated using the control panel on the unit or the included remote control.
Control Panel:
The LED control panel provides access to all functions. Refer to the diagram below for button identification.
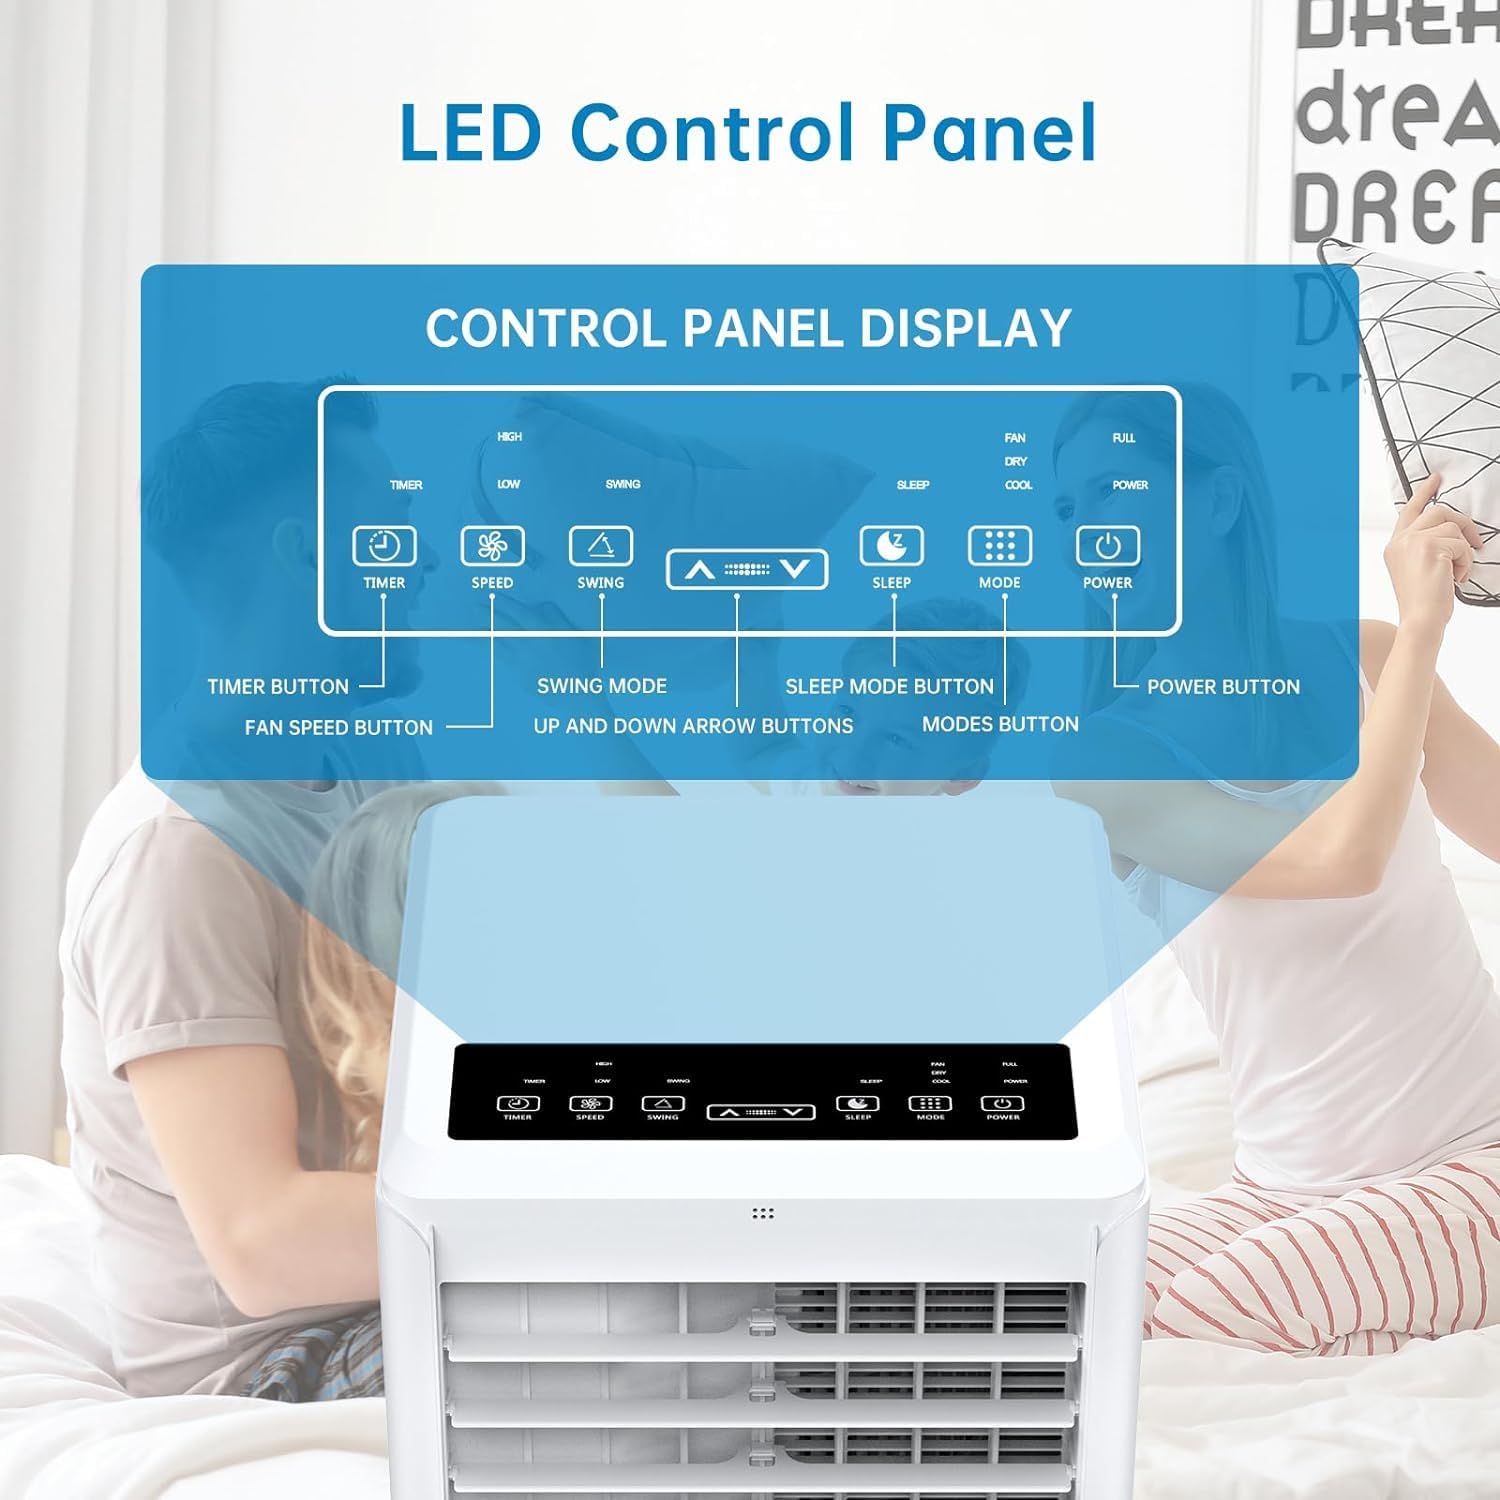
Image 4.1: Layout of the control panel display, indicating the function of each button.
- Power Button: Turns the unit On or Off.
- Mode Button: Cycles through Cool, Dry (Dehumidify), and Fan modes.
- Speed Button: Adjusts fan speed (Low, Medium, High) in Fan and Cool modes.
- Timer Button: Sets the 24-hour on/off timer.
- Swing Button: Activates or deactivates the automatic louver swing function.
- Sleep Button: Engages Sleep Mode for quiet, energy-efficient operation.
- Up/Down Arrows: Adjusts the desired temperature or timer settings.
Remote Control:
The remote control allows you to operate the unit from a distance of up to 20 feet.

Image 4.2: The remote control for the portable air conditioner, enabling convenient operation from a distance.
The remote control features buttons corresponding to those on the main control panel, allowing for full functionality.
Operating Modes:
- Cool Mode: Provides powerful cooling. Set your desired temperature using the Up/Down arrows.
- Dry (Dehumidify) Mode: Reduces humidity in the room. The fan speed is fixed in this mode. Ensure the drainage pipe is connected for continuous operation.
- Fan Mode: Circulates air without cooling. Adjust fan speed as desired.
- Sleep Mode: Optimizes temperature and fan speed for quiet operation during sleep. The unit will gradually increase the set temperature by 1°F after 30 minutes, and again after another 30 minutes, then maintain this temperature for 7 hours before returning to the original setting.
5. Maintenance
Regular maintenance ensures optimal performance and extends the lifespan of your air conditioner.
Cleaning the Air Filter:
The air filter should be cleaned every two weeks or more frequently depending on usage and air quality.
- Unplug the unit from the power outlet.
- Locate the air filter panel (usually on the back or side of the unit).
- Remove the filter.
- Wash the filter with warm, soapy water. Rinse thoroughly.
- Allow the filter to air dry completely before reinstalling. Do not expose to direct sunlight.
Draining Water:
The unit has an internal water collection tank. When full, the unit will stop operating and display an error code (e.g., 'FL').
- Unplug the unit.
- Place a shallow pan or tray under the drain port at the bottom rear of the unit.
- Remove the drain plug.
- Allow all water to drain completely.
- Replace the drain plug securely.
For continuous drainage in Dry mode, connect the provided drainage pipe to the drain port and ensure it leads to a floor drain or a larger container.
Storage:
When storing the unit for an extended period:
- Drain all accumulated water.
- Clean the air filter.
- Run the unit in Fan mode for a few hours to dry the internal components.
- Unplug the power cord and wrap it neatly.
- Store the unit in a cool, dry place, away from direct sunlight and extreme temperatures.
6. Troubleshooting
Before contacting customer support, please refer to the following table for common issues and solutions.
| Problem | Possible Cause | Solution |
|---|---|---|
| Unit does not turn on | No power; Power cord not plugged in; Circuit breaker tripped; Full water tank. | Check power connection; Reset circuit breaker; Drain water tank. |
| Unit does not cool effectively | Air filter dirty; Room too large; Doors/windows open; Exhaust hose blocked/leaking; Temperature setting too high. | Clean air filter; Ensure room size is within limits; Close doors/windows; Check exhaust hose for proper installation; Lower temperature setting. |
| Unit is noisy | Unit not on a level surface; Air filter dirty; Obstruction in fan. | Place unit on a flat surface; Clean air filter; Check for obstructions. |
| Water leakage | Drain plug loose; Drainage pipe not connected properly; Water tank full. | Secure drain plug; Ensure drainage pipe is correctly attached; Drain water tank. |
| Remote control not working | Batteries dead or incorrectly inserted; Obstruction between remote and unit. | Replace batteries; Ensure clear line of sight to the unit's receiver. |
7. Specifications
Technical details for the Acekool 8,000BTU Portable Air Conditioner.
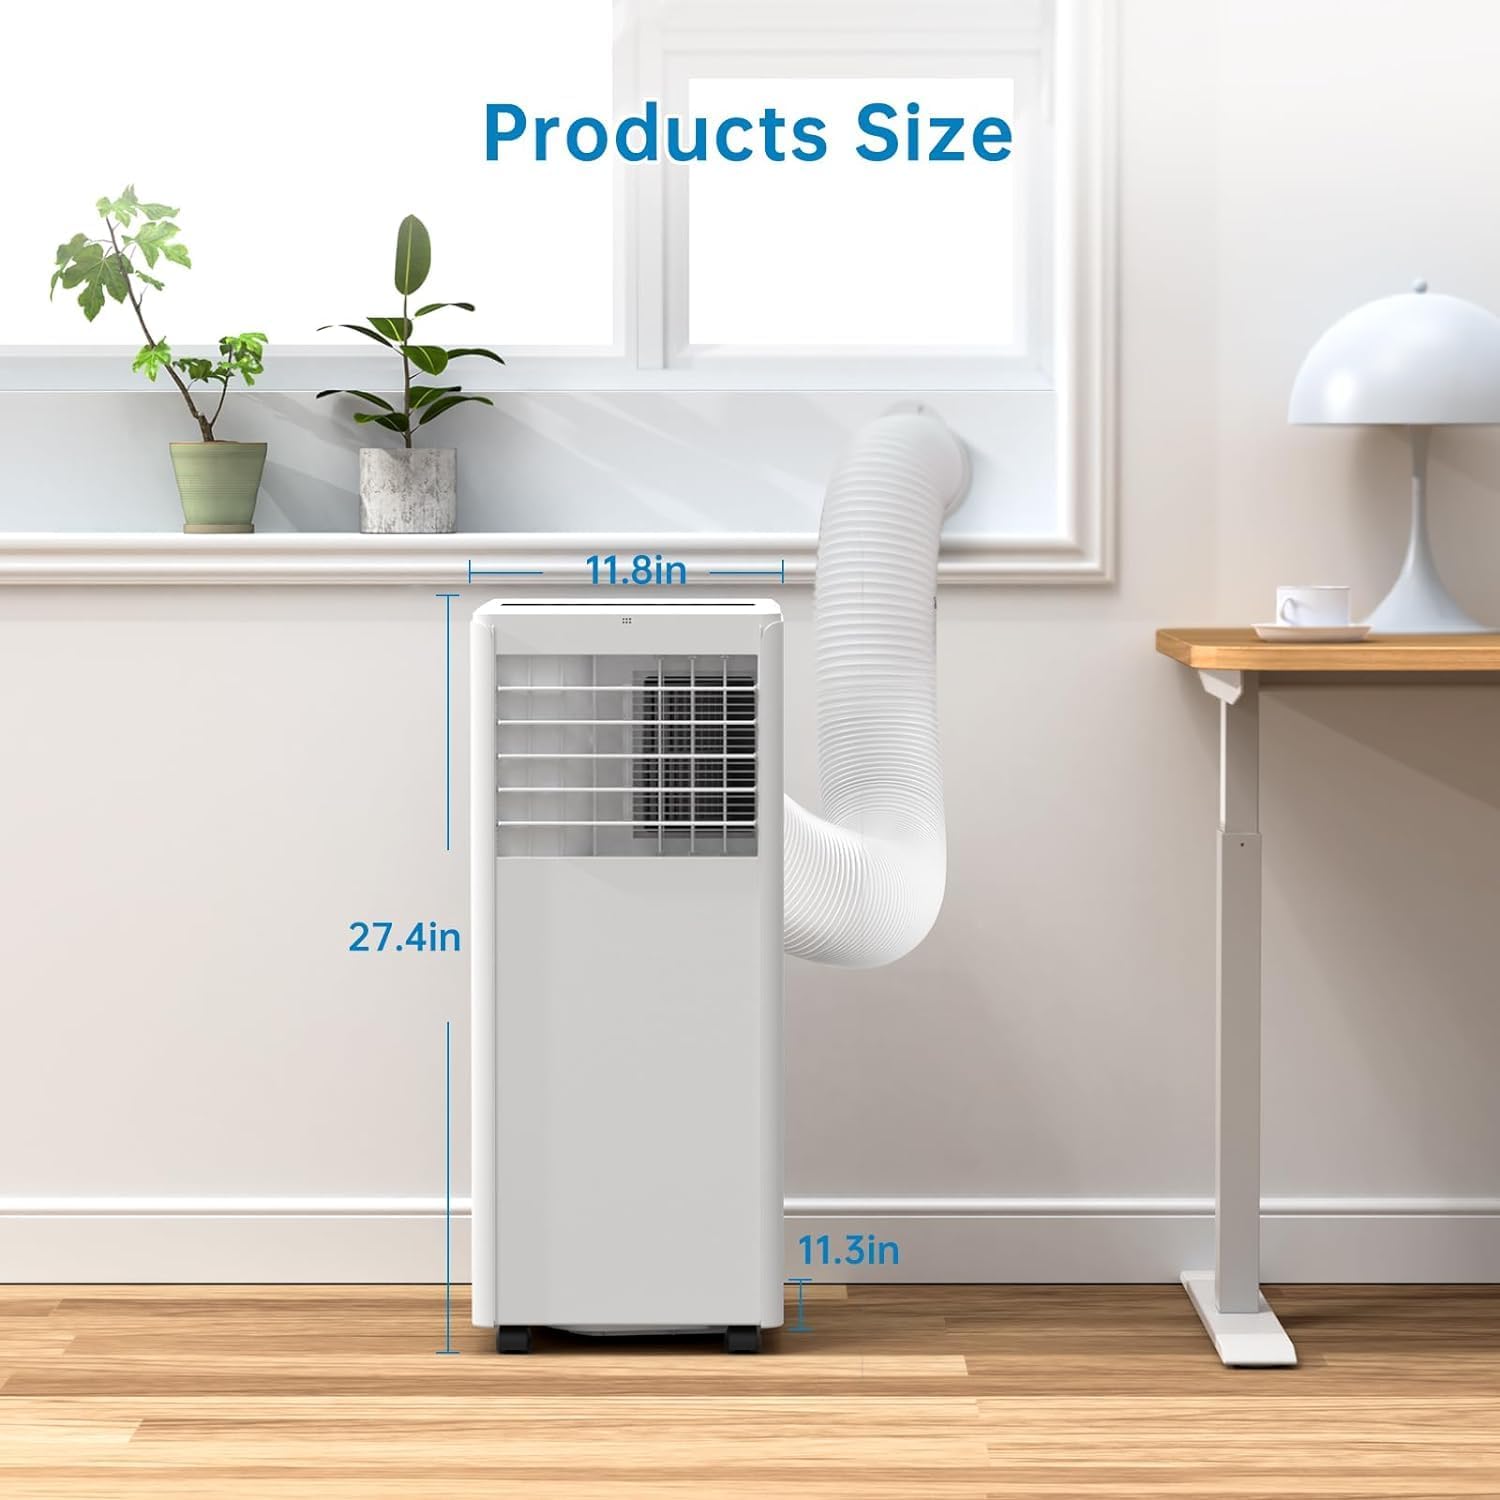
Image 7.1: Product dimensions of the portable air conditioner.
| Specification | Detail |
|---|---|
| Brand | Acekool |
| Model Name | AIR_CONDITIONER |
| Cooling Capacity | 8,000 BTU |
| Coverage Area | Up to 350 sq. ft. |
| Functions | Cool, Dehumidify, Fan |
| Noise Level | 54 dB |
| Product Dimensions (D x W x H) | 13.11"D x 13.11"W x 34.45"H |
| Voltage | 115V |
| Controls Type | Remote, Control Panel |
| UPC | 198290383276 |
8. Warranty Information
This Acekool portable air conditioner comes with a 1-Year Limited Warranty from the date of purchase. This warranty covers defects in materials and workmanship under normal use. It does not cover damage resulting from misuse, accident, modification, or unauthorized repair.
Please retain your proof of purchase for warranty claims.
9. Customer Support
If you have any questions, require technical assistance, or need to make a warranty claim, please contact Acekool customer support. Refer to the product packaging or the official Acekool website for the most current contact information.
When contacting support, please have your model name (AIR_CONDITIONER) and proof of purchase readily available.


