
1. Important Safety Information
Please read all instructions carefully before installation and use. Retain this manual for future reference.
- Electrical Safety: Ensure the bidet seat is connected to a properly grounded 120V electrical outlet. Do not use extension cords. Disconnect power before cleaning or servicing.
- Water Safety: Use only potable water. Do not install where water may freeze, as this can damage the unit.
- Cleaning: Use mild, non-abrasive cleaners. Avoid harsh chemicals that may damage surfaces.
- Children and Individuals with Reduced Capabilities: This appliance can be used by children aged 8 years and above and persons with reduced physical, sensory or mental capabilities or lack of experience and knowledge if they have been given supervision or instruction concerning use of the appliance in a safe way and understand the hazards involved. Children shall not play with the appliance. Cleaning and user maintenance shall not be made by children without supervision.
2. Product Overview
The WLJBIDET O80K Smart Bidet Toilet Seat offers advanced hygiene and comfort features, including multiple cleaning modes, adjustable warm water, a heated seat, warm air drying, and a soft-close lid. It is designed for easy installation and intuitive operation.

Figure 2.1: Top-down view of the WLJBIDET O80K Smart Bidet Toilet Seat and its remote control.

Figure 2.2: The WLJBIDET O80K Smart Bidet Toilet Seat seamlessly installed on a standard toilet.
3. Package Contents
Verify that all components are present before beginning installation:
- WLJBIDET O80K Smart Bidet Toilet Seat
- Wireless Remote Control
- Mounting Plate and Hardware (screws, metal adjustment sheets, rubber expansion bolts)
- T-Valve Adapter
- Bidet Water Supply Hose (DMT Pipe)
- Water Filter
- User Manual
4. Pre-Installation Checklist & Requirements
Before installation, ensure your toilet and bathroom meet the following requirements:
- Toilet Type: This model is designed for Round toilets. Verify your toilet's shape and dimensions.
- Dimensions: Measure your toilet bowl to ensure compatibility. Refer to the diagram below for specific measurements.
- Electrical Outlet: A grounded 120V AC electrical outlet must be available within reach of the bidet seat's power cord.
- Water Supply: A cold water supply line with a shut-off valve is required.
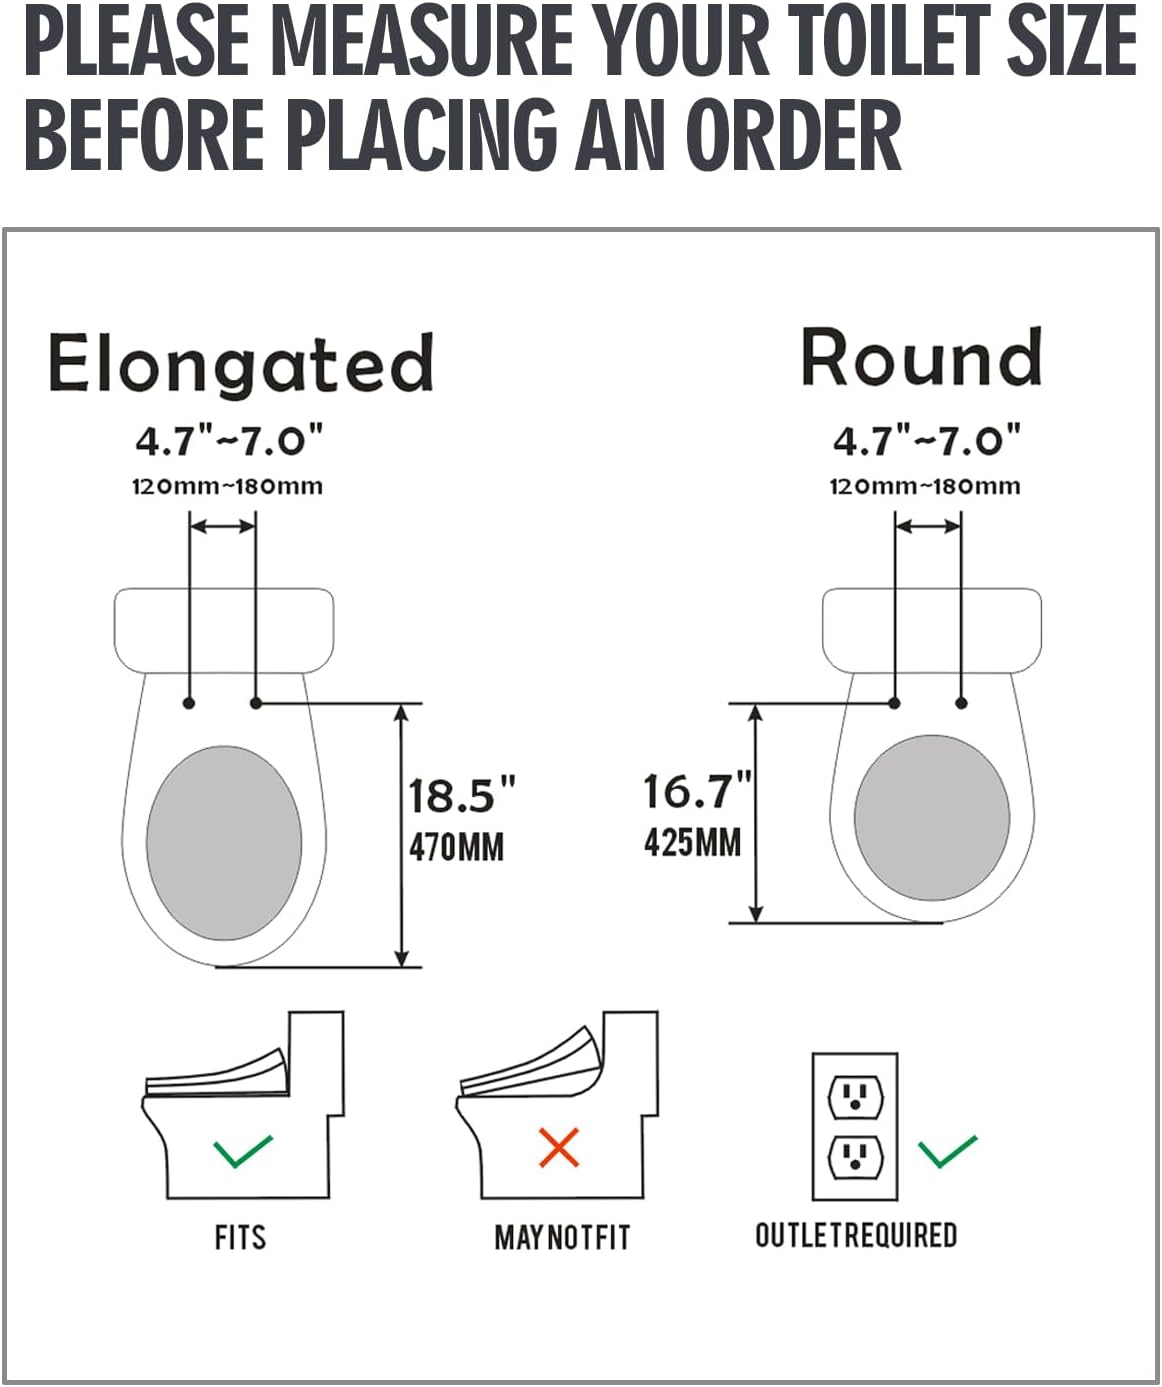
Figure 4.1: Toilet measurement guide. For Round toilets, the distance from the toilet seat bolts to the front rim should be approximately 16.7 inches (425mm), and the bolt spacing 4.7-7.0 inches (120-180mm).
5. Installation Guide
Follow these steps for proper installation. It is recommended to have basic plumbing knowledge or consult a professional if unsure.

Important: Ensure the 3-way valve is connected to the tank as per the diagram. The included 3-way valve instructions may only apply to certain toilets. When installing, open the water supply valve first and wait 3-5 minutes for the bidet to fill with water before plugging it in. Do not operate any functions while the blue light is blinking; it will stop blinking in approximately 1 minute.
Step-by-Step Installation:
- Remove Existing Toilet Seat: Lift the hinge covers and use a screwdriver or wrench to loosen the bolts holding the current toilet seat. Remove the seat and clean the toilet rim thoroughly.
- Prepare the Bidet Seat:

Figure 5.1: Remove the fixing plate from the bottom of the smart bidet toilet seat by holding and pressing the buckle.
- Install the Fixing Plate:

Figure 5.2: Install the accessories (screws, metal adjustment sheets, fixing plate, rubber expansion bolts) according to the diagram into the toilet bolt holes. Ensure the plate is securely fastened.
- Attach the Bidet Seat:

Figure 5.3: Hold down the buckle and align the bidet toilet seat to both sides of the fixing plate. Push the seat in the direction of the arrow until it clicks into place.
- Connect Water Supply:

Figure 5.4: Screw the 3-way valve onto the inlet of the toilet tank. Connect the water filter and the DMT pipe from the bidet seat to the 3-way valve. Ensure all connections are tight to prevent leaks.
- Open Water Supply and Power On: Slowly open the main water supply valve to the toilet. Allow 3-5 minutes for the bidet's internal tank to fill. Once filled and the blue light stops blinking, plug the bidet seat into the grounded electrical outlet.
6. Operating Instructions
The WLJBIDET O80K can be operated using the wireless remote control or the side knob on the unit.
6.1 Wireless Remote Control
The remote control provides full access to all functions. It can be mounted on the wall using the included adhesive tape.
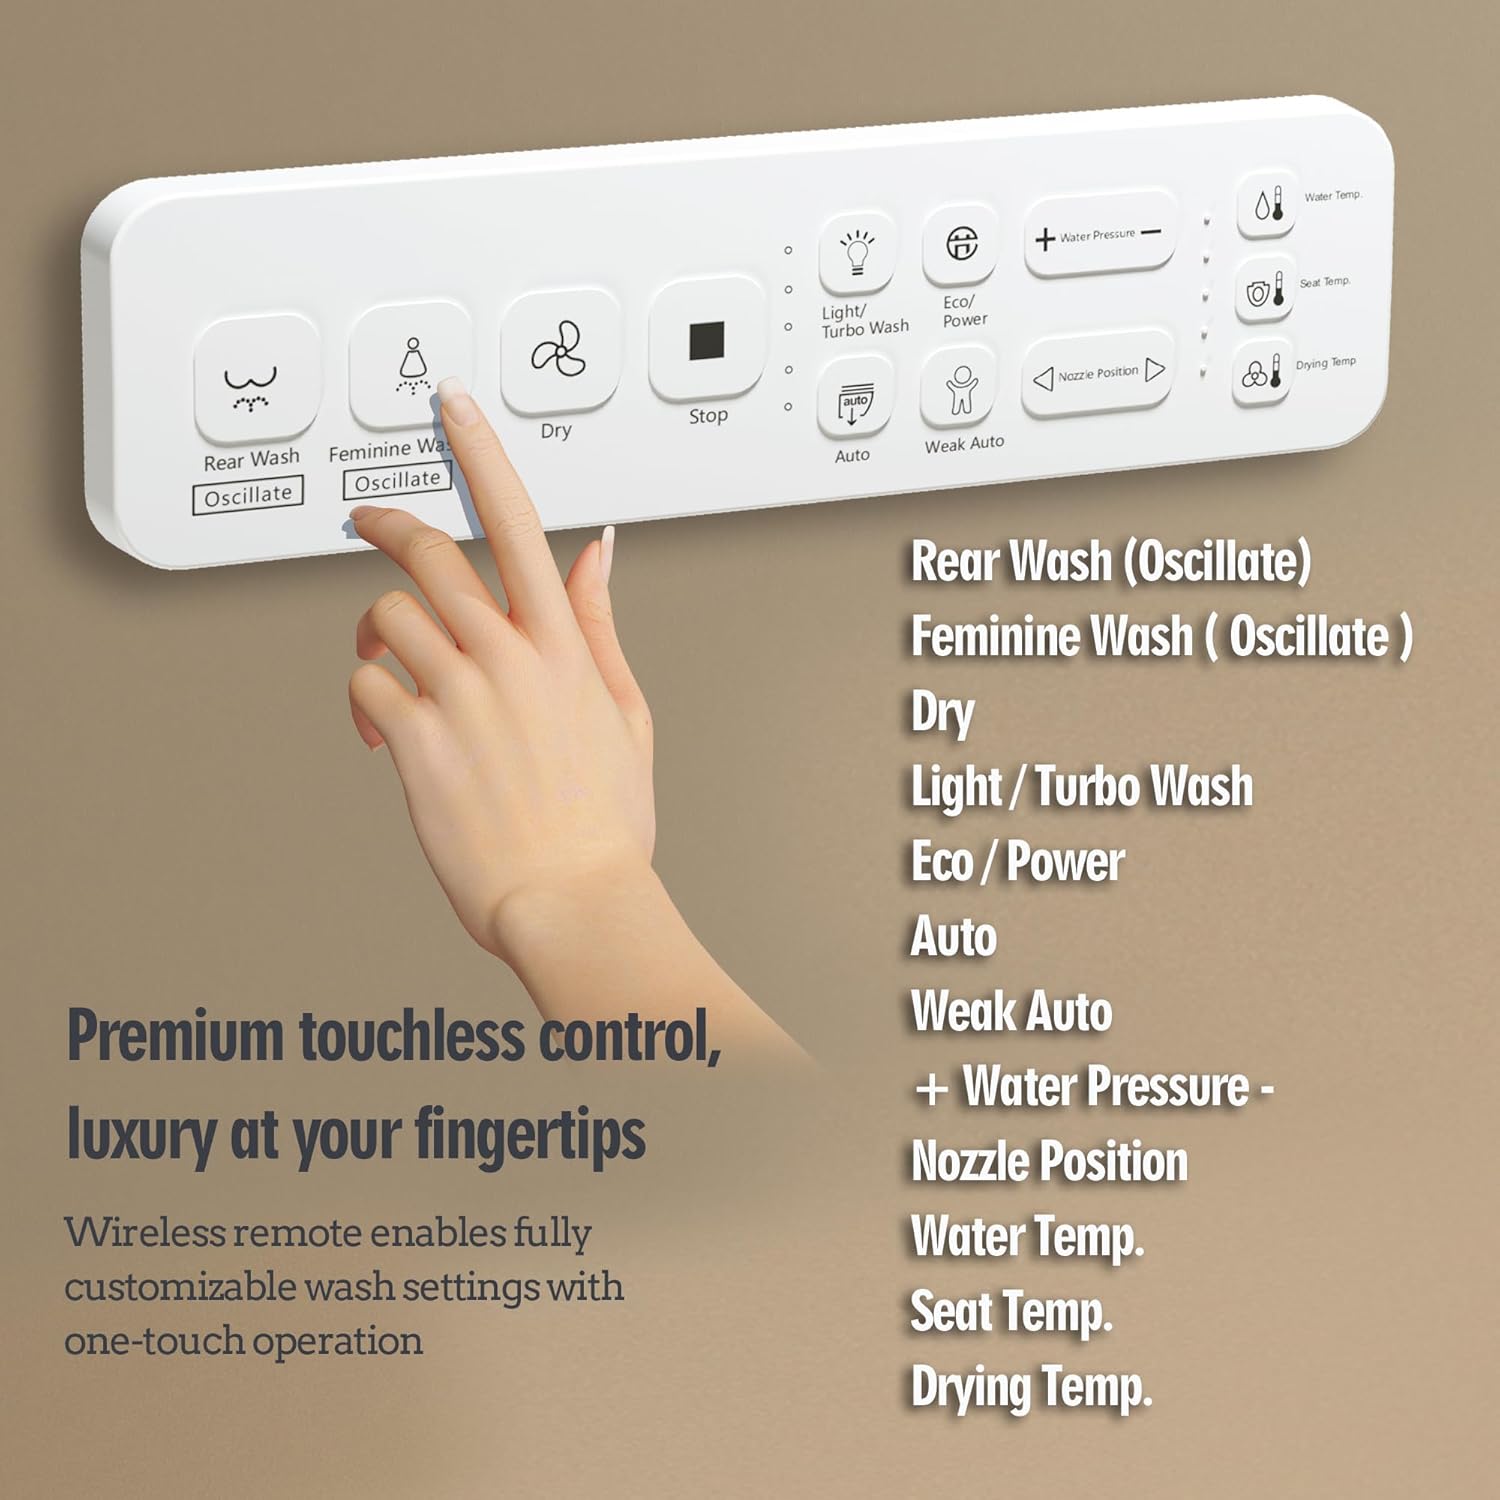
Figure 6.1: The wireless remote control for the WLJBIDET O80K, showing various function buttons.
- Rear Wash / Oscillate: Activates the posterior wash. Press again for oscillating spray.
- Feminine Wash / Oscillate: Activates the feminine wash. Press again for oscillating spray.
- Dry: Activates the warm air dryer.
- Stop: Stops all current operations.
- Light / Turbo Wash: Toggles the night light or activates a stronger wash mode.
- Eco / Power: Toggles Eco mode or power on/off.
- Auto: Initiates an automatic wash and dry cycle.
- Weak Auto: Initiates a gentler automatic wash and dry cycle.
- Water Pressure +/-: Adjusts the water spray intensity.
- Nozzle Position: Adjusts the nozzle's forward/backward position.
- Water Temp: Adjusts the water temperature.
- Seat Temp: Adjusts the heated seat temperature.
- Drying Temp: Adjusts the warm air dryer temperature.
6.2 Smart Display Screen
The integrated LED screen on the bidet seat displays real-time water and seat temperatures, providing clear feedback on current settings.
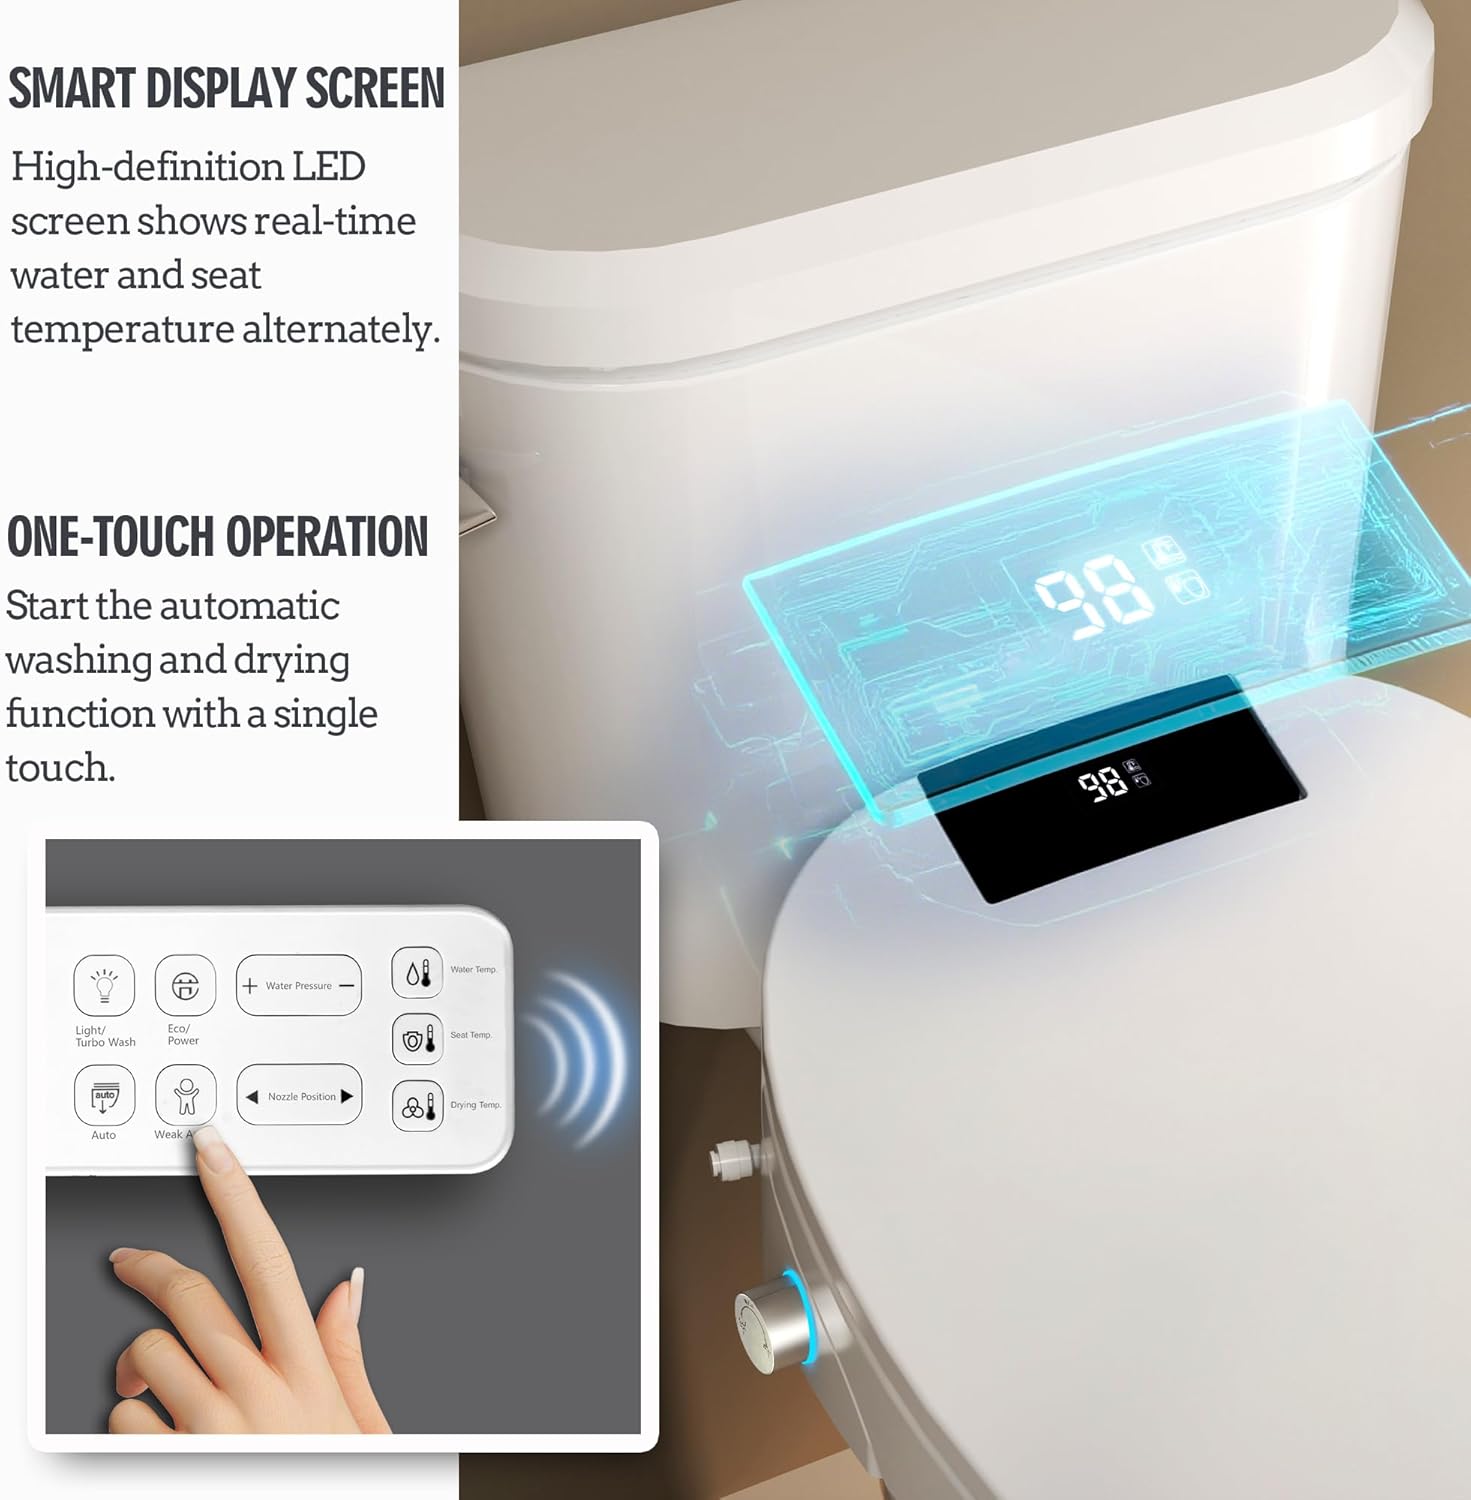
Figure 6.2: The smart display screen provides real-time temperature information and indicates active functions.
6.3 Cleaning Modes and Features
- Multiple Cleaning Modes: Choose from posterior wash, feminine wash, and oscillating wash for comprehensive cleaning. The nozzle self-cleans before and after each use.
- Heated Toilet Seat: Enjoy consistent warmth with adjustable temperature settings, eliminating the discomfort of cold seats.
- Warm Air Drying: After washing, a gentle stream of warm air dries the area, reducing the need for toilet paper. Drying temperature is adjustable.
- Toilet LED Night Light: A soft-glow night light illuminates the bowl, providing gentle visibility for nighttime use without harsh overhead lighting.
- Soft-Close Lid: The seat and lid feature a soft-close mechanism, preventing slamming and reducing noise.
- Colorful Knob (Manual Control): For basic functions without the remote, rotate the side knob counterclockwise for rear washing, clockwise for feminine washing, and press to activate warm-air drying.
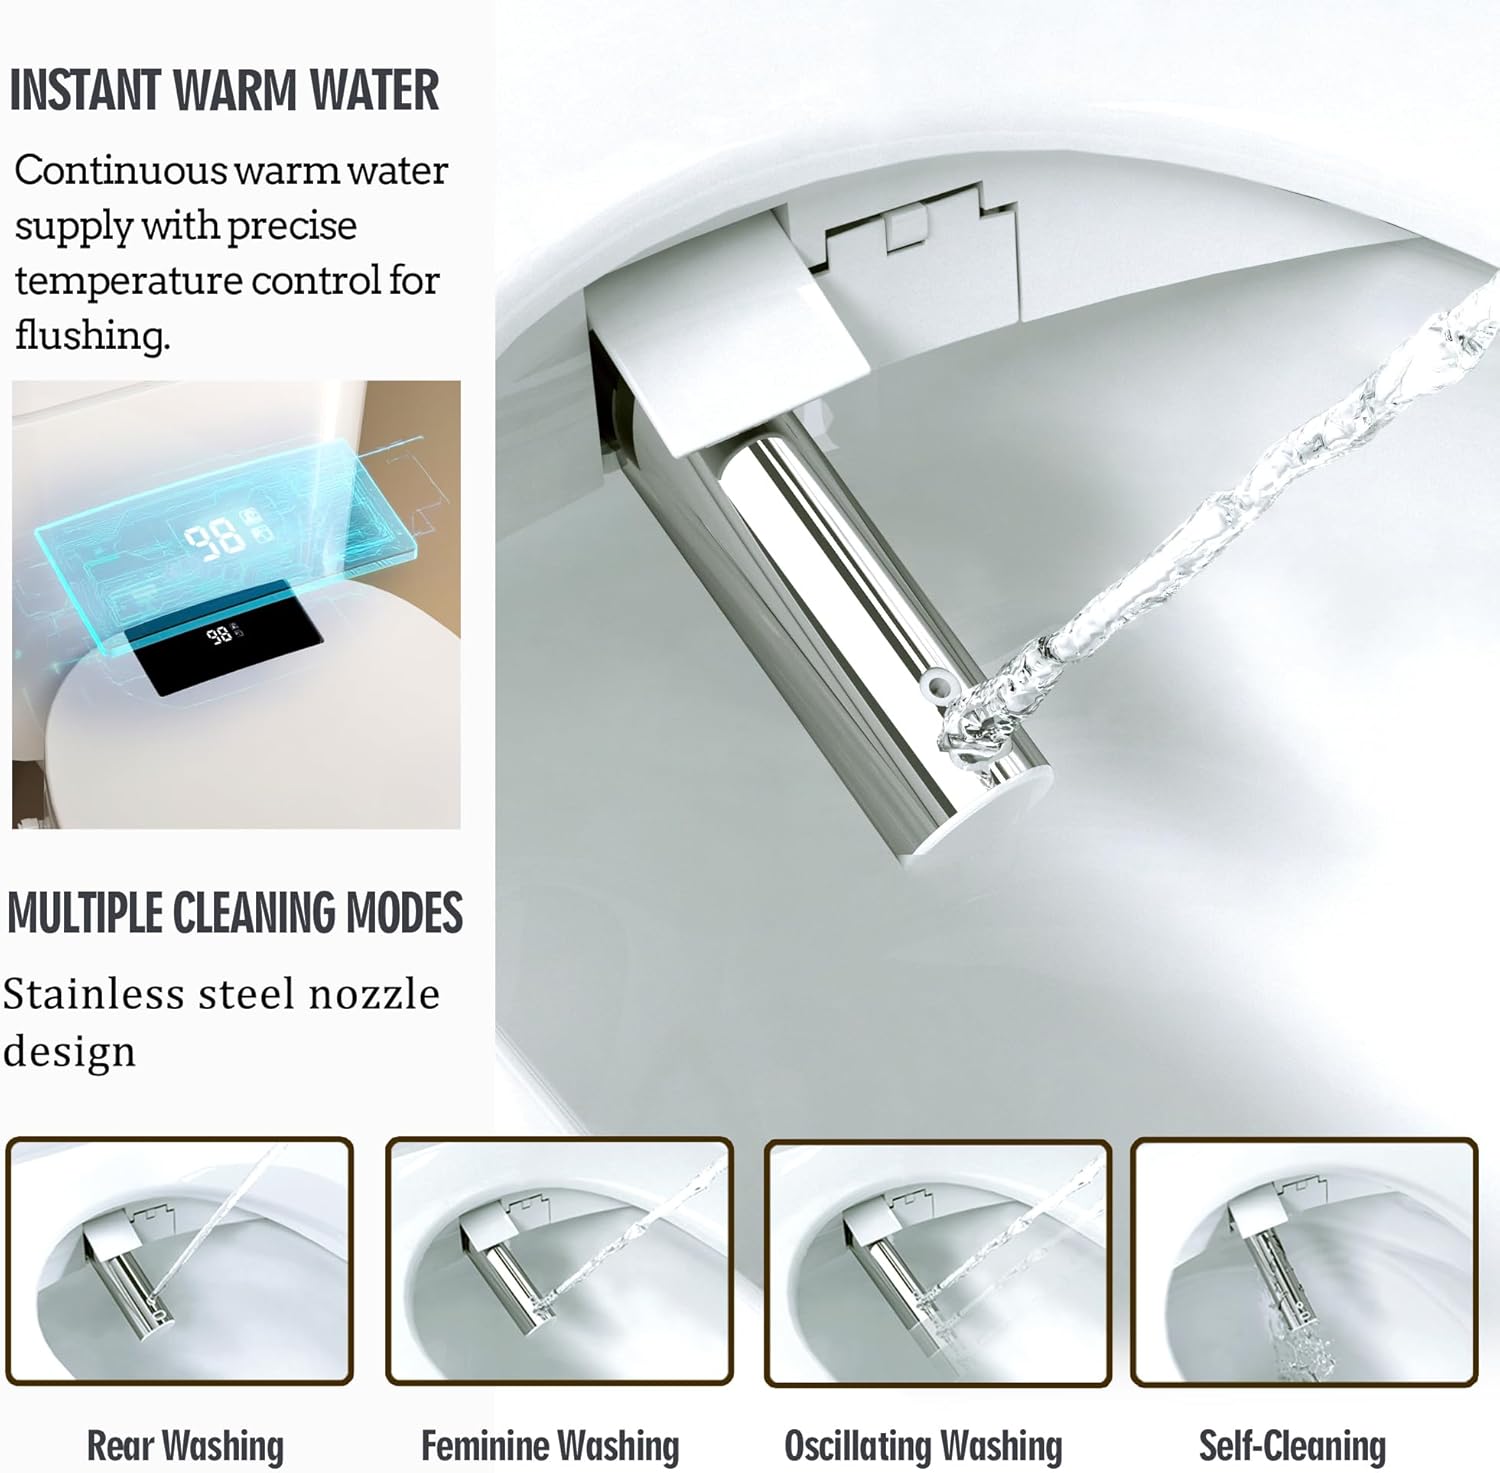
Figure 6.3: The bidet offers instant warm water and various cleaning modes for personalized hygiene.

Figure 6.4: The bidet features a heated seat for comfort and a warm air dryer to reduce toilet paper usage.
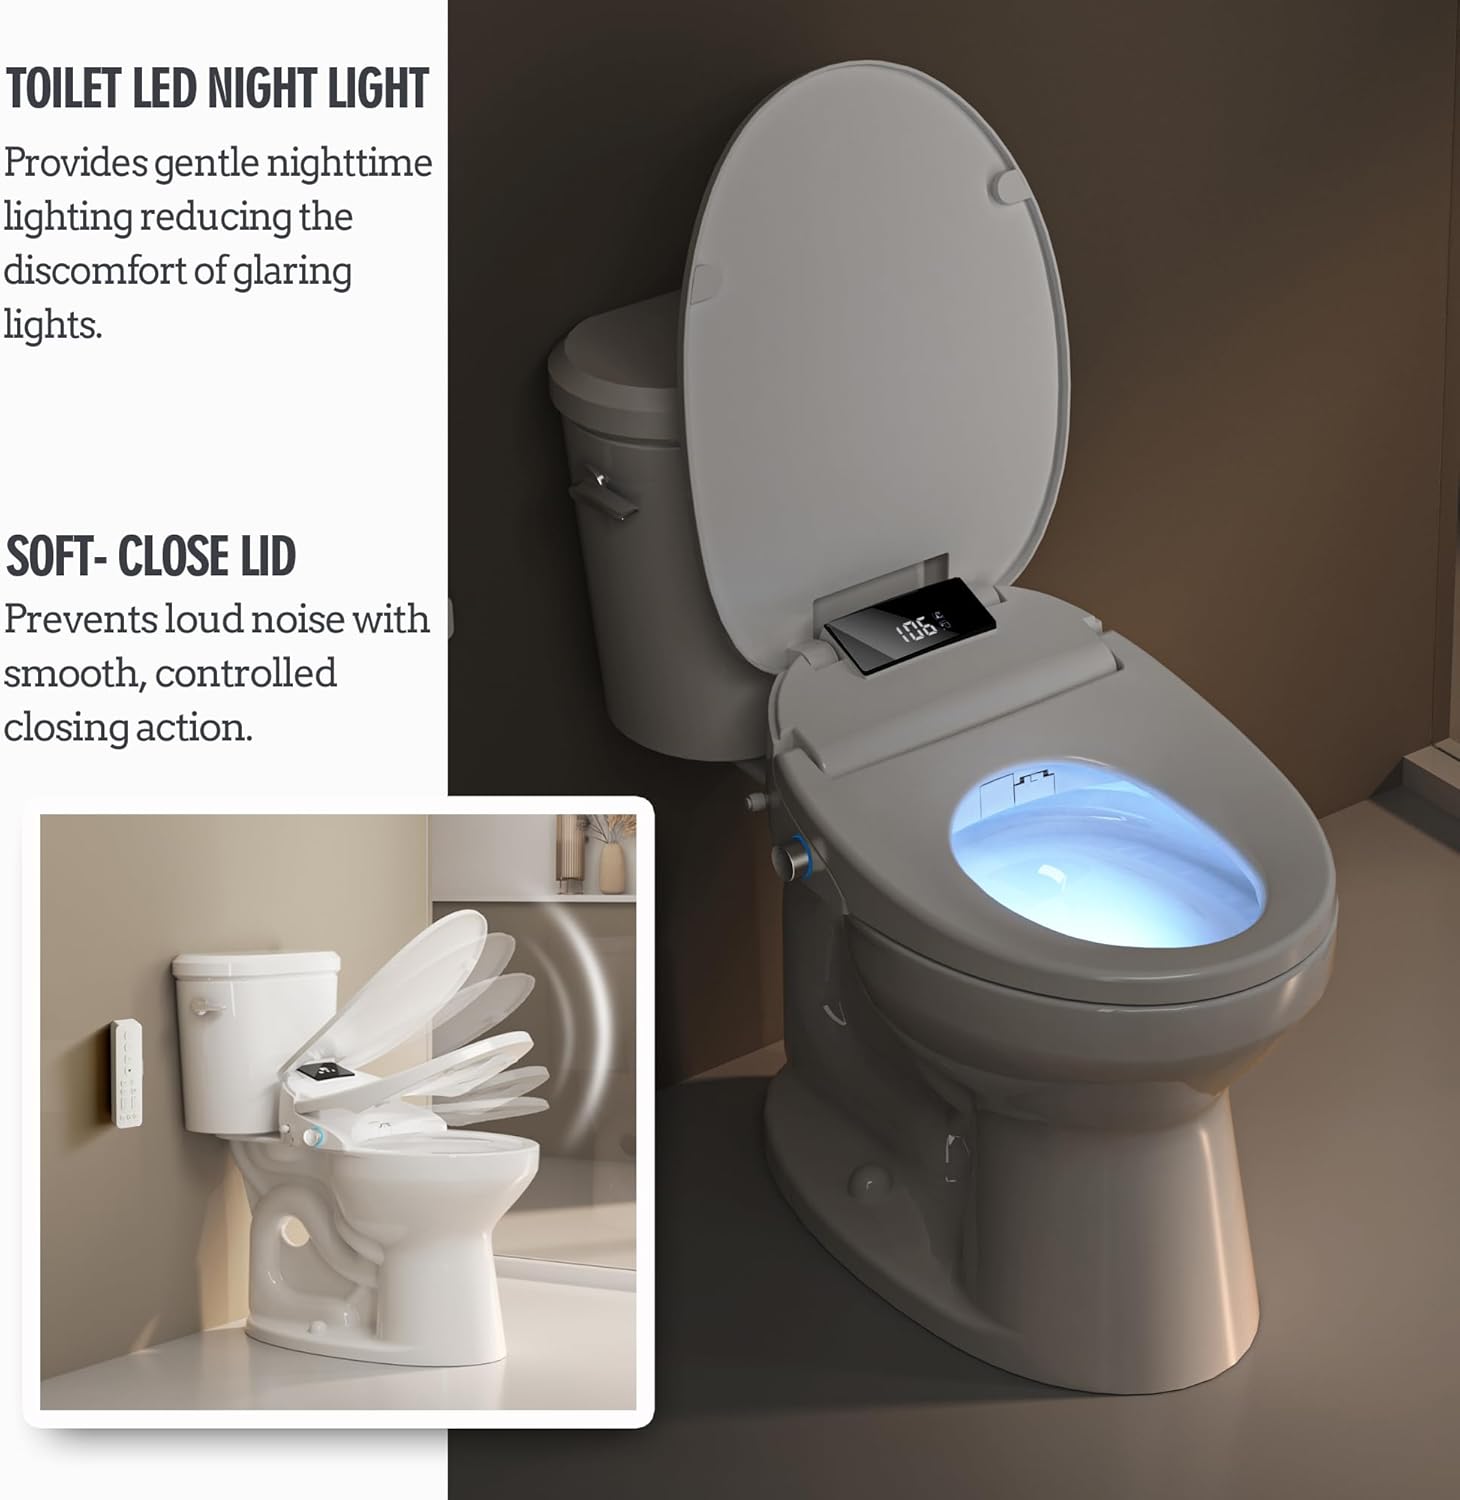
Figure 6.5: The bidet includes a gentle LED night light and a soft-close lid for quiet operation.
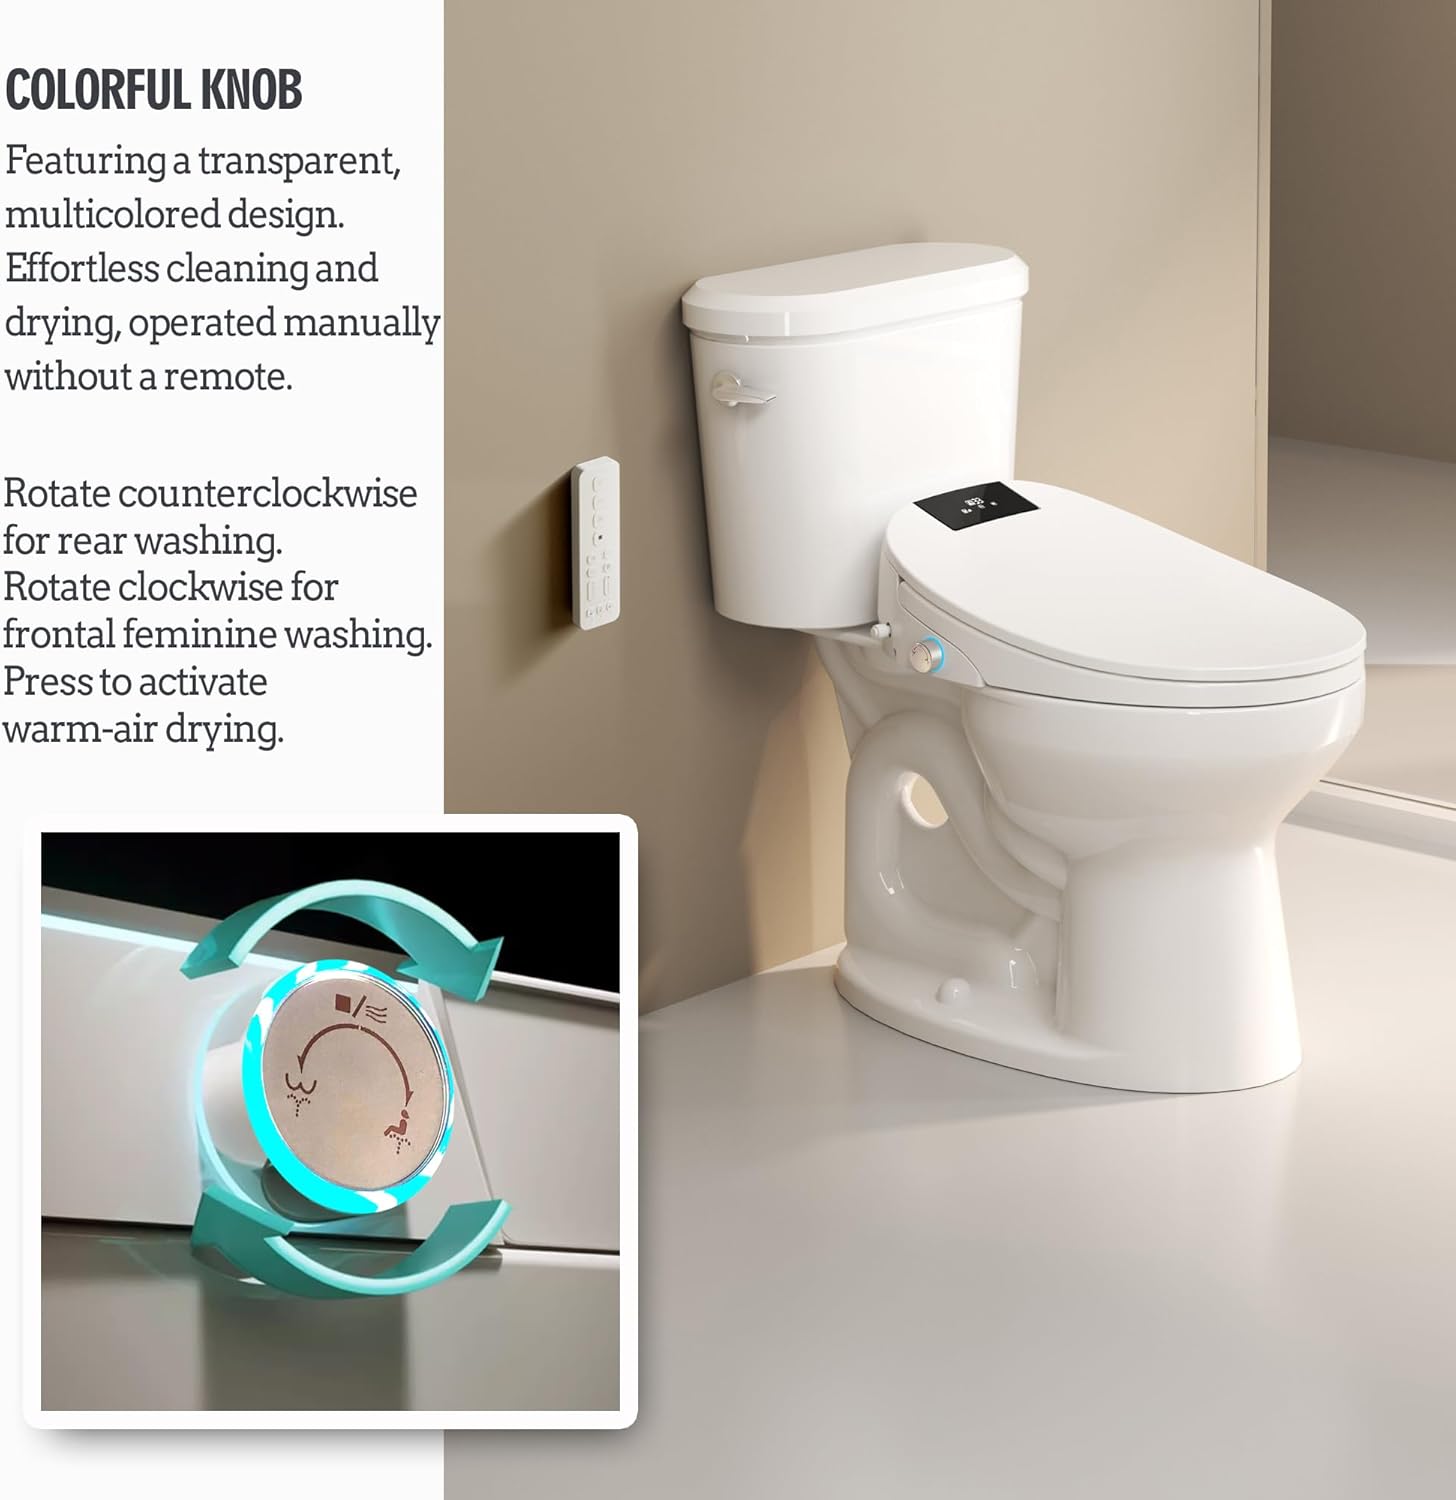
Figure 6.6: The colorful knob on the side of the bidet seat allows for manual control of primary functions.
7. Maintenance
Regular maintenance ensures optimal performance and hygiene of your bidet seat.
7.1 Nozzle Cleaning
The nozzle performs an automatic self-cleaning cycle before and after each use. For additional cleaning, you can manually extend the nozzle (refer to remote control functions) and gently wipe it with a soft cloth and mild soap. Do not use abrasive materials or harsh chemicals.
7.2 Exterior Cleaning
Wipe the exterior surfaces of the bidet seat with a soft, damp cloth and a mild, non-abrasive cleaner. Avoid spraying water directly onto the unit or using strong chemical cleaners, as this may damage the electronic components or finish.
7.3 Water Filter Replacement
The included water filter helps maintain the cleanliness of the water supply to the bidet. The filter should be replaced periodically, typically every 6-12 months, depending on water quality and usage. Refer to the filter's specific instructions for replacement procedures.
8. Troubleshooting
If you encounter issues with your bidet seat, refer to the table below for common problems and solutions.
| Problem | Possible Cause | Solution |
|---|---|---|
| No power / Unit not turning on | Not plugged in; Power outlet issue; Circuit breaker tripped. | Ensure power cord is securely plugged in. Check the outlet with another appliance. Reset the circuit breaker if tripped. |
| No water spray / Weak spray | Water supply valve closed; Water filter clogged; Nozzle blocked; Water pressure setting too low. | Open the water supply valve fully. Check and replace the water filter if necessary. Clean the nozzle. Increase water pressure via remote. |
| Water not warm | Water heater off; Temperature setting too low; Eco mode active. | Ensure water heater function is on. Increase water temperature setting. Disable Eco mode if desired. |
| Heated seat not working | Heated seat function off; Temperature setting too low. | Ensure heated seat function is on. Increase seat temperature setting. |
| Warm air dryer not working / Weak air | Dryer function off; Temperature setting too low; Air vent blocked. | Ensure dryer function is on. Increase drying temperature setting. Check for any obstructions in the air vent. |
| Remote control not responding | Batteries dead; Remote not paired; Obstruction between remote and unit. | Replace remote batteries. Refer to pairing instructions in the manual. Ensure clear line of sight. |
| Water leaking | Loose connections; Damaged hose/valve. | Check all water connections and tighten if loose. If damage is present, contact customer support for replacement parts. |
9. Specifications
| Feature | Detail |
|---|---|
| Model | O80K |
| Brand | WLJBIDET |
| Dimensions (L x W x H) | 52 x 38 x 2.51 cm (20.5 x 15 x 1 inches) |
| Weight | 5.56 kg (12.26 lbs) |
| Shape | Round |
| Color | White |
| Material | Acrylonitrile Butadiene Styrene (ABS) |
| Voltage | 120 Volts |
| Wattage | 1300 Watts |
| Water Heating Method | Instantaneous (Tankless) |
| Water Temperature Range | 92℉ to 102℉ (33.3℃ to 38.9℃) |
| Features | Heated Seat, Warm Air Dryer, Night Light, Soft-Close Lid, Remote Control, Multiple Wash Modes (Posterior, Feminine, Oscillating) |
10. Warranty and Customer Support
For warranty information, please refer to the documentation included with your purchase or contact WLJBIDET customer support directly. If you have any questions, require technical assistance, or need to order replacement parts, please reach out to the manufacturer's customer service team. Contact details can typically be found on the product packaging or the official WLJBIDET website.


