
1. Introduction
The Microsoft Surface Pro 10 is a versatile 2-in-1 device designed to adapt to various work styles, offering the functionality of both a tablet and a laptop. It features an Intel Core Ultra 5 processor, providing robust performance for daily tasks and advanced applications. This manual provides essential information to help you set up, operate, and maintain your device, ensuring optimal performance and longevity.
2. What's in the Box
Carefully unpack your Surface Pro 10 and ensure all items are present. The standard package includes:
- Microsoft Surface Pro 10 Device
- Power Supply Unit
- Microsoft Surface Pro Keyboard
- Microsoft Surface Pro Slim Pen
- Quick Start Guide
- Safety and Warranty Documents
3. Device Overview
Familiarize yourself with the physical components of your Surface Pro 10.

Figure 3.1: Front view of the Surface Pro 10 with the keyboard attached, showcasing the display and keyboard layout.

Figure 3.2: Side view of the Surface Pro 10 in laptop configuration, highlighting the adjustable kickstand and connected keyboard.
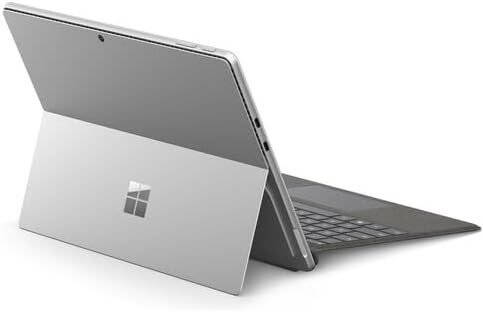
Figure 3.3: Rear view of the Surface Pro 10 with the kickstand deployed, revealing the device's sleek design and the iconic Microsoft logo.
Key Components:
- 13-inch PixelSense Flow Display: High-resolution touchscreen for vibrant visuals and touch interaction.
- Front-facing Camera: For video calls and facial recognition (Windows Hello).
- Rear-facing Camera: For capturing photos and videos.
- Power Button: Located on the side, used to turn the device on/off or put it to sleep.
- Volume Buttons: Located on the side, for adjusting audio levels.
- USB-C Ports: For charging, data transfer, and connecting external displays or accessories.
- Surface Connect Port: For charging and connecting to Surface Dock accessories.
- Kickstand: Integrated into the back, allows for multiple viewing angles.
- Microphones: For voice commands and audio recording.
4. Setup
4.1 Initial Charging
- Connect the power supply to the Surface Connect port or one of the USB-C ports on your Surface Pro 10.
- Plug the power supply into a wall outlet.
- Allow the device to charge for at least 30 minutes before first use, or until the battery indicator shows sufficient charge.
4.2 Powering On/Off
- To Power On: Press and hold the Power button until the Microsoft logo appears on the screen.
- To Power Off: From the Windows desktop, select Start > Power > Shut down. Alternatively, press and hold the Power button for a few seconds, then slide down to shut down.
- To Sleep: Briefly press the Power button. Press it again to wake the device.
4.3 Initial Windows Setup
Upon first power-on, you will be guided through the Windows 11 setup process. Follow the on-screen prompts to:
- Select your language and region.
- Connect to a Wi-Fi network.
- Accept the license terms.
- Sign in with your Microsoft account or create a new one.
- Set up Windows Hello (facial recognition or fingerprint, if available).
- Configure privacy settings.
4.4 Attaching the Surface Pro Keyboard
Align the magnetic connector on the keyboard with the corresponding port at the bottom edge of your Surface Pro 10. The keyboard will snap into place magnetically. You can adjust the keyboard to lie flat or tilt it slightly for a more ergonomic typing experience.
4.5 Pairing the Surface Pro Slim Pen
The Surface Pro Slim Pen typically pairs automatically when first used with your Surface Pro 10. If not, follow these steps:
- Go to Start > Settings > Bluetooth & devices > Add device > Bluetooth.
- Press and hold the top button on your Slim Pen for 5-7 seconds until the LED light flashes white.
- Select your Surface Slim Pen from the list of available devices and follow any on-screen prompts.
5. Operating Your Surface Pro 10
5.1 Switching Between Tablet and Laptop Modes
- Laptop Mode: Attach the Surface Pro Keyboard and adjust the kickstand for a traditional laptop experience.
- Tablet Mode: Detach the keyboard or fold it back completely. Windows will automatically switch to Tablet Mode, optimizing the interface for touch input.
5.2 Using the Touchscreen
The PixelSense Flow Display supports multi-touch gestures:
- Tap: Select an item or open an app.
- Tap and Hold: Access context menus (right-click equivalent).
- Pinch to Zoom: Zoom in or out on images and web pages.
- Swipe from Edges: Access quick settings, notifications, or switch between apps.
5.3 Using the Surface Pro Slim Pen
The Slim Pen allows for precise input and creative tasks:
- Writing/Drawing: Use the pen directly on the screen in compatible apps like Microsoft Whiteboard or OneNote.
- Selecting: Tap with the pen to select items.
- Eraser: Use the eraser button on the pen to erase digital ink.
- Top Button: Customizable for quick access to apps like OneNote or screenshots.
5.4 Basic Windows 11 Navigation
- Start Menu: Access apps, settings, and power options.
- Taskbar: Pin frequently used apps and view open applications.
- Action Center: Swipe in from the right edge (or click the icon) for quick settings and notifications.
- Widgets: Swipe in from the left edge (or click the icon) for personalized information.
6. Maintenance
6.1 Cleaning Your Device
- Use a soft, lint-free cloth slightly dampened with water or an approved screen cleaner to wipe the display.
- For the body of the device and keyboard, use a soft, dry cloth.
- Avoid harsh chemicals, abrasive cleaners, or excessive moisture.
6.2 Battery Care
- Avoid fully discharging the battery frequently.
- Store the device in a cool, dry place when not in use for extended periods.
- Use only the official Microsoft power supply or certified compatible chargers.
6.3 Software Updates
Regularly check for and install Windows updates to ensure your device has the latest security patches, features, and performance improvements. Go to Start > Settings > Windows Update.
7. Troubleshooting
7.1 Device Not Turning On
- Ensure the device is charged. Connect the power supply and wait a few minutes before attempting to power on.
- Perform a force restart: Press and hold the Power button for 15-20 seconds, then release and press it again briefly to turn on.
7.2 Screen Issues (No Display, Flickering)
- Restart the device.
- Ensure display drivers are up to date via Windows Update.
- If connected to an external display, try disconnecting it.
7.3 Wi-Fi or Bluetooth Connectivity Problems
- Check if Wi-Fi or Bluetooth is enabled in Quick Settings or Windows Settings.
- Restart your Surface Pro 10 and your router/modem.
- Forget the network/device and try reconnecting.
- Update network drivers via Windows Update.
7.4 Performance Issues (Slowdowns, Freezes)
- Close unnecessary applications running in the background.
- Check for and install all available Windows updates.
- Run a disk cleanup and optimize drives.
- Ensure sufficient free storage space.
8. Specifications
The following table outlines the key technical specifications for the Microsoft Surface Pro 10 (Intel Core Ultra 5, 16GB RAM, 256GB SSD) model:
| Feature | Specification |
|---|---|
| Model Name | Surface Pro 10 (ZEA-00001) |
| Standing Screen Display Size | 13 inches |
| Screen Resolution | 2880 x 1920 pixels |
| Max Screen Resolution | 2880x1920 |
| Processor | 1.4 GHz Intel Core Ultra 5 |
| Hard Drive | 256 GB SSD |
| RAM Memory Installed Size | 16 GB DDR5 RAM |
| Operating System | Windows 11 Pro |
| Chipset Brand | Intel |
| Graphics Card Description | Integrated |
| Wireless Type | 802.11ax |
| Color | Platinum |
| Product Dimensions | 11.3 x 8.2 x 0.4 inches |
| Batteries | 1 Lithium Ion battery (included) |
9. Warranty and Support
Your Microsoft Surface Pro 10 comes with a limited hardware warranty. For detailed warranty information, please refer to the documentation included with your device or visit the official Microsoft Support website. For technical assistance, troubleshooting guides, and driver downloads, please visit support.microsoft.com/surface.


