
1. Introduction
This manual provides essential instructions for the installation, operation, and maintenance of your Nilight Front Winch Bumper (Model Che-19). This full-width front bumper is designed for 2016, 2017, and 2018 Chevy Silverado 1500 pickup trucks, featuring a built-in winch plate, D-ring shackles, and integrated LED lighting. Please read this manual thoroughly before beginning installation or use to ensure proper function and safety.
2. Safety Information
Always prioritize safety during installation and operation. Failure to follow these guidelines may result in injury or damage to the product or vehicle.
- Wear appropriate personal protective equipment (PPE), including safety glasses and gloves.
- Ensure the vehicle is securely supported on a level surface using jack stands before working underneath.
- Disconnect the vehicle's battery before performing any electrical work.
- Do not modify the bumper or its components. Unauthorized modifications can compromise structural integrity and void the warranty.
- If you are unsure about any step of the installation process, seek professional assistance.
- Keep all fasteners tightened to the specified torque values. Regularly check for loose hardware.
3. Setup & Installation
This section outlines the components included and general installation guidance. A detailed DIY Installation Manual is provided with your product for specific step-by-step instructions.
3.1. What's Included
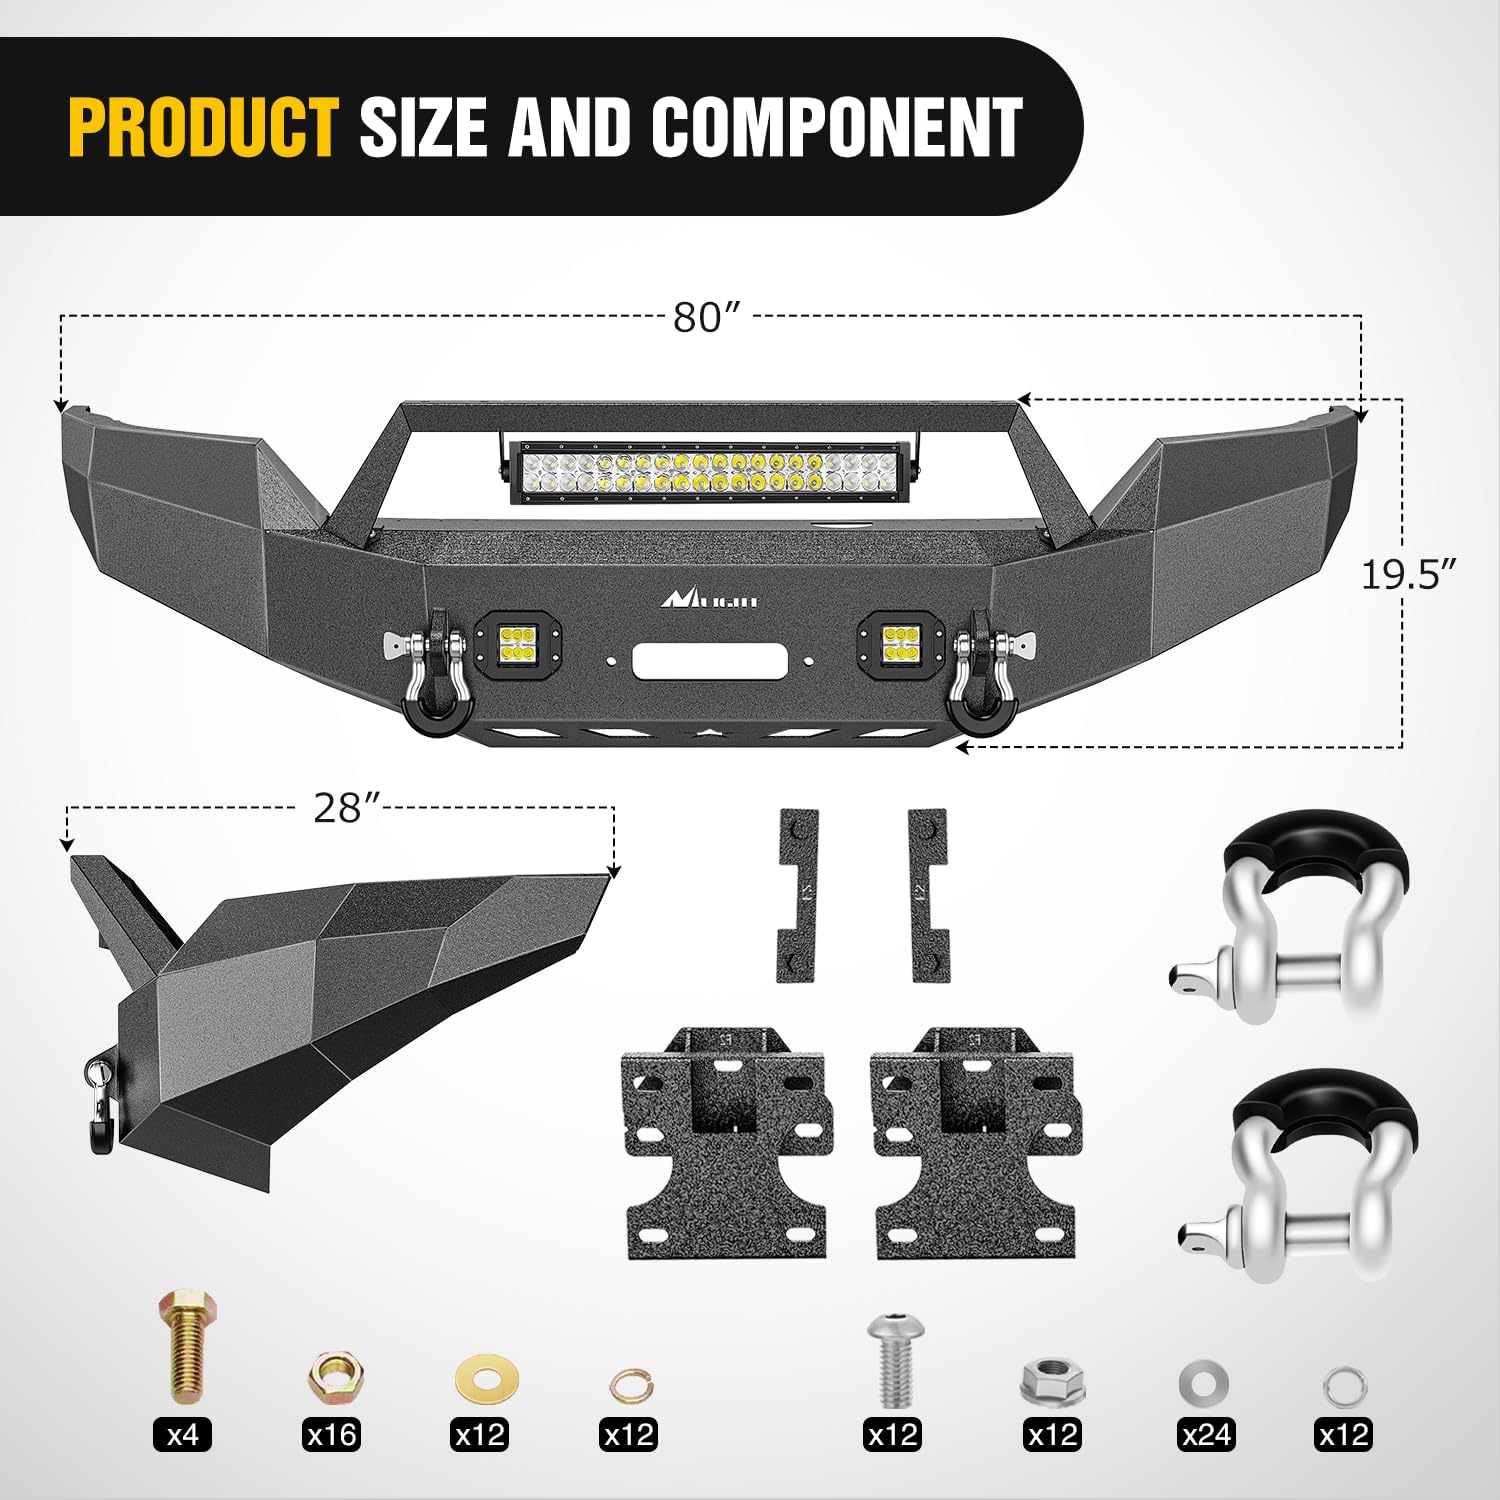
Verify that all components listed below are present and undamaged before beginning installation.
- 1 × Front Bumper
- 2 × 18W LED Lights
- 1 × 120W Light Bar
- 2 Pcs 4.75-ton D-ring isolators
- 1 Set of Screws and mounting hardware
- 1 × DIY Installation Manual (paper copy)
3.2. Compatibility
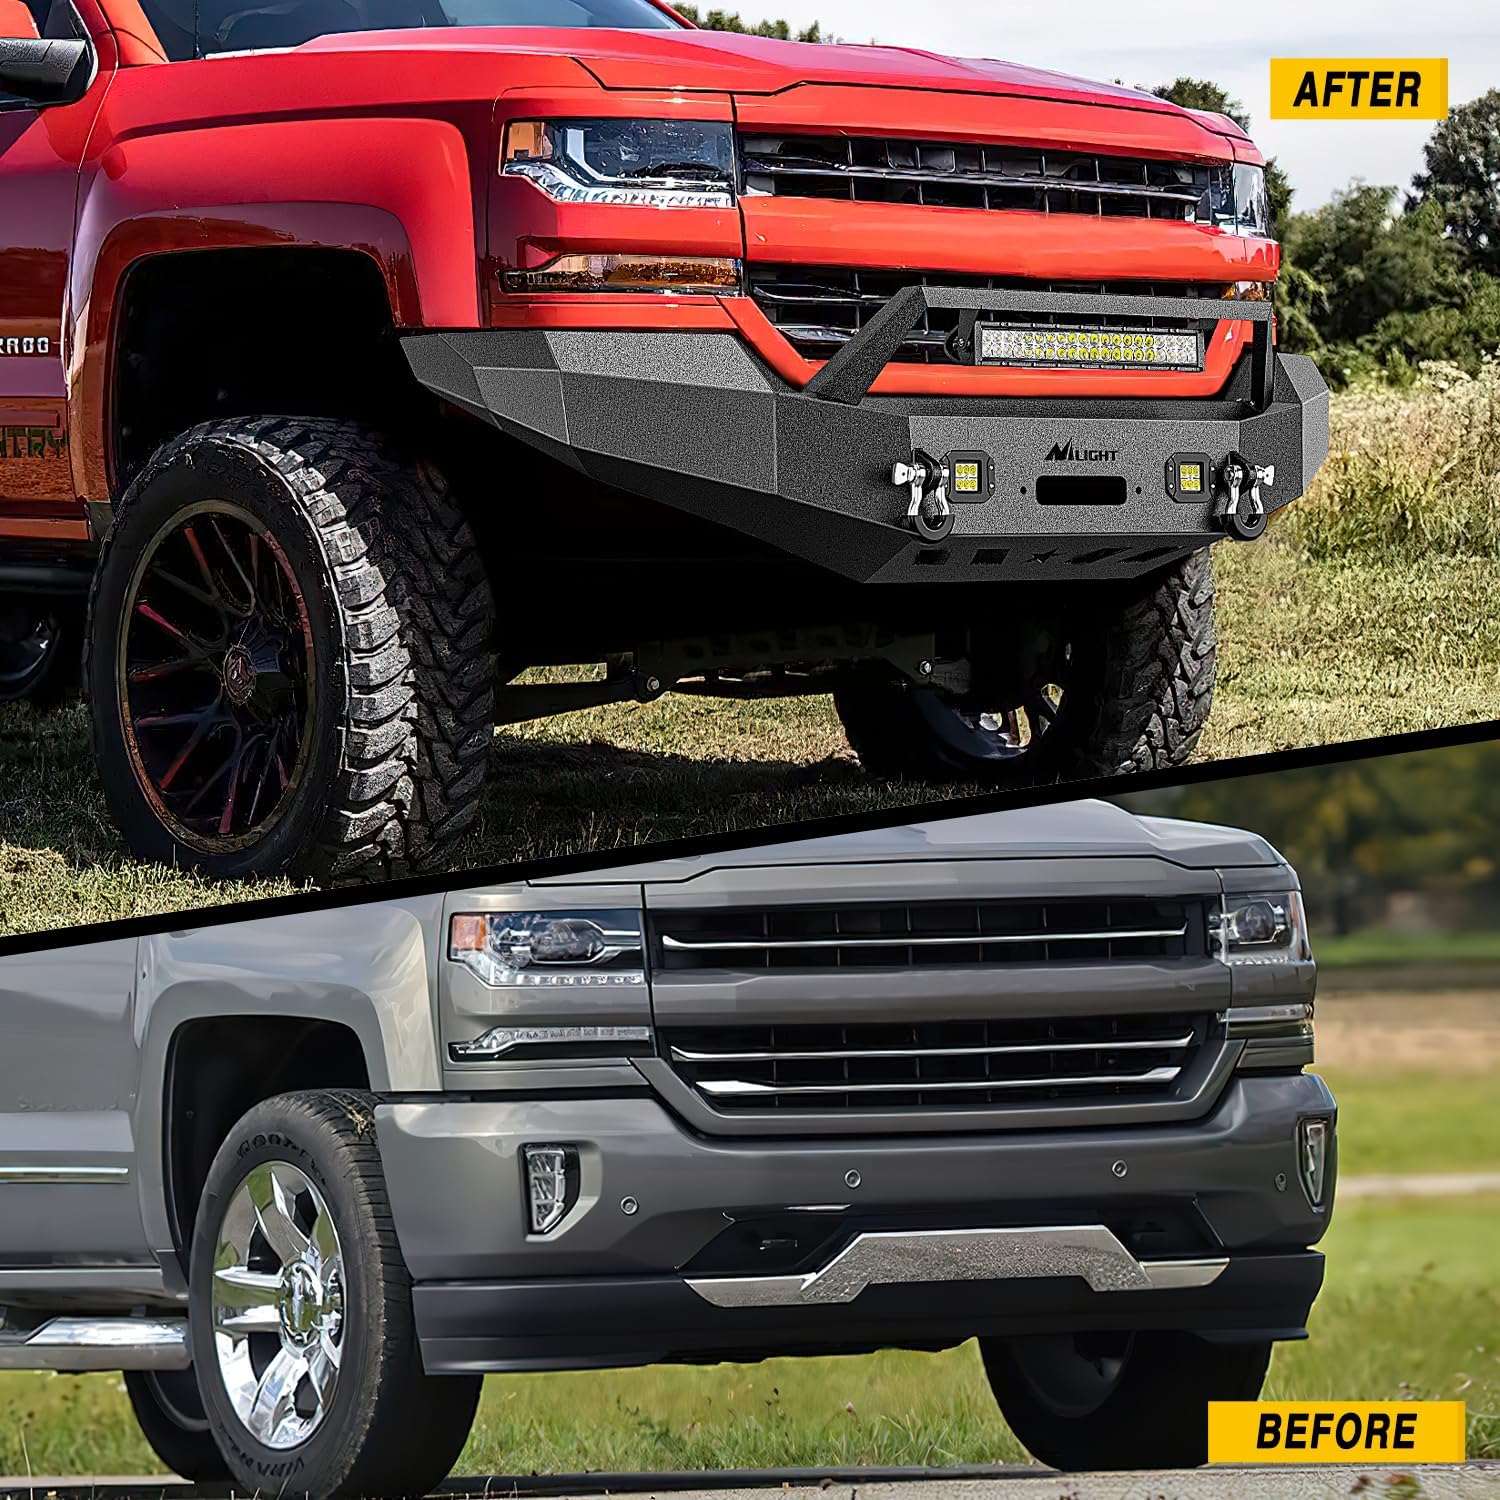
This bumper is specifically designed for a perfect fit on 2016, 2017, and 2018 Chevy Silverado 1500 Pickup Trucks. It features a 3-piece design with high-accuracy laser measuring and cutting to ensure direct bolt-on installation to factory holes, requiring no additional drilling or cutting.
3.3. Installation Overview
Refer to the included DIY Installation Manual for detailed, step-by-step instructions. The general process involves:
- Removing the factory front bumper.
- Assembling the new Nilight bumper components.
- Mounting the bumper to the vehicle's frame using the provided hardware.
- Wiring the integrated LED light bar and pod lights.
- Attaching the D-ring shackles.

Video 1: Installation overview for the Nilight Front Bumper on a 2016-2018 Chevy Silverado 1500. This video demonstrates key steps and features of the bumper installation.
4. Operating Features
The Nilight Front Winch Bumper enhances your vehicle's utility and appearance with several integrated features.
4.1. Winch Plate
The bumper includes a built-in winch plate capable of supporting a 12,000 lbs winch. This provides a secure mounting point for recovery operations. Ensure your winch is properly installed and rated for the intended load.
4.2. Integrated LED Lighting
The bumper comes equipped with a 120W LED light bar and two 18W Spot Cube LED Work Light Pods. These lights are designed to provide enhanced illumination for night-time driving and off-road adventures. Connect them to your vehicle's electrical system according to the wiring instructions in the DIY Installation Manual.

4.3. D-Ring Shackles
Two 4.75-ton D-ring isolators are included. These D-rings provide secure attachment points for recovery straps and other off-road accessories. Always ensure D-rings are properly secured before use.
5. Maintenance
Regular maintenance will ensure the longevity and performance of your Nilight Front Winch Bumper.
- Cleaning: Wash the bumper regularly with mild soap and water to remove dirt, salt, and other debris. Avoid abrasive cleaners or harsh chemicals that could damage the finish.
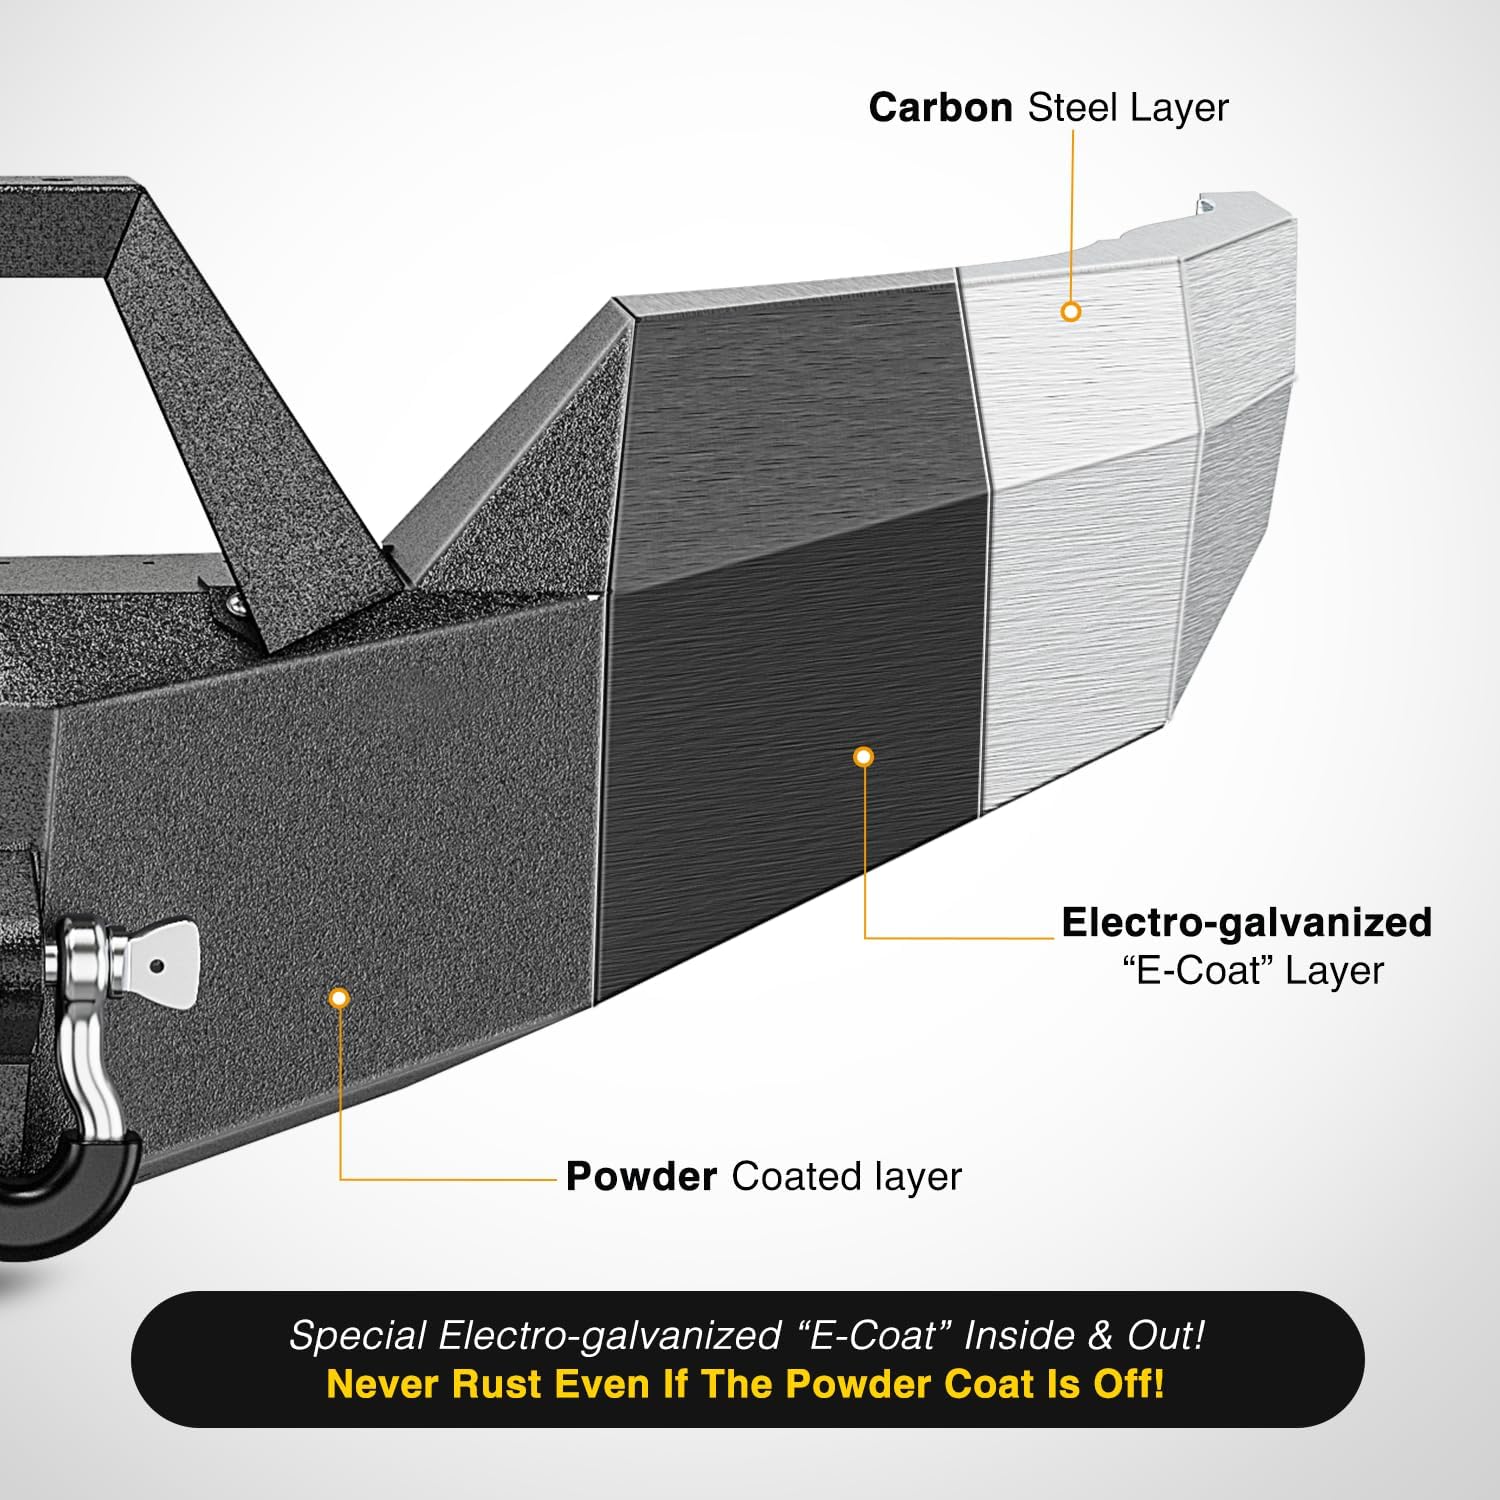
- Corrosion Protection: The bumper features a two-stage textured black powder coating finish over electro-galvanized and carbon steel layers for enhanced rust prevention. Despite this, inspect the bumper periodically for any signs of chipping or damage to the coating, especially after off-road use. Touch up any damaged areas promptly to prevent rust.
- Fastener Inspection: Periodically check all mounting bolts and hardware for tightness. Vibrations from driving can cause fasteners to loosen over time.
- Light Inspection: Ensure LED lights are clean and free from obstructions. Check wiring connections for corrosion or damage.
6. Troubleshooting
This section addresses common issues you might encounter.
| Problem | Possible Cause | Solution |
|---|---|---|
| LED Lights not working | Loose wiring connection, blown fuse, faulty switch, damaged light. | Check all electrical connections. Inspect vehicle's fuse box for blown fuses. Test the switch. If lights are still not working, contact customer support. |
| Bumper appears loose or rattles | Loose mounting hardware. | Inspect and re-tighten all mounting bolts and nuts to factory specifications. |
| Difficulty aligning mounting holes during installation | Minor manufacturing tolerances, vehicle frame variations. | Ensure the bumper is properly supported and aligned. Slight manipulation or "persuasion" may be required. Do not force components if significant misalignment occurs; re-check the installation manual. |
| Rust spots appearing on bumper | Damage to the powder coating, prolonged exposure to harsh elements without cleaning. | Clean the affected area thoroughly. Apply rust-inhibiting primer and touch-up paint to prevent further corrosion. Regular cleaning and inspection are recommended. |
7. Specifications
| Feature | Detail |
|---|---|
| Brand | Nilight |
| Model Number | Che-19 |
| Auto Part Position | Front |
| Material | Heavy-duty 5/32" steel sheet and 2"X0.120" steel tubing (Alloy Steel) |
| Exterior Finish | Two-stage textured black powder coating |
| Item Weight | 79 pounds |
| Product Dimensions (D x W x H) | 38"D x 8"W x 18"H |
| Vehicle Service Type Compatibility | 2016, 2017, 2018 Chevy Silverado 1500 |
| Winch Plate Capacity | Up to 12,000 lbs |
| Included Lights | 1 × 120W LED Light Bar, 2 × 18W Spot Cube LED Work Light Pods |
| D-Ring Shackles | 2 Pcs 4.75-ton D-ring isolators included |
| UPC | 840323918763 |
8. Warranty & Support
8.1. Manufacturer Warranty
This Nilight Front Winch Bumper comes with a 2-Year Warranty. Please retain your proof of purchase for warranty claims. The warranty covers defects in materials and workmanship under normal use. It does not cover damage resulting from improper installation, accidents, modifications, or misuse.
8.2. Customer Support
For any questions, concerns, or assistance with your Nilight product, please contact Nilight Customer Support. Refer to the contact information provided in your product packaging or visit the official Nilight website for support options.


