1. Introduction
This manual provides comprehensive instructions for the installation, operation, and maintenance of your DieseRC Smart WiFi 2-Channel Relay Module with Bluetooth Transmitter. This device allows for remote control of various electrical appliances via Wi-Fi, Bluetooth, and voice commands through compatible smart home systems.

Image 1.1: The DieseRC Smart WiFi 2-Channel Relay Module and its accompanying Bluetooth remote control.
2. Product Overview
The DieseRC Smart WiFi Relay Module is designed for versatile control of electrical devices. It features two independent relays, Wi-Fi connectivity for app control, Bluetooth for remote control, and compatibility with voice assistants.
2.1 Key Features
- Wireless Connectivity: Supports 2.4 GHz Wi-Fi for remote control via the eWelink app.
- Bluetooth Control: Includes a Bluetooth transmitter for local remote operation.
- Voice Control: Compatible with Amazon Alexa and Google Home for hands-free operation.
- Dual Relays: Two independent 10A relays with Normally Open (NO), Common (COM), and Normally Closed (NC) terminals.
- Flexible Power Input: Operates on DC 5V or DC 7V-48V.
- Compact Design: Dimensions of 60x32x17 mm (2.4x1.3x0.7 inches) for easy integration.
- Multiple Operating Modes: Configurable as toggle mode or inching mode.
2.2 Component Identification

Image 2.1: Detailed view of the relay module showing terminals and indicators.
- NO (Normally Open) Pin: Contact is open when the relay is de-energized.
- COM (Common) Pin: Common terminal for the relay contact.
- NC (Normally Closed) Pin: Contact is closed when the relay is de-energized.
- Relay Indicator Light: Illuminates when the corresponding relay is active.
- Open the key / Pairing button: Used for pairing with the eWelink app and Bluetooth remote.
- WiFi Network Indicator Light: Shows the status of the Wi-Fi connection.
- Input USB 5V/0.5A: Micro USB port for 5V DC power input.
- +V / -V Terminals: Screw terminals for DC 7V-48V power input.
3. Specifications
| Feature | Specification |
|---|---|
| Model Number | EW748 |
| Brand | DieseRC |
| Dimensions (L x W x H) | 60 x 32 x 17 mm (2.4 x 1.3 x 0.7 inches) |
| Weight | 118 grams (approx.) |
| Input Voltage | DC 5V (via USB) or DC 7V-48V (via screw terminals) |
| Current Rating | 10A per relay |
| Contact Type | Normally Open (NO), Common (COM), Normally Closed (NC) |
| Wireless Connectivity | Wi-Fi 2.4GHz, Bluetooth |
| App Compatibility | eWelink (Android & iOS) |
| Voice Assistant Compatibility | Amazon Alexa, Google Home |
| Operating Modes | Toggle Mode, Inching Mode |
| Certification | CE |
4. Setup
4.1 Powering the Module
The module can be powered in two ways:
- USB 5V: Connect a standard Micro USB cable to the USB port on the module and a 5V/0.5A power adapter.
- DC 7V-48V: Connect the positive (+) and negative (-) wires of your DC power supply to the corresponding +V and -V screw terminals on the module. Ensure correct polarity.

Image 4.1: Powering the module via USB 5V or DC 7V-48V terminals.
4.2 eWelink App Installation and Pairing
- Download the eWelink App: Scan the QR code below or visit http://app.coolkit.cc/dl.html to download the eWelink app for your Android or iOS device.
- Register/Log In: Open the eWelink app and create an account or log in if you already have one.
- Enter Pairing Mode: Power on the DieseRC module. Press and hold the "Open the key / Pairing button" on the module for approximately 5-7 seconds until the Wi-Fi indicator light blinks rapidly.
- Add Device in App: In the eWelink app, tap the "+" icon to add a new device. Follow the on-screen instructions to select "Quick Pairing Mode" or "Compatible Pairing Mode" as needed.
- Connect to Wi-Fi: Enter your 2.4GHz Wi-Fi network name (SSID) and password when prompted. The module does not support 5GHz Wi-Fi.
- Complete Pairing: Once connected, the Wi-Fi indicator light on the module will stop blinking and remain solid. The device will appear in your eWelink app.

Image 4.2: QR code for eWelink app download.
4.3 Bluetooth Remote Pairing
The included Bluetooth remote control (RM2.4G) is pre-paired with the module. If re-pairing is necessary:
- Ensure the module is powered on.
- Press and hold the pairing button on the module until the Wi-Fi indicator light blinks.
- Press any button on the Bluetooth remote. The module's indicator light should confirm successful pairing.
5. Operating Instructions
5.1 eWelink App Control
Once paired, you can control the module from anywhere using the eWelink app:
- Open the eWelink app and select your device.
- You will see virtual buttons for each relay (e.g., Channel 1, Channel 2). Tap to toggle the relay on/off.
- The app allows for scheduling, timers, and sharing control with family members.

Image 5.1: Remote control of devices via the eWelink app.
5.2 Voice Control (Alexa/Google Home)
To enable voice control, link your eWelink account with Amazon Alexa or Google Home:
- Open the Alexa or Google Home app.
- Navigate to "Skills & Games" (Alexa) or "Works with Google" (Google Home).
- Search for "eWelink" and enable the skill/service.
- Link your eWelink account using your credentials.
- Discover devices. Your DieseRC module will appear.
- You can now use voice commands such as:
- "Alexa, turn on Channel 1."
- "Hey Google, turn off Channel 2."

Image 5.2: Voice control integration with smart home assistants.
5.3 Bluetooth Remote Control
Use the included Bluetooth remote for local control:
- Press buttons 1 or 2 to control the respective relays.
- "ALL ON" and "ALL OFF" buttons control both relays simultaneously.
6. Modes of Operation
The module supports two main operating modes, configurable via the eWelink app:
- Toggle Mode: Each press of the button (app, voice, or remote) will switch the relay state (ON to OFF, or OFF to ON). This is suitable for lights or devices that need to stay on until manually turned off.
- Inching Mode (Momentary): The relay will turn ON for a set duration (e.g., 0.5 seconds) after a button press, then automatically turn OFF. This is ideal for momentary actions like garage door openers or electric locks. The duration can be configured in the eWelink app.

Image 6.1: The module can be configured to act as a momentary switch (push button) or a toggle switch (rocker switch).
7. Wiring Diagrams
Important: Ensure power is disconnected before performing any wiring. If you are unsure about electrical wiring, consult a qualified electrician.
7.1 Relay Contact Configuration

Image 7.1: Illustration of NO, COM, and NC terminals for each relay.
- NO (Normally Open) to COM: The circuit is open when the relay is off and closes when the relay is on.
- NC (Normally Closed) to COM: The circuit is closed when the relay is off and opens when the relay is on.
7.2 Example Wiring Scenarios
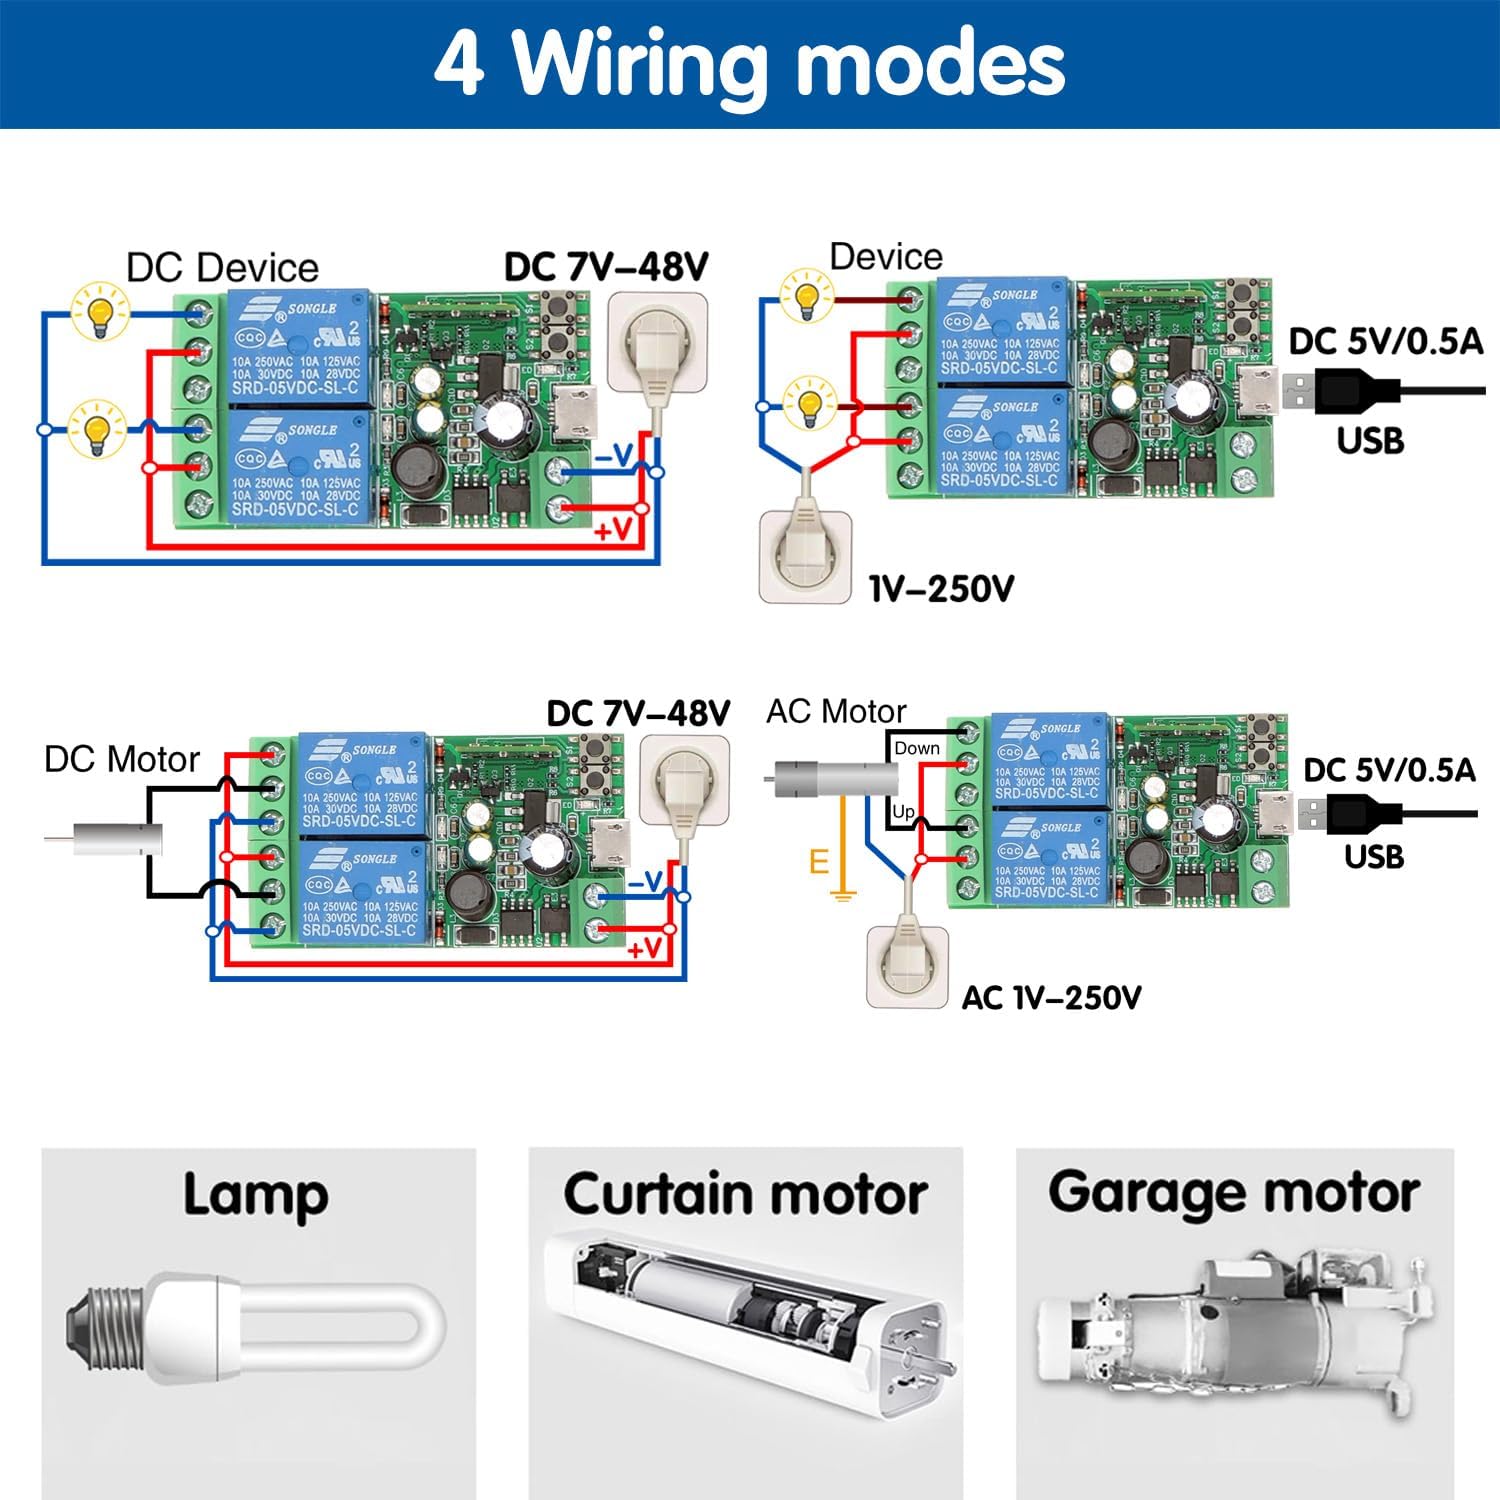
Image 7.2: Various wiring configurations for different applications.
- DC Device (DC 7V-48V): Connect the DC power supply to the module's +V and -V terminals. Connect the device's power input to the relay's COM and NO terminals.
- AC Device (1V-250V): Power the module via USB 5V. Connect the AC power source to the device and route one of the AC lines through the relay's COM and NO terminals.
- DC Motor (DC 7V-48V): For controlling a DC motor, two relays can be used for forward/reverse or on/off control, depending on the motor type and desired functionality.
- Garage Door/Curtain Motor: The module can be integrated into existing control circuits for garage doors or curtain motors, typically using the inching mode to simulate a momentary button press.
For specific applications, refer to the device's wiring requirements and ensure compatibility with the relay's specifications (10A, 250VAC/30VDC).
8. Maintenance
- Keep the module in a dry environment, away from moisture and extreme temperatures.
- Do not expose the module to direct sunlight or corrosive substances.
- Regularly check wiring connections for security.
- Ensure the power supply matches the module's specifications.
- Periodically check for eWelink app updates to ensure optimal performance and security.
9. Troubleshooting
- Module not powering on:
- Check power connections (USB 5V or DC 7V-48V).
- Ensure the power adapter provides sufficient voltage and current (at least 0.5A).
- Cannot connect to Wi-Fi:
- Ensure your Wi-Fi network is 2.4GHz. The module does not support 5GHz.
- Verify your Wi-Fi password is correct.
- Place the module closer to your Wi-Fi router during pairing.
- Reset the module by holding the pairing button until the Wi-Fi indicator blinks rapidly, then try pairing again.
- App control not working:
- Check your internet connection.
- Ensure the module's Wi-Fi indicator is solid, indicating a stable connection.
- Restart the eWelink app.
- Voice control not responding:
- Verify that your eWelink account is correctly linked to Alexa/Google Home.
- Ensure the device is discovered in your Alexa/Google Home app.
- Check your voice commands for accuracy.
- Bluetooth remote not working:
- Ensure the remote has working batteries.
- Re-pair the remote with the module as described in Section 4.3.
10. Warranty and Support
For warranty information and technical support, please refer to the product packaging or contact DieseRC customer service through the retailer where the product was purchased. You can also visit the official DieseRC website for further assistance.


