Introduction
Thank you for choosing the RAINPOINT 2-Outlet Irrigation Computer. This device is designed to automate your garden watering, providing flexibility and efficiency. With its dual outlets, programmable settings, and durable brass connections, it ensures reliable performance and water conservation. Please read this manual carefully before installation and operation to ensure proper use and longevity of your device.
Product Features
- Premium Brass Inlet and Outlet: Constructed with high-quality brass for excellent corrosion resistance, abrasion resistance, and superior waterproof/anti-leak performance, ensuring long-term stable operation.
- Two Separately Programmable Zones: Features two large outlets (flow rate 5-35 L/min) allowing independent watering schedules (start time, frequency, duration) for different garden areas.
- Three Manual Watering Modes: Easily switch between ZONE1, ZONE2, or both zones for flexible manual watering durations (1 to 59 minutes) as needed.
- Extensive Automatic Watering Modes: Offers 38 automatic watering modes with durations from 1 minute to 3 hours 59 minutes and frequencies from 1 hour to 7 days, supporting cyclic and fixed-time watering plans.
- Low Battery Warning: A 2.5-inch LED screen displays watering times, upcoming plans, and battery status. The valve automatically closes when the battery is critically low to prevent water waste.
- Rain Delay Function: Suspend watering for 24, 48, or 72 hours without disrupting your programmed schedule, preventing overwatering and conserving water during rainy periods.

Image: Comparison of the RAINPOINT irrigation computer's advanced valve design (left) with a standard valve (right), illustrating reduced pressure loss and stronger flow in the RAINPOINT model.
Setup
1. Battery Installation
The irrigation computer requires batteries for operation. Locate the battery compartment on the device, typically on the back or side. Insert the recommended battery type (usually AA or AAA, check device for specifics) ensuring correct polarity. Close the compartment securely to maintain water resistance.
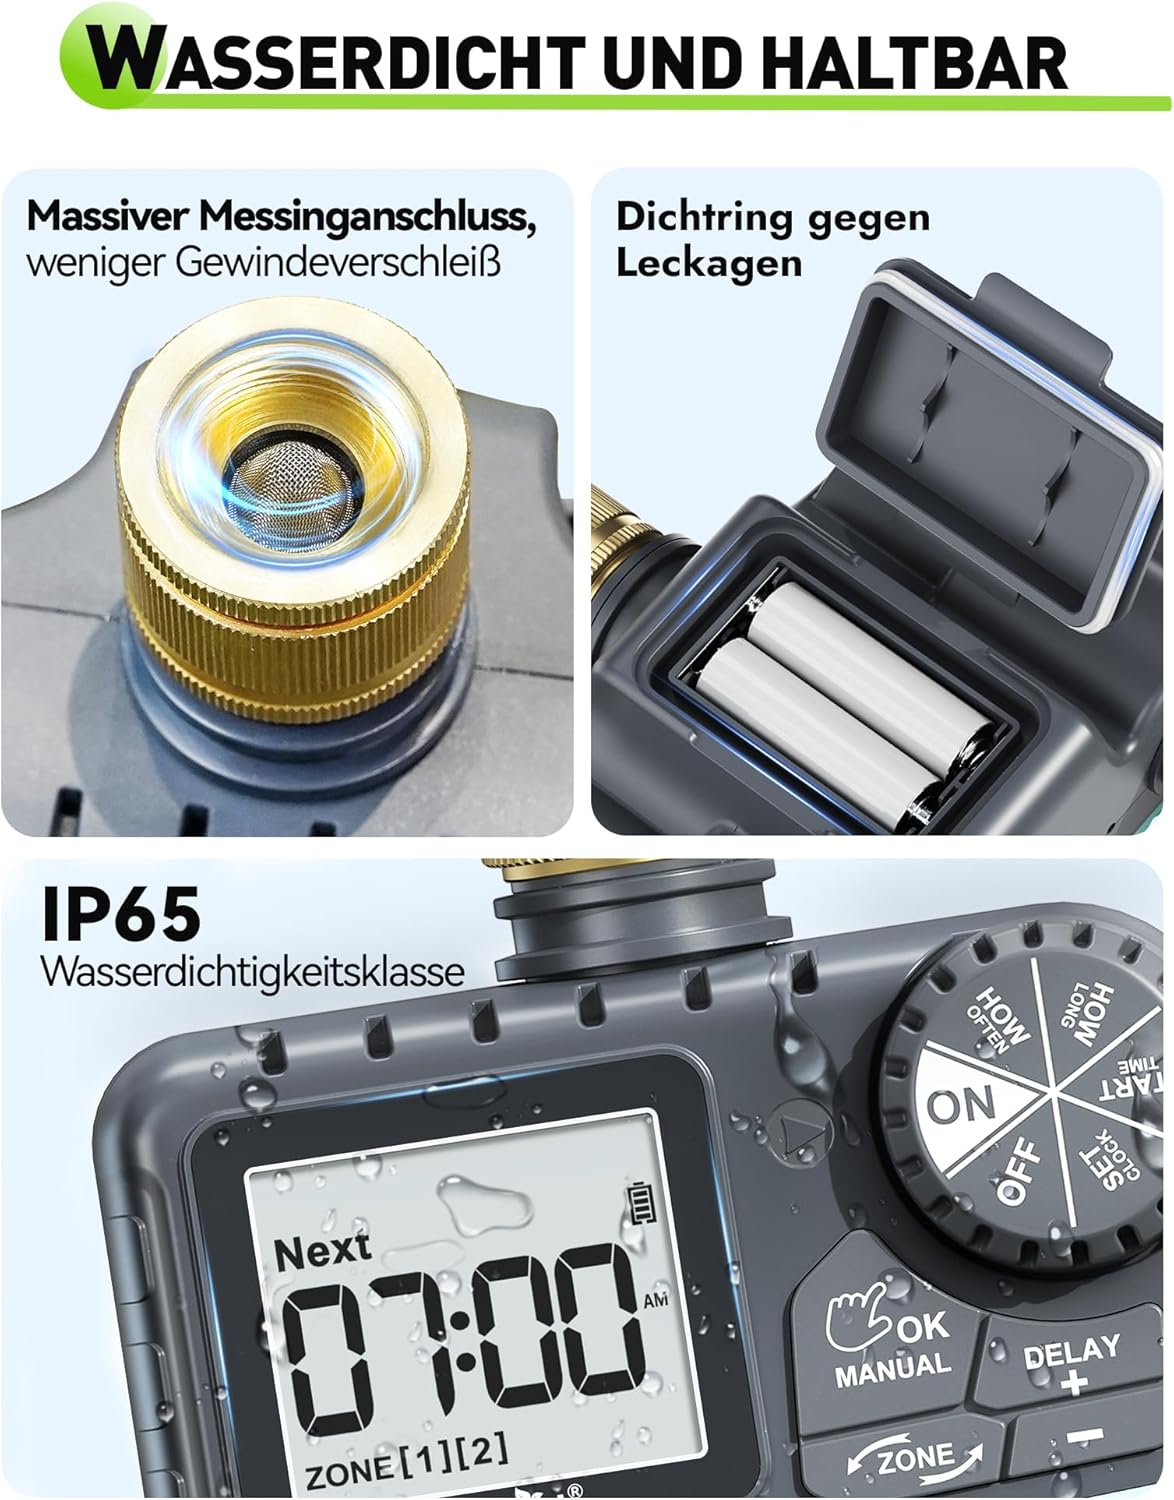
Image: A detailed view of the RAINPOINT irrigation computer, highlighting the secure battery compartment and the robust brass inlet connection, emphasizing its waterproof design.
2. Connecting to Faucet
Screw the brass inlet of the irrigation computer onto your outdoor faucet. Ensure a tight fit to prevent leaks. Hand-tighten only; do not overtighten with tools. The device is designed for tool-free installation.
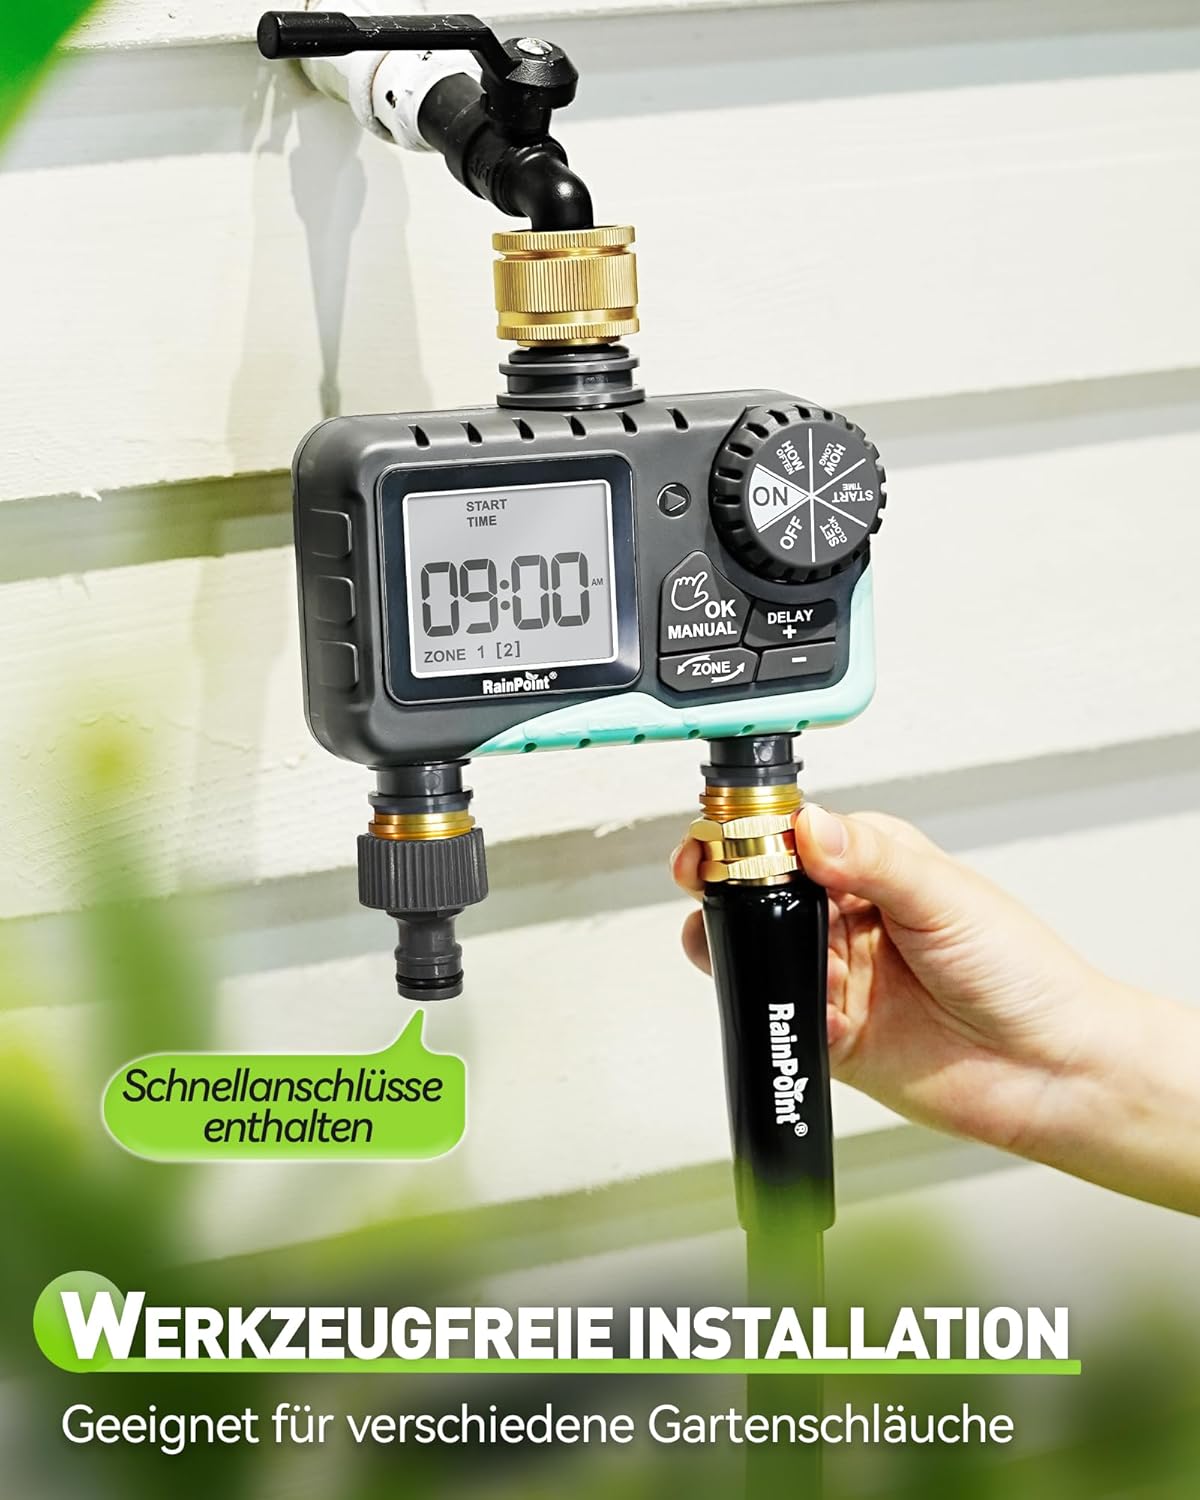
Image: The RAINPOINT irrigation computer installed on an outdoor faucet, demonstrating the tool-free installation process and the attachment of quick connectors to its dual outlets.
3. Connecting Hoses
Attach your garden hoses to the two brass outlets at the bottom of the irrigation computer. If using quick connectors, ensure they are securely fastened. Each outlet can be connected to a separate watering system (e.g., sprinklers, drip irrigation).

Image: The RAINPOINT irrigation computer mounted on a wall, illustrating its versatility with connections to different garden watering systems such as sprinklers, soaker hoses, hose distributors, and drip irrigation.
Operating Instructions
1. Setting the Clock
Turn the dial to the "SET CLOCK" position. Use the "+" and "-" buttons to adjust the current time. Press "OK" to confirm each setting (hour, minute). Ensure the clock is set accurately for precise watering schedules.
2. Programming Automatic Watering
The device allows for two independent watering zones. Follow these steps for each zone:
- Set Start Time: Turn the dial to "START TIME". Use "+" and "-" to set the desired start time for watering. Press "OK".
- Set How Long (Duration): Turn the dial to "HOW LONG". Use "+" and "-" to set the watering duration (1 minute to 3 hours 59 minutes). Press "OK".
- Set How Often (Frequency): Turn the dial to "HOW OFTEN". Use "+" and "-" to set the watering frequency (e.g., every 1-12 hours, or every 1-7 days). Press "OK".
Repeat these steps for ZONE 2 by pressing the "ZONE" button to switch between zones during programming.

Image: The RAINPOINT irrigation computer's display, illustrating the settings for automatic watering, including frequency options (every 1-12 hours or every 1-7 days) and duration (1 minute to 4 hours).
3. Manual Watering
To initiate manual watering:
- Press the "MANUAL" button.
- Use the "ZONE" button to select ZONE1, ZONE2, or both.
- Use "+" and "-" to set the desired manual watering duration (1 to 59 minutes).
- Press "OK" to start manual watering. The watering will stop automatically after the set duration.

Image: The RAINPOINT irrigation computer displaying the rain delay function (top) with options for 24, 48, or 72 hours, and a user manually watering plants (bottom), demonstrating flexible water management.
4. Rain Delay Function
To activate the rain delay:
- Press the "DELAY" button.
- Use "+" and "-" to select the delay duration: 24 hours, 48 hours, or 72 hours.
- Press "OK" to confirm. The programmed schedule will resume automatically after the delay period.
5. Low Battery Warning
The device features a low battery indicator on the LED screen. When the battery level is critically low, the valve will automatically close to prevent continuous water flow and waste. Replace batteries promptly when the low battery warning appears.

Image: The RAINPOINT irrigation computer displaying a low battery icon, indicating that the valve will automatically close to prevent water wastage when battery power is insufficient.
Maintenance
- Cleaning: Periodically clean the exterior of the device with a soft, damp cloth. Do not use abrasive cleaners or solvents.
- Battery Replacement: Replace batteries when the low battery indicator appears. Always use fresh batteries of the specified type.
- Winterization: Before the first frost, disconnect the irrigation computer from the faucet and hoses. Drain any remaining water from the device and store it indoors in a dry, frost-free location. Remove batteries if storing for extended periods.
- Check for Leaks: Regularly inspect connections for any signs of leakage. Ensure all connections are hand-tightened.
Troubleshooting
| Problem | Possible Cause | Solution |
|---|---|---|
| No water flow |
|
|
| Watering at wrong times |
|
|
| Leaks from connections |
|
|
Specifications
- Brand: RAINPOINT
- Model: B0D1QTGYB2
- Color: Black and Turquoise
- Product Dimensions (L x W x H): 13.6 x 7.4 x 14.1 cm
- Item Weight: 670 grams
- Screen Size: 2.5 Inches
- Flow Rate: 5-35 L/min (per outlet)
- Watering Duration: 1 minute - 3 hours 59 minutes
- Watering Frequency: Every 1-12 hours or Every 1-7 days
- Rain Delay Options: 24h, 48h, 72h
Warranty and Support
RAINPOINT products are manufactured to high-quality standards. For warranty information, technical support, or any questions regarding your irrigation computer, please refer to the contact information provided with your purchase or visit the official RAINPOINT website. Please retain your proof of purchase for warranty claims.


