Introduction
The ANVIZ CX3 Time Clock is a biometric attendance system designed for efficient employee time tracking. This device supports fingerprint, RFID card, and PIN punching methods, offering a versatile solution for recording employee check-ins and check-outs. It operates without requiring monthly fees or external software installation, simplifying payroll data management through USB export.

Image: Front view of the ANVIZ CX3 Time Clock, displaying the digital screen with current time and status, along with the fingerprint scanner and keypad.
Setup Instructions
The ANVIZ CX3 Time Clock is designed for straightforward setup without complex network configurations or software installation.
1. Initial Device Configuration
- Power On: Connect the device to a power source. The system will initiate automatically.
- Basic Settings: Follow the on-screen prompts to configure initial settings such as date, time, and language. The device supports English, Spanish, French, and Portuguese.
- Work Schedule and Pay Period: Define your business's work schedule and payroll cycles (weekly, bi-weekly, semi-monthly, or monthly) directly on the device.
2. Employee Enrollment
Employees can be registered using fingerprints, PINs, or RFID proximity badges.
- Access Enrollment Menu: Navigate to the enrollment section through the device's menu.
- Register Employee Data: For each employee, register their unique work code, a PIN, and/or their fingerprint. If using fingerprints, ensure clear scans are captured for reliable recognition. The device may require multiple scans for a single finger to ensure accuracy.
- RFID Card/Fob Assignment: If using RFID, assign a proximity card or fob to each employee. The package includes 2 backup RFID cards.
3. Physical Installation
The time clock can be mounted in a suitable indoor location.
- Select Location: Choose a stable, accessible indoor location for the time clock.
- Install Mounting Bracket: Secure the provided mounting bracket to the wall using appropriate fasteners.
- Mount Device: Hang the time clock onto the installed bracket.
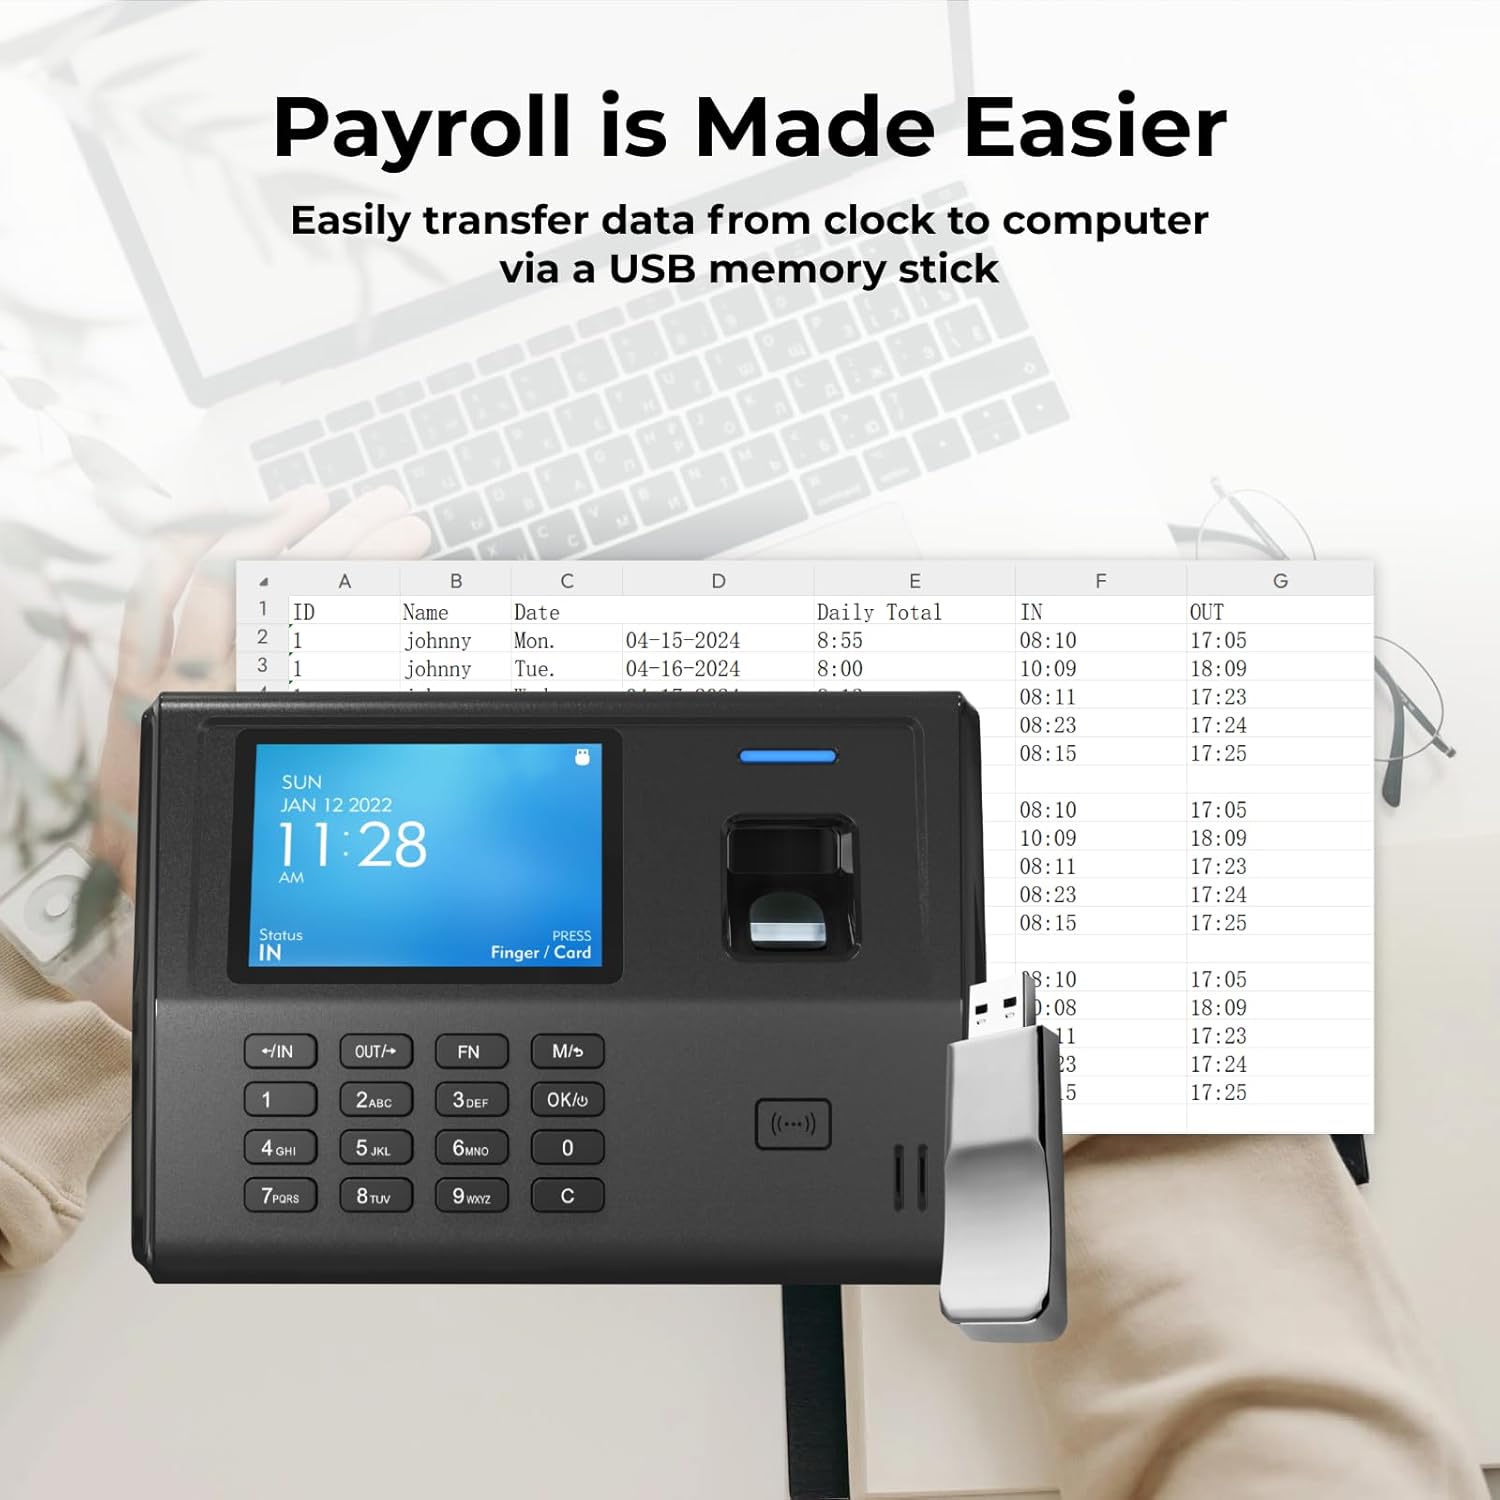
Image: The ANVIZ CX3 Time Clock being attached to its wall-mounted bracket, illustrating the quick setup and installation process.

Image: A visual representation of the four key setup steps: powering on and configuring, registering employees, mounting the device, and exporting timesheets.
Operating Instructions
The CX3 time clock automates employee attendance tracking by recognizing check-ins and check-outs in the order they occur, automatically calculating work hours.
1. Employee Punching Methods
Employees can log their attendance using one of the following methods:
- Fingerprint: Place a registered finger on the biometric scanner.
- PIN: Enter the assigned PIN using the keypad.
- RFID Card/Fob: Present the assigned RFID card or fob to the device's reader.

Image: The ANVIZ CX3 Time Clock with its display showing the current time and status, accompanied by two ANVIZ RFID user cards, demonstrating the card-based punching option.
2. Data Export and Payroll Processing
Time logs can be transferred directly via a USB drive for payroll processing.
- Insert USB Drive: Insert a USB flash drive into the designated port on the time clock.
- Export Data: Navigate to the data export menu on the device and select the desired pay period for export.
- Transfer to Computer: Remove the USB drive and insert it into a computer.
- View with Microsoft Excel: The exported files can be viewed and managed using Microsoft Excel or similar spreadsheet software. This allows for verification and processing of payroll data.

Image: The ANVIZ CX3 Time Clock with a USB drive inserted, positioned next to a laptop displaying an Excel spreadsheet with employee time records, illustrating the ease of data transfer for payroll.

Image: The ANVIZ CX3 Time Clock shown with an Excel spreadsheet, highlighting its compatibility with weekly, bi-weekly, semi-monthly, or monthly pay periods for payroll management.
3. Shift Management
The device supports displaying up to three shifts, including overnight shifts.

Image: A close-up of the ANVIZ CX3 Time Clock's digital display, showing the schedule menu with options like 'Split Timesheets' and 'Auto Punch Status', indicating its capability to manage multiple shifts.
Maintenance
To ensure optimal performance and longevity of your ANVIZ CX3 Time Clock, follow these maintenance guidelines:
- Cleaning: Regularly wipe the device's screen and fingerprint scanner with a soft, dry, lint-free cloth. Avoid using abrasive cleaners or solvents.
- Environment: Operate the device in a clean, dry indoor environment. Avoid exposure to direct sunlight, extreme temperatures, or high humidity.
- Firmware Updates: Check the official ANVIZ website periodically for any available firmware updates. Follow instructions carefully for any update procedures.
- Data Backup: Regularly export attendance data to a USB drive to maintain backups of important records.
Troubleshooting
This section addresses common issues and limitations of the ANVIZ CX3 Time Clock.
- Records Cannot Be Modified: Please note that attendance records cannot be modified directly on the device. All data adjustments must be made after exporting to a computer spreadsheet.
- No Internet Connection: The device does not connect to the internet. All data transfer is performed via USB drive.
- Flexible Schedule Not Supported: The CX3 operates based on predefined work schedules and does not support highly flexible or dynamic scheduling changes directly on the device.
- Incorrect Time Format (AM/PM): If the time format displays AM hours for nighttime, verify the device's time settings. If the issue persists and the device does not allow PM changes, contact customer support for assistance.
- Fingerprint Scan Issues: Ensure fingers are clean and dry when scanning. If enrollment requires multiple finger scans (e.g., all five fingers), follow the on-screen instructions precisely to complete the registration process.
- Data Export Failure: Ensure the USB drive is properly formatted (FAT32 is generally recommended) and has sufficient storage space. Try a different USB drive if issues persist.
Product Specifications
| Feature | Detail |
|---|---|
| Brand | ANVIZ |
| Model Number | CX3 |
| Color | Black |
| Display Type | Digital |
| Special Feature | Large Display |
| Product Dimensions | 7.3"W x 5.1"H |
| Power Source | Corded Electric |
| Indoor/Outdoor Usage | Indoor |
| Frame Material | Plastic |
| Batteries Included | No |
| Mounting Type | Tabletop / Wall-mountable |
| Number of Items | 1 |
| Operation Mode | Electrical |
| Item Weight | 1.43 pounds |
| Employee Capacity | Up to 300 employees |
| Record Capacity | Up to 50,000 punch records (circular overwrite) |
| Supported Languages | English, Spanish, French, Portuguese |
| UPC | 850056978347 |
| ASIN | B0D1C7598Q |
| Date First Available | April 10, 2024 |

Image: A detailed diagram illustrating the physical dimensions and key components of the ANVIZ CX3 Time Clock, such as the 3.5-inch display, ergonomic keypad, biometric fingerprint scanner, and RFID reader.
Warranty Information
The ANVIZ CX3 Time Clock comes with a 3-year warranty or 3-year limited warranty. This warranty covers manufacturing defects and ensures the product functions as intended under normal use.
Customer Support
For any questions, technical assistance, or warranty claims, ANVIZ provides U.S.-based customer support. There is no subscription fee required for accessing support.
- Availability: Monday - Friday
- Contact: Refer to the contact information provided with your product packaging or visit the official ANVIZ website for support details.


