Introduction
Thank you for purchasing the KOSUMOSU Digital Alarm Clock. This sleek and modern clock features a 6.7-inch LED display, dual alarms, temperature display, date, day of the week, and automatic/manual dimming. This manual will guide you through the setup, operation, and maintenance of your new digital alarm clock to ensure optimal performance and longevity.
Please read this manual thoroughly before using the product and keep it for future reference.
Safety Information
- Do not expose the device to extreme temperatures, direct sunlight, or high humidity.
- Avoid dropping or subjecting the device to strong impacts.
- Use only the specified 5V/1A AC adapter (not included) for power.
- Keep out of reach of children.
- Do not attempt to disassemble or repair the device yourself. Contact customer service for assistance.
Package Contents
Please check the package for the following items:
- KOSUMOSU Digital Alarm Clock (Model: ACD-330BL)
- USB Power Cable (1.5 meters)
- User Manual
- Bracket Base
- Button Battery (for time retention during power loss)

Image: Contents of the KOSUMOSU Digital Alarm Clock package.
Product Overview
The KOSUMOSU Digital Alarm Clock features a minimalist design with intuitive controls located on the back panel.
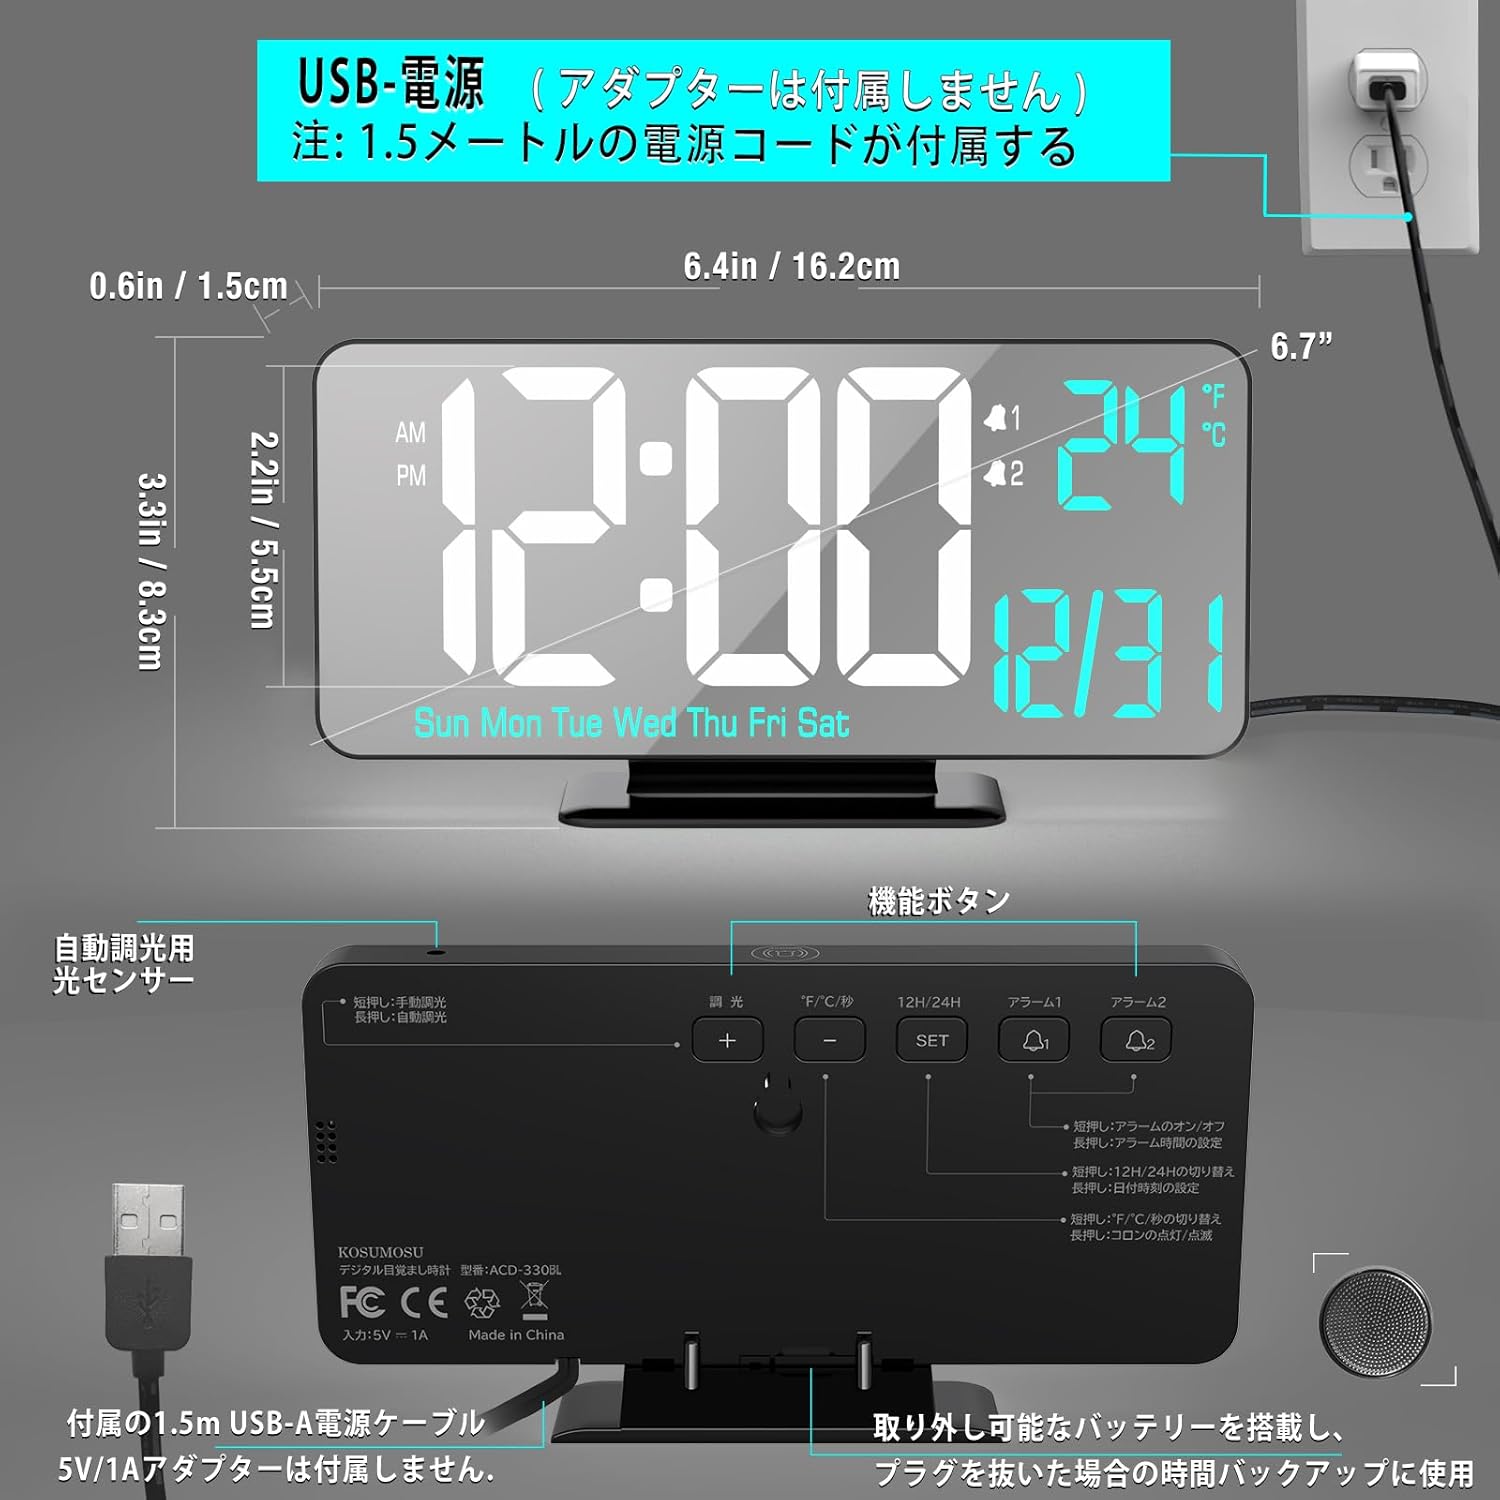
Image: Front and back view of the clock with dimensions and button labels.
Front Display
- Time Display: Large LED digits for hours and minutes.
- AM/PM Indicator: For 12-hour format.
- Alarm Indicators: Icons for Alarm 1 and Alarm 2.
- Temperature Display: Shows indoor temperature in °F or °C.
- Date Display: Month and Day.
- Day of Week Display: Sun, Mon, Tue, Wed, Thu, Fri, Sat.
Back Panel Controls
- DIMMING Button: Adjusts display brightness.
- °F/°C/SEC Button: Toggles between temperature units and seconds display.
- 12H/24H Button: Switches between 12-hour and 24-hour time formats.
- ALARM 1 Button: Sets Alarm 1.
- ALARM 2 Button: Sets Alarm 2.
- SET Button: Enters setting mode and confirms selections.
- + Button: Increases values during setting.
- - Button: Decreases values during setting.
- SNOOZE Button (Top): Activates snooze during an alarm.
Setup
Power Connection
- Connect the provided USB power cable to the clock's USB port.
- Plug the other end of the USB cable into a 5V/1A AC adapter (not included).
- Plug the AC adapter into a wall outlet. The display will light up.
Note: A button battery is included to retain time settings during power outages. It is not intended for continuous power supply.

Image: USB power connection setup.
Operating Instructions
Setting Time, Date, and Day
- Press and hold the SET button for 3 seconds to enter time setting mode. The hour digits will flash.
- Use the + or - buttons to adjust the hour.
- Press SET to confirm and move to minute setting. Adjust minutes with + or -.
- Press SET to confirm and move to year setting. Adjust year with + or -.
- Press SET to confirm and move to month setting. Adjust month with + or -.
- Press SET to confirm and move to day setting. Adjust day with + or -.
- Press SET to confirm and exit setting mode.
12/24 Hour Format
Press the 12H/24H button to toggle between 12-hour (with AM/PM indicator) and 24-hour formats.
Temperature Display (°F/°C)
Press the °F/°C/SEC button to switch the temperature display between Fahrenheit (°F) and Celsius (°C). A short press will also toggle the display of seconds.
Setting Alarms (Alarm 1 & Alarm 2)
The clock supports two independent alarms (Alarm 1 and Alarm 2).
- Press and hold the ALARM 1 (or ALARM 2) button for 3 seconds. The alarm hour digits will flash.
- Use the + or - buttons to adjust the alarm hour.
- Press ALARM 1 (or ALARM 2) to confirm and move to alarm minute setting. Adjust minutes with + or -.
- Press ALARM 1 (or ALARM 2) to confirm and move to alarm cycle setting. Use + or - to select:
- WEEKDAY: Alarm sounds Monday to Friday.
- WEEKEND: Alarm sounds Saturday and Sunday.
- DAILY: Alarm sounds every day.
- Press ALARM 1 (or ALARM 2) to confirm and exit alarm setting mode.
Activating/Deactivating Alarms
A short press of the ALARM 1 (or ALARM 2) button will toggle the respective alarm ON or OFF. An alarm icon will appear on the display when activated.
Snooze Function
When an alarm sounds, press the large SNOOZE button on the top of the clock to activate the snooze function. The alarm will pause for 5 minutes and then sound again. The alarm duration is 5 minutes before it automatically turns off if not snoozed or deactivated.

Image: Snooze function illustration.
Brightness Adjustment (Dimming)
The clock offers both automatic and manual dimming options.
- Automatic Dimming: Long press the DIMMING button to activate automatic dimming via the light sensor. The clock will adjust its brightness based on ambient light.
- Manual Dimming: Short press the DIMMING button to cycle through manual brightness levels: Low, Medium, High, or LED display Off.
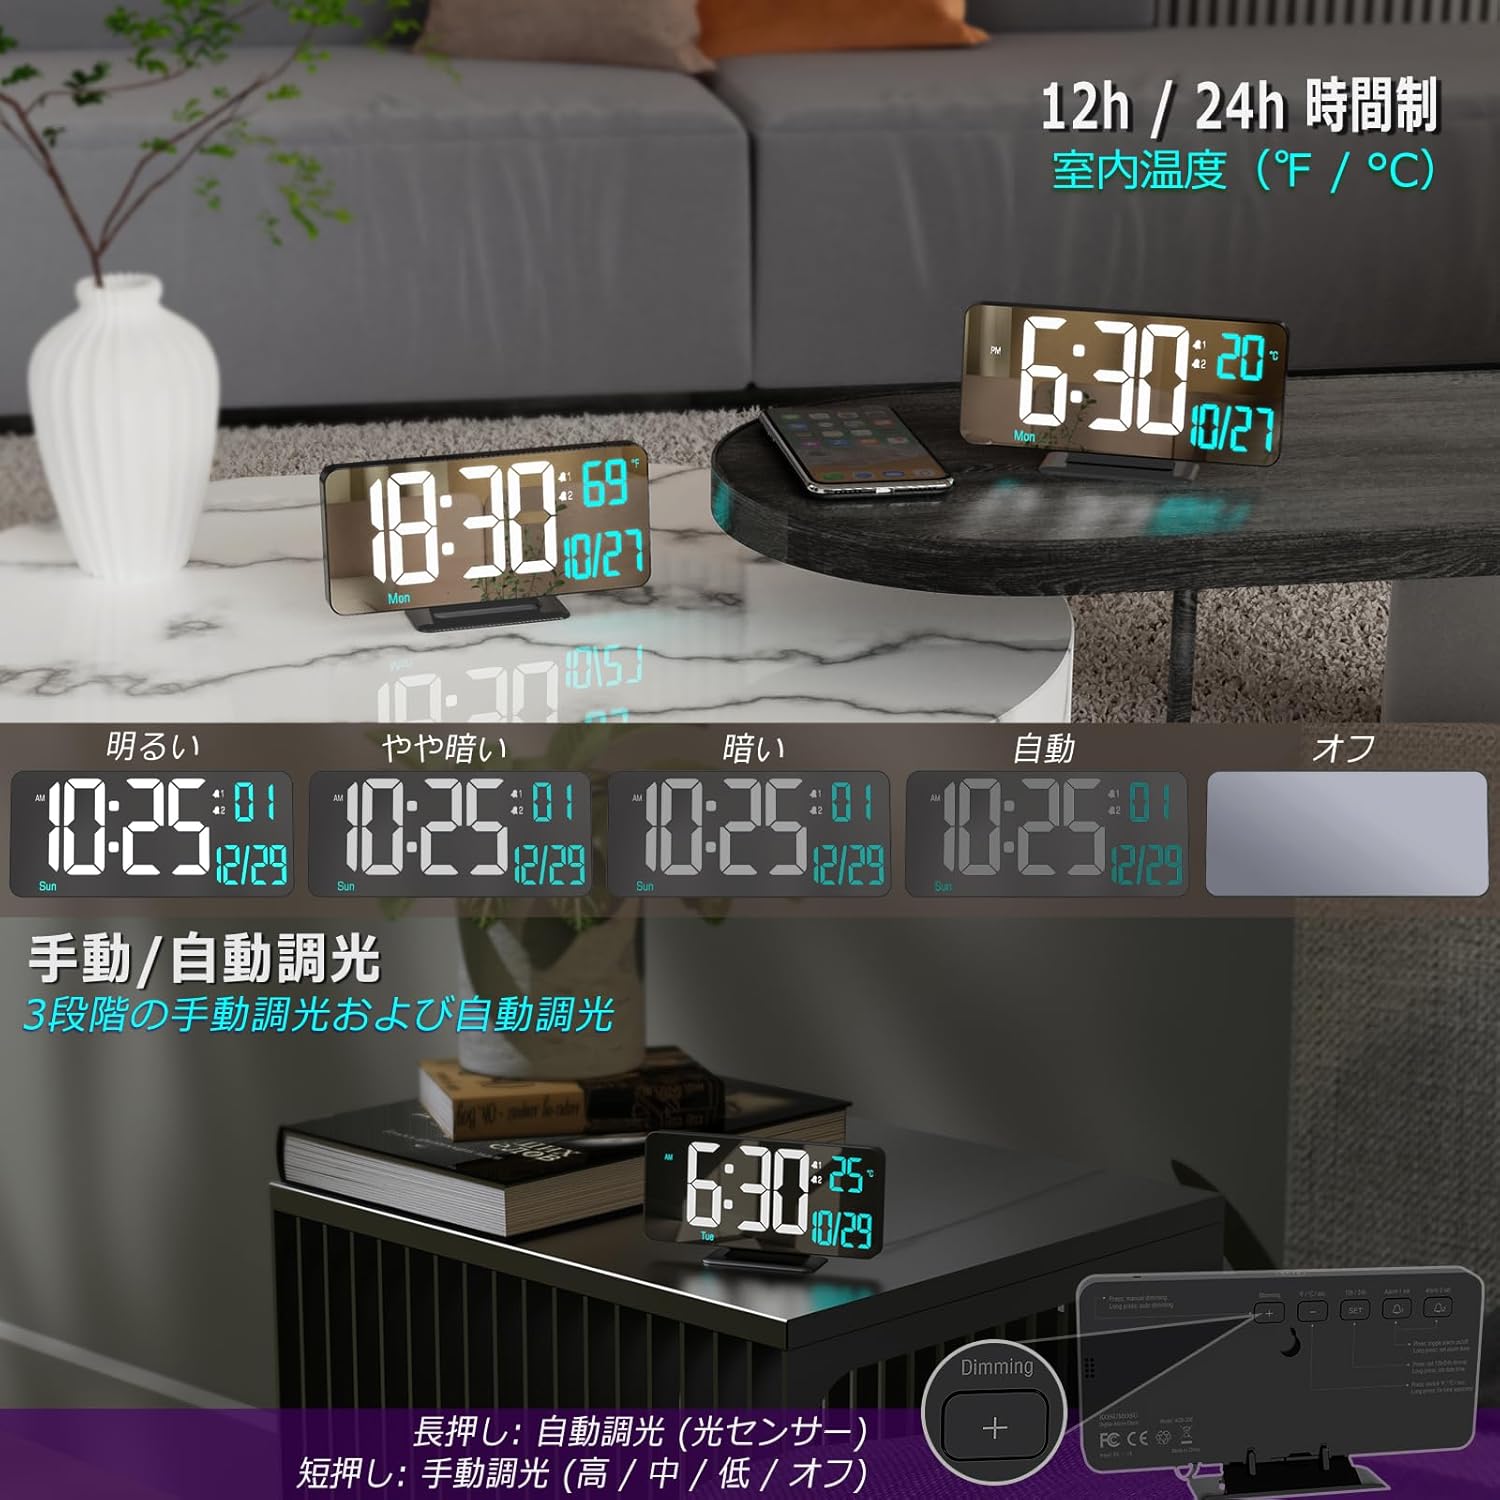
Image: Brightness adjustment options.
Maintenance
- To clean the clock, gently wipe the surface with a soft, dry cloth.
- Do not use abrasive cleaners or solvents, as they may damage the finish.
- Ensure the clock is unplugged before cleaning.
Troubleshooting
| Problem | Possible Cause | Solution |
|---|---|---|
| Display is off or dim. | No power, power adapter issue, or display is set to off. | Ensure power cable is securely connected and AC adapter is working. Check brightness setting (short press DIMMING button). |
| Alarm does not sound. | Alarm not activated, volume too low, or incorrect alarm time/cycle. | Ensure alarm is ON (icon visible). Re-check alarm time and cycle settings. The alarm volume is fixed and cannot be adjusted. |
| Time is incorrect after power loss. | Button battery depleted or not installed. | Ensure the button battery is correctly installed and has sufficient charge. Replace if necessary. |
| Temperature reading seems inaccurate. | Clock placed near heat source/vent or in direct sunlight. | Relocate the clock to an area with stable ambient temperature. |
Specifications
| Feature | Detail |
|---|---|
| Model Number | ACD-330BL |
| Display Type | Digital LED |
| Display Size | 6.7 inches |
| Dimensions (W x H) | 16.2 cm x 8.3 cm (6.4 inches x 3.3 inches) |
| Power Source | USB Powered (Requires 5V/1A AC adapter, not included) |
| Backup Battery | Button Battery (included, for time retention only) |
| Material | Plastic |
| Features | Dual Alarm, Snooze, 12/24H Format, Date, Day, Seconds, Temperature (°F/°C), Auto/Manual Dimming |
| Weight | 170 grams (0.17 kg) |
Warranty and Support
KOSUMOSU products come with a 2-year warranty. If you encounter any quality or usage issues with your digital alarm clock, please do not hesitate to contact our customer service team via email. We are committed to resolving any problems promptly to ensure your satisfaction.
For support, please refer to the contact information provided on the product packaging or our official website.


