
1. Introduction
The Creality CR-Scan Raptor is a high-precision 3D scanner designed for various applications, including 3D printing, industrial inspection, and reverse engineering. It features a hybrid scanning technology combining blue laser and near-infrared (NIR) structured light, offering exceptional accuracy and versatility for scanning objects of different sizes and materials.
This manual provides detailed instructions for setting up, operating, maintaining, and troubleshooting your CR-Scan Raptor 3D scanner to ensure optimal performance and longevity.

Figure 1: Creality CR-Scan Raptor 3D Scanner in operation.
2. Product Overview
2.1 Components
The CR-Scan Raptor integrates advanced optical and electronic components to deliver precise 3D scanning capabilities. Key components include:
- Blue Laser Emitters: Multiple parallel blue laser lines for high-accuracy scanning of small to medium objects.
- NIR Projector: Infrared structured light for marker-free scanning, suitable for larger objects and human bodies.
- High-Resolution Camera: A 2.3-megapixel camera captures detailed surface data.
- Color Camera: Captures 24-bit full-color texture information.
- Supplemental Lights: 12 white LED lights enhance color mapping in various environments.
- Mechanical Buttons: For intuitive control during scanning.
- Indicator Lights: Provide real-time status feedback.
- Ergonomic Design: Lightweight (372g) with an optimized grip to reduce fatigue during extended use.

Figure 2: Internal components and light sources of the CR-Scan Raptor.
2.2 What's in the Box
Upon unboxing, verify that all components are present:
- Creality CR-Scan Raptor 3D Scanner
- Power Adaptor
- USB 3.0 Data Cable (Type-C/USB3.0)
- Reflective Marker Points
- Scanning Pad
- High-Precision Glass Calibration Board
- User Manual (this document)
3. Setup
3.1 System Requirements
Before connecting the scanner, ensure your computer meets the following specifications for optimal performance with the Creality Scan software:
- Operating System: Windows 10/11 (64-bit) or macOS 11.7.7 and above (Big Sur/Monterey/Ventura).
- Processor (Windows): Recommended 7th Gen Intel Core i7 CPU or equivalent.
- Processor (macOS): Apple M1/M2/M3 series processors.
- Graphics Card (Windows): NVIDIA graphics card with 6GB VRAM or higher.
- RAM: 16GB or higher.

Figure 3: System requirements for Creality Scan software.
3.2 Software Installation
- Download the latest version of Creality Scan software from the official Creality website.
- Follow the on-screen instructions to install the software. Ensure all necessary drivers are installed during this process.
3.3 Hardware Connection
- Connect the power adaptor to the scanner and a power outlet.
- Connect the USB 3.0 data cable from the scanner to a compatible USB 3.0 port on your computer.
- Once connected, the scanner's indicator lights should activate, signaling it is powered on and recognized by the system.
4. Operating Instructions
4.1 Calibration
Before your first scan and periodically thereafter, calibrate the scanner using the provided high-precision glass calibration board to maintain accuracy. Follow the calibration steps within the Creality Scan software.
4.2 Scanning Modes
The CR-Scan Raptor offers two primary scanning modes:
- Blue Laser Mode: Ideal for high-precision scanning of small to medium objects (minimum 5x5x5mm). This mode may require reflective marker points for optimal tracking, especially on featureless surfaces. It offers an accuracy of up to 0.02mm and a scanning speed of up to 60fps.
- Infrared (NIR) Mode: Suitable for marker-free scanning of larger objects (minimum 150x150x150mm), faces, and human bodies. This mode provides faster scanning speeds of up to 20fps and is effective for objects with rich geometric features.

Figure 4: Blue Laser mode for small items and Infrared mode for large items.
4.3 Scanning Process
- Prepare the Object: Clean the object to be scanned. For blue laser mode, apply reflective marker points if the object lacks sufficient geometric features. For black or metal objects, the scanner can often capture data without powder spraying.
- Launch Creality Scan Software: Open the software and select the desired scanning mode (Blue Laser or NIR).
- Adjust Distance: Position the scanner at the recommended working distance from the object (150-400mm for Blue Laser, 170-1000mm for NIR). The software will provide visual feedback on optimal distance.
- Start Scanning: Press the scan button on the device or within the software. Move the scanner smoothly around the object, ensuring consistent coverage. The anti-shake tracking technology helps maintain a stable scan.
- Monitor Progress: Observe the real-time scan data on your computer screen. The indicator lights on the scanner provide status information.
- Capture Full-Color Texture: The 24-bit full-color scanning capability, aided by 12 white LED supplemental lights, captures realistic textures.
- Post-Processing: After scanning, use the Creality Scan software for data alignment, merging, hole filling, and texture mapping to create a complete 3D model. Output formats include OBJ, STL, and PLY.

Figure 5: High-precision scanning with blue laser lines.

Figure 6: Example of 24-bit full-color scanning.

Figure 7: Scanning black and metal objects without spray.
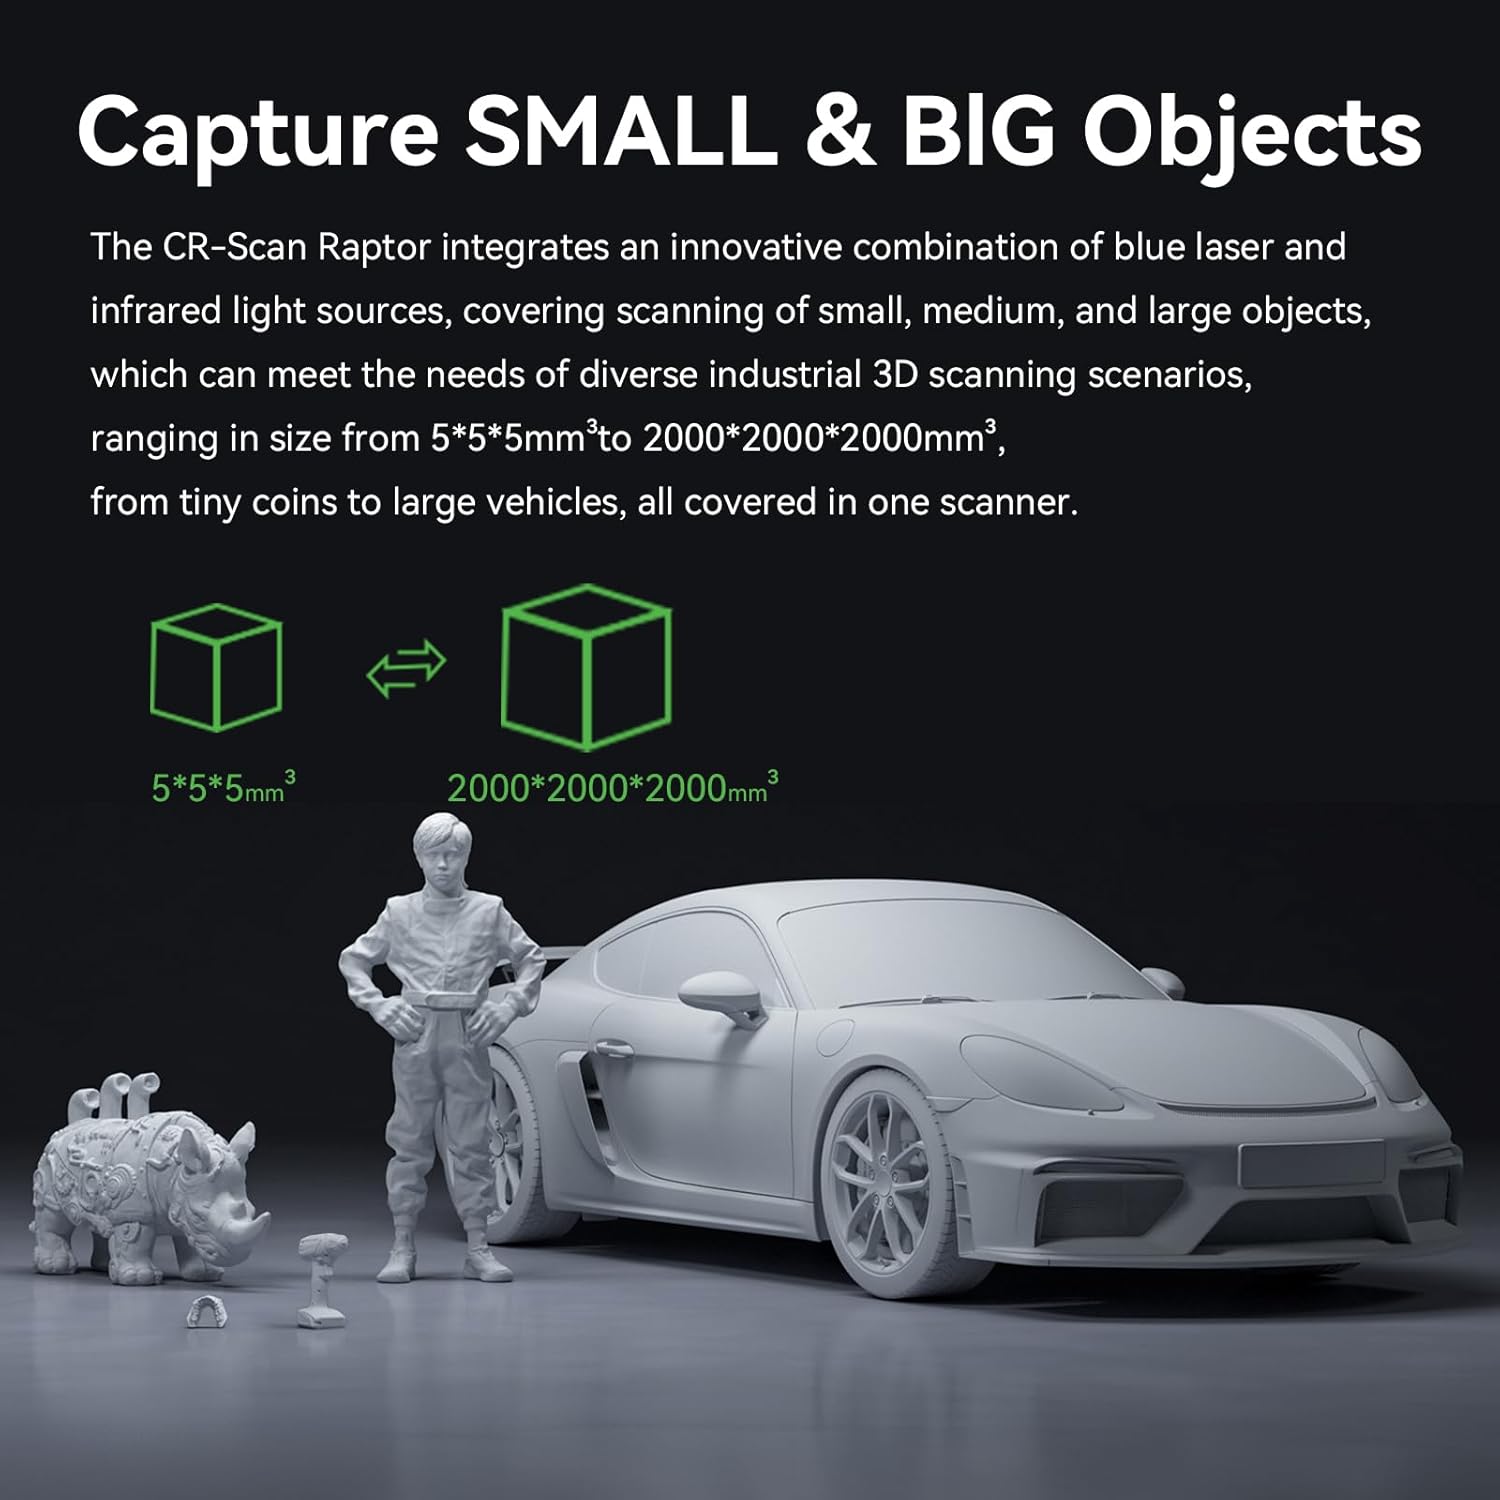
Figure 8: Versatile scanning for small and large objects.
4.4 Applications
The CR-Scan Raptor is suitable for a wide range of applications, including:
- Metrology Grade Inspection
- Auto Parts Design and Analysis
- Reverse Engineering
- Action Figure and Sculpture Creation
- Medical Applications (e.g., prosthetics, orthotics)
- Mold Manufacturing
- Augmented Reality (AR) / Virtual Reality (VR) Content Creation
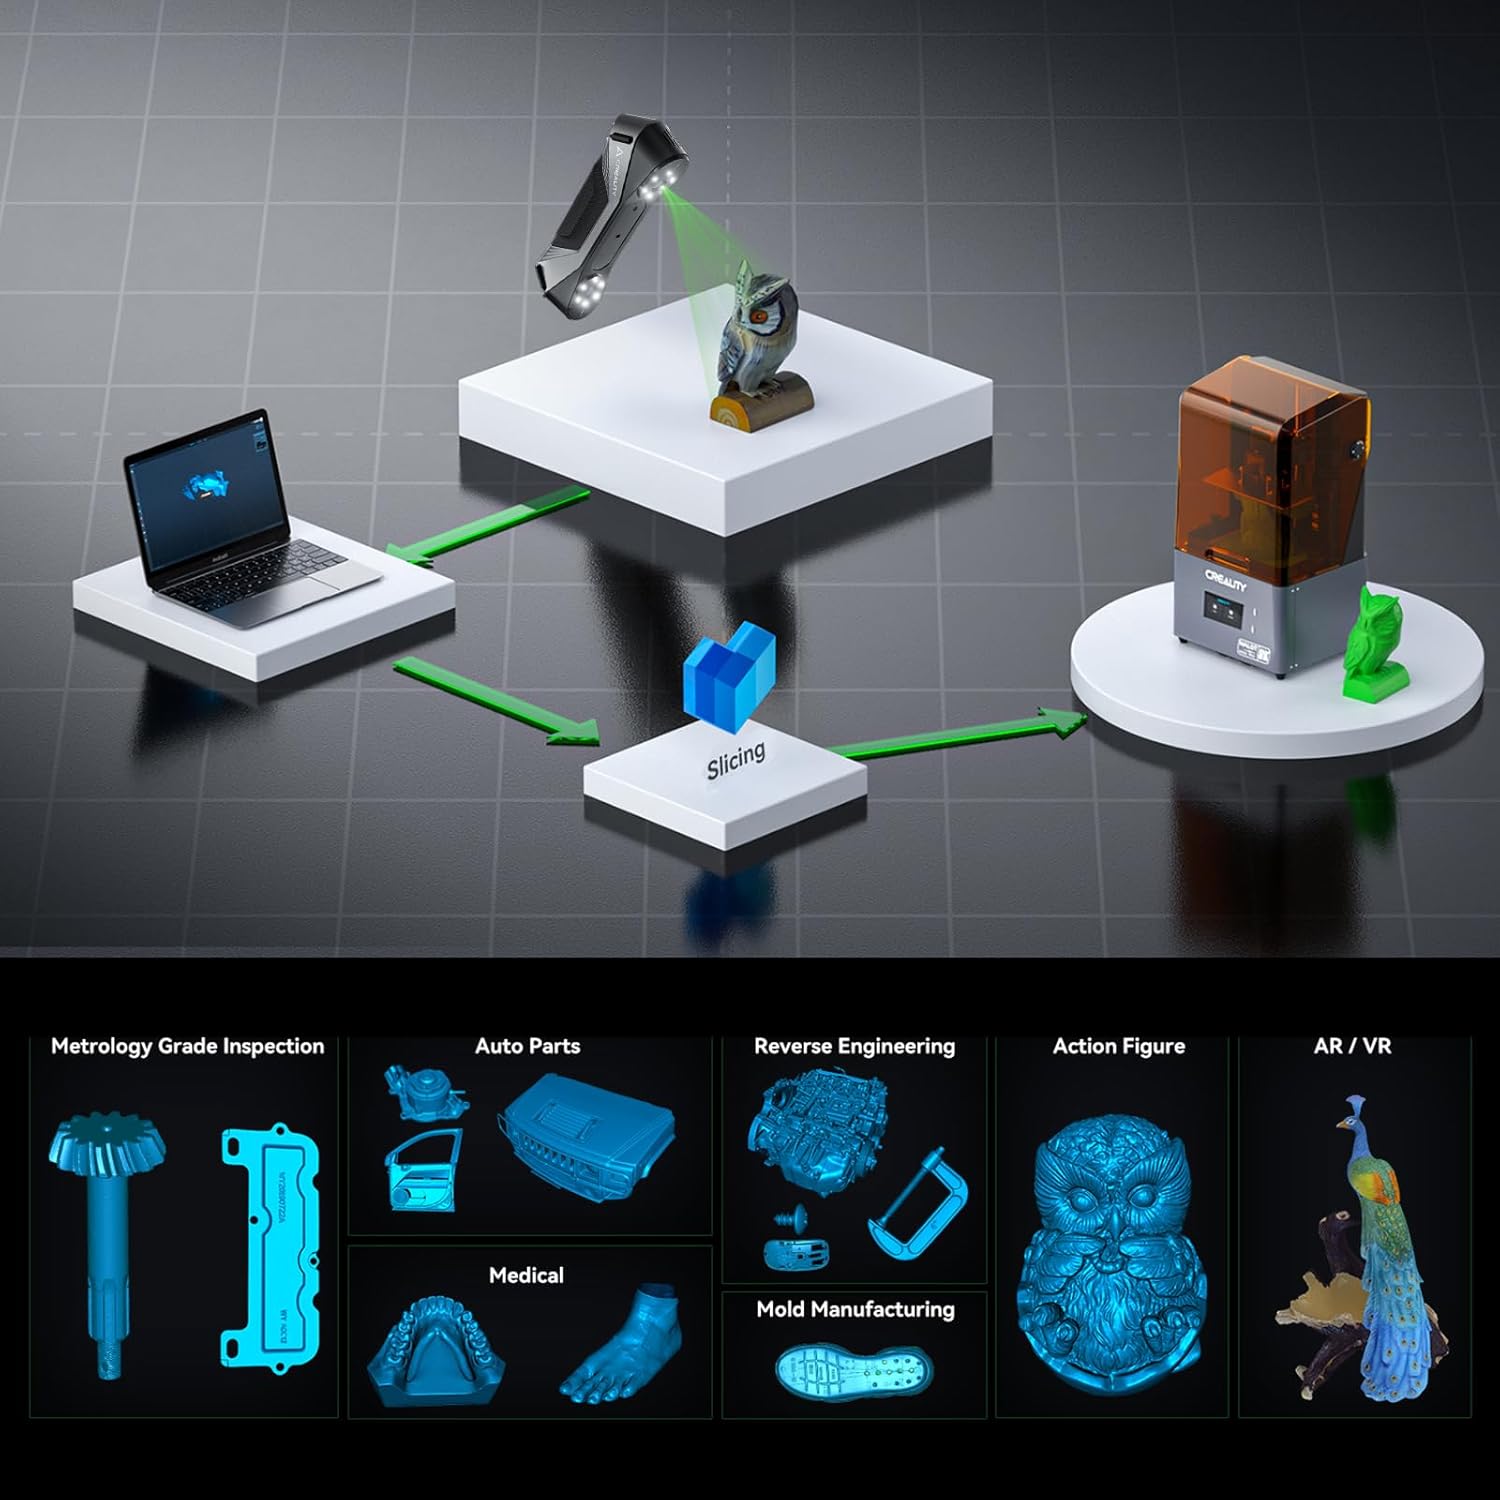
Figure 9: Diverse applications of the CR-Scan Raptor.
5. Maintenance
Proper maintenance ensures the longevity and accuracy of your Creality CR-Scan Raptor 3D scanner:
- Cleaning: Gently wipe the scanner's exterior and lens surfaces with a soft, lint-free cloth. Avoid abrasive materials or harsh chemicals.
- Storage: Store the scanner in a clean, dry environment, away from direct sunlight, dust, and extreme temperatures. Use the original packaging or a protective case when not in use.
- Handling: Handle the scanner with care to prevent drops or impacts, which can affect its internal components and calibration.
- Software Updates: Regularly check for and install the latest Creality Scan software updates to benefit from performance improvements, bug fixes, and new features.
- Calibration: Perform calibration periodically, especially if you notice any discrepancies in scan accuracy or after transporting the scanner.
6. Troubleshooting
This section addresses common issues you might encounter with the CR-Scan Raptor 3D scanner.
6.1 Common Issues and Solutions
- Issue: Scanner not recognized by computer.
Solution: Ensure the USB 3.0 cable is securely connected to both the scanner and a compatible USB 3.0 port on your computer. Verify that the power adaptor is connected and providing power. Reinstall the Creality Scan software and drivers if necessary. - Issue: Frequent tracking loss during scanning.
Solution:- Ensure adequate lighting in the scanning environment, avoiding overly bright or dark conditions.
- For Blue Laser mode, apply sufficient reflective marker points to the object, especially on featureless or uniform surfaces.
- Maintain a steady scanning motion and keep the scanner within the optimal working distance.
- Calibrate the scanner if tracking issues persist.
- Issue: Software crashes or error messages (e.g., GPU driver out of date).
Solution:- Ensure your computer meets the minimum system requirements, particularly for GPU and RAM.
- Update your graphics card drivers to the latest version directly from the manufacturer's website (NVIDIA, AMD, Intel).
- Close other demanding applications while scanning.
- Restart the Creality Scan software and your computer.
- Issue: Inaccurate or distorted scan results.
Solution:- Perform a thorough calibration of the scanner.
- Ensure the object is stable and does not move during scanning.
- Verify that the scanning distance is within the recommended range for the selected mode.
- For objects with complex geometries or reflective surfaces, consider using scanning spray or additional marker points.
- Issue: Wireless scanning issues (if applicable with future accessories).
Solution: Ensure the wireless accessory is properly connected and configured. Check for specific software updates related to wireless functionality, especially for macOS users, as compatibility can vary.
7. Specifications
The following table details the technical specifications of the Creality CR-Scan Raptor 3D Scanner:
| Feature | Blue Light (7-line laser) | NIR (infrared binocular structured light) |
|---|---|---|
| Accuracy | Up to 0.02mm @ 100mm | Up to 0.1mm |
| 3D Resolution | 0.02-2mm | 0.1-2mm |
| Scanning Speed | Up to 60fps | Up to 20fps |
| Min. Scan Volume | 5mm x 5mm x 5mm | 150mm x 150mm x 150mm |
| Single Capture Range | 270mm x 170mm @ 300mm | 930mm x 580mm @ 1000mm |
| Working Distance | 150mm-400mm | 170mm-1000mm |
| Color Mapping | Yes | Yes |
| Alignment Mode | Marker | Marker / Geometry / Texture |
| General Specifications | |
|---|---|
| 3D Imaging Camera Resolution | 1920x1200 |
| Color Supplemental Light | 12 white LEDs |
| Marker Recognition Enhancement | 12 blue LEDs |
| Laser Safety | Class I (eye safe) |
| Button | Mechanical |
| IMU | Yes |
| Output Format | OBJ/STL/PLY |
| Input Power | 12V 2A |
| Data Interface | Type-C/USB3.0 |
| Device Dimensions | 215mm x 50mm x 74mm |
| Device Weight | 372g |
| System Support | Windows 10/11 (64-bit), NVIDIA graphics card (6GB video memory), 16GB memory or higher; macOS 11.7 and above, Apple M1/M2/M3 series processors, RAM: 16GB or higher |
| Wireless Scanning | Supported in conjunction with future wireless scanning accessories |
| Operating Temperature | -10°C to 40°C |
| Operating Humidity | 0-90%RH |
Note: Accuracy is evaluated in laboratory conditions (measurement object is 100mm sphere pair) and actual results may be affected by operating environments such as temperature, vibration, and other factors.
8. Warranty and Support
For warranty information, technical support, or service inquiries, please refer to the official Creality website or contact Creality customer service directly. Keep your purchase receipt as proof of purchase for warranty claims.
Creality Official Website: www.creality.com


